User Manual
Page 1
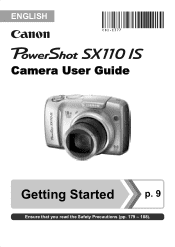
ENGLISH Camera User Guide Getting Started p. 9 Ensure that you read the Safety Precautions (pp. 179 - 188).
ENGLISH Camera User Guide Getting Started p. 9 Ensure that you read the Safety Precautions (pp. 179 - 188).
User Manual
Page 2
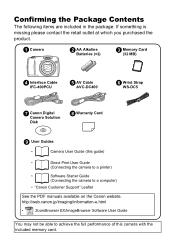
... e AV Cable AVC-DC400 f Wrist Strap WS-DC5 g Canon Digital Camera Solution Disk h Warranty Card i User Guides • Camera User Guide (this guide) • Direct Print User Guide (Connecting the camera to a printer) • Software Starter Guide (Connecting the camera to achieve the full performance of this camera with the included memory card. Confirming the Package...
... e AV Cable AVC-DC400 f Wrist Strap WS-DC5 g Canon Digital Camera Solution Disk h Warranty Card i User Guides • Camera User Guide (this guide) • Direct Print User Guide (Connecting the camera to a printer) • Software Starter Guide (Connecting the camera to achieve the full performance of this camera with the included memory card. Confirming the Package...

User Manual
Page 3
Getting Started p. 9 This section explains how to view images. Next... Details on using each function are described in this section, including how to connect the camera to a television to prepare the camera for use the camera's many features to shoot more challenging photos. Learning More p. 39 Once you have mastered the basics, use and the basics of shooting, viewing and printing images. Let's Get Started! 1 Let's Get Started! Start out by familiarizing yourself with the camera and mastering the basics. This guide is divided into the following two sections. First...
Getting Started p. 9 This section explains how to view images. Next... Details on using each function are described in this section, including how to connect the camera to a television to prepare the camera for use the camera's many features to shoot more challenging photos. Learning More p. 39 Once you have mastered the basics, use and the basics of shooting, viewing and printing images. Let's Get Started! 1 Let's Get Started! Start out by familiarizing yourself with the camera and mastering the basics. This guide is divided into the following two sections. First...
User Manual
Page 4
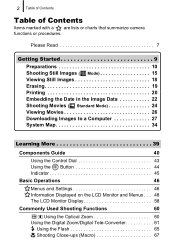
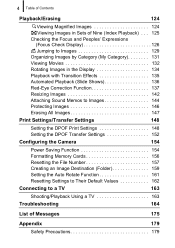
2 Table of Contents Table of Contents Items marked with a are lists or charts that summarize camera functions or procedures. Please Read 7 Getting Started 9 Preparations 10 Shooting Still Images ( Mode 15 Viewing Still Images 18 Erasing 19 Printing 20 Embedding the Date ...
2 Table of Contents Table of Contents Items marked with a are lists or charts that summarize camera functions or procedures. Please Read 7 Getting Started 9 Preparations 10 Shooting Still Images ( Mode 15 Viewing Still Images 18 Erasing 19 Printing 20 Embedding the Date ...

User Manual
Page 5
... Changing the Recording Pixels (Still Images 70 Changing the Compression (Still Images 71 Setting the Image Stabilizer Function 72 Adjusting the ISO Speed 74 Reducing Camera Shake When Shooting (Auto ISO Shift) 75 Shooting Using the Mode Dial 77 Mode Dial 77 Easy Shooting (Easy Mode 78 Shooting Modes for Specific...
... Changing the Recording Pixels (Still Images 70 Changing the Compression (Still Images 71 Setting the Image Stabilizer Function 72 Adjusting the ISO Speed 74 Reducing Camera Shake When Shooting (Auto ISO Shift) 75 Shooting Using the Mode Dial 77 Mode Dial 77 Easy Shooting (Easy Mode 78 Shooting Modes for Specific...
User Manual
Page 6
... Images 146 Erasing All Images 147 Print Settings/Transfer Settings 148 Setting the DPOF Print Settings 148 Setting the DPOF Transfer Settings 152 Configuring the Camera 154 Power Saving Function 154 Formatting Memory Cards 156 Resetting the File Number 157 Creating an Image Destination (Folder 159 Setting the Auto Rotate Function...
... Images 146 Erasing All Images 147 Print Settings/Transfer Settings 148 Setting the DPOF Print Settings 148 Setting the DPOF Transfer Settings 152 Configuring the Camera 154 Power Saving Function 154 Formatting Memory Cards 156 Resetting the File Number 157 Creating an Image Destination (Folder 159 Setting the Auto Rotate Function...

User Manual
Page 7
Table of Contents 5 Preventing Malfunctions 185 Using the Power Kits (Sold Separately 189 Using an Externally Mounted Flash (Sold Separately) . . 192 Replacing the Date Battery 194 Camera Care and Maintenance 196 Specifications 197 Index 207 Functions Available in Each Shooting Mode 222
Table of Contents 5 Preventing Malfunctions 185 Using the Power Kits (Sold Separately 189 Using an Externally Mounted Flash (Sold Separately) . . 192 Replacing the Date Battery 194 Camera Care and Maintenance 196 Specifications 197 Index 207 Functions Available in Each Shooting Mode 222
User Manual
Page 8
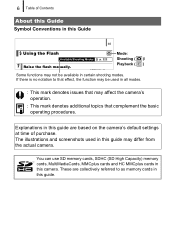
... settings at time of Contents About this Guide Symbol Conventions in this guide may differ from the actual camera. You can use SD memory cards, SDHC (SD High Capacity) memory cards, MultiMediaCards, MMCplus cards and HC MMCplus cards in this guide. ...illustrations and screenshots used in certain shooting modes. If there is no notation to as memory cards in this camera. 6 Table of purchase. p. 222 Mode: Shooting ( )/ Playback ( ) Some functions may affect the camera's operation. : This mark denotes additional topics that may not be used in this Guide 65 Using the...
... settings at time of Contents About this Guide Symbol Conventions in this guide may differ from the actual camera. You can use SD memory cards, SDHC (SD High Capacity) memory cards, MultiMediaCards, MMCplus cards and HC MMCplus cards in this guide. ...illustrations and screenshots used in certain shooting modes. If there is no notation to as memory cards in this camera. 6 Table of purchase. p. 222 Mode: Shooting ( )/ Playback ( ) Some functions may affect the camera's operation. : This mark denotes additional topics that may not be used in this Guide 65 Using the...
User Manual
Page 9
...in the country of sale before proceeding with your camera. Warranty Limitations This camera's warranty is in a manner that infringes upon or contravenes international or domestic copyright laws and regulations. Please note that Canon Inc., its subsidiaries and affiliates, and its ...back to the country of sale. For Canon Customer Support contacts, please see the customer support list supplied with a warranty claim to a Canon Customer Support Help Desk. Warning Against Copyright Infringement Please note that Canon digital cameras are not liable for any consequential damages ...
...in the country of sale before proceeding with your camera. Warranty Limitations This camera's warranty is in a manner that infringes upon or contravenes international or domestic copyright laws and regulations. Please note that Canon Inc., its subsidiaries and affiliates, and its ...back to the country of sale. For Canon Customer Support contacts, please see the customer support list supplied with a warranty claim to a Canon Customer Support Help Desk. Warning Against Copyright Infringement Please note that Canon digital cameras are not liable for any consequential damages ...
User Manual
Page 10
...than 0.01% of the pixels may become warm. About the LCD Monitor The LCD monitor is used in your camera is produced with a TV monitor (p. 163). Video Format Please set the camera's video signal format to change the language setting. Language Setting Please see Setting the Display Language (p. 14) to.... Please be aware of the pixels operate to specification. Less than 99.99% of this and take care when operating the camera for prolonged periods, the camera body may occasionally misfire or appear as red or black dots. This has no effect on the recorded image and does not ...
...than 0.01% of the pixels may become warm. About the LCD Monitor The LCD monitor is used in your camera is produced with a TV monitor (p. 163). Video Format Please set the camera's video signal format to change the language setting. Language Setting Please see Setting the Display Language (p. 14) to.... Please be aware of the pixels operate to specification. Less than 99.99% of this and take care when operating the camera for prolonged periods, the camera body may occasionally misfire or appear as red or black dots. This has no effect on the recorded image and does not ...
User Manual
Page 13
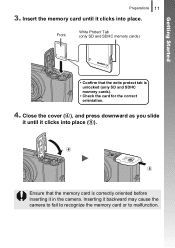
Insert the memory card until it in the camera. Front Write Protect Tab (only SD and SDHC memory cards) • Confirm that the memory card is unlocked (only SD and SDHC memory cards). • Check the card for the correct orientation. 4. d e Ensure that the write protect tab is correctly oriented before inserting it clicks into place. Close the cover (d), and press downward as you slide it until it backward may cause the camera to fail to recognize the memory card or to malfunction. Inserting it clicks into place (e). Getting Started Preparations 11 3.
Insert the memory card until it in the camera. Front Write Protect Tab (only SD and SDHC memory cards) • Confirm that the memory card is unlocked (only SD and SDHC memory cards). • Check the card for the correct orientation. 4. d e Ensure that the write protect tab is correctly oriented before inserting it clicks into place. Close the cover (d), and press downward as you slide it until it backward may cause the camera to fail to recognize the memory card or to malfunction. Inserting it clicks into place (e). Getting Started Preparations 11 3.
User Manual
Page 14
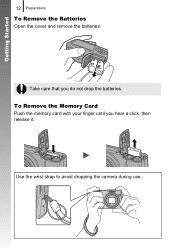
Take care that you hear a click, then release it. Use the wrist strap to avoid dropping the camera during use. Getting Started 12 Preparations To Remove the Batteries Open the cover and remove the batteries. To Remove the Memory Card Push the memory card with your finger until you do not drop the batteries.
Take care that you hear a click, then release it. Use the wrist strap to avoid dropping the camera during use. Getting Started 12 Preparations To Remove the Batteries Open the cover and remove the batteries. To Remove the Memory Card Push the memory card with your finger until you do not drop the batteries.

User Manual
Page 17
... also appears in the LCD monitor. • Pressing the power button again turns the power off. 2. Avoiding Camera Shake Keep your arms tight against your body while holding the camera firmly by the sides. Select a shooting mode. 1. Press the power button. • The start-up sound ...will play and the start-up image will display in mode). Aim the camera at the subject. Getting Started Shooting Still Images ( Shooting Still Images 15 Mode) Shutter Button Power Button Mode Dial Indicator DISP. Button 1. Press...
... also appears in the LCD monitor. • Pressing the power button again turns the power off. 2. Avoiding Camera Shake Keep your arms tight against your body while holding the camera firmly by the sides. Select a shooting mode. 1. Press the power button. • The start-up sound ...will play and the start-up image will display in mode). Aim the camera at the subject. Getting Started Shooting Still Images ( Shooting Still Images 15 Mode) Shutter Button Power Button Mode Dial Indicator DISP. Button 1. Press...

User Manual
Page 18
... fully Shooting Preparations Complete: Lights green (orange when the flash will fire) Recording: Blinks green AF Frame An AF frame will display in Focus The camera automatically sets the focus when you hold the shutter button down to display. • The indicator will blink green and the file will record. •...
... fully Shooting Preparations Complete: Lights green (orange when the flash will fire) Recording: Blinks green AF Frame An AF frame will display in Focus The camera automatically sets the focus when you hold the shutter button down to display. • The indicator will blink green and the file will record. •...

User Manual
Page 19
... shoot. 3. Easy Mode (Recommended for beginners to (Easy mode) (p. 78). button while switching on the camera power will display. 2. Use the or button to display the image you wish to silence all camera sounds. Press the (playback) button. 2. Press the shutter button halfway to focus. • When the... camera focuses, a green AF frame will set the mute setting to [On] to view. • You ...
... shoot. 3. Easy Mode (Recommended for beginners to (Easy mode) (p. 78). button while switching on the camera power will display. 2. Use the or button to display the image you wish to silence all camera sounds. Press the (playback) button. 2. Press the shutter button halfway to focus. • When the... camera focuses, a green AF frame will set the mute setting to [On] to view. • You ...
User Manual
Page 22
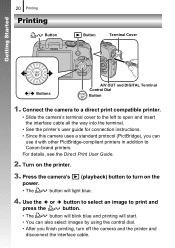
...• See the printer's user guide for connection instructions. • Since this camera uses a standard protocol (PictBridge), you finish printing, turn on the printer. 3. Use the or button to select an image to Canon-brand printers. Turn on the • The button will start. • You...print and press the button. • The button will blink blue and printing will light blue. 4. Press the camera's power. (playback) button to turn off the camera and the printer and disconnect the interface cable. For details, see the Direct Print User Guide. 2. Getting Started...
...• See the printer's user guide for connection instructions. • Since this camera uses a standard protocol (PictBridge), you finish printing, turn on the printer. 3. Use the or button to select an image to Canon-brand printers. Turn on the • The button will start. • You...print and press the button. • The button will blink blue and printing will light blue. 4. Press the camera's power. (playback) button to turn off the camera and the printer and disconnect the interface cable. For details, see the Direct Print User Guide. 2. Getting Started...
User Manual
Page 23
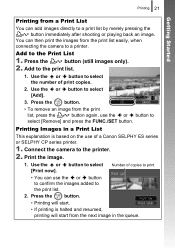
... print list. 1. Use the or [Print now]. Use the or button to a printer. Printing Images in the queue. button to select Number of a Canon SELPHY ES series or SELPHY CP series printer. 1. Add to the print list. 2. Add to select [Add]. 3. Use the or button to the Print... List 1. Connect the camera to a print list by merely pressing the button immediately after shooting or playing back an image. Press the button. • Printing will start. • If...
... print list. 1. Use the or [Print now]. Use the or button to a printer. Printing Images in the queue. button to select Number of a Canon SELPHY ES series or SELPHY CP series printer. 1. Add to the print list. 2. Add to select [Add]. 3. Use the or button to the Print... List 1. Connect the camera to a print list by merely pressing the button immediately after shooting or playing back an image. Press the button. • Printing will start. • If...
User Manual
Page 24
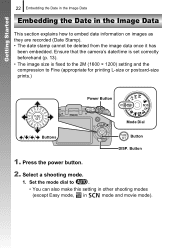
Select a shooting mode. 1. Ensure that the camera's date/time is set correctly beforehand (p. 13). • The image size is fixed to the 2M (1600 × 1200) setting and the compression to embed ...
Select a shooting mode. 1. Ensure that the camera's date/time is set correctly beforehand (p. 13). • The image size is fixed to the 2M (1600 × 1200) setting and the compression to embed ...
User Manual
Page 25
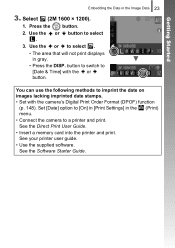
Use the or button to a printer and print. Set [Date] option to [On] in [Print Settings] in the (Print) menu. • Connect the camera to select . 3. See your printer user guide. • Use the supplied software. Press the button. 2. Use the or to imprint the date on images lacking ... following methods to select . • The area that will not print displays in the Image Data 23 3. button to switch to [Date & Time] with the camera's Digital Print Order Format (DPOF) function (p. 148).
Use the or button to a printer and print. Set [Date] option to [On] in [Print Settings] in the (Print) menu. • Connect the camera to select . 3. See your printer user guide. • Use the supplied software. Press the button. 2. Use the or to imprint the date on images lacking ... following methods to select . • The area that will not print displays in the Image Data 23 3. button to switch to [Date & Time] with the camera's Digital Print Order Format (DPOF) function (p. 148).
User Manual
Page 26
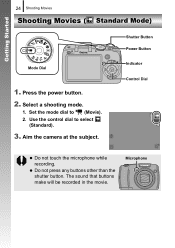
Use the control dial to (Movie). 2. Indicator Control Dial z Do not touch the microphone while recording. Press the power button. 2. Getting Started 24 Shooting Movies Shooting Movies ( Standard Mode) Shutter Button Power Button Mode Dial 1. Set the mode dial to select (Standard). 3. Microphone z Do not press any buttons other than the shutter button. The sound that buttons make will be recorded in the movie. Aim the camera at the subject. Select a shooting mode. 1.
Use the control dial to (Movie). 2. Indicator Control Dial z Do not touch the microphone while recording. Press the power button. 2. Getting Started 24 Shooting Movies Shooting Movies ( Standard Mode) Shutter Button Power Button Mode Dial 1. Set the mode dial to select (Standard). 3. Microphone z Do not press any buttons other than the shutter button. The sound that buttons make will be recorded in the movie. Aim the camera at the subject. Select a shooting mode. 1.


