User Manual
Page 8
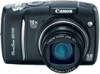
The illustrations and screenshots used in this guide are collectively referred to that complement the basic operating procedures. These are based on the camera's default settings at time of Contents About this Guide Symbol Conventions in this camera. You can use SD memory cards, SDHC (SD High Capacity) memory cards, MultiMediaCards, MMCplus cards...
The illustrations and screenshots used in this guide are collectively referred to that complement the basic operating procedures. These are based on the camera's default settings at time of Contents About this Guide Symbol Conventions in this camera. You can use SD memory cards, SDHC (SD High Capacity) memory cards, MultiMediaCards, MMCplus cards...
User Manual
Page 15
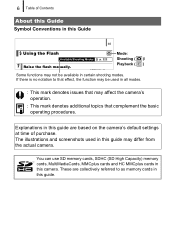
...) menu. 3. Press the button. Use the or button to set the value. • You can also set the value by using the control dial. 3. Use the or button to select [Date/Time]. 4. Press the MENU button. 2. Power Button Buttons Button Control Dial MENU Button 1. Press the...an option. 2. Press the button. Getting Started Preparations 13 Setting the Date and Time The Date/Time settings menu will appear the first time the power is turned on. To Change a Previously Set Date/Time Use the following procedures to display the Date/Time settings menu, and then perform Steps 2 and 3 above. ...
...) menu. 3. Press the button. Use the or button to set the value. • You can also set the value by using the control dial. 3. Use the or button to select [Date/Time]. 4. Press the MENU button. 2. Power Button Buttons Button Control Dial MENU Button 1. Press the...an option. 2. Press the button. Getting Started Preparations 13 Setting the Date and Time The Date/Time settings menu will appear the first time the power is turned on. To Change a Previously Set Date/Time Use the following procedures to display the Date/Time settings menu, and then perform Steps 2 and 3 above. ...
User Manual
Page 16
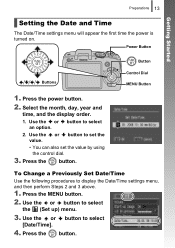
Use the , , or button to select a language. 4. Hold down the button and press the MENU button. 3. Button Button Buttons MENU Button 1. Press the (playback) button. 2. Press the button. Setting the Display Language You can change the language displayed in the LCD monitor menus and messages. Getting Started 14 Preparations The date/time setting screen will appear when the capacity of the lithium date/time battery is depleted (p. 194).
Use the , , or button to select a language. 4. Hold down the button and press the MENU button. 3. Button Button Buttons MENU Button 1. Press the (playback) button. 2. Press the button. Setting the Display Language You can change the language displayed in the LCD monitor menus and messages. Getting Started 14 Preparations The date/time setting screen will appear when the capacity of the lithium date/time battery is depleted (p. 194).
User Manual
Page 24
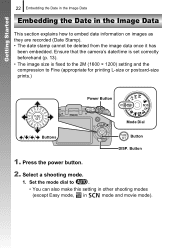
...in the Image Data Embedding the Date in mode and movie mode). Ensure that the camera's date/time is set correctly beforehand (p. 13). • The image size is fixed to the 2M (1600 × 1200) setting and the compression to embed date information on images as they are recorded (Date Stamp). •...; The date stamp cannot be deleted from the image data once it has been embedded. Press the power button. 2. Set the mode dial to . • You can also make this setting in other shooting modes (except Easy mode, in the Image Data This section explains how to Fine (appropriate for printing...
...in the Image Data Embedding the Date in mode and movie mode). Ensure that the camera's date/time is set correctly beforehand (p. 13). • The image size is fixed to the 2M (1600 × 1200) setting and the compression to embed date information on images as they are recorded (Date Stamp). •...; The date stamp cannot be deleted from the image data once it has been embedded. Press the power button. 2. Set the mode dial to . • You can also make this setting in other shooting modes (except Easy mode, in the Image Data This section explains how to Fine (appropriate for printing...
User Manual
Page 25
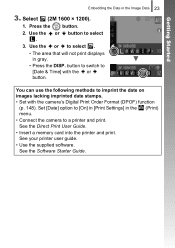
... the or button. You can use the following methods to select . 3. button to switch to [On] in [Print Settings] in gray. • Press the DISP. Press the button. 2. Set [Date] option to [Date & Time] with the camera's Digital Print Order Format (DPOF) function (p. 148). Getting Started Embedding the Date in the Image Data...
... the or button. You can use the following methods to select . 3. button to switch to [On] in [Print Settings] in gray. • Press the DISP. Press the button. 2. Set [Date] option to [Date & Time] with the camera's Digital Print Order Format (DPOF) function (p. 148). Getting Started Embedding the Date in the Image Data...
User Manual
Page 27
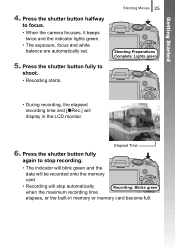
...memory card become full. Press the shutter button fully to stop automatically when the maximum recording time Recording: Blinks green elapses, or the built-in the LCD monitor. Elapsed Time 6. Press the shutter button fully again to shoot. • Recording starts. Press the ...shutter button halfway to focus. • When the camera focuses, it beeps twice and the indicator lights green. • The exposure, focus and white balance are automatically set. 5. Getting...
...memory card become full. Press the shutter button fully to stop automatically when the maximum recording time Recording: Blinks green elapses, or the built-in the LCD monitor. Elapsed Time 6. Press the shutter button fully again to shoot. • Recording starts. Press the ...shutter button halfway to focus. • When the camera focuses, it beeps twice and the indicator lights green. • The exposure, focus and white balance are automatically set. 5. Getting...

User Manual
Page 35
... [Select & Transfer] or the [Wallpaper] option was last selected. The button will be downloaded as wallpaper for a computer. The previous setting will blink blue while downloading is in effect the next time the Direct Transfer menu is turned off. Windows Macintosh ZoomBrowser EX ImageBrowser By default, the downloaded images are saved into...
... [Select & Transfer] or the [Wallpaper] option was last selected. The button will be downloaded as wallpaper for a computer. The previous setting will blink blue while downloading is in effect the next time the Direct Transfer menu is turned off. Windows Macintosh ZoomBrowser EX ImageBrowser By default, the downloaded images are saved into...

User Manual
Page 38
...• High-Power Flash HF-DC1 This attachable supplementary flash can also purchase NiMH Battery NB4-300, a set . Other Accessories • Interface Cable IFC-400PCU Use this cable to connect the camera to a computer,...your Bubble Jet printer user guide). • AV Cable AVC-DC400 Use this cable to connect the camera to a TV set of four rechargeable AA-size NiMH batteries separately. Recommended to power a camera for the built-in some regions, or may...standard household power outlet. Convenient when taking or playing back large numbers of time or when connecting to illuminate.
...• High-Power Flash HF-DC1 This attachable supplementary flash can also purchase NiMH Battery NB4-300, a set . Other Accessories • Interface Cable IFC-400PCU Use this cable to connect the camera to a computer,...your Bubble Jet printer user guide). • AV Cable AVC-DC400 Use this cable to connect the camera to a TV set of four rechargeable AA-size NiMH batteries separately. Recommended to power a camera for the built-in some regions, or may...standard household power outlet. Convenient when taking or playing back large numbers of time or when connecting to illuminate.
User Manual
Page 46
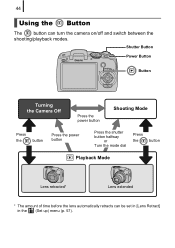
Shutter Button Power Button Button Turning the Camera Off Press the power button Shooting Mode Press the button Press the power button Press the shutter button halfway or Turn the mode dial Press the button Playback Mode Lens retracted* Lens extended * The amount of time before the lens automatically retracts can turn the camera on/off and switch between the shooting/playback modes. 44 Using the Button The button can be set in [Lens Retract] in the (Set up) menu (p. 57).
Shutter Button Power Button Button Turning the Camera Off Press the power button Shooting Mode Press the button Press the power button Press the shutter button halfway or Turn the mode dial Press the button Playback Mode Lens retracted* Lens extended * The amount of time before the lens automatically retracts can turn the camera on/off and switch between the shooting/playback modes. 44 Using the Button The button can be set in [Lens Retract] in the (Set up) menu (p. 57).

User Manual
Page 48
... dial to the shooting mode you can press the shutter button to select a menu item. menu or the Rec., Play, Print or Set up menu. Menu ( Button) This menu sets many of the common shooting functions. 1 2 5 34 • This example shows the FUNC. button. • After selecting an option, you...• Items showing the icon can also use . 2 Press the button. 3 Use the or button to shoot immediately. FUNC. 46 Basic Operations Menus and Settings Settings for the shooting or playback modes or such camera settings as the print settings, date/time and sounds are set using the FUNC.
... dial to the shooting mode you can press the shutter button to select a menu item. menu or the Rec., Play, Print or Set up menu. Menu ( Button) This menu sets many of the common shooting functions. 1 2 5 34 • This example shows the FUNC. button. • After selecting an option, you...• Items showing the icon can also use . 2 Press the button. 3 Use the or button to shoot immediately. FUNC. 46 Basic Operations Menus and Settings Settings for the shooting or playback modes or such camera settings as the print settings, date/time and sounds are set using the FUNC.
User Manual
Page 50
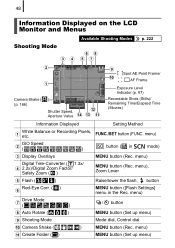
...(Rec. menu) Digital Tele-Converter ( 1.3x/ d 2.2x)/Digital Zoom Factor/ Safety Zoom ( ) MENU button (Rec. menu) MENU button (Set up menu) i Shooting Mode Mode dial, Control dial j Camera Shake ( k Create Folder ( ) ) MENU button (Rec. 48 Information Displayed ..., Aperture Value l nm k i Spot AE Point Frame/ j AF Frame Exposure Level Indicator (p. 87) Recordable Shots (Stills)/ Remaining Time/Elapsed Time (Movies) Information Displayed Setting Method a White etc. Balance or Recording Pixels, FUNC./SET button (FUNC. menu) b ISO ( Speed ) button ( in the Rec.
...(Rec. menu) Digital Tele-Converter ( 1.3x/ d 2.2x)/Digital Zoom Factor/ Safety Zoom ( ) MENU button (Rec. menu) MENU button (Set up menu) i Shooting Mode Mode dial, Control dial j Camera Shake ( k Create Folder ( ) ) MENU button (Rec. 48 Information Displayed ..., Aperture Value l nm k i Spot AE Point Frame/ j AF Frame Exposure Level Indicator (p. 87) Recordable Shots (Stills)/ Remaining Time/Elapsed Time (Movies) Information Displayed Setting Method a White etc. Balance or Recording Pixels, FUNC./SET button (FUNC. menu) b ISO ( Speed ) button ( in the Rec.

User Manual
Page 52
...Compression (Still Images)/Recording Pixels (Still Images), Movie ( ) Auto Category ( ) r My Category ( ) Setting Method button, MENU button (Print menu) MENU button (Play menu) FUNC./SET button (FUNC. 50 Playback Mode (Detailed) o r Battery Charge Indicator Displayed image number/ Total number of ...images Folder Number-File Number Shooting information Histogram qp File Size Recording Pixels (Stills)/ Recording Length (Movies) Shooting Date/Time ...
...Compression (Still Images)/Recording Pixels (Still Images), Movie ( ) Auto Category ( ) r My Category ( ) Setting Method button, MENU button (Print menu) MENU button (Play menu) FUNC./SET button (FUNC. 50 Playback Mode (Detailed) o r Battery Charge Indicator Displayed image number/ Total number of ...images Folder Number-File Number Shooting information Histogram qp File Size Recording Pixels (Stills)/ Recording Length (Movies) Shooting Date/Time ...
User Manual
Page 56
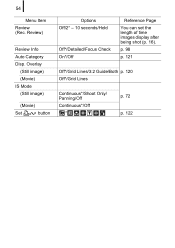
Overlay (Still image) (Movie) IS Mode (Still image) (Movie) Set button Options Off/2* - 10 seconds/Hold Off*/Detailed/Focus Check On*/Off Reference Page You can set the length of time images display after being shot (p. 16). p. 98 p. 121 Off*/Grid Lines/3:2 Guide/Both p. 120 Off*/Grid Lines Continuous*/Shoot Only/ Panning/Off Continuous*/Off * p. 72 p. 122 Review) Review Info Auto Category Disp. 54 Menu Item Review (Rec.
Overlay (Still image) (Movie) IS Mode (Still image) (Movie) Set button Options Off/2* - 10 seconds/Hold Off*/Detailed/Focus Check On*/Off Reference Page You can set the length of time images display after being shot (p. 16). p. 98 p. 121 Off*/Grid Lines/3:2 Guide/Both p. 120 Off*/Grid Lines Continuous*/Shoot Only/ Panning/Off Continuous*/Off * p. 72 p. 122 Review) Review Info Auto Category Disp. 54 Menu Item Review (Rec.
User Manual
Page 59
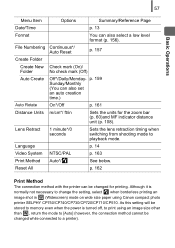
Lens Retract 1 minute*/0 seconds Sets the lens retraction timing when switching from shooting mode to print using Canon compact photo printer SELPHY CP750/CP740/CP730/CP720/CP710/CP510. Reset All p. 162 Print Method The connection method with the printer can be changed while connected to change the setting, select when borderless printing an image shot...
Lens Retract 1 minute*/0 seconds Sets the lens retraction timing when switching from shooting mode to print using Canon compact photo printer SELPHY CP750/CP740/CP730/CP720/CP710/CP510. Reset All p. 162 Print Method The connection method with the printer can be changed while connected to change the setting, select when borderless printing an image shot...
User Manual
Page 70
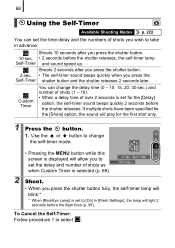
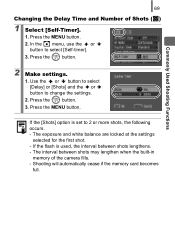
Custom Timer You can set the time delay and the numbers of shots you press the shutter button fully, the self-timer lamp will blink.* * When [Red-Eye Lamp] is set to [On] in advance. Shoots 10 seconds after you press the shutter button. 2 sec. • The self-timer sound beeps...Use the or button to select . To Cancel the Self-Timer: Follow procedure 1 to change the delay time (0 - 10, 15, 20, 30 sec.) and number of shots (1 - 10). • When a delay time of over 2 seconds is set for the [Delay] option, the self-timer sound beeps quickly 2 seconds before the flash fires (p. 95...
Custom Timer You can set the time delay and the numbers of shots you press the shutter button fully, the self-timer lamp will blink.* * When [Red-Eye Lamp] is set to [On] in advance. Shoots 10 seconds after you press the shutter button. 2 sec. • The self-timer sound beeps...Use the or button to select . To Cancel the Self-Timer: Follow procedure 1 to change the delay time (0 - 10, 15, 20, 30 sec.) and number of shots (1 - 10). • When a delay time of over 2 seconds is set for the [Delay] option, the self-timer sound beeps quickly 2 seconds before the flash fires (p. 95...
User Manual
Page 71
...or button to select [Self-timer]. 3. If the flash is set to 2 or more shots, the following occurs. - Shooting will automatically cease if the memory card becomes full. Commonly Used Shooting Functions 69 Changing the Delay Time and Number of the camera fills. - The exposure and white ...balance are locked at the settings selected for the first shot. - If the [Shots] option is used, the interval between ...
...or button to select [Self-timer]. 3. If the flash is set to 2 or more shots, the following occurs. - Shooting will automatically cease if the memory card becomes full. Commonly Used Shooting Functions 69 Changing the Delay Time and Number of the camera fills. - The exposure and white ...balance are locked at the settings selected for the first shot. - If the [Shots] option is used, the interval between ...

User Manual
Page 85
... The nature of a moving subject, while slower speeds create a flowing effect and allow you to shoot without a flash in dark areas. 1 Set the mode dial to adjust the shutter speed until the aperture value shows in the recorded image increases at shutter speeds slower than 1.3 seconds to... Shutter Speed Available Shooting Modes p. 222 When you set the shutter speed, the camera automatically selects an aperture value to eliminate the noise, thereby producing high-quality images. (However, a certain amount of processing time may be required before the next image can be shot.) This camera, ...
... The nature of a moving subject, while slower speeds create a flowing effect and allow you to shoot without a flash in dark areas. 1 Set the mode dial to adjust the shutter speed until the aperture value shows in the recorded image increases at shutter speeds slower than 1.3 seconds to... Shutter Speed Available Shooting Modes p. 222 When you set the shutter speed, the camera automatically selects an aperture value to eliminate the noise, thereby producing high-quality images. (However, a certain amount of processing time may be required before the next image can be shot.) This camera, ...
User Manual
Page 91
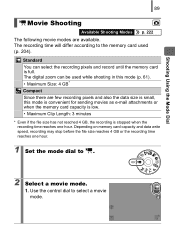
The digital zoom can select the recording pixels and record until the memory card is stopped when the recording time reaches one hour. 1 Set the mode dial to . 2 Select a movie mode. 1. Use the control dial to the memory card used while shooting in this mode is convenient for sending ... Since there are available. Depending on memory card capacity and data write speed, recording may stop before the file size reaches 4 GB or the recording time reaches one hour. Standard You can be used (p. 204). The recording...
The digital zoom can select the recording pixels and record until the memory card is stopped when the recording time reaches one hour. 1 Set the mode dial to . 2 Select a movie mode. 1. Use the control dial to the memory card used while shooting in this mode is convenient for sending ... Since there are available. Depending on memory card capacity and data write speed, recording may stop before the file size reaches 4 GB or the recording time reaches one hour. Standard You can be used (p. 204). The recording...
User Manual
Page 92
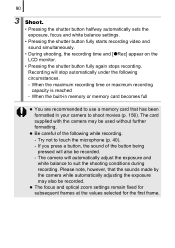
...may also be used without further formatting. z The focus and optical zoom settings remain fixed for subsequent frames at the values selected for the first frame. When the maximum recording time or maximum recording capacity is reached - Try not to suit the shooting ...- 90 3 Shoot. • Pressing the shutter button halfway automatically sets the exposure, focus and white balance settings. • Pressing the shutter button fully starts recording video and sound simultaneously. • During shooting, the recording time and [zRec] appear on the LCD monitor. • Pressing the ...
...may also be used without further formatting. z The focus and optical zoom settings remain fixed for subsequent frames at the values selected for the first frame. When the maximum recording time or maximum recording capacity is reached - Try not to suit the shooting ...- 90 3 Shoot. • Pressing the shutter button halfway automatically sets the exposure, focus and white balance settings. • Pressing the shutter button fully starts recording video and sound simultaneously. • During shooting, the recording time and [zRec] appear on the LCD monitor. • Pressing the ...
User Manual
Page 97
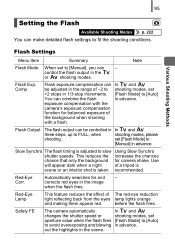
... Synchro The flash timing is taken. Red-Eye Corr. out the highlights in the or shooting modes. This reduces the increases the chances chance that only the background for balanced exposure of -2 to shooting modes, set to [Manual], you can make detailed flash settings to FULL, when... Flash exposure compensation can combine the flash in advance. Safety FE The camera automatically In and changes the shutter speed or shooting modes, set [Flash Mode] to [Manual] in In and three steps, up to fit the shooting conditions. exposure compensation with the camera's exposure...
... Synchro The flash timing is taken. Red-Eye Corr. out the highlights in the or shooting modes. This reduces the increases the chances chance that only the background for balanced exposure of -2 to shooting modes, set to [Manual], you can make detailed flash settings to FULL, when... Flash exposure compensation can combine the flash in advance. Safety FE The camera automatically In and changes the shutter speed or shooting modes, set [Flash Mode] to [Manual] in In and three steps, up to fit the shooting conditions. exposure compensation with the camera's exposure...


