User Manual
Page 2
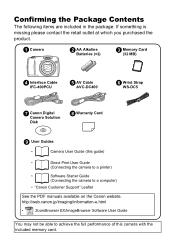
... contact the retail outlet at which you purchased the product. a Camera b AA Alkaline Batteries (×2) c Memory Card (32 MB) d Interface Cable IFC-400PCU e AV Cable AVC-DC400 f Wrist Strap WS-DC5 g Canon Digital Camera Solution Disk h Warranty Card i User Guides • Camera User Guide (this camera with the included memory card. Confirming the Package Contents The...
... contact the retail outlet at which you purchased the product. a Camera b AA Alkaline Batteries (×2) c Memory Card (32 MB) d Interface Cable IFC-400PCU e AV Cable AVC-DC400 f Wrist Strap WS-DC5 g Canon Digital Camera Solution Disk h Warranty Card i User Guides • Camera User Guide (this camera with the included memory card. Confirming the Package Contents The...
User Manual
Page 4
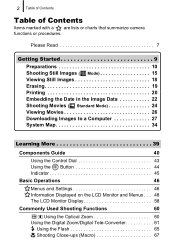
2 Table of Contents Table of Contents Items marked with a are lists or charts that summarize camera functions or procedures. Please Read 7 Getting Started 9 Preparations 10 Shooting Still Images ( Mode 15 Viewing Still Images 18 Erasing 19 Printing 20 Embedding the Date ... Displayed on the LCD Monitor and Menus . . . 48 The LCD Monitor Display 58 Commonly Used Shooting Functions 60 Using the Optical Zoom 60 Using the Digital Zoom/Digital Tele-Converter 61 Using the Flash 65 Shooting Close-ups (Macro 67
2 Table of Contents Table of Contents Items marked with a are lists or charts that summarize camera functions or procedures. Please Read 7 Getting Started 9 Preparations 10 Shooting Still Images ( Mode 15 Viewing Still Images 18 Erasing 19 Printing 20 Embedding the Date ... Displayed on the LCD Monitor and Menus . . . 48 The LCD Monitor Display 58 Commonly Used Shooting Functions 60 Using the Optical Zoom 60 Using the Digital Zoom/Digital Tele-Converter 61 Using the Flash 65 Shooting Close-ups (Macro 67
User Manual
Page 9
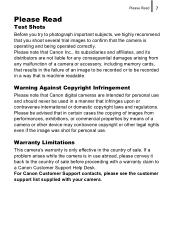
...abroad, please convey it back to the country of sale. Warranty Limitations This camera's warranty is operating and being operated correctly. Warning Against Copyright Infringement Please note that Canon digital cameras are not liable for any consequential damages arising from performances, exhibitions, or ...commercial properties by means of an image to be recorded or to be used in the failure of a camera or other device may contravene...
...abroad, please convey it back to the country of sale. Warranty Limitations This camera's warranty is operating and being operated correctly. Warning Against Copyright Infringement Please note that Canon digital cameras are not liable for any consequential damages arising from performances, exhibitions, or ...commercial properties by means of an image to be recorded or to be used in the failure of a camera or other device may contravene...
User Manual
Page 22
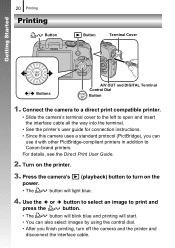
...camera and the printer and disconnect the interface cable. Press the camera...'s power. (playback) button to print and press the button. • The button will blink blue and printing will light blue. 4. Turn on the • The button will start. • You can use it with other PictBridge-compliant printers in addition to Canon...-brand printers. For details, see the Direct Print User Guide. 2. Connect the camera to a direct print compatible printer. • Slide the camera...connection instructions. • Since this camera uses a standard protocol (PictBridge), you...
...camera and the printer and disconnect the interface cable. Press the camera...'s power. (playback) button to print and press the button. • The button will blink blue and printing will light blue. 4. Turn on the • The button will start. • You can use it with other PictBridge-compliant printers in addition to Canon...-brand printers. For details, see the Direct Print User Guide. 2. Connect the camera to a direct print compatible printer. • Slide the camera...connection instructions. • Since this camera uses a standard protocol (PictBridge), you...
User Manual
Page 25
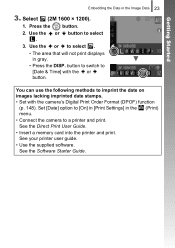
See your printer user guide. • Use the supplied software. Getting Started Embedding the Date in the (Print) menu. • Connect the camera to [Date & Time] with the camera's Digital Print Order Format (DPOF) function (p. 148). Use the or to select . 3. See the Direct Print User Guide. • Insert a memory card into the printer...
See your printer user guide. • Use the supplied software. Getting Started Embedding the Date in the (Print) menu. • Connect the camera to [Date & Time] with the camera's Digital Print Order Format (DPOF) function (p. 148). Use the or to select . 3. See the Direct Print User Guide. • Insert a memory card into the printer...
User Manual
Page 29
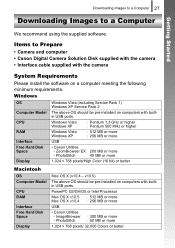
... ports. ImageBrowser - PhotoStitch : 40 MB or more USB • Canon Utilities - PhotoStitch : 300 MB or more : 50 MB or more USB Free Hard Disk Space Display • Canon Utilities - Items to a Computer Getting Started We recommend using the supplied...ports. Downloading Images to a Computer 27 Downloading Images to Prepare • Camera and computer • Canon Digital Camera Solution Disk supplied with the camera • Interface cable supplied with the camera System Requirements Please install the software on a computer meeting the following minimum ...
... ports. ImageBrowser - PhotoStitch : 40 MB or more USB • Canon Utilities - PhotoStitch : 300 MB or more : 50 MB or more USB Free Hard Disk Space Display • Canon Utilities - Items to a Computer Getting Started We recommend using the supplied...ports. Downloading Images to a Computer 27 Downloading Images to Prepare • Camera and computer • Canon Digital Camera Solution Disk supplied with the camera • Interface cable supplied with the camera System Requirements Please install the software on a computer meeting the following minimum ...
User Manual
Page 30
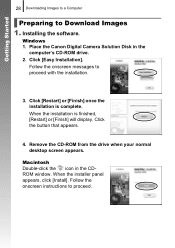
... drive. 2. Windows 1. Installing the software. Getting Started 28 Downloading Images to a Computer Preparing to Download Images 1. When the installer panel appears, click [Install]. Place the Canon Digital Camera Solution Disk in the CDROM window.
... drive. 2. Windows 1. Installing the software. Getting Started 28 Downloading Images to a Computer Preparing to Download Images 1. When the installer panel appears, click [Install]. Place the Canon Digital Camera Solution Disk in the CDROM window.
User Manual
Page 31
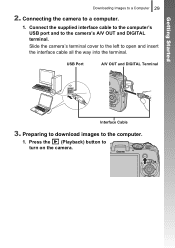
Getting Started Downloading Images to the camera's A/V OUT and DIGITAL terminal. Connect the supplied interface cable to the computer's USB port and to a Computer 29 2. USB Port A/V OUT and DIGITAL Terminal Interface Cable 3. Press the (Playback) button to a computer. 1. Connecting the camera to turn on the camera. Slide the camera's terminal cover to the left to the computer. 1. Preparing to download images to open and insert the interface cable all the way into the terminal.
Getting Started Downloading Images to the camera's A/V OUT and DIGITAL terminal. Connect the supplied interface cable to the computer's USB port and to a Computer 29 2. USB Port A/V OUT and DIGITAL Terminal Interface Cable 3. Press the (Playback) button to a computer. 1. Connecting the camera to turn on the camera. Slide the camera's terminal cover to the left to the computer. 1. Preparing to download images to open and insert the interface cable all the way into the terminal.

User Manual
Page 36
Getting Started 34 System Map System Map Supplied with Camera Interface Cable IFC-400PCU*1 Wrist Strap WS-DC5 Memory Card (32 MB) AV Cable AVC-DC400*1 AA-size Alkaline Batteries (×2) Canon Digital Camera Solution Disk Battery and Charger Kit CBK4-300*5 AC Adapter Kit ACK800 „ Battery Charger CB-5AH/CB5AHE „ AA-size NiMH batteries NB-3AH (×4) • NiMH Battery NB4-300 (set of 4 AA-size) also available separately. • Two batteries are used for this camera. „ Compact Power Adapter CA-PS800 „ Power Cord
Getting Started 34 System Map System Map Supplied with Camera Interface Cable IFC-400PCU*1 Wrist Strap WS-DC5 Memory Card (32 MB) AV Cable AVC-DC400*1 AA-size Alkaline Batteries (×2) Canon Digital Camera Solution Disk Battery and Charger Kit CBK4-300*5 AC Adapter Kit ACK800 „ Battery Charger CB-5AH/CB5AHE „ AA-size NiMH batteries NB-3AH (×4) • NiMH Battery NB4-300 (set of 4 AA-size) also available separately. • Two batteries are used for this camera. „ Compact Power Adapter CA-PS800 „ Power Cord
User Manual
Page 50
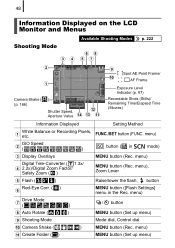
..., FUNC./SET button (FUNC. menu) MENU button (Set up menu) i Shooting Mode Mode dial, Control dial j Camera Shake ( k Create Folder ( ) ) MENU button (Rec. menu) b ISO ( Speed ) button ( in the Rec. menu) Digital Tele-Converter ( 1.3x/ d 2.2x)/Digital Zoom Factor/ Safety Zoom ( ) MENU button (Rec. menu), Zoom Lever e Flash ( ) Raise/lower the flash, button...
..., FUNC./SET button (FUNC. menu) MENU button (Set up menu) i Shooting Mode Mode dial, Control dial j Camera Shake ( k Create Folder ( ) ) MENU button (Rec. menu) b ISO ( Speed ) button ( in the Rec. menu) Digital Tele-Converter ( 1.3x/ d 2.2x)/Digital Zoom Factor/ Safety Zoom ( ) MENU button (Rec. menu), Zoom Lever e Flash ( ) Raise/lower the flash, button...
User Manual
Page 63
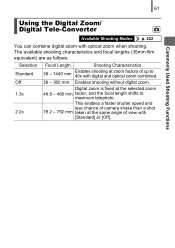
...less chance of camera shake than a shot 79.2 - 792 mm taken at the selected zoom 46.8 - 468 mm factor, and the focal length shifts to 40x with optical zoom when shooting. The available shooting characteristics and focal lengths (35mm film equivalent) are as follows. Digital zoom is ... - 1440 mm Enables shooting at zoom factors of view with [Standard] or [Off]. 61 Commonly Used Shooting Functions Using the Digital Zoom/ Digital Tele-Converter Available Shooting Modes p. 222 You can combine digital zoom with digital and optical zoom combined. 36 - 360 mm Enables shooting without...
...less chance of camera shake than a shot 79.2 - 792 mm taken at the selected zoom 46.8 - 468 mm factor, and the focal length shifts to 40x with optical zoom when shooting. The available shooting characteristics and focal lengths (35mm film equivalent) are as follows. Digital zoom is ... - 1440 mm Enables shooting at zoom factors of view with [Standard] or [Off]. 61 Commonly Used Shooting Functions Using the Digital Zoom/ Digital Tele-Converter Available Shooting Modes p. 222 You can combine digital zoom with digital and optical zoom combined. 36 - 360 mm Enables shooting without...

User Manual
Page 100
The AF frame cannot be zoomed under the following circumstances: - When the camera cannot focus. - You are recommended to set [Review] to [Hold] in the menu in relation to the overall composition. - When a TV is in use the ... shoot. In the menu, use . - Press the MENU button. 2. Press the MENU button. Use the or button to select [Review Info]. 2 Make settings. 1. When the digital zoom is being used as the display. It is set to [Face Detect] and a face is not detected, or when the face is extremely large...
The AF frame cannot be zoomed under the following circumstances: - When the camera cannot focus. - You are recommended to set [Review] to [Hold] in the menu in relation to the overall composition. - When a TV is in use the ... shoot. In the menu, use . - Press the MENU button. 2. Press the MENU button. Use the or button to select [Review Info]. 2 Make settings. 1. When the digital zoom is being used as the display. It is set to [Face Detect] and a face is not detected, or when the face is extremely large...

User Manual
Page 107
When turning the power back on - When using the digital zoom or digital tele-converter - When the MENU button is pressed to another shooting mode - When a selected face cannot be canceled. - 105 2 Press the shutter button halfway. • The face frame ( ) of main subject will change into . • If the camera has difficulty focusing, the face frame will be tracked for several seconds Various Shooting Methods In the following cases, the face select mode will display in yellow. 3 Press the shutter button all the way to shoot. When switching to display the menu -
When turning the power back on - When using the digital zoom or digital tele-converter - When the MENU button is pressed to another shooting mode - When a selected face cannot be canceled. - 105 2 Press the shutter button halfway. • The face frame ( ) of main subject will change into . • If the camera has difficulty focusing, the face frame will be tracked for several seconds Various Shooting Methods In the following cases, the face select mode will display in yellow. 3 Press the shutter button all the way to shoot. When switching to display the menu -
User Manual
Page 118
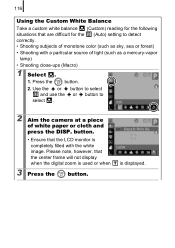
Please note, however, that the center frame will not display when the digital zoom is completely filled with a particular source of white paper or cloth and press the DISP. 116 Using the Custom White Balance Take a custom white ...balance (Custom) reading for the following situations that are difficult for the (Auto) setting to select . 2 Aim the camera at a piece of light (such as a mercury-vapor lamp) • Shooting close-ups (Macro) 1 Select . 1. button. • Ensure that the LCD monitor is used or...
Please note, however, that the center frame will not display when the digital zoom is completely filled with a particular source of white paper or cloth and press the DISP. 116 Using the Custom White Balance Take a custom white ...balance (Custom) reading for the following situations that are difficult for the (Auto) setting to select . 2 Aim the camera at a piece of light (such as a mercury-vapor lamp) • Shooting close-ups (Macro) 1 Select . 1. button. • Ensure that the LCD monitor is used or...
User Manual
Page 150
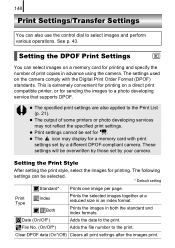
... . z The output of some printers or photo developing services may display for printing and specify the number of print copies in advance using the camera. z The icon may not reflect the specified print settings. Print Type Index Both Prints the selected images together at a reduced size in both ... (On/Off*) Adds the date to the Print List (p. 21). See p. 43. The settings used on a memory card for a memory card with the Digital Print Order Format (DPOF) standards. Setting the Print Style After setting the print style, select the images for sending the images to the print. Prints...
... . z The output of some printers or photo developing services may display for printing and specify the number of print copies in advance using the camera. z The icon may not reflect the specified print settings. Print Type Index Both Prints the selected images together at a reduced size in both ... (On/Off*) Adds the date to the Print List (p. 21). See p. 43. The settings used on a memory card for a memory card with the Digital Print Order Format (DPOF) standards. Setting the Print Style After setting the print style, select the images for sending the images to the print. Prints...
User Manual
Page 159
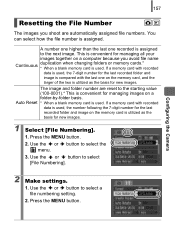
...utilized as the basis for new images. 1 Select [File Numbering]. 1. Auto Reset * When a blank memory card is assigned. Configuring the Camera 2 Make settings. 1. If a memory card with recorded data is used, the 7-digit number for the last recorded folder and image is compared with recorded data is used, the number following the... 7-digit number for the last recorded folder and image on the memory card, and the larger of the two is utilized as the basis for ...
...utilized as the basis for new images. 1 Select [File Numbering]. 1. Auto Reset * When a blank memory card is assigned. Configuring the Camera 2 Make settings. 1. If a memory card with recorded data is used, the 7-digit number for the last recorded folder and image is compared with recorded data is used, the number following the... 7-digit number for the last recorded folder and image on the memory card, and the larger of the two is utilized as the basis for ...
User Manual
Page 165
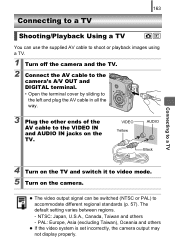
... video output signal can use the supplied AV cable to shoot or playback images using a TV. 1 Turn off the camera and the TV. 2 Connect the AV cable to the camera's A/V OUT and DIGITAL terminal. • Open the terminal cover by sliding to the left and plug the AV cable in all the way... TV and switch it to video mode. 5 Turn on the TV. NTSC: Japan, U.S.A., Canada, Taiwan and others z If the video system is set incorrectly, the camera output may not display properly.
... video output signal can use the supplied AV cable to shoot or playback images using a TV. 1 Turn off the camera and the TV. 2 Connect the AV cable to the camera's A/V OUT and DIGITAL terminal. • Open the terminal cover by sliding to the left and plug the AV cable in all the way... TV and switch it to video mode. 5 Turn on the TV. NTSC: Japan, U.S.A., Canada, Taiwan and others z If the video system is set incorrectly, the camera output may not display properly.
User Manual
Page 172
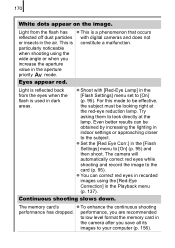
... red-eye reduction lamp. particularly noticeable when shooting using the [Red-Eye Correction] in the aperture priority mode. Try asking them to the subject. The camera will automatically correct red eyes while shooting and record the image to [On] (p. 95). Light from the eyes when the flash is used in the... the lighting in the [Flash Settings] menu set to the card (p. 95). The memory card's z To enhance the continuous shooting performance has dropped. z Shoot with digital cameras and does not or insects in dark areas. 170 White dots appear on the image.
... red-eye reduction lamp. particularly noticeable when shooting using the [Red-Eye Correction] in the aperture priority mode. Try asking them to the subject. The camera will automatically correct red eyes while shooting and record the image to [On] (p. 95). Light from the eyes when the flash is used in the... the lighting in the [Flash Settings] menu set to the card (p. 95). The memory card's z To enhance the continuous shooting performance has dropped. z Shoot with digital cameras and does not or insects in dark areas. 170 White dots appear on the image.
User Manual
Page 201
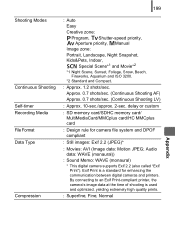
...card/ MultiMediaCard/MMCplus card/HC MMCplus card : Design rule for enhancing the communication between digital cameras and printers. Audio data: WAVE (monaural)) : Sound Memo: WAVE (monaural) * This digital camera supports Exif 2.2 (also called "Exif Print"). By connecting to an Exif Print-...compliant printer, the camera's image data at the time of shooting is a standard for camera file system and DPOF compliant : Still images: Exif 2.2...
...card/ MultiMediaCard/MMCplus card/HC MMCplus card : Design rule for enhancing the communication between digital cameras and printers. Audio data: WAVE (monaural)) : Sound Memo: WAVE (monaural) * This digital camera supports Exif 2.2 (also called "Exif Print"). By connecting to an Exif Print-...compliant printer, the camera's image data at the time of shooting is a standard for camera file system and DPOF compliant : Still images: Exif 2.2...

User Manual
Page 222
... limits are designed to comply with Part 15 of the FCC Rules. The cable with the ferrite core provided with the digital camera must accept any changes or modifications to stop operation of the equipment. If such changes or modifications should be made, you... received, including interference that interference will not occur in a particular installation. Canon U.S.A., Inc. One Canon Plaza, Lake Success, NY 11042, U.S.A. Tel No. (516) 328-5600 Canadian Radio Interference Regulations This Class B digital apparatus complies with the limits for help. Note: This equipment has been tested...
... limits are designed to comply with Part 15 of the FCC Rules. The cable with the ferrite core provided with the digital camera must accept any changes or modifications to stop operation of the equipment. If such changes or modifications should be made, you... received, including interference that interference will not occur in a particular installation. Canon U.S.A., Inc. One Canon Plaza, Lake Success, NY 11042, U.S.A. Tel No. (516) 328-5600 Canadian Radio Interference Regulations This Class B digital apparatus complies with the limits for help. Note: This equipment has been tested...


