User Guide
Page 3
...image to be recorded or to SD specifications. If covered, remove the film before contacting a Canon Customer Support Help Desk. • Although the LCD monitor is produced under extremely high-precision ... are intended for personal use , photography may contravene copyright or other devices such as red or black dots. This does not indicate damage. 3 Compatible Memory Cards The following ... an extended period, it may become warm. Preliminary Notes and Legal Information • Take and review some test shots initially to work with a thin plastic film for personal use . In case ...
...image to be recorded or to SD specifications. If covered, remove the film before contacting a Canon Customer Support Help Desk. • Although the LCD monitor is produced under extremely high-precision ... are intended for personal use , photography may contravene copyright or other devices such as red or black dots. This does not indicate damage. 3 Compatible Memory Cards The following ... an extended period, it may become warm. Preliminary Notes and Legal Information • Take and review some test shots initially to work with a thin plastic film for personal use . In case ...
User Guide
Page 155
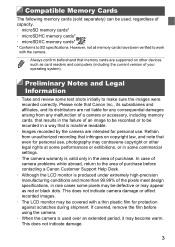
... 152. • Some images may not be overwritten. 156 Correct the image. You can save the corrected image as a new image and review. Choose [Red-Eye Correction]. z Press the m button. Save as a separate file. In this case, the original image will be erased. • ...be corrected accurately. • To overwrite the original image with the corrected image, choose [Overwrite] in "Magnifying Images" (p. 135). X Red-eye detected by red-eye. X The image is now corrected, and frames are displayed around corrected image areas. Follow the steps in step 4. Choose an image...
... 152. • Some images may not be overwritten. 156 Correct the image. You can save the corrected image as a new image and review. Choose [Red-Eye Correction]. z Press the m button. Save as a separate file. In this case, the original image will be erased. • ...be corrected accurately. • To overwrite the original image with the corrected image, choose [Overwrite] in "Magnifying Images" (p. 135). X Red-eye detected by red-eye. X The image is now corrected, and frames are displayed around corrected image areas. Follow the steps in step 4. Choose an image...

User Guide
Page 207
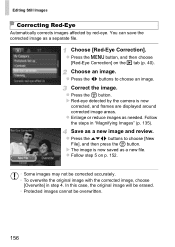
.... 70, 77) i-Contrast (p. 107) On Off On Off*4 On Off On Off Red-Eye On Corr. Off Red-Eye On Lamp Off Auto Off Hg Lamp Corr. (p. 71) Wind Filter (p. 73) Review (p. 78) On/Off On/Off Off/2 - 10 sec./Hold Review Info (p. 78) Off Detailed/Focus Check Blink Detection (p. 76) On Off Grid...
.... 70, 77) i-Contrast (p. 107) On Off On Off*4 On Off On Off Red-Eye On Corr. Off Red-Eye On Lamp Off Auto Off Hg Lamp Corr. (p. 71) Wind Filter (p. 73) Review (p. 78) On/Off On/Off Off/2 - 10 sec./Hold Review Info (p. 78) Off Detailed/Focus Check Blink Detection (p. 76) On Off Grid...


