User Guide
Page 4
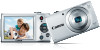
... indicate whether the function is used for expert camera use • =xx: Pages with related information (in this example, "xx" represents a page number) • Instructions in this guide apply to the camera under default settings. • For convenience, all supported memory cards are simply referred to represent the corresponding camera buttons on -screen icons and text are indicated in This Guide Speaker Zoom lever Shooting: / Playback: / Lens Shutter button Lamp Power button Microphone Flash Tripod socket Memory card/battery cover DC coupler cable...
... indicate whether the function is used for expert camera use • =xx: Pages with related information (in this example, "xx" represents a page number) • Instructions in this guide apply to the camera under default settings. • For convenience, all supported memory cards are simply referred to represent the corresponding camera buttons on -screen icons and text are indicated in This Guide Speaker Zoom lever Shooting: / Playback: / Lens Shutter button Lamp Power button Microphone Flash Tripod socket Memory card/battery cover DC coupler cable...
User Guide
Page 5
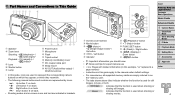
... ([P] Mode 48 Image Brightness (Exposure Compensation 48 Color and Continuous Shooting....51 Shooting Range and Focusing.....52 Flash 56 Using Eco Mode 57 Other Settings 57 5 Playback Mode 60 Viewing 61 Browsing and Filtering Images.....62 Image Viewing Options 64 Protecting Images 65 Erasing Images 67 Rotating Images 68 Editing Still Images 69 6 Setting Menu 72 Adjusting Basic Camera Functions 73 7 Accessories 79 Optional Accessories 80 Using Optional Accessories..........81 Printing Images 83 Using an Eye-Fi Card 90 8 Appendix 92 Troubleshooting 93 On-Screen Messages 95...
... ([P] Mode 48 Image Brightness (Exposure Compensation 48 Color and Continuous Shooting....51 Shooting Range and Focusing.....52 Flash 56 Using Eco Mode 57 Other Settings 57 5 Playback Mode 60 Viewing 61 Browsing and Filtering Images.....62 Image Viewing Options 64 Protecting Images 65 Erasing Images 67 Rotating Images 68 Editing Still Images 69 6 Setting Menu 72 Adjusting Basic Camera Functions 73 7 Accessories 79 Optional Accessories 80 Using Optional Accessories..........81 Printing Images 83 Using an Eye-Fi Card 90 8 Appendix 92 Troubleshooting 93 On-Screen Messages 95...
User Guide
Page 6
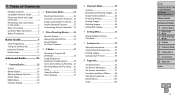
...using the flash (Flash Off 34 zzInclude yourself in the shot (Self-Timer 33, 45 zzAdd a date stamp 35 1 View zzView images (Playback Mode 61 zzAutomatic playback (Slideshow 64 zzOn a TV 81 zzOn a computer 18 zzBrowse through images quickly 62 zzErase images 67 E Shoot/View Movies zzShoot movies 29 zzView movies (Playback Mode 61 c Print zzPrint pictures 83 Save zzSave images to a computer 18 Cover Preliminary Notes and Legal Information Contents: Basic Operations Basic Guide Advanced Guide 1 Camera Basics 2 Smart Auto Mode 3 Other Shooting Modes 4 P Mode 5 Playback Mode 6 Setting...
...using the flash (Flash Off 34 zzInclude yourself in the shot (Self-Timer 33, 45 zzAdd a date stamp 35 1 View zzView images (Playback Mode 61 zzAutomatic playback (Slideshow 64 zzOn a TV 81 zzOn a computer 18 zzBrowse through images quickly 62 zzErase images 67 E Shoot/View Movies zzShoot movies 29 zzView movies (Playback Mode 61 c Print zzPrint pictures 83 Save zzSave images to a computer 18 Cover Preliminary Notes and Legal Information Contents: Basic Operations Basic Guide Advanced Guide 1 Camera Basics 2 Smart Auto Mode 3 Other Shooting Modes 4 P Mode 5 Playback Mode 6 Setting...
User Guide
Page 12
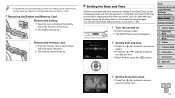
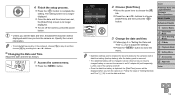
... battery lock in the direction of the arrow. • For guidelines on how many shots or hours of recording can also add a date stamp to choose your home time zone. 12 Remove the memory card. zzPress the buttons to specify the date and time. zzWhen finished, press the button. Cover Preliminary Notes and Legal Information Contents: Basic Operations Basic Guide Advanced Guide 1 Camera Basics 2 Smart Auto Mode 3 Other Shooting Modes 4 P Mode 5 Playback Mode 6 Setting Menu 7 Accessories 8 Appendix Index 3 Set...
... battery lock in the direction of the arrow. • For guidelines on how many shots or hours of recording can also add a date stamp to choose your home time zone. 12 Remove the memory card. zzPress the buttons to specify the date and time. zzWhen finished, press the button. Cover Preliminary Notes and Legal Information Contents: Basic Operations Basic Guide Advanced Guide 1 Camera Basics 2 Smart Auto Mode 3 Other Shooting Modes 4 P Mode 5 Playback Mode 6 Setting Menu 7 Accessories 8 Appendix Index 3 Set...
User Guide
Page 13
...; Date/time settings can be retained for about 4 hours once you insert a charged battery or connect the camera to set , the [Date/Time] screen is no longer displayed. zzPress the button. 2 Choose [Date/Time]. Follow the steps in "Setting the Date and Time" (=12) to complete the setting. Changing the Date and Time Adjust the date and time as follows. 1 Access the camera menu. Cover Preliminary Notes and Legal Information Contents: Basic Operations Basic Guide Advanced Guide 1 Camera Basics 2 Smart Auto Mode 3 Other Shooting Modes 4 P Mode 5 Playback Mode 6 Setting Menu...
...; Date/time settings can be retained for about 4 hours once you insert a charged battery or connect the camera to set , the [Date/Time] screen is no longer displayed. zzPress the button. 2 Choose [Date/Time]. Follow the steps in "Setting the Date and Time" (=12) to complete the setting. Changing the Date and Time Adjust the date and time as follows. 1 Access the camera menu. Cover Preliminary Notes and Legal Information Contents: Basic Operations Basic Guide Advanced Guide 1 Camera Basics 2 Smart Auto Mode 3 Other Shooting Modes 4 P Mode 5 Playback Mode 6 Setting Menu...
User Guide
Page 18
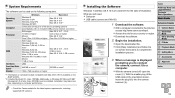
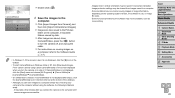
... Operations Basic Guide Advanced Guide 1 Camera Basics 2 Smart Auto Mode 3 Other Shooting Modes 4 P Mode 5 Playback Mode 6 Setting Menu 7 Accessories 8 Appendix Index 18 Installation may take some time, depending on the Apple website. *2 Includes Silverlight 5.1 (max. 100 MB). System Requirements The software can be installed. zzWith the camera turned off, open the cover ( ). Installing the Software Windows 7 and Mac OS X 10.6 are used on -screen instructions to complete the installation process. 3 When a message is available on computer performance. • Check the Canon...
... Operations Basic Guide Advanced Guide 1 Camera Basics 2 Smart Auto Mode 3 Other Shooting Modes 4 P Mode 5 Playback Mode 6 Setting Menu 7 Accessories 8 Appendix Index 18 Installation may take some time, depending on the Apple website. *2 Includes Silverlight 5.1 (max. 100 MB). System Requirements The software can be installed. zzWith the camera turned off, open the cover ( ). Installing the Software Windows 7 and Mac OS X 10.6 are used on -screen instructions to complete the installation process. 3 When a message is available on computer performance. • Check the Canon...
User Guide
Page 20
... available, such as movie editing. Images shot in horizontal orientation. - Some functions provided by date. zzFor instructions on viewing images on the screen displayed when you can save images to a computer simply by connecting your camera to the computer without using Canon CameraWindow] on a computer, refer to the computer. zzDouble click [ ]. Cover Preliminary Notes and Legal Information Contents: Basic Operations Basic Guide Advanced Guide 1 Camera Basics 2 Smart Auto Mode 3 Other Shooting Modes 4 P Mode 5 Playback Mode 6 Setting Menu 7 Accessories 8 Appendix...
... available, such as movie editing. Images shot in horizontal orientation. - Some functions provided by date. zzFor instructions on viewing images on the screen displayed when you can save images to a computer simply by connecting your camera to the computer without using Canon CameraWindow] on a computer, refer to the computer. zzDouble click [ ]. Cover Preliminary Notes and Legal Information Contents: Basic Operations Basic Guide Advanced Guide 1 Camera Basics 2 Smart Auto Mode 3 Other Shooting Modes 4 P Mode 5 Playback Mode 6 Setting Menu 7 Accessories 8 Appendix...
User Guide
Page 45
... useful when including yourself in "Specific Scenes" (=40) and choose [ ]. 2 Compose the shot and press the shutter button halfway. Cover Preliminary Notes and Legal Information Contents: Basic Operations Basic Guide Advanced Guide 1 Camera Basics 2 Smart Auto Mode 3 Other Shooting Modes 4 P Mode 5 Playback Mode 6 Setting Menu 7 Accessories 8 Appendix Index 45 This is displayed. XXThe camera now enters shooting standby mode, and [Look straight at the camera. XXAfter the camera detects a new face, the lamp blinking and self-timer sound...
... useful when including yourself in "Specific Scenes" (=40) and choose [ ]. 2 Compose the shot and press the shutter button halfway. Cover Preliminary Notes and Legal Information Contents: Basic Operations Basic Guide Advanced Guide 1 Camera Basics 2 Smart Auto Mode 3 Other Shooting Modes 4 P Mode 5 Playback Mode 6 Setting Menu 7 Accessories 8 Appendix Index 45 This is displayed. XXThe camera now enters shooting standby mode, and [Look straight at the camera. XXAfter the camera detects a new face, the lamp blinking and self-timer sound...
User Guide
Page 51
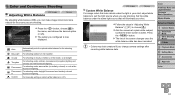
... will illuminate your shot, adjust white balance to choose [ ]. zzPress the button, choose [ ] in fair weather. For shooting under warm-white (or similarly colored) or cool-white fluorescent lighting. Cover Preliminary Notes and Legal Information Contents: Basic Operations Basic Guide Advanced Guide 1 Camera Basics 2 Smart Auto Mode 3 Other Shooting Modes 4 P Mode 5 Playback Mode 6 Setting Menu 7 Accessories 8 Appendix Index 51 Color and Continuous Shooting Still Images Adjusting White Balance Movies By adjusting white balance (WB), you can make image colors look more natural...
... will illuminate your shot, adjust white balance to choose [ ]. zzPress the button, choose [ ] in fair weather. For shooting under warm-white (or similarly colored) or cool-white fluorescent lighting. Cover Preliminary Notes and Legal Information Contents: Basic Operations Basic Guide Advanced Guide 1 Camera Basics 2 Smart Auto Mode 3 Other Shooting Modes 4 P Mode 5 Playback Mode 6 Setting Menu 7 Accessories 8 Appendix Index 51 Color and Continuous Shooting Still Images Adjusting White Balance Movies By adjusting white balance (WB), you can make image colors look more natural...
User Guide
Page 55
... when using the self-timer (=33). Cover Preliminary Notes and Legal Information Contents: Basic Operations Basic Guide Advanced Guide 1 Camera Basics 2 Smart Auto Mode 3 Other Shooting Modes 4 P Mode 5 Playback Mode 6 Setting Menu 7 Accessories 8 Appendix Index 55 XXThe focus is now locked, and [%] is not pressed. Still Images Changing the Focus Setting Movies You can limit camera focusing to the specified AF frame mode. • If adequate exposure cannot be locked. Helps avoid missing sudden photo On opportunities, because the camera constantly focuses...
... when using the self-timer (=33). Cover Preliminary Notes and Legal Information Contents: Basic Operations Basic Guide Advanced Guide 1 Camera Basics 2 Smart Auto Mode 3 Other Shooting Modes 4 P Mode 5 Playback Mode 6 Setting Menu 7 Accessories 8 Appendix Index 55 XXThe focus is now locked, and [%] is not pressed. Still Images Changing the Focus Setting Movies You can limit camera focusing to the specified AF frame mode. • If adequate exposure cannot be locked. Helps avoid missing sudden photo On opportunities, because the camera constantly focuses...
User Guide
Page 74
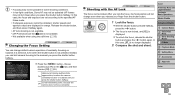
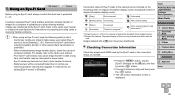
... the memory card to a computer, or take other steps to continue with this option. Low-Level Formatting Perform low-level formatting in "Formatting Memory Cards" (=74) to back them up. Before low-level formatting, copy images on the card and does not erase the data completely. Cover Preliminary Notes and Legal Information Contents: Basic Operations Basic Guide Advanced Guide 1 Camera Basics 2 Smart Auto Mode 3 Other Shooting Modes 4 P Mode 5 Playback Mode 6 Setting Menu 7 Accessories 8 Appendix Index 74 zzPress the buttons...
... the memory card to a computer, or take other steps to continue with this option. Low-Level Formatting Perform low-level formatting in "Formatting Memory Cards" (=74) to back them up. Before low-level formatting, copy images on the card and does not erase the data completely. Cover Preliminary Notes and Legal Information Contents: Basic Operations Basic Guide Advanced Guide 1 Camera Basics 2 Smart Auto Mode 3 Other Shooting Modes 4 P Mode 5 Playback Mode 6 Setting Menu 7 Accessories 8 Appendix Index 74 zzPress the buttons...
User Guide
Page 75
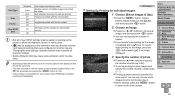
... memory cards. To start saving shots from all data will now be numbered consecutively after you switch memory cards, or when a new folder is reset to 0001 if you press the button, set the retraction timing to 2,000 images each. In this setting, shots may be saved in folders created each day you switch memory cards. Cover Preliminary Notes and Legal Information Contents: Basic Operations Basic Guide Advanced Guide 1 Camera Basics 2 Smart Auto Mode 3 Other Shooting Modes 4 P Mode 5 Playback Mode 6 Setting Menu 7 Accessories 8 Appendix Index 75 File Numbering...
... memory cards. To start saving shots from all data will now be numbered consecutively after you switch memory cards, or when a new folder is reset to 0001 if you press the button, set the retraction timing to 2,000 images each. In this setting, shots may be saved in folders created each day you switch memory cards. Cover Preliminary Notes and Legal Information Contents: Basic Operations Basic Guide Advanced Guide 1 Camera Basics 2 Smart Auto Mode 3 Other Shooting Modes 4 P Mode 5 Playback Mode 6 Setting Menu 7 Accessories 8 Appendix Index 75 File Numbering...
User Guide
Page 86
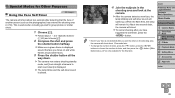
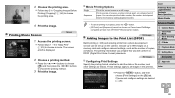
...Smart Auto Mode 3 Other Shooting Modes 4 P Mode 5 Playback Mode 6 Setting Menu 7 Accessories 8 Appendix Index zzPress the button, and then choose [Print Settings] on a single sheet of copies, as a still image. Printing Movie Scenes Movies 1 Access the printing screen. Cover Preliminary Notes and Legal Information Contents: Basic Operations Basic Guide • To cancel printing in "Cropping Images Before Printing (Cropping)" (=84) to 998 images on the camera. compatible printers from a photo development service can also print the folder number, file number, and elapsed time for...
...Smart Auto Mode 3 Other Shooting Modes 4 P Mode 5 Playback Mode 6 Setting Menu 7 Accessories 8 Appendix Index zzPress the button, and then choose [Print Settings] on a single sheet of copies, as a still image. Printing Movie Scenes Movies 1 Access the printing screen. Cover Preliminary Notes and Legal Information Contents: Basic Operations Basic Guide • To cancel printing in "Cropping Images Before Printing (Cropping)" (=84) to 998 images on the camera. compatible printers from a photo development service can also print the folder number, file number, and elapsed time for...
User Guide
Page 87
... memory card has print settings that were configured on the [2] tab, and then press the button. 2 Choose an image. To cancel index printing for index prints. Still Images Setting Up Printing for both [Date] and [File No.] at the same time. • The date is printed in a format matching setting details in some Canon-brand PictBridge-compatible printers (sold separately). zzPrinting quantity cannot be displayed on the camera to specify the number of multiple images are printed...
... memory card has print settings that were configured on the [2] tab, and then press the button. 2 Choose an image. To cancel index printing for index prints. Still Images Setting Up Printing for both [Date] and [File No.] at the same time. • The date is printed in a format matching setting details in some Canon-brand PictBridge-compatible printers (sold separately). zzPrinting quantity cannot be displayed on the camera to specify the number of multiple images are printed...
User Guide
Page 90
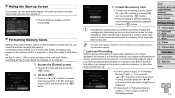
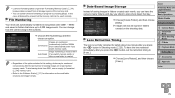
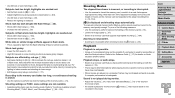
Inserting a prepared Eye-Fi card enables automatic wireless transfer of this , try setting [Eye-Fi trans.] to take a long time, and transfer may be interrupted in normal use is displayed. Poor Eye-Fi connections may cause image transfer to [Disable]. Battery power will be checked on the shooting screen (in regular information display mode) or playback screen (in simple information display mode). (Gray) Not connected Interrupted (Blinking white) Connecting Not communicating (White) (Animated) Connected Transfer in mind. - Camera operation may become sluggish. Cover ...
Inserting a prepared Eye-Fi card enables automatic wireless transfer of this , try setting [Eye-Fi trans.] to take a long time, and transfer may be interrupted in normal use is displayed. Poor Eye-Fi connections may cause image transfer to [Disable]. Battery power will be checked on the shooting screen (in regular information display mode) or playback screen (in simple information display mode). (Gray) Not connected Interrupted (Blinking white) Connecting Not communicating (White) (Animated) Connected Transfer in mind. - Camera operation may become sluggish. Cover ...

User Guide
Page 93
... the shutter button halfway to focus on a TV Camera images look too dark. • Set the flash mode to [h] (=56). • Adjust brightness by using i-Contrast (=50, 70). Power Nothing happens when the power button is pressed. • Confirm that the battery is charged (=10). • Confirm that the battery is inserted facing the correct way (=11). • Confirm that unneeded functions such as macro are recorded in shots look...
... the shutter button halfway to focus on a TV Camera images look too dark. • Set the flash mode to [h] (=56). • Adjust brightness by using i-Contrast (=50, 70). Power Nothing happens when the power button is pressed. • Confirm that the battery is charged (=10). • Confirm that the battery is inserted facing the correct way (=11). • Confirm that unneeded functions such as macro are recorded in shots look...
User Guide
Page 94
...; When movies are affected by using red-eye correction (=71). Also try increasing the lighting in this mode. menu settings are washed-out. • Shoot within flash range (=104). • Increase the ISO speed (=50). The camera's internal memory buffer filled up as the camera could not record to [!] (=34). • Adjust brightness by red-eye (=36). • Set [Lamp Setting] to [On] (=38) to "Functions Available in flash shots. Playback Playback is counteracting red-eye. Shooting settings or FUNC. Menu", and "Shooting Menu...
...; When movies are affected by using red-eye correction (=71). Also try increasing the lighting in this mode. menu settings are washed-out. • Shoot within flash range (=104). • Increase the ISO speed (=50). The camera's internal memory buffer filled up as the camera could not record to [!] (=34). • Adjust brightness by red-eye (=36). • Set [Lamp Setting] to [On] (=38) to "Functions Available in flash shots. Playback Playback is counteracting red-eye. Shooting settings or FUNC. Menu", and "Shooting Menu...
User Guide
Page 96
... Canon Customer Support Help Desk to [Auto Reset] (=75), or format the memory card (=74). Cover Preliminary Notes and Legal Information Contents: Basic Operations Basic Guide Advanced Guide 1 Camera Basics 2 Smart Auto Mode 3 Other Shooting Modes 4 P Mode 5 Playback Mode 6 Setting Menu 7 Accessories 8 Appendix Index 96 In the [3] menu, change [File Numbering] to request assistance with another camera. In this error message may not have been altered using computer software, even if the camera is correct, restart the printer and complete the setting on the camera again. Print error...
... Canon Customer Support Help Desk to [Auto Reset] (=75), or format the memory card (=74). Cover Preliminary Notes and Legal Information Contents: Basic Operations Basic Guide Advanced Guide 1 Camera Basics 2 Smart Auto Mode 3 Other Shooting Modes 4 P Mode 5 Playback Mode 6 Setting Menu 7 Accessories 8 Appendix Index 96 In the [3] menu, change [File Numbering] to request assistance with another camera. In this error message may not have been altered using computer software, even if the camera is correct, restart the printer and complete the setting on the camera again. Print error...
User Guide
Page 104
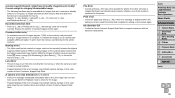
... Eco mode Movie Recording Time*1 Continuous Shooting*2 Playback Time Approx. 220 Approx. 300 Approx. 50 minutes Approx. 1 hour, 30 minutes Approx. 5 hours *1 Time under default camera settings, when normal operations are performed, such as shooting, pausing, turning the camera on and off, and zooming. *2 Time available when shooting the maximum movie length (until recording stops automatically) repeatedly. • The number of shots that can be taken is based on measurement guidelines of the Camera & Imaging...
... Eco mode Movie Recording Time*1 Continuous Shooting*2 Playback Time Approx. 220 Approx. 300 Approx. 50 minutes Approx. 1 hour, 30 minutes Approx. 5 hours *1 Time under default camera settings, when normal operations are performed, such as shooting, pausing, turning the camera on and off, and zooming. *2 Time available when shooting the maximum movie length (until recording stops automatically) repeatedly. • The number of shots that can be taken is based on measurement guidelines of the Camera & Imaging...
User Guide
Page 106
...date/time battery) Power saving 23 Battery Charging 10 Level 97 Power saving 23 Battery charger 2 Blink detection 37 C Camera Reset all 78 Center (AF frame mode 54 Color (white balance 51 Continuous shooting 52 Creative filters (shooting mode 42 Custom white balance 51 D Date/time Adding date stamps 35 Changing 13, 59 Date/time battery 13 Settings 12 World clock 76 Defaults" Reset all Digital zoom 32 Display language 14 DPOF 86 Drive mode 52 E Eco Mode 35, 57 Editing i-Contrast 70 Red-eye correction 71 Resizing images 69 Erasing 67 Error messages 95 Exposure AE lock...
...date/time battery) Power saving 23 Battery Charging 10 Level 97 Power saving 23 Battery charger 2 Blink detection 37 C Camera Reset all 78 Center (AF frame mode 54 Color (white balance 51 Continuous shooting 52 Creative filters (shooting mode 42 Custom white balance 51 D Date/time Adding date stamps 35 Changing 13, 59 Date/time battery 13 Settings 12 World clock 76 Defaults" Reset all Digital zoom 32 Display language 14 DPOF 86 Drive mode 52 E Eco Mode 35, 57 Editing i-Contrast 70 Red-eye correction 71 Resizing images 69 Erasing 67 Error messages 95 Exposure AE lock...


