User Guide
Page 3
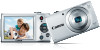
... Auto Mode 3 Other Shooting Modes 4 P Mode 5 Playback Mode 6 Setting Menu 7 Accessories 8 Appendix Index 3 If covered, remove the film before contacting a Canon Customer Support Help Desk. • Although the LCD monitor is used over an extended period, it may become warm. Preliminary Notes and Legal Information •...; Take and review some pixels may be defective or may appear as red or black dots. In case of camera problems while abroad, return to the ...
... Auto Mode 3 Other Shooting Modes 4 P Mode 5 Playback Mode 6 Setting Menu 7 Accessories 8 Appendix Index 3 If covered, remove the film before contacting a Canon Customer Support Help Desk. • Although the LCD monitor is used over an extended period, it may become warm. Preliminary Notes and Legal Information •...; Take and review some pixels may be defective or may appear as red or black dots. In case of camera problems while abroad, return to the ...

User Guide
Page 59
...images for the specified time. zzTo restore the original setting, repeat this process but choose [Off]. zzPress the button, choose [Review image after shots. Displays images until you can take another shot by pressing the shutter button halfway again. Displays shooting details (=98...Off] or [Quick], [Display Info] is set to choose [Display Info]. Changing the Image Display Period After Shots 1 Access the [Review image after shooting. Off Detailed Displays only the image. Protection (=65) Cover Preliminary Notes and Legal Information Contents: Basic Operations Basic Guide...
...images for the specified time. zzTo restore the original setting, repeat this process but choose [Off]. zzPress the button, choose [Review image after shots. Displays images until you can take another shot by pressing the shutter button halfway again. Displays shooting details (=98...Off] or [Quick], [Display Info] is set to choose [Display Info]. Changing the Image Display Period After Shots 1 Access the [Review image after shooting. Off Detailed Displays only the image. Protection (=65) Cover Preliminary Notes and Legal Information Contents: Basic Operations Basic Guide...
User Guide
Page 60
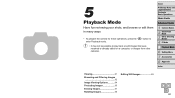
4 5 Playback Mode Have fun reviewing your shots, and browse or edit them in many ways • To prepare the camera for these operations, press the button to enter Playback mode. &#...
4 5 Playback Mode Have fun reviewing your shots, and browse or edit them in many ways • To prepare the camera for these operations, press the button to enter Playback mode. &#...

User Guide
Page 70
... the button. [Display new image?] is not possible for images shot at a resolution of [ ] (=36) or saved as a new image and review. Insufficient overall image contrast is also automatically corrected, to choose [Yes], and then press the button. zzPress the buttons to make subjects stand out better...editing using this function. • If [Auto] does not produce the expected results, try correcting images using [Low], [Medium], or [High]. 5 Review the new image. zzPress the buttons to appear grainy. • Images may cause images to choose an image, and then press the button. 3 ...
... the button. [Display new image?] is not possible for images shot at a resolution of [ ] (=36) or saved as a new image and review. Insufficient overall image contrast is also automatically corrected, to choose [Yes], and then press the button. zzPress the buttons to make subjects stand out better...editing using this function. • If [Auto] does not produce the expected results, try correcting images using [Low], [Medium], or [High]. 5 Review the new image. zzPress the buttons to appear grainy. • Images may cause images to choose an image, and then press the button. 3 ...

User Guide
Page 71
... corrected image areas. zzPress the button. Correcting Red-Eye Still Images Automatically corrects images affected by the camera is now saved as a new image and review. zzFollow step 5 in "Resizing Images" (= 70). • Some images may not be overwritten. In this case, the original image will be erased. • Protected images...
... corrected image areas. zzPress the button. Correcting Red-Eye Still Images Automatically corrects images affected by the camera is now saved as a new image and review. zzFollow step 5 in "Resizing Images" (= 70). • Some images may not be overwritten. In this case, the original image will be erased. • Protected images...
User Guide
Page 101
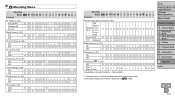
...*1 Tracking AF Center O O O OOOO - - OOO - - OO OOO O Available or set automatically. - O - - - O Off O O O OOOOOOOOOOOOO Red-Eye Corr. (=36) On O O - O O OO - O - 4 Shooting Menu Shooting Mode G I Function PtN Review image after shooting (=59) Off/ Quick/ Display 2 sec./ Time 4 sec./ 8 sec./ Hold O O O OOOOOOOOOOOOO Display Off O O O OOOOOOOOOOOOO Info Detailed - Cover Preliminary Notes and Legal Information Contents...
...*1 Tracking AF Center O O O OOOO - - OOO - - OO OOO O Available or set automatically. - O - - - O Off O O O OOOOOOOOOOOOO Red-Eye Corr. (=36) On O O - O O OO - O - 4 Shooting Menu Shooting Mode G I Function PtN Review image after shooting (=59) Off/ Quick/ Display 2 sec./ Time 4 sec./ 8 sec./ Hold O O O OOOOOOOOOOOOO Display Off O O O OOOOOOOOOOOOO Info Detailed - Cover Preliminary Notes and Legal Information Contents...


