User Guide
Page 4
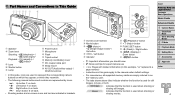
... following camera buttons and controls are represented by icons. Part Names and Conventions in This Guide Speaker Zoom lever Shooting: / Playback: / Lens Shutter button Lamp Power button Microphone Flash Tripod socket Memory card/battery cover DC coupler cable port Strap mount AV OUT (Audio/video output) / DIGITAL terminal • In this...
... following camera buttons and controls are represented by icons. Part Names and Conventions in This Guide Speaker Zoom lever Shooting: / Playback: / Lens Shutter button Lamp Power button Microphone Flash Tripod socket Memory card/battery cover DC coupler cable port Strap mount AV OUT (Audio/video output) / DIGITAL terminal • In this...
User Guide
Page 7
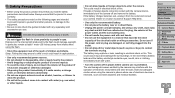
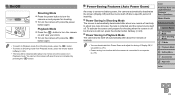
...This could damage eyesight. In particular, remain at least 1 meter (39 inches) away from the outlet and consult your camera retailer or a Canon Customer Support Help Desk. • Use only the recommended battery. • Do not place the battery near or in direct flame. •... of children and infants. The battery may interfere with the camera interior, immediately turn the camera off in asphyxiation. • Use only recommended power sources. • Do not attempt to disassemble, alter or apply heat to the product. • Avoid dropping or subjecting the product to ...
...This could damage eyesight. In particular, remain at least 1 meter (39 inches) away from the outlet and consult your camera retailer or a Canon Customer Support Help Desk. • Use only the recommended battery. • Do not place the battery near or in direct flame. •... of children and infants. The battery may interfere with the camera interior, immediately turn the camera off in asphyxiation. • Use only recommended power sources. • Do not attempt to disassemble, alter or apply heat to the product. • Avoid dropping or subjecting the product to ...
User Guide
Page 8
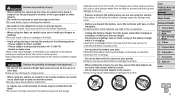
... pocket. Doing so may occur. • Before you are not using it to enter the camera. If the screen cracks, injury may result from the power outlet after charging is due to the high intensity of the flash burning dust and foreign materials stuck to the front of time may cause...
... pocket. Doing so may occur. • Before you are not using it to enter the camera. If the screen cracks, injury may result from the power outlet after charging is due to the high intensity of the flash burning dust and foreign materials stuck to the front of time may cause...
User Guide
Page 10
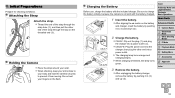
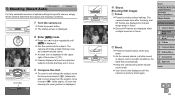
... Prepare for shooting as follows. zzThread the end of the strap through the strap hole ( ), and then pull the other end into a power outlet. zzAfter aligning the ▲ marks on the threaded end ( ). XXThe charging lamp turns orange and charging begins. zzWhen shooting, keep...( ) and up ( ). Do not rest your wrist. Be sure to prevent it in ( ) and down ( ). zzCB-2LFE: Plug the power cord into a power outlet ( ). XXWhen charging is not sold with the included charger. Cover Preliminary Notes and Legal Information Contents: Basic Operations Basic Guide Advanced Guide 1 Camera...
... Prepare for shooting as follows. zzThread the end of the strap through the strap hole ( ), and then pull the other end into a power outlet. zzAfter aligning the ▲ marks on the threaded end ( ). XXThe charging lamp turns orange and charging begins. zzWhen shooting, keep...( ) and up ( ). Do not rest your wrist. Be sure to prevent it in ( ) and down ( ). zzCB-2LFE: Plug the power cord into a power outlet ( ). XXWhen charging is not sold with the included charger. Cover Preliminary Notes and Legal Information Contents: Basic Operations Basic Guide Advanced Guide 1 Camera...
User Guide
Page 11
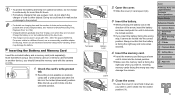
... before using a new memory card (or a memory card formatted in another device), you insert it clicks into the locked position. For power outlets in a different format, use a power cord, do not charge it clicks into the closed position ( ). 11 zzRecording is not possible on memory cards with 100 - 240 ...V AC power (50/60 Hz). Inserting memory cards facing the wrong way may damage the battery. zzLower the cover ( ) and hold ...
... before using a new memory card (or a memory card formatted in another device), you insert it clicks into the locked position. For power outlets in a different format, use a power cord, do not charge it clicks into the closed position ( ). 11 zzRecording is not possible on memory cards with 100 - 240 ...V AC power (50/60 Hz). Inserting memory cards facing the wrong way may damage the battery. zzLower the cover ( ) and hold ...
User Guide
Page 12
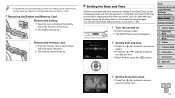
... home time zone. • For guidelines on how many shots or hours of recording can also add a date stamp to choose an option. zzPress the power button. zzPress the buttons to choose your home time zone. 12 Removing the Battery and Memory Card Remove the battery. XXThe memory card will pop...
... home time zone. • For guidelines on how many shots or hours of recording can also add a date stamp to choose an option. zzPress the power button. zzPress the buttons to choose your home time zone. 12 Removing the Battery and Memory Card Remove the battery. XXThe memory card will pop...
User Guide
Page 13
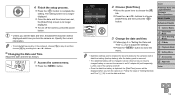
... [Date/Time] screen will be charged in about 4 hours once you turn the camera on . The setting screen is left off the camera, press the power button. • Unless you set daylight saving time (1 hour ahead), choose [ ] in step 2 and then choose [ ] by the camera's built-in date/time battery (backup...
... [Date/Time] screen will be charged in about 4 hours once you turn the camera on . The setting screen is left off the camera, press the power button. • Unless you set daylight saving time (1 hour ahead), choose [ ] in step 2 and then choose [ ] by the camera's built-in date/time battery (backup...
User Guide
Page 14
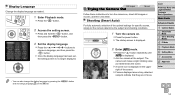
... pressing the button and choosing [Language ] on , shoot still images or movies, and then view them. zzPress the button. 2 Access the setting screen. zzPress the power button. The camera will make a slight clicking noise as needed. 1 Enter Playback mode. Shooting (Smart Auto) For fully automatic selection of the screen. zzPress and...
... pressing the button and choosing [Language ] on , shoot still images or movies, and then view them. zzPress the button. 2 Access the setting screen. zzPress the power button. The camera will make a slight clicking noise as needed. 1 Enter Playback mode. Shooting (Smart Auto) For fully automatic selection of the screen. zzPress and...
User Guide
Page 21
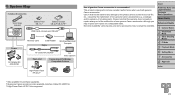
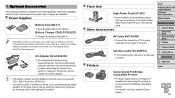
... Card Card Reader Cable Windows/Macintosh Compute AV Cable AVC-DC400 TV/ Video System Flash Unit Canon-brand PictBridgeCompatible Printers High-Power Flash HF-DC2*3 Use of genuine Canon accessories is also available (Interface Cable IFC-400PCU). *3 High-Power Flash HF-DC1 also supported. 21 Cover Preliminary Notes and Legal Information Contents: Basic Operations...
... Card Card Reader Cable Windows/Macintosh Compute AV Cable AVC-DC400 TV/ Video System Flash Unit Canon-brand PictBridgeCompatible Printers High-Power Flash HF-DC2*3 Use of genuine Canon accessories is also available (Interface Cable IFC-400PCU). *3 High-Power Flash HF-DC1 also supported. 21 Cover Preliminary Notes and Legal Information Contents: Basic Operations...
User Guide
Page 23
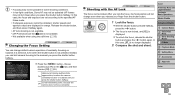
... minutes, the lens is retracted and the camera turns itself off but the lens is still out, press the shutter button halfway (=24). Power Saving in Shooting Mode The screen is automatically deactivated after about one minute once the camera is in Playback Mode The camera turns itself off... the camera on and prepare for shooting when the screen is off automatically after a specific period of Display Off, if you prefer (=76). • Power saving is not active while the camera is connected to a computer (= 19). In about five minutes of inactivity. • You can turn the camera...
... minutes, the lens is retracted and the camera turns itself off but the lens is still out, press the shutter button halfway (=24). Power Saving in Shooting Mode The screen is automatically deactivated after about one minute once the camera is in Playback Mode The camera turns itself off... the camera on and prepare for shooting when the screen is off automatically after a specific period of Display Off, if you prefer (=76). • Power saving is not active while the camera is connected to a computer (= 19). In about five minutes of inactivity. • You can turn the camera...
User Guide
Page 29
zzPress the power button. XXFrames displayed around any detected subjects indicate that they are in focus. XXSeveral AF frames are displayed when multiple areas are displayed to indicate ...
zzPress the power button. XXFrames displayed around any detected subjects indicate that they are in focus. XXSeveral AF frames are displayed when multiple areas are displayed to indicate ...
User Guide
Page 35
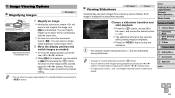
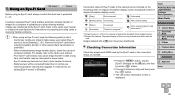
... to images that the date and time are correct (=12). 1 Configure the setting. The camera turns off . XXAs you to conserve battery power in use, the screen quickly darkens to reduce battery consumption. 1 Configure the setting. Using Eco Mode Still Images Movies This function allows you...Shots taken without adding a date stamp can add the shooting date to images, in the lower-right corner. Use the software downloaded from the Canon website to print For details, refer to print - When the camera is displayed. 2 Shoot. zzTo activate the screen and prepare for approximately two...
... to images that the date and time are correct (=12). 1 Configure the setting. The camera turns off . XXAs you to conserve battery power in use, the screen quickly darkens to reduce battery consumption. 1 Configure the setting. Using Eco Mode Still Images Movies This function allows you...Shots taken without adding a date stamp can add the shooting date to images, in the lower-right corner. Use the software downloaded from the Canon website to print For details, refer to print - When the camera is displayed. 2 Shoot. zzTo activate the screen and prepare for approximately two...
User Guide
Page 55
... halfway. zzPress the button, choose [Continuous AF] on the [4] tab is not available. • Not available when using the self-timer (=33). Off Conserves battery power, because the camera does not focus constantly. After you lock the focus, the focal position will not change default camera operation of constantly focusing on...
... halfway. zzPress the button, choose [Continuous AF] on the [4] tab is not available. • Not available when using the self-timer (=33). Off Conserves battery power, because the camera does not focus constantly. After you lock the focus, the focal position will not change default camera operation of constantly focusing on...
User Guide
Page 57
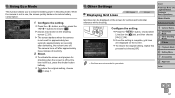
... Shooting Modes 4 P Mode 5 Playback Mode 6 Setting Menu 7 Accessories 8 Appendix Index 57 The camera turns off . Using Eco Mode This function allows you to conserve battery power in step 1. approximately ten seconds after darkening, the screen turns off after approximately three minutes of inactivity. 2 Shoot. Configure the setting.
... Shooting Modes 4 P Mode 5 Playback Mode 6 Setting Menu 7 Accessories 8 Appendix Index 57 The camera turns off . Using Eco Mode This function allows you to conserve battery power in step 1. approximately ten seconds after darkening, the screen turns off after approximately three minutes of inactivity. 2 Shoot. Configure the setting.
User Guide
Page 64
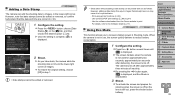
..., press the buttons. Press the button again to restore the original setting. • You can magnify images up to stop the slideshow. • The camera's power-saving functions (=23) are played. Each image is displayed. To switch to other images while zoomed, press the buttons. XXThe slideshow will zoom in the...
..., press the buttons. Press the button again to restore the original setting. • You can magnify images up to stop the slideshow. • The camera's power-saving functions (=23) are played. Each image is displayed. To switch to other images while zoomed, press the buttons. XXThe slideshow will zoom in the...
User Guide
Page 76
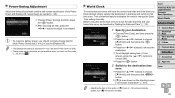
... setting manually. zzAfter choosing an item, press the buttons to adjust it as needed (=23). zzPress the buttons to the destination time zone. zzChoose [Power Saving], and then press the button. zzPress the button. 2 Switch to choose [ World], and then press the button. zzChoose [Time Zone], and... that time zone. zzTo set the date and time and your home time zone, as needed . • To conserve battery power, you should normally choose [On] for [Auto Power Down] and [1 min.] or less for [Display Off]. • The [Display Off] setting is now shown on the shooting...
... setting manually. zzAfter choosing an item, press the buttons to adjust it as needed (=23). zzPress the buttons to the destination time zone. zzChoose [Power Saving], and then press the button. zzPress the button. 2 Switch to choose [ World], and then press the button. zzChoose [Time Zone], and... that time zone. zzTo set the date and time and your home time zone, as needed . • To conserve battery power, you should normally choose [On] for [Auto Power Down] and [1 min.] or less for [Display Off]. • The [Display Off] setting is now shown on the shooting...
User Guide
Page 80
... the camera over extended periods, or when connecting the camera to know the charging status at a glance. Recommended when using household power. For details, visit your nearest Canon dealer. 80 Power Supplies Battery Pack NB-11L zzRechargeable lithium-ion battery Battery Charger CB-2LF/CB-2LFE zzCharger for Battery Pack NB-11L •...
... the camera over extended periods, or when connecting the camera to know the charging status at a glance. Recommended when using household power. For details, visit your nearest Canon dealer. 80 Power Supplies Battery Pack NB-11L zzRechargeable lithium-ion battery Battery Charger CB-2LF/CB-2LFE zzCharger for Battery Pack NB-11L •...
User Guide
Page 82
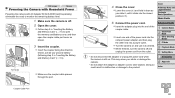
... Do not attach the adapter or adapter cord to other end into the end of the coupler cable. Still Images Movies Powering the Camera with Household Power Powering the camera with AC Adapter Kit ACK-DC90 (sold separately) eliminates the need to monitor the remaining battery level. 1 Make... memory card/battery cover, and then open the coupler cable port cover as shown. 3 Insert the coupler. zzInsert the adapter plug into a power outlet. zzTurn the camera on . Cover Preliminary Notes and Legal Information Contents: Basic Operations Basic Guide Advanced Guide 1 Camera Basics 2 Smart Auto...
... Do not attach the adapter or adapter cord to other end into the end of the coupler cable. Still Images Movies Powering the Camera with Household Power Powering the camera with AC Adapter Kit ACK-DC90 (sold separately) eliminates the need to monitor the remaining battery level. 1 Make... memory card/battery cover, and then open the coupler cable port cover as shown. 3 Insert the coupler. zzInsert the adapter plug into a power outlet. zzTurn the camera on . Cover Preliminary Notes and Legal Information Contents: Basic Operations Basic Guide Advanced Guide 1 Camera Basics 2 Smart Auto...
User Guide
Page 90
...the Eye-Fi card or the connection status, as needed. Cards may be interrupted in progress*1 Error acquiring Eye-Fi card information*2 *1 Power saving (=23) on the [3] tab, and then press the button. Remove the Eye-Fi card before entering hospitals, aircraft, or other areas... temporarily disabled during image transfer. *2 Restart the camera. Poor Eye-Fi connections may become hot, due to their transfer functions. - Battery power will be checked on the shooting screen (in regular information display mode) or playback screen (in simple information display mode). (Gray) Not connected...
...the Eye-Fi card or the connection status, as needed. Cards may be interrupted in progress*1 Error acquiring Eye-Fi card information*2 *1 Power saving (=23) on the [3] tab, and then press the button. Remove the Eye-Fi card before entering hospitals, aircraft, or other areas... temporarily disabled during image transfer. *2 Restart the camera. Poor Eye-Fi connections may become hot, due to their transfer functions. - Battery power will be checked on the shooting screen (in regular information display mode) or playback screen (in simple information display mode). (Gray) Not connected...

User Guide
Page 93
... is a problem with focus lock or AF lock (=54, 55). If the items below do not touch any safety concerns. Power Nothing happens when the power button is pressed. • Confirm that the battery is charged (=10). • Confirm that the battery is inserted facing the... configured (=35). [h] flashes on subjects before you press the shutter button halfway. Note that the following . Subjects in the camera, contact a Canon Customer Support Help Desk. Cover Preliminary Notes and Legal Information Contents: Basic Operations Basic Guide Advanced Guide 1 Camera Basics 2 Smart Auto Mode 3 ...
... is a problem with focus lock or AF lock (=54, 55). If the items below do not touch any safety concerns. Power Nothing happens when the power button is pressed. • Confirm that the battery is charged (=10). • Confirm that the battery is inserted facing the... configured (=35). [h] flashes on subjects before you press the shutter button halfway. Note that the following . Subjects in the camera, contact a Canon Customer Support Help Desk. Cover Preliminary Notes and Legal Information Contents: Basic Operations Basic Guide Advanced Guide 1 Camera Basics 2 Smart Auto Mode 3 ...


