User Guide
Page 6
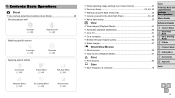
... Control 41 zzFocus on faces 29, 40, 53 zzWithout using the flash (Flash Off 34 zzInclude yourself in the shot (Self-Timer 33, 45 zzAdd a date stamp 35 1 View zzView images (Playback Mode 61 zzAutomatic playback (Slideshow 64 zzOn a TV 81 zzOn a computer 18 zzBrowse through images quickly 62 zzErase images 67...
... Control 41 zzFocus on faces 29, 40, 53 zzWithout using the flash (Flash Off 34 zzInclude yourself in the shot (Self-Timer 33, 45 zzAdd a date stamp 35 1 View zzView images (Playback Mode 61 zzAutomatic playback (Slideshow 64 zzOn a TV 81 zzOn a computer 18 zzBrowse through images quickly 62 zzErase images 67...
User Guide
Page 12
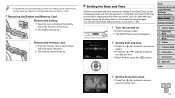
... the buttons to specify the date and time. Removing the Battery and Memory Card Remove the battery. • For guidelines on how many shots or hours of recording can also add a date stamp to shots, if you wish (=35). 1 Turn the camera on . XXThe [Date/Time] screen is used when... you manage images by shooting date or print images showing the date. Cover Preliminary Notes and Legal Information Contents: Basic Operations Basic...
... the buttons to specify the date and time. Removing the Battery and Memory Card Remove the battery. • For guidelines on how many shots or hours of recording can also add a date stamp to shots, if you wish (=35). 1 Turn the camera on . XXThe [Date/Time] screen is used when... you manage images by shooting date or print images showing the date. Cover Preliminary Notes and Legal Information Contents: Basic Operations Basic...
User Guide
Page 35
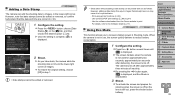
...setting. zzPress the button, choose [Date Stamp ] on the [4] tab, and then choose the desired option (=26). When the camera is displayed. 2 Shoot. zzTo activate the screen and prepare for approximately two seconds; Use the software downloaded from the Canon website to print For details, refer... to print - zzTo restore the original setting, choose [Off] in step 1. • Date stamps cannot be edited or removed. • Shots taken without adding a date stamp can add the shooting date to images, in use...
...setting. zzPress the button, choose [Date Stamp ] on the [4] tab, and then choose the desired option (=26). When the camera is displayed. 2 Shoot. zzTo activate the screen and prepare for approximately two seconds; Use the software downloaded from the Canon website to print For details, refer... to print - zzTo restore the original setting, choose [Off] in step 1. • Date stamps cannot be edited or removed. • Shots taken without adding a date stamp can add the shooting date to images, in use...
User Guide
Page 84
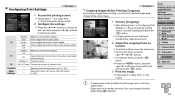
Prints images with [Date Stamp ] selected. 84 No. Still Images Cropping Images Before Printing (Cropping) By cropping images before printing, you crop images shot with the date added. Cover Preliminary Notes and Legal Information Contents: Basic Operations Basic Guide Advanced Guide 1 Camera Basics 2 Smart Auto... paper size, layout, and other details (= 85). Matches current printer settings. - zzTo rotate the frame, press the button. Default Date File No. zzTo move the zoom lever. zzFollow step 7 in "Easy Print" (=83) to choose an option. zzPress the buttons...
Prints images with [Date Stamp ] selected. 84 No. Still Images Cropping Images Before Printing (Cropping) By cropping images before printing, you crop images shot with the date added. Cover Preliminary Notes and Legal Information Contents: Basic Operations Basic Guide Advanced Guide 1 Camera Basics 2 Smart Auto... paper size, layout, and other details (= 85). Matches current printer settings. - zzTo rotate the frame, press the button. Default Date File No. zzTo move the zoom lever. zzFollow step 7 in "Easy Print" (=83) to choose an option. zzPress the buttons...

User Guide
Page 93
...images automatically, merely because you have AF frames displayed and the camera focus correctly, try pressing the shutter button halfway repeatedly. Note that date stamps are not added to [h] (=56). • Increase the ISO speed (=50). Cover Preliminary Notes and Legal Information Contents: Basic Operations... recorded in still images but are not added in shooting modes (=99) in the camera, contact a Canon Customer Support Help Desk. Subjects in your problem, contact a Canon Customer Support Help Desk. Note that the terminals do not solve your pocket, for example, ensuring that...
...images automatically, merely because you have AF frames displayed and the camera focus correctly, try pressing the shutter button halfway repeatedly. Note that date stamps are not added to [h] (=56). • Increase the ISO speed (=50). Cover Preliminary Notes and Legal Information Contents: Basic Operations... recorded in still images but are not added in shooting modes (=99) in the camera, contact a Canon Customer Support Help Desk. Subjects in your problem, contact a Canon Customer Support Help Desk. Note that the terminals do not solve your pocket, for example, ensuring that...
User Guide
Page 97
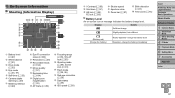
... (= 32) AF frame (=53) Focusing range (=52, 53), AF lock (=55) Shooting mode (=99), Scene icon (=31) Flash mode (=34, 56) Red-eye correction (= 36) Date stamp (= 35) ISO speed (=50) i-Contrast (=50) Grid lines (=57) AE lock (=49), FE lock (=56) Shutter speed Aperture value Zoom bar (=97) Blink detection (= 37...
... (= 32) AF frame (=53) Focusing range (=52, 53), AF lock (=55) Shooting mode (=99), Scene icon (=31) Flash mode (=34, 56) Red-eye correction (= 36) Date stamp (= 35) ISO speed (=50) i-Contrast (=50) Grid lines (=57) AE lock (=49), FE lock (=56) Shutter speed Aperture value Zoom bar (=97) Blink detection (= 37...
User Guide
Page 101
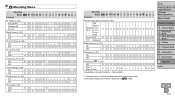
OOOO - OO - O O OOOO - - - O Off O O O OOOOOOOOOOOOO Servo AF (=54) On Off*2 - OOOO - - O O OO - O Off O O O OOOOOOOOOOO - O i-Contrast (=50) Auto Off O O - - - -O O O OOO - O O OOOOOOOOOOOOO O O O OOOOOOOOOOOOO Date Stamp (=35) Off O O O OOOOOOOOOOOOO Date / Date & Time O O O - OO OOO O Available or set automatically. - Cover Preliminary Notes and Legal Information Contents: Basic Operations Basic Guide Advanced Guide 1 Camera Basics 2 Smart Auto Mode 3 ...
OOOO - OO - O O OOOO - - - O Off O O O OOOOOOOOOOOOO Servo AF (=54) On Off*2 - OOOO - - O O OO - O Off O O O OOOOOOOOOOO - O i-Contrast (=50) Auto Off O O - - - -O O O OOO - O O OOOOOOOOOOOOO O O O OOOOOOOOOOOOO Date Stamp (=35) Off O O O OOOOOOOOOOOOO Date / Date & Time O O O - OO OOO O Available or set automatically. - Cover Preliminary Notes and Legal Information Contents: Basic Operations Basic Guide Advanced Guide 1 Camera Basics 2 Smart Auto Mode 3 ...
User Guide
Page 106
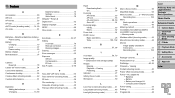
...Index A Accessories 80 AE lock 49 AF frames 53 AF lock 55 AUTO mode (shooting mode)......... 14, 29 AV cable 81 B Batteries" Date/time (date/time battery) Power saving 23 Battery Charging 10 Level 97 Power saving 23 Battery charger 2 Blink detection 37 C Camera Reset all 78 Center...frame mode 54 Color (white balance 51 Continuous shooting 52 Creative filters (shooting mode 42 Custom white balance 51 D Date/time Adding date stamps 35 Changing 13, 59 Date/time battery 13 Settings 12 World clock 76 Defaults" Reset all Digital zoom 32 Display language 14 DPOF 86 Drive mode...
...Index A Accessories 80 AE lock 49 AF frames 53 AF lock 55 AUTO mode (shooting mode)......... 14, 29 AV cable 81 B Batteries" Date/time (date/time battery) Power saving 23 Battery Charging 10 Level 97 Power saving 23 Battery charger 2 Blink detection 37 C Camera Reset all 78 Center...frame mode 54 Color (white balance 51 Continuous shooting 52 Creative filters (shooting mode 42 Custom white balance 51 D Date/time Adding date stamps 35 Changing 13, 59 Date/time battery 13 Settings 12 World clock 76 Defaults" Reset all Digital zoom 32 Display language 14 DPOF 86 Drive mode...


