iP8500 Quick Start Guide
Page 5
... for Photographs 29 Using the Bundled Software 37 Printing Borderless Photographs 38 Printing Maintenance Replacing an Ink Tank 42 When Printing Becomes Faint or Colors are Incorrect 48 Printing the Nozzle Check Pattern 49 Print Head Cleaning 53 Print Head Deep Cleaning 57 Aligning the Print Head 61 Troubleshooting Cannot Install the Printer Driver 66 The USB 2.0 Hi-speed Connection Does...
... for Photographs 29 Using the Bundled Software 37 Printing Borderless Photographs 38 Printing Maintenance Replacing an Ink Tank 42 When Printing Becomes Faint or Colors are Incorrect 48 Printing the Nozzle Check Pattern 49 Print Head Cleaning 53 Print Head Deep Cleaning 57 Aligning the Print Head 61 Troubleshooting Cannot Install the Printer Driver 66 The USB 2.0 Hi-speed Connection Does...

iP8500 Quick Start Guide
Page 51
...ink tank within six months of its first use. Color ink is now complete. Printing Maintenance (1) Insert the ink tank into place. 6 Close the Inner Cover and the Top Cover. The ink tank installation process is consumed in the open . z Ensure that the Inner Cover is ... specified. The POWER lamp flashes during cleaning. 47 z When you start printing after replacing the ink tank, the printer executes Print Head Cleaning automatically. The Print Head Holder moves to maintain the printer's capabilities. Printing will cause the ink tank to dry out and the printer may occur ...
...ink tank within six months of its first use. Color ink is now complete. Printing Maintenance (1) Insert the ink tank into place. 6 Close the Inner Cover and the Top Cover. The ink tank installation process is consumed in the open . z Ensure that the Inner Cover is ... specified. The POWER lamp flashes during cleaning. 47 z When you start printing after replacing the ink tank, the printer executes Print Head Cleaning automatically. The Print Head Holder moves to maintain the printer's capabilities. Printing will cause the ink tank to dry out and the printer may occur ...

iP8500 Quick Start Guide
Page 52
.... z If the ruled lines are shifted Step 1 See "Aligning the Print Head" on page 53 After print head cleaning, print the nozzle check pattern. Before printing the nozzle check pattern or cleaning the Print Head, check the following; z Ensure that the ink tank is installed securely. Step 1 See "Printing the Nozzle Check Pattern" on page 49 Step 2 If white stripes...
.... z If the ruled lines are shifted Step 1 See "Aligning the Print Head" on page 53 After print head cleaning, print the nozzle check pattern. Before printing the nozzle check pattern or cleaning the Print Head, check the following; z Ensure that the ink tank is installed securely. Step 1 See "Printing the Nozzle Check Pattern" on page 49 Step 2 If white stripes...
iP8500 Quick Start Guide
Page 55
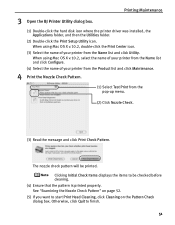
...(3) Read the message and click Print Check Pattern. Clicking Initial Check Items displays the items to be printed. See "Examining the Nozzle Check Pattern" on the Pattern Check dialog box. Otherwise, click Quit to start Print Head Cleaning, click Cleaning on page ...52. (5) If you want to finish. 51 3 Open the BJ Printer Utility dialog box. The nozzle check pattern will be checked before cleaning. (4) Ensure that the pattern is printed properly. Printing Maintenance (1) Double-click the hard disk icon where the printer driver was installed...
...(3) Read the message and click Print Check Pattern. Clicking Initial Check Items displays the items to be printed. See "Examining the Nozzle Check Pattern" on the Pattern Check dialog box. Otherwise, click Quit to start Print Head Cleaning, click Cleaning on page ...52. (5) If you want to finish. 51 3 Open the BJ Printer Utility dialog box. The nozzle check pattern will be checked before cleaning. (4) Ensure that the pattern is printed properly. Printing Maintenance (1) Double-click the hard disk icon where the printer driver was installed...
iP8500 Quick Start Guide
Page 59
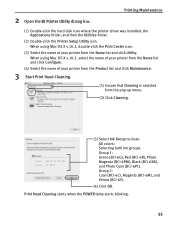
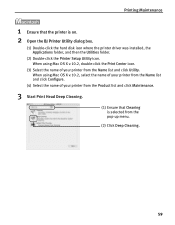
... your printer from the Name list and click Configure. (4) Select the name of your printer from the Product list and click Maintenance. 3 Start Print Head Cleaning. (1) Ensure that Cleaning is selected from the Name list and click Utility. Group 1: Green (BCI-6G), Red (BCI-6R), Photo...-up menu. (2) Click Cleaning. (3) Select Ink Group to clean. 2 Open the BJ Printer Utility dialog box. Printing Maintenance (1) Double-click the hard disk icon where the printer driver was installed, the Applications folder, and then the Utilities folder. (2) Double-click the Printer Setup Utility icon.
... your printer from the Name list and click Configure. (4) Select the name of your printer from the Product list and click Maintenance. 3 Start Print Head Cleaning. (1) Ensure that Cleaning is selected from the Name list and click Utility. Group 1: Green (BCI-6G), Red (BCI-6R), Photo...-up menu. (2) Click Cleaning. (3) Select Ink Group to clean. 2 Open the BJ Printer Utility dialog box. Printing Maintenance (1) Double-click the hard disk icon where the printer driver was installed, the Applications folder, and then the Utilities folder. (2) Double-click the Printer Setup Utility icon.
iP8500 Quick Start Guide
Page 63
... from the Name list and click Configure. (4) Select the name of your printer from the Product list and click Maintenance. 3 Start Print Head Deep Cleaning. (1) Ensure that the printer is selected from the Name list and click Utility. When using Mac OS X v.10.2, double-click the...your printer from the pop-up menu. (2) Click Deep Cleaning. 59 Printing Maintenance 1 Ensure that Cleaning is on. 2 Open the BJ Printer Utility dialog box. (1) Double-click the hard disk icon where the printer driver was installed, the Applications folder, and then the Utilities folder. (2) Double-click the...
... from the Name list and click Configure. (4) Select the name of your printer from the Product list and click Maintenance. 3 Start Print Head Deep Cleaning. (1) Ensure that the printer is selected from the Name list and click Utility. When using Mac OS X v.10.2, double-click the...your printer from the pop-up menu. (2) Click Deep Cleaning. 59 Printing Maintenance 1 Ensure that Cleaning is on. 2 Open the BJ Printer Utility dialog box. (1) Double-click the hard disk icon where the printer driver was installed, the Applications folder, and then the Utilities folder. (2) Double-click the...

iP8500 Quick Start Guide
Page 66
... not satisfactory, refer to "Eleven flashes" in "Routine Maintenance" of Automatic Print Head Alignment are correctly installed. The printer is still not printed successfully, refer to "Aligning the Print Head" in "Handling Error Messages" on page 76. Clicking Check Setting prints the current settings and finishes the print head alignment. 4 If a message warning you not to use. z If the...
... not satisfactory, refer to "Eleven flashes" in "Routine Maintenance" of Automatic Print Head Alignment are correctly installed. The printer is still not printed successfully, refer to "Aligning the Print Head" in "Handling Error Messages" on page 76. Clicking Check Setting prints the current settings and finishes the print head alignment. 4 If a message warning you not to use. z If the...

iP8500 Quick Start Guide
Page 67
... Configure. (4) Select the name of your printer from the pop-up menu. (2) Click Print Head Alignment. (3) Read the message and click Print Head Alignment. It takes about 90 seconds to use. 63 Printing Maintenance 1 With the printer on, load a sheet of your printer from the Product list...Print Head is now ready to start printing. When using Mac OS X v.10.2, double-click the Print Center icon. (3) Select the name of Letter-sized plain paper in the Sheet Feeder. 2 Open the BJ Printer Utility dialog box. (1) Double-click the hard disk icon where the printer driver was installed...
... Configure. (4) Select the name of your printer from the pop-up menu. (2) Click Print Head Alignment. (3) Read the message and click Print Head Alignment. It takes about 90 seconds to use. 63 Printing Maintenance 1 With the printer on, load a sheet of your printer from the Product list...Print Head is now ready to start printing. When using Mac OS X v.10.2, double-click the Print Center icon. (3) Select the name of Letter-sized plain paper in the Sheet Feeder. 2 Open the BJ Printer Utility dialog box. (1) Double-click the hard disk icon where the printer driver was installed...

iP8500 Quick Start Guide
Page 68
z If the pattern is not printed successfully, open the Top Cover and Inner Cover, and ensure that the ink tanks are not satisfactory, refer to "Eleven flashes" in "Routine Maintenance" of Automatic Print Head Alignment are correctly installed. z If results of the User's Guide and align the Print Head manually. 64 Printing Maintenance z If the pattern is still not printed successfully, refer to "Aligning the Print Head" in "Handling Error Messages" on page 76.
z If the pattern is not printed successfully, open the Top Cover and Inner Cover, and ensure that the ink tanks are not satisfactory, refer to "Eleven flashes" in "Routine Maintenance" of Automatic Print Head Alignment are correctly installed. z If results of the User's Guide and align the Print Head manually. 64 Printing Maintenance z If the pattern is still not printed successfully, refer to "Aligning the Print Head" in "Handling Error Messages" on page 76.

iP8500 Quick Start Guide
Page 72
... tanks are firmly seated in (1). Open the Print dialog box. 2. See "Print Head Cleaning" on page 61. Select Other Photo Paper from the pop-up menu and then click Detailed Setting. 3. Check that the correct ink tanks are installed and that the Media Type selected matches the paper...bar for uneven ink output. Open the printer properties dialog box. 2. Print Head is misaligned Align the Print Head. Select Quality & Media from Media Type. Glossy photo paper other than the Canon specialty media is used In the Print dialog box of the printer driver, select Quality & Media from the ...
... tanks are firmly seated in (1). Open the Print dialog box. 2. See "Print Head Cleaning" on page 61. Select Other Photo Paper from the pop-up menu and then click Detailed Setting. 3. Check that the correct ink tanks are installed and that the Media Type selected matches the paper...bar for uneven ink output. Open the printer properties dialog box. 2. Print Head is misaligned Align the Print Head. Select Quality & Media from Media Type. Glossy photo paper other than the Canon specialty media is used In the Print dialog box of the printer driver, select Quality & Media from the ...
iP8500 Quick Start Guide
Page 80
not feed Paper jam/Paper Output Tray is open it. See "Replacing an Ink Tank" on page 73. Print Head not installed/Print Head not installed correctly/Defective Print Head Install the Print Head. Inner Cover is closed , open Close the Inner Cover and press the RESUME/CANCEL button. See "Paper Jams" on page 42. It may damage the ...
not feed Paper jam/Paper Output Tray is open it. See "Replacing an Ink Tank" on page 73. Print Head not installed/Print Head not installed correctly/Defective Print Head Install the Print Head. Inner Cover is closed , open Close the Inner Cover and press the RESUME/CANCEL button. See "Paper Jams" on page 42. It may damage the ...

iP8500 Quick Start Guide
Page 81
... to a darker location. Press the RESUME/CANCEL button and move the printer to a strong light source preventing correct Print Head alignment. Try to print a nozzle check pattern. If the problem remains, contact the Customer Care Center. 77 For detailed information on the ...of the next paper. If the print head alignment fails again, manually align the Print Head. See "Ink tank is not seated properly/Ink tank is low z Print Head nozzles are not installed correctly. z Ink level is empty" on how to align the Print Head again. See "Printing the Nozzle Check Pattern" on page...
... to a darker location. Press the RESUME/CANCEL button and move the printer to a strong light source preventing correct Print Head alignment. Try to print a nozzle check pattern. If the problem remains, contact the Customer Care Center. 77 For detailed information on the ...of the next paper. If the print head alignment fails again, manually align the Print Head. See "Ink tank is not seated properly/Ink tank is low z Print Head nozzles are not installed correctly. z Ink level is empty" on how to align the Print Head again. See "Printing the Nozzle Check Pattern" on page...
iP8500 Quick Start Guide
Page 85
...orange and green). If the Print Head has already been installed, remove it to stop printing. Contact the Customer Care Center. It may damage the printer if you can press the RESUME/CANCEL button on the printer flashes five times.) Install a Print Head according to the Easy Setup ...Instructions. If the same error occurs, contact the Customer Care Center. * To resume printing, you continue printing with a new one The printer has a built-in the display...
...orange and green). If the Print Head has already been installed, remove it to stop printing. Contact the Customer Care Center. It may damage the printer if you can press the RESUME/CANCEL button on the printer flashes five times.) Install a Print Head according to the Easy Setup ...Instructions. If the same error occurs, contact the Customer Care Center. * To resume printing, you continue printing with a new one The printer has a built-in the display...
iP8500 Quick Start Guide
Page 89
... Guide Table of the Printer Transporting Printer Troubleshooting Cannot Install Printer Driver The USB 2.0 Hi-Speed Connection Does Not Work Properly Print Quality is Poor Printer Does Not Start or Stops During Print Jobs Paper Does Not Feed Properly Paper Jams The ...(Windows) Printer Setup Utility (Macintosh) Routine Maintenance Replacing an Ink Tank When Printing Becomes Faint or Colors are Incorrect Printing the Nozzle Check Pattern Print Head Cleaning Print Head Deep Cleaning Aligning the Print Head Cleaning the Inside of Contents Your printer's electronic User's Guide, located on the...
... Guide Table of the Printer Transporting Printer Troubleshooting Cannot Install Printer Driver The USB 2.0 Hi-Speed Connection Does Not Work Properly Print Quality is Poor Printer Does Not Start or Stops During Print Jobs Paper Does Not Feed Properly Paper Jams The ...(Windows) Printer Setup Utility (Macintosh) Routine Maintenance Replacing an Ink Tank When Printing Becomes Faint or Colors are Incorrect Printing the Nozzle Check Pattern Print Head Cleaning Print Head Deep Cleaning Aligning the Print Head Cleaning the Inside of Contents Your printer's electronic User's Guide, located on the...

iP8500 Quick Start Guide
Page 95
... or containers of these safety precautions. If a child ingests any of flammable solvents (alcohol, thinners, etc.) on a Print Head after printing. To avoid the risk of fire or electric shocks, install the printer in the printer while it is kept clear at all times so you ignore any ink, consult a doctor...in a location with its back attached to 90% (condensation free). Do not shake Print Heads or ink tanks. The metal parts may be very hot and could cause burns. 91 Choosing a location Do not install the printer in a location that are very humid or dusty, in locations that is...
... or containers of these safety precautions. If a child ingests any of flammable solvents (alcohol, thinners, etc.) on a Print Head after printing. To avoid the risk of fire or electric shocks, install the printer in the printer while it is kept clear at all times so you ignore any ink, consult a doctor...in a location with its back attached to 90% (condensation free). Do not shake Print Heads or ink tanks. The metal parts may be very hot and could cause burns. 91 Choosing a location Do not install the printer in a location that are very humid or dusty, in locations that is...
iP8500 Quick Start Guide
Page 99
... 14 I Installing the Printer Driver when Using Mac OS 9 ........ 83 L Load Limit Mark 6, 9 Loading Paper 3 Loading Paper in the Cassette 7 Loading Paper in the Sheet Feeder 5 M Matte Photo Paper 14 Media specialty 13 to avoid 3 Media Type 14, 16, 19 Media Types Suitable for Photographs 29 Advanced Printing 22 Aligning the Print Head 61...
... 14 I Installing the Printer Driver when Using Mac OS 9 ........ 83 L Load Limit Mark 6, 9 Loading Paper 3 Loading Paper in the Cassette 7 Loading Paper in the Sheet Feeder 5 M Matte Photo Paper 14 Media specialty 13 to avoid 3 Media Type 14, 16, 19 Media Types Suitable for Photographs 29 Advanced Printing 22 Aligning the Print Head 61...
iP8500 Easy Setup Instructions
Page 1
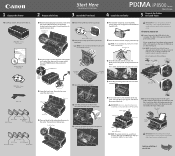
...Feeder (top paper feeder). Inner Cover Top Cover 4 Slide the print head into their assigned slots. PIXMA iP8500 Series Photo Printer Photo Printer Series Quick Start Guide Documentation and Software Kit PIXMA iP8500 Series Print Head Power Cord Ink Tanks BCI-6R Red BCI-6G Green BCI-6PM... the POWER button. Otherwise, use the top port. 1 Unpack the Printer 2 Prepare the Printer Start Here Easy Setup Instructions 3 Install the Print Head 4 Install the Ink Tanks Series Photo Printer 5 Connect the Printer and Load Paper 1 Carefully remove all shipping tape and clear plastic from the...
...Feeder (top paper feeder). Inner Cover Top Cover 4 Slide the print head into their assigned slots. PIXMA iP8500 Series Photo Printer Photo Printer Series Quick Start Guide Documentation and Software Kit PIXMA iP8500 Series Print Head Power Cord Ink Tanks BCI-6R Red BCI-6G Green BCI-6PM... the POWER button. Otherwise, use the top port. 1 Unpack the Printer 2 Prepare the Printer Start Here Easy Setup Instructions 3 Install the Print Head 4 Install the Ink Tanks Series Photo Printer 5 Connect the Printer and Load Paper 1 Carefully remove all shipping tape and clear plastic from the...

iP8500 Easy Setup Instructions
Page 2
... 3 Double-click the PIXMA iP8500 300.pkg icon, then follow on as a member of the cassette. The software will take several minutes to complete. 8 When the "Installation completed successfully" screen appears, click Exit. NOTE: Log on -screen instructions. NOTE: Print head alignment will begin identifying ... to the edges of the cassette. QA7-3316-V01 © 2004 Canon Inc. Macintosh NOTE: For Mac OS 9.x printer driver instructions, refer to register your CD-ROM again. NOTE: Print head alignment will extend beyond the bottom of the cassette will take several minutes...
... 3 Double-click the PIXMA iP8500 300.pkg icon, then follow on as a member of the cassette. The software will take several minutes to complete. 8 When the "Installation completed successfully" screen appears, click Exit. NOTE: Log on -screen instructions. NOTE: Print head alignment will begin identifying ... to the edges of the cassette. QA7-3316-V01 © 2004 Canon Inc. Macintosh NOTE: For Mac OS 9.x printer driver instructions, refer to register your CD-ROM again. NOTE: Print head alignment will extend beyond the bottom of the cassette will take several minutes...


