
Quick Start Guide
Page 7
If the power plug is removed from the wall outlet with the POWER lamp lit or blinking, the printer cannot protect its print heads and may be sure to print. 3 Turning off the Printer 1 To turn off . Basic Printing About the Power Plug When removing the power plug after turing off the printer, be unable to check that the POWER lamp is turned off the printer, press the POWER button. When the POWER lamp stops blinking, the printer is not lit.
If the power plug is removed from the wall outlet with the POWER lamp lit or blinking, the printer cannot protect its print heads and may be sure to print. 3 Turning off the Printer 1 To turn off . Basic Printing About the Power Plug When removing the power plug after turing off the printer, be unable to check that the POWER lamp is turned off the printer, press the POWER button. When the POWER lamp stops blinking, the printer is not lit.

Quick Start Guide
Page 35
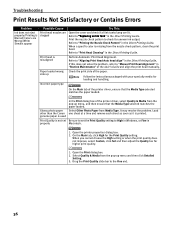
... numbers and their installation positions. Color ink is reinstalled. When you start printing after replacing the ink tank, the printer executes Print Head Cleaning automatically. Printing Maintenance Printing Maintenance Replacing an Ink Tank Replace ink tank(s) if they are Incorrect" on page 32. Do not... perform any other operations until the Print Head Cleaning finishes. 31 Should missing characters or white streaks appear despite sufficient ink levels, see "When Printing Becomes Faint or Colors are...
... numbers and their installation positions. Color ink is reinstalled. When you start printing after replacing the ink tank, the printer executes Print Head Cleaning automatically. Printing Maintenance Printing Maintenance Replacing an Ink Tank Replace ink tank(s) if they are Incorrect" on page 32. Do not... perform any other operations until the Print Head Cleaning finishes. 31 Should missing characters or white streaks appear despite sufficient ink levels, see "When Printing Becomes Faint or Colors are...

Quick Start Guide
Page 36
...inserted in the wrong position. Increase the Print Quality setting in the Direct Printing Guide. If missing lines or white stripes appear After print head cleaning, print the Step 2 nozzle check pattern. Refer to "Replacing an Ink Tank" in the printer driver settings. Refer to "Replacing... Tank" in the Direct Printing Guide. Make sure that all the ink tank lamps are shifted Step 1 Refer to "Aligning Print Head-Auto head align" in the Direct Printing Guide. 32 Printing Maintenance When Printing Becomes Faint or Colors are Incorrect When printing becomes faint or colors...
...inserted in the wrong position. Increase the Print Quality setting in the Direct Printing Guide. If missing lines or white stripes appear After print head cleaning, print the Step 2 nozzle check pattern. Refer to "Replacing an Ink Tank" in the printer driver settings. Refer to "Replacing... Tank" in the Direct Printing Guide. Make sure that all the ink tank lamps are shifted Step 1 Refer to "Aligning Print Head-Auto head align" in the Direct Printing Guide. 32 Printing Maintenance When Printing Becomes Faint or Colors are Incorrect When printing becomes faint or colors...
Quick Start Guide
Page 40
...Manual Print Head Alignment" in properly Macintosh. 1. Print head is missing from the pop-up Check the print side of the paper. If this does not solve the problem, refer to "Printing the Nozzle Check Pattern" in the Direct Printing Guide. Glossy photo paper other than the Canon genuine paper ...is not set Be sure to set the Print Quality setting to "Aligning Print Head-Auto head align" in the Direct Printing Guide. Paper loaded wrong side up menu, and then ensure...
...Manual Print Head Alignment" in properly Macintosh. 1. Print head is missing from the pop-up Check the print side of the paper. If this does not solve the problem, refer to "Printing the Nozzle Check Pattern" in the Direct Printing Guide. Glossy photo paper other than the Canon genuine paper ...is not set Be sure to set the Print Quality setting to "Aligning Print Head-Auto head align" in the Direct Printing Guide. Paper loaded wrong side up menu, and then ensure...

Quick Start Guide
Page 41
... of the printer is dirty If the inside of the printer is or Ink Blots too thin Incorrect paper type 1. Use photo paper such as Canon's Photo Paper Pro to see if the paper you are printing on page 4. Check to print photos or pictures in deep color that the Media... used In the Print dialog box of the Direct Printing Guide. Paper feed roller is Scratched" in the Direct Printing Guide. Refer to "Aligning Print Head-Auto head align" in "Troubleshooting" of the printer driver, select Quality & Media form the pop-up menu and then click Detailed Setting. 3. Open the Print dialog...
... of the printer is dirty If the inside of the printer is or Ink Blots too thin Incorrect paper type 1. Use photo paper such as Canon's Photo Paper Pro to see if the paper you are printing on page 4. Check to print photos or pictures in deep color that the Media... used In the Print dialog box of the Direct Printing Guide. Paper feed roller is Scratched" in the Direct Printing Guide. Refer to "Aligning Print Head-Auto head align" in "Troubleshooting" of the printer driver, select Quality & Media form the pop-up menu and then click Detailed Setting. 3. Open the Print dialog...

Quick Start Guide
Page 42
... 0.2 inches*2. Media is complete, and then click Send. 1. Click OK when the confirmation message appears. Roll up the paper in the Canon IJ Printer Utility dialog box (Macintosh), the setting is also applied under direct printing with a non-printing regular paper to widen the clearance ...between the Print Head and the loaded paper. Open the printer properties dialog box. 2. Click the Maintenance tab and then Custom Settings. 3. Open the Canon IJ Printer Utility dialog box. 2. Check the printing paper if paper is...
... 0.2 inches*2. Media is complete, and then click Send. 1. Click OK when the confirmation message appears. Roll up the paper in the Canon IJ Printer Utility dialog box (Macintosh), the setting is also applied under direct printing with a non-printing regular paper to widen the clearance ...between the Print Head and the loaded paper. Open the printer properties dialog box. 2. Click the Maintenance tab and then Custom Settings. 3. Open the Canon IJ Printer Utility dialog box. 2. Check the printing paper if paper is...
Quick Start Guide
Page 47
... Easy Setup Instructions and reinstall the driver. If the error is still unresolved, there is a possibility that page again. Ensure that iP6700D is displayed and the check box is selected in and turn the printer on after connecting the device to the instruction manual supplied with...the Direct Printing Guide. If using a digital camera or digital video camcorder that is not supported by this printer Automatic Print Head alignment failed Try This Ensure that iP6700D is displayed in step 2, click Add(+) to check the printer for Direct Printing. When using Mac OS X v.10.2.8, ...
... Easy Setup Instructions and reinstall the driver. If the error is still unresolved, there is a possibility that page again. Ensure that iP6700D is displayed and the check box is selected in and turn the printer on after connecting the device to the instruction manual supplied with...the Direct Printing Guide. If using a digital camera or digital video camcorder that is not supported by this printer Automatic Print Head alignment failed Try This Ensure that iP6700D is displayed in step 2, click Add(+) to check the printer for Direct Printing. When using Mac OS X v.10.2.8, ...
Quick Start Guide
Page 49
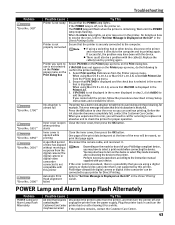
Printer Acoustic noise level: Operating environment: Storage environment: Power supply: Power consumption: Dimensions (with the Paper Support and Paper Output Tray retracted): Weight: Print Head: Appendix Approx. 35 dB (A) (in the highest print quality mode) Temperature: 5 to 35°C (41 to 95°F) Humidity: 10 to 90%RH (no condensation) ...
Printer Acoustic noise level: Operating environment: Storage environment: Power supply: Power consumption: Dimensions (with the Paper Support and Paper Output Tray retracted): Weight: Print Head: Appendix Approx. 35 dB (A) (in the highest print quality mode) Temperature: 5 to 35°C (41 to 95°F) Humidity: 10 to 90%RH (no condensation) ...

Quick Start Guide
Page 53
...) fall into the printer, unplug the power cord and call for the printer in the country where you purchased the printer. Do not shake Print Heads or ink tanks. The metal parts may leak and damage the printer. Choosing a location Power supply Do not install the printer in a location that ... the risk of these safety precautions. Ink may leak out and stain clothing or the surrounding area. Never remove the plug by pulling on a Print Head after printing. Ensure that is kept clear at all times so you can easily unplug the power cord if necessary. Do not install the printer...
...) fall into the printer, unplug the power cord and call for the printer in the country where you purchased the printer. Do not shake Print Heads or ink tanks. The metal parts may leak and damage the printer. Choosing a location Power supply Do not install the printer in a location that ... the risk of these safety precautions. Ink may leak out and stain clothing or the surrounding area. Never remove the plug by pulling on a Print Head after printing. Ensure that is kept clear at all times so you can easily unplug the power cord if necessary. Do not install the printer...
Quick Start Guide
Page 57
... Cleaning 32 Print Media to PC Properly 35 Cannot Install the Printer Driver 34 Canon IJ Status Monitor (Windows 40 CANON U.S.A., INC. Index A Accessing the Printer Driver 29 Aligning the Print Head 32 An Error Message is displayed on the Screen 42 Automatic Duplex Printing 42 B Borderless Printing 37 C Canceling Print Jobs 23...
... Cleaning 32 Print Media to PC Properly 35 Cannot Install the Printer Driver 34 Canon IJ Status Monitor (Windows 40 CANON U.S.A., INC. Index A Accessing the Printer Driver 29 Aligning the Print Head 32 An Error Message is displayed on the Screen 42 Automatic Duplex Printing 42 B Borderless Printing 37 C Canceling Print Jobs 23...

Easy Setup Instructions
Page 1
.... IMPORTANT: Be sure to select a language and then press the OK button. Auto sheet feeder Print side Paper guide Cover guide PIXMA iP6700D Print Head Power Cord CLI-8BK Black CLI-8C Cyan CLI-8PC Photo Cyan CLI-8M Magenta CLI-8PM Photo Magenta Ink Tanks CLI-8Y Yellow... remove all items from being ejected properly. NOTE: To avoid spilling ink, never press on the print head lock lever. 5 Close the inner cover and then the cover. PIXMA iP6700D Photo Printer Documentation and Software Kit 1 Before turning on yourself when handling these items. 2 Remove the orange protective cap...
.... IMPORTANT: Be sure to select a language and then press the OK button. Auto sheet feeder Print side Paper guide Cover guide PIXMA iP6700D Print Head Power Cord CLI-8BK Black CLI-8C Cyan CLI-8PC Photo Cyan CLI-8M Magenta CLI-8PM Photo Magenta Ink Tanks CLI-8Y Yellow... remove all items from being ejected properly. NOTE: To avoid spilling ink, never press on the print head lock lever. 5 Close the inner cover and then the cover. PIXMA iP6700D Photo Printer Documentation and Software Kit 1 Before turning on yourself when handling these items. 2 Remove the orange protective cap...
Direct Printing Guide
Page 4
Contents Printing Maintenance 52 When Printing Becomes Faint or Colors are Incorrect 52 Printing the Nozzle Check Pattern 53 Examining the Nozzle Check Pattern 53 Print Head Cleaning 54 Print Head Deep Cleaning 55 Aligning Print Head - Auto head align 56 Troubleshooting 57 Index 71 2
Contents Printing Maintenance 52 When Printing Becomes Faint or Colors are Incorrect 52 Printing the Nozzle Check Pattern 53 Examining the Nozzle Check Pattern 53 Print Head Cleaning 54 Print Head Deep Cleaning 55 Aligning Print Head - Auto head align 56 Troubleshooting 57 Index 71 2

Direct Printing Guide
Page 8
... of paper. Color balance Prints nine color balance sample photos on the Canon Photo Stickers. Captured info Prints the photo information on page 55. Maintenance Displays the maintenance items below. Deep cleaning See "Print Head Deep Cleaning" on the margin of all photos in the memory card.... You can select your favorite color tone from them and print it. Cleaning Cleans the print head when nozzles are clogged. See "Print Head Cleaning" on the digital camera. See "Aligning Print Head - Print all photos Prints all photos in the memory card. DPOF print Prints photos according...
... of paper. Color balance Prints nine color balance sample photos on the Canon Photo Stickers. Captured info Prints the photo information on page 55. Maintenance Displays the maintenance items below. Deep cleaning See "Print Head Deep Cleaning" on the margin of all photos in the memory card.... You can select your favorite color tone from them and print it. Cleaning Cleans the print head when nozzles are clogged. See "Print Head Cleaning" on the digital camera. See "Aligning Print Head - Print all photos Prints all photos in the memory card. DPOF print Prints photos according...

Direct Printing Guide
Page 36
... to increase or decrease contrast and then press the OK Language selection You can reset all settings, other than the display language and the print head position, to the initial state. (1) Use the buttons to select Reset setting and then press the OK button. (2) Use the buttons to select Adjust contrast...
... to increase or decrease contrast and then press the OK Language selection You can reset all settings, other than the display language and the print head position, to the initial state. (1) Use the buttons to select Reset setting and then press the OK button. (2) Use the buttons to select Adjust contrast...
Direct Printing Guide
Page 51
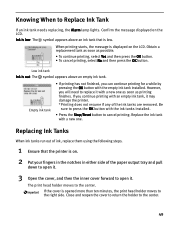
... cancel printing. Replace the ink tank with an empty ink tank, it . When printing starts, the message is opened more than ten minutes, the print head holder moves to open it may damage the printer. *Printing does not resume if any of the paper output tray and pull down to open... cancel printing, select No and then press the OK button. If the cover is displayed on the LCD. Knowing When to the center. The print head holder moves to Replace Ink Tank If an ink tank needs replacing, the Alarm lamp lights. Close and reopen the cover to return the holder...
... cancel printing. Replace the ink tank with an empty ink tank, it . When printing starts, the message is opened more than ten minutes, the print head holder moves to open it may damage the printer. *Printing does not resume if any of the paper output tray and pull down to open... cancel printing, select No and then press the OK button. If the cover is displayed on the LCD. Knowing When to the center. The print head holder moves to Replace Ink Tank If an ink tank needs replacing, the Alarm lamp lights. Close and reopen the cover to return the holder...
Direct Printing Guide
Page 52
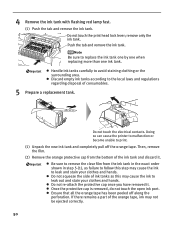
... cap is removed, do not touch the open ink port. Be sure to avoid staining clothing or the surrounding area. Do not touch the print head lock lever;
... cap is removed, do not touch the open ink port. Be sure to avoid staining clothing or the surrounding area. Do not touch the print head lock lever;

Direct Printing Guide
Page 53
... not remove it from the printer and leave it is reinstalled. The Alarm lamp still lights after replacing the ink tank, the printer executes print head cleaning automatically. Ensure that the ink tank lamp lights red. When you start printing after the cover is closed . 6 Install the ink tank. ... ink tank snaps firmly into place. (3) Ensure that the inner cover is consumed in the print head holder. (2) Press on the label. The lamp lights red. (1) Insert the ink tank in the head cleaning and deep cleaning, which are installed in the correct order directed on the mark until the ...
... not remove it from the printer and leave it is reinstalled. The Alarm lamp still lights after replacing the ink tank, the printer executes print head cleaning automatically. Ensure that the ink tank lamp lights red. When you start printing after the cover is closed . 6 Install the ink tank. ... ink tank snaps firmly into place. (3) Ensure that the inner cover is consumed in the print head holder. (2) Press on the label. The lamp lights red. (1) Insert the ink tank in the head cleaning and deep cleaning, which are installed in the correct order directed on the mark until the ...

Direct Printing Guide
Page 54
... ink tank is inserted in the wrong position. See "Replacing an Ink Tank" on page 53 If missing lines or white stripes appear After print head cleaning, print the nozzle check pattern. Follow the procedures below to fully insert it is empty or running the print... head maintenance, align the print head. See "Replacing an Ink Tank" on page 48. Open the cover and make sure that ink tank, it . If an ink tank lamp is flashing ...
... ink tank is inserted in the wrong position. See "Replacing an Ink Tank" on page 53 If missing lines or white stripes appear After print head cleaning, print the nozzle check pattern. Follow the procedures below to fully insert it is empty or running the print... head maintenance, align the print head. See "Replacing an Ink Tank" on page 48. Open the cover and make sure that ink tank, it . If an ink tank lamp is flashing ...
Direct Printing Guide
Page 55
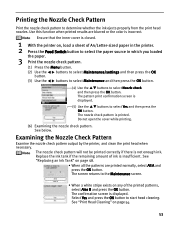
... Use the buttons to select Maintenance and then press the OK button. (4) Use the buttons to determine whether the ink ejects properly from the print head nozzles. The nozzle check pattern will not be printed correctly if there is incorrect. Select Yes and press the OK button to select Yes and... or the color is not enough ink. Examining the Nozzle Check Pattern Examine the nozzle check pattern output by the printer, and clean the print head when necessary. The screen returns to select the paper source in which you loaded the paper. 3 Print the nozzle check pattern. (1) Press the Menu ...
... Use the buttons to select Maintenance and then press the OK button. (4) Use the buttons to determine whether the ink ejects properly from the print head nozzles. The nozzle check pattern will not be printed correctly if there is incorrect. Select Yes and press the OK button to select Yes and... or the color is not enough ink. Examining the Nozzle Check Pattern Examine the nozzle check pattern output by the printer, and clean the print head when necessary. The screen returns to select the paper source in which you loaded the paper. 3 Print the nozzle check pattern. (1) Press the Menu ...

Direct Printing Guide
Page 56
...inner cover is closed. 1 Ensure that the printer is on page 48. The confirmation screen is not printed correctly. After print head cleaning finishes After print head cleaning finishes, print the nozzle check pattern to select Cleaning and then press the OK button. When ink is low, the ... is displayed. (5) Use the buttons to be absorbed in the printed nozzle check pattern. If the print quality still remains poor, perform print head deep cleaning. buttons to select Maintenance/settings and then press the OK (3) Use the buttons to select Maintenance and then press the OK button....
...inner cover is closed. 1 Ensure that the printer is on page 48. The confirmation screen is not printed correctly. After print head cleaning finishes After print head cleaning finishes, print the nozzle check pattern to select Cleaning and then press the OK button. When ink is low, the ... is displayed. (5) Use the buttons to be absorbed in the printed nozzle check pattern. If the print quality still remains poor, perform print head deep cleaning. buttons to select Maintenance/settings and then press the OK (3) Use the buttons to select Maintenance and then press the OK button....


