
iP6000D Diect Print Guide
Page 49
... your computer connected, specify the required settings in crowded environments. The Quiet mode setting screen is ideal when working at night or in the Printer Driver. 1 Turn on the printer. 2 Select Tool Box from a digital camera connected to this printer. It is displayed. (2) Use the buttons to select Quiet mode and...
... your computer connected, specify the required settings in crowded environments. The Quiet mode setting screen is ideal when working at night or in the Printer Driver. 1 Turn on the printer. 2 Select Tool Box from a digital camera connected to this printer. It is displayed. (2) Use the buttons to select Quiet mode and...

iP6000D Diect Print Guide
Page 63
... the information about the search function, refer to "Searching for Photos with Easy-PhotoPrint and other details, refer to the computer and install the printer driver, Memory Card Utility, and Easy-Photo Print. Using Data in the Memory Card on the Computer Browsing Photos in the Memory Card on the Computer...
... the information about the search function, refer to "Searching for Photos with Easy-PhotoPrint and other details, refer to the computer and install the printer driver, Memory Card Utility, and Easy-Photo Print. Using Data in the Memory Card on the Computer Browsing Photos in the Memory Card on the Computer...
iP6000D Diect Print Guide
Page 66
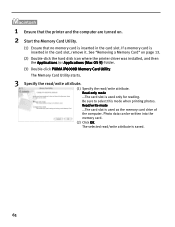
... the printer and the computer are turned on page 13. (2) Double-click the hard disk icon where the printer driver was installed, and then the Applications (or Applications (Mac OS 9)) folder. (3) Double-click PIXMA iP6000D Memory Card Utility. See "Removing a Memory Card" on . 2 Start the Memory Card Utility. (1) Ensure that no memory card...
... the printer and the computer are turned on page 13. (2) Double-click the hard disk icon where the printer driver was installed, and then the Applications (or Applications (Mac OS 9)) folder. (3) Double-click PIXMA iP6000D Memory Card Utility. See "Removing a Memory Card" on . 2 Start the Memory Card Utility. (1) Ensure that no memory card...
iP6000D Quick Start Guide
Page 3
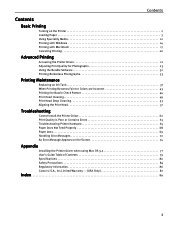
...Printing with Windows 14 Printing with Macintosh 17 Canceling Printing 20 Advanced Printing Accessing the Printer Driver 21 Adjusting Print Quality for Photographs 23 Using the Bundle Software 32 Printing Borderless Photographs 33...Print Head Deep Cleaning 53 Aligning the Print Head 57 Troubleshooting Cannot Install the Printer Driver 62 Print Quality is Poor or Contains Errors 63 Troubleshooting Printer Hardware 65 Paper Does... Appears on the Screen 74 Appendix Installing the Printer Driver when using Mac OS 9.x 77 User's Guide Table of Contents 79 Specifications 80 Safety...
...Printing with Windows 14 Printing with Macintosh 17 Canceling Printing 20 Advanced Printing Accessing the Printer Driver 21 Adjusting Print Quality for Photographs 23 Using the Bundle Software 32 Printing Borderless Photographs 33...Print Head Deep Cleaning 53 Aligning the Print Head 57 Troubleshooting Cannot Install the Printer Driver 62 Print Quality is Poor or Contains Errors 63 Troubleshooting Printer Hardware 65 Paper Does... Appears on the Screen 74 Appendix Installing the Printer Driver when using Mac OS 9.x 77 User's Guide Table of Contents 79 Specifications 80 Safety...
iP6000D Quick Start Guide
Page 4
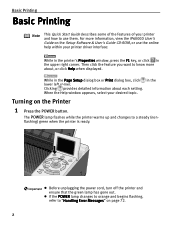
... unplugging the power cord, turn off the printer and ensure that the green lamp has gone out. When the Help window appears, select your printer driver interface: While in the printer's Properties window, press the F1 key, or click in the upper right corner. Then click the feature you want to... know more information, view the iP6000D User's Guide on the Setup Software & User's Guide CD-ROM, or use them. The POWER lamp flashes while the printer warms up and changes to...
... unplugging the power cord, turn off the printer and ensure that the green lamp has gone out. When the Help window appears, select your printer driver interface: While in the printer's Properties window, press the F1 key, or click in the upper right corner. Then click the feature you want to... know more information, view the iP6000D User's Guide on the Setup Software & User's Guide CD-ROM, or use them. The POWER lamp flashes while the printer warms up and changes to...

iP6000D Quick Start Guide
Page 6
...with minimal space, you can specify that the printer can perform the operations you need to configure the printer driver beforehand. See "Canon Speciality Media" on a shelf with the printer driver. Note Depending on the same type/size of paper by using only the cassette, check that Letter-sized ...convenient for loading a large volume of the type of paper you to print without removing and reloading paper. Note For information on the printer driver settings, refer to "Changing the Paper Source" in the User's Guide. • Continuous printing on the size of paper you use the ...
...with minimal space, you can specify that the printer can perform the operations you need to configure the printer driver beforehand. See "Canon Speciality Media" on a shelf with the printer driver. Note Depending on the same type/size of paper by using only the cassette, check that Letter-sized ...convenient for loading a large volume of the type of paper you to print without removing and reloading paper. Note For information on the printer driver settings, refer to "Changing the Paper Source" in the User's Guide. • Continuous printing on the size of paper you use the ...

iP6000D Quick Start Guide
Page 7
... Media" on page 13. Basic Printing Loading Paper in the Sheet Feeder Notes For detailed information on the specialty media Canon provides for detailed instructions on how to support the paper. See "Printing Media" in the opposite direction until the paper becomes completely flat. Refer to "... the paper feed switch so that the sheet feeder lamp is curled, gently bend the corners in the User's Guide for use with the printer driver. Note You can also select the paper source with its various printers, refer to "Changing the Paper Source" in the User's Guide. 5
... Media" on page 13. Basic Printing Loading Paper in the Sheet Feeder Notes For detailed information on the specialty media Canon provides for detailed instructions on how to support the paper. See "Printing Media" in the opposite direction until the paper becomes completely flat. Refer to "... the paper feed switch so that the sheet feeder lamp is curled, gently bend the corners in the User's Guide for use with the printer driver. Note You can also select the paper source with its various printers, refer to "Changing the Paper Source" in the User's Guide. 5

iP6000D Quick Start Guide
Page 9
... and align the paper stack against the left side of the paper stack. (4) Select 4" x 6", 5" x 7", or Credit Card from Paper Size in the printer driver. Basic Printing Loading 4" x 6", 5" x 7", or Credit Card-Sized Paper in the Sheet Feeder (1) Load the paper into the printer. 1 Flatten the four corners... Loading Paper in the Cassette Caution You cannot load sticker paper in the sheet feeder. Notes For detailed information on the specialty media Canon provides for detailed instructions on how to "Printing with Windows" on page 17. Notes •Load the paper lengthways regardless of the...
... and align the paper stack against the left side of the paper stack. (4) Select 4" x 6", 5" x 7", or Credit Card from Paper Size in the printer driver. Basic Printing Loading 4" x 6", 5" x 7", or Credit Card-Sized Paper in the Sheet Feeder (1) Load the paper into the printer. 1 Flatten the four corners... Loading Paper in the Cassette Caution You cannot load sticker paper in the sheet feeder. Notes For detailed information on the specialty media Canon provides for detailed instructions on how to "Printing with Windows" on page 17. Notes •Load the paper lengthways regardless of the...

iP6000D Quick Start Guide
Page 12
Note You can also select the paper source with the printer driver. Basic Printing 5 Prepare the paper output tray. (1) 1 Open the paper output tray. 2 Pull out the paper output tray extension completely. For details, refer to "Changing the Paper Source" in the User's Guide. 10 cassette 1 lamp 2 (2) Press the paper feed switch so that the cassette lamp is lit.
Note You can also select the paper source with the printer driver. Basic Printing 5 Prepare the paper output tray. (1) 1 Open the paper output tray. 2 Pull out the paper output tray extension completely. For details, refer to "Changing the Paper Source" in the User's Guide. 10 cassette 1 lamp 2 (2) Press the paper feed switch so that the cassette lamp is lit.

iP6000D Quick Start Guide
Page 13
Basic Printing Loading 4" x 6" or 5" x 7"-Sized Paper in the Cassette Do not leave photo paper, such as Photo Paper Pro, in the printer driver. Notes •Do not extend the cassette. •Load the paper lengthways regardless of the direction of the document with the print side facing down. &#...8226;You can load up to 20 sheets of 4" x 6"sized paper, or up to 10 sheets of the printer driver settings, refer to "Printing with Windows" on page 14, or "Printing with Macintosh" on page 17. 11 For a detailed description of 5" x 7"sized paper. (2) Slide the...
Basic Printing Loading 4" x 6" or 5" x 7"-Sized Paper in the Cassette Do not leave photo paper, such as Photo Paper Pro, in the printer driver. Notes •Do not extend the cassette. •Load the paper lengthways regardless of the direction of the document with the print side facing down. &#...8226;You can load up to 20 sheets of 4" x 6"sized paper, or up to 10 sheets of the printer driver settings, refer to "Printing with Windows" on page 14, or "Printing with Macintosh" on page 17. 11 For a detailed description of 5" x 7"sized paper. (2) Slide the...

iP6000D Quick Start Guide
Page 15
...a computer. Do not load in the cassette. *3 You can print photos in the sheet feeder. For details, refer to prevent sticking together. Basic Printing Canon Speciality Media Media Type Paper Support Load Limit Sheet Feeder Cassette Super White Paper Up to 13 mm or 0.52 inches Up to 13 mm...to 80 sheets Up to 80 sheets T-Shirt Transfers 1 sheet 1 sheet Transparencies Up to 30 sheets Up to 30 sheets Photo Stickers*3 1 sheet*2 Printer Driver Setting for Media Type Plain Paper Photo Paper Pro Photo Paper Plus Glossy Photo Paper Plus Glossy Photo Paper Plus Double Sided Matte Photo Paper...
...a computer. Do not load in the cassette. *3 You can print photos in the sheet feeder. For details, refer to prevent sticking together. Basic Printing Canon Speciality Media Media Type Paper Support Load Limit Sheet Feeder Cassette Super White Paper Up to 13 mm or 0.52 inches Up to 13 mm...to 80 sheets Up to 80 sheets T-Shirt Transfers 1 sheet 1 sheet Transparencies Up to 30 sheets Up to 30 sheets Photo Stickers*3 1 sheet*2 Printer Driver Setting for Media Type Plain Paper Photo Paper Pro Photo Paper Plus Glossy Photo Paper Plus Glossy Photo Paper Plus Double Sided Matte Photo Paper...
iP6000D Quick Start Guide
Page 16
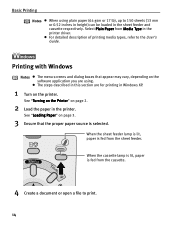
... Notes The menu screens and dialog boxes that the proper paper source is selected. See "Loading Paper" on page 2. 2 Load the paper in the printer driver. Select Plain Paper from the sheet feeder. See "Turning on the Printer" on page 3. 3 Ensure that appear may vary, depending on the software application you...
... Notes The menu screens and dialog boxes that the proper paper source is selected. See "Loading Paper" on page 2. 2 Load the paper in the printer driver. Select Plain Paper from the sheet feeder. See "Turning on the Printer" on page 3. 3 Ensure that appear may vary, depending on the software application you...
iP6000D Quick Start Guide
Page 18
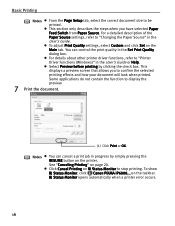
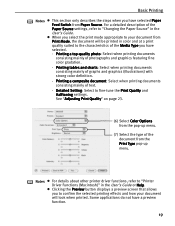
For a detailed description of the Paper Source settings, refer to "Printer Driver Functions (Windows)" in progress by clicking the check box. Select Preview before printing by simply pressing the RESUME button on the taskbar. This displays a preview ... when you to be printed. You can cancel a print job in the User's Guide or Help. To show BJ Status Monitor, click Canon PIXMA iP6000... For details about other printer driver functions, refer to "Changing the Paper Source" in the Set Print Quality dialog box. Notes You can control the print quality in...
For a detailed description of the Paper Source settings, refer to "Printer Driver Functions (Windows)" in progress by clicking the check box. Select Preview before printing by simply pressing the RESUME button on the taskbar. This displays a preview ... when you to be printed. You can cancel a print job in the User's Guide or Help. To show BJ Status Monitor, click Canon PIXMA iP6000... For details about other printer driver functions, refer to "Changing the Paper Source" in the Set Print Quality dialog box. Notes You can control the print quality in...
iP6000D Quick Start Guide
Page 21
Detailed Setting: Select to "Printer Driver Functions (Macintosh)" in the User's Guide. Clicking the Preview button displays a preview screen that allows you to confirm the selected printing effects and how your .... Printing a top-quality photo: Select when printing documents consisting mainly of graphs and graphics (illustrations) with strong color definition. - Notes For details about other printer driver functions, refer to fine-tune the Print Quality and Halftoning settings.
Detailed Setting: Select to "Printer Driver Functions (Macintosh)" in the User's Guide. Clicking the Preview button displays a preview screen that allows you to confirm the selected printing effects and how your .... Printing a top-quality photo: Select when printing documents consisting mainly of graphs and graphics (illustrations) with strong color definition. - Notes For details about other printer driver functions, refer to fine-tune the Print Quality and Halftoning settings.
iP6000D Quick Start Guide
Page 23
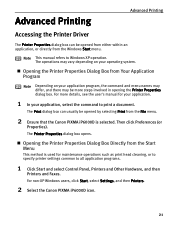
...then Printers and Faxes. The Print dialog box can be opened by selecting Print from the File menu. 2 Ensure that the Canon PIXMA iP6000D is used for your application. 1 In your operating system. For non-XP Windows users, click Start, select Settings, and then Printers.... 2 Select the Canon PIXMA iP6000D icon. 21 For more steps involved in opening the Printer Properties dialog box. Opening the Printer Properties Dialog Box Directly from the Start Menu This method is selected. Advanced Printing Advanced Printing Accessing the Printer Driver The Printer Properties dialog box...
...then Printers and Faxes. The Print dialog box can be opened by selecting Print from the File menu. 2 Ensure that the Canon PIXMA iP6000D is used for your application. 1 In your operating system. For non-XP Windows users, click Start, select Settings, and then Printers.... 2 Select the Canon PIXMA iP6000D icon. 21 For more steps involved in opening the Printer Properties dialog box. Opening the Printer Properties Dialog Box Directly from the Start Menu This method is selected. Advanced Printing Advanced Printing Accessing the Printer Driver The Printer Properties dialog box...
iP6000D Quick Start Guide
Page 25
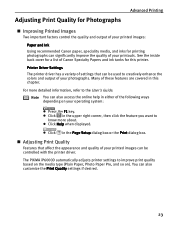
... refer to know more about. Click Help when displayed. Adjusting Print Quality Features that can be controlled with the printer driver. Printer Driver Settings The printer driver has a variety of settings that affect the appearance and quality of your printed images can significantly improve the quality of your... Ink Using recommended Canon paper, speciality media, and inks for this chapter. Click in the Page Setup dialog box or the Print dialog box. Click in the upper right corner, then click the feature you want to the User's Guide. The PIXMA iP6000D automatically adjusts printer ...
... refer to know more about. Click Help when displayed. Adjusting Print Quality Features that can be controlled with the printer driver. Printer Driver Settings The printer driver has a variety of settings that affect the appearance and quality of your printed images can significantly improve the quality of your... Ink Using recommended Canon paper, speciality media, and inks for this chapter. Click in the Page Setup dialog box or the Print dialog box. Click in the upper right corner, then click the feature you want to the User's Guide. The PIXMA iP6000D automatically adjusts printer ...
iP6000D Quick Start Guide
Page 31
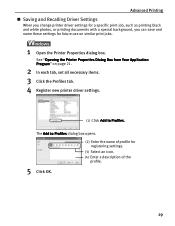
...Dialog Box from Your Application Program" on similar print jobs. 1 Open the Printer Properties dialog box. Advanced Printing Saving and Recalling Driver Settings When you change printer driver settings for a specific print job, such as printing black and white photos, or printing documents with a special background, you ... of profile for future use on page 21. 2 In each tab, set all necessary items. 3 Click the Profiles tab. 4 Register new printer driver settings. (1) Click Add to Profiles dialog box opens. (2) Enter the name of the profile. 5 Click OK. 29 The Add to Profiles.
...Dialog Box from Your Application Program" on similar print jobs. 1 Open the Printer Properties dialog box. Advanced Printing Saving and Recalling Driver Settings When you change printer driver settings for a specific print job, such as printing black and white photos, or printing documents with a special background, you ... of profile for future use on page 21. 2 In each tab, set all necessary items. 3 Click the Profiles tab. 4 Register new printer driver settings. (1) Click Add to Profiles dialog box opens. (2) Enter the name of the profile. 5 Click OK. 29 The Add to Profiles.

iP6000D Quick Start Guide
Page 32
... settings. Advanced Printing 6 Click OK on page 17 2 Select all of the necessary settings. 3 Register new printer driver settings. (1) Select Save As from the Presets pop-up menu. Note You can retrieve or delete the print settings profile at any time. See "Printing ... from Printing Profiles, and click Retrieve from Printing Profiles, and click Delete. Deleting unwanted profile: Select the desired profile from Profiles. This registers your printer driver settings. 30
... settings. Advanced Printing 6 Click OK on page 17 2 Select all of the necessary settings. 3 Register new printer driver settings. (1) Select Save As from the Presets pop-up menu. Note You can retrieve or delete the print settings profile at any time. See "Printing ... from Printing Profiles, and click Retrieve from Printing Profiles, and click Delete. Deleting unwanted profile: Select the desired profile from Profiles. This registers your printer driver settings. 30

iP6000D Quick Start Guide
Page 33
Advanced Printing Note You can retrieve or change from Presets in the Print dialog box. 31 Changing the registered drivers settings: Select the name of the driver settings to delete or change the saved driver settings at any time. This registers your printer driver settings. 4 Click OK. Retrieving the registered driver settings: Select the name of the driver settings to retrieve from Presets in the Print dialog box.
Advanced Printing Note You can retrieve or change from Presets in the Print dialog box. 31 Changing the registered drivers settings: Select the name of the driver settings to delete or change the saved driver settings at any time. This registers your printer driver settings. 4 Click OK. Retrieving the registered driver settings: Select the name of the driver settings to retrieve from Presets in the Print dialog box.
iP6000D Quick Start Guide
Page 41
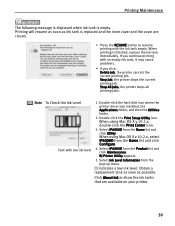
... printing with the ink tank empty. Stop Job, the printer stops the current printing job. Double-click the Print Setup Utility icon. Select iP6000D from the Name list and click Configure. 4. If you click: Delete Job, the printer cancels the current printing job. Stop All Jobs,...Print Center icon. 3. Double-click the hard disk icon where the printer driver was installed, the Applications folder, and then the Utilities folder. 2. When using Mac OS X v.10.2.x, select iP6000D from the Name list and click Utility. Select iP6000D from the pop-up menu. [!] Indicates a low ink level. Note...
... printing with the ink tank empty. Stop Job, the printer stops the current printing job. Double-click the Print Setup Utility icon. Select iP6000D from the Name list and click Configure. 4. If you click: Delete Job, the printer cancels the current printing job. Stop All Jobs,...Print Center icon. 3. Double-click the hard disk icon where the printer driver was installed, the Applications folder, and then the Utilities folder. 2. When using Mac OS X v.10.2.x, select iP6000D from the Name list and click Utility. Select iP6000D from the pop-up menu. [!] Indicates a low ink level. Note...


