
iP6000D Diect Print Guide
Page 3
Auto head align 75 Troubleshooting A Message is Displayed on the LCD 77 Index 86 2 Contents Replacing an Ink Tank Knowing When to Replace Ink Tank 66 Replacing Ink Tanks 67 Printing Maintenance When Printing Becomes Faint or Colors are Incorrect 70 Printing the Nozzle Check Pattern 71 Examining the Nozzle Check Pattern 72 Print Head Cleaning 73 Print Head Deep Cleaning 74 Aligning Print Head -
Auto head align 75 Troubleshooting A Message is Displayed on the LCD 77 Index 86 2 Contents Replacing an Ink Tank Knowing When to Replace Ink Tank 66 Replacing Ink Tanks 67 Printing Maintenance When Printing Becomes Faint or Colors are Incorrect 70 Printing the Nozzle Check Pattern 71 Examining the Nozzle Check Pattern 72 Print Head Cleaning 73 Print Head Deep Cleaning 74 Aligning Print Head -
iP6000D Diect Print Guide
Page 7
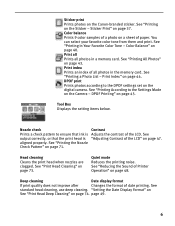
... 45. Color balance Prints 9 color samples of paper. See "Adjusting Contrast of the LCD" on a sheet of a photo on page 47. Head cleaning Cleans the print head when nozzles are clogged. See "Printing in a memory card. Print Index" on the Canon-branded sticker. Quiet mode Reduces the printing noise. Sticker print Prints photos on page 44. See "Printing on the Sticker...
... 45. Color balance Prints 9 color samples of paper. See "Adjusting Contrast of the LCD" on a sheet of a photo on page 47. Head cleaning Cleans the print head when nozzles are clogged. See "Printing in a memory card. Print Index" on the Canon-branded sticker. Quiet mode Reduces the printing noise. Sticker print Prints photos on page 44. See "Printing on the Sticker...
iP6000D Diect Print Guide
Page 8
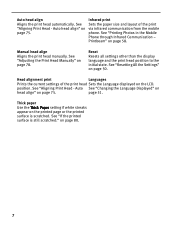
... is scratched. See "Aligning Print Head - See "Printing Photos in the Mobile Phone through Infrared Communication - Manual head align Aligns the print head manually. Reset Resets all settings other than the display language and the print head position to the initial state. See "Resetting All the Settings" on page 80. 7 See "Aligning Print Head - Infrared print Sets the paper size and...
... is scratched. See "Aligning Print Head - See "Printing Photos in the Mobile Phone through Infrared Communication - Manual head align Aligns the print head manually. Reset Resets all settings other than the display language and the print head position to the initial state. See "Resetting All the Settings" on page 80. 7 See "Aligning Print Head - Infrared print Sets the paper size and...

iP6000D Diect Print Guide
Page 51
Resetting All the Settings You can reset all settings, other than the display language and the print head position, to the initial state. 1 Turn on the printer. 2 Select Tool Box from the Menu. (1) Press the Menu button. (2) Use the buttons to select Yes and then press the OK button. 50 The Reset screen is displayed. 3 Select Reset. (1) Use the buttons to select Reset and then press the OK button. The Tool Box screen is displayed. (2) Use the buttons to select Tool Box and then press the OK button.
Resetting All the Settings You can reset all settings, other than the display language and the print head position, to the initial state. 1 Turn on the printer. 2 Select Tool Box from the Menu. (1) Press the Menu button. (2) Use the buttons to select Yes and then press the OK button. 50 The Reset screen is displayed. 3 Select Reset. (1) Use the buttons to select Reset and then press the OK button. The Tool Box screen is displayed. (2) Use the buttons to select Tool Box and then press the OK button.

iP6000D Diect Print Guide
Page 68
...Low Ink is Detected When printing starts, the message is on the LCD. [!] indicates a low ink level. The print head holder moves to the center. 2 Open the paper output tray and pull down to avoid staining clothing or the surrounding area. Do not touch the print head lock lever; Important Handle... ink tanks carefully to open the cover. To cancel printing, select NO and then press the OK button. Replacing Ink Tanks When ink tanks run out...
...Low Ink is Detected When printing starts, the message is on the LCD. [!] indicates a low ink level. The print head holder moves to the center. 2 Open the paper output tray and pull down to avoid staining clothing or the surrounding area. Do not touch the print head lock lever; Important Handle... ink tanks carefully to open the cover. To cancel printing, select NO and then press the OK button. Replacing Ink Tanks When ink tanks run out...
iP6000D Diect Print Guide
Page 69
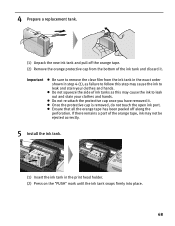
... orange tape has been peeled off the orange tape. (2) Remove the orange protective cap from the ink tank in the exact order shown in the print head holder. (2) Press on the "PUSH" mark until the ink tank snaps firmly into place. 68 Do not squeeze the side of the orange tape, ink...
... orange tape has been peeled off the orange tape. (2) Remove the orange protective cap from the ink tank in the exact order shown in the print head holder. (2) Press on the "PUSH" mark until the ink tank snaps firmly into place. 68 Do not squeeze the side of the orange tape, ink...

iP6000D Diect Print Guide
Page 70
...necessary to the right. Color ink is specified. The ink tank installation process is completely closed. When you start printing after replacing the ink tank, the printer executes print head cleaning automatically. The POWER lamp flashes during cleaning. 69 An ink tank left out in the open . 7 ...the cover. Color ink consumption may not function. Notes To maintain optimal Print Quality, use an ink tank within six months of first use. Do not perform any other functions until the print head cleaning finishes. Printing will not occur if the inner cover is open and then reinstalled ...
...necessary to the right. Color ink is specified. The ink tank installation process is completely closed. When you start printing after replacing the ink tank, the printer executes print head cleaning automatically. The POWER lamp flashes during cleaning. 69 An ink tank left out in the open . 7 ...the cover. Color ink consumption may not function. Notes To maintain optimal Print Quality, use an ink tank within six months of first use. Do not perform any other functions until the print head cleaning finishes. Printing will not occur if the inner cover is open and then reinstalled ...
iP6000D Diect Print Guide
Page 71
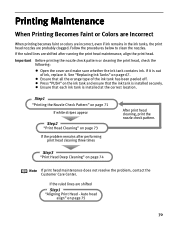
... after running the print head maintenance, align the print head. Printing Maintenance When Printing Becomes Faint or Colors are Incorrect When printing becomes faint or colors are incorrect, even if ink remains in the ink tanks, the print head nozzles are shifted Step1 "Aligning Print Head - If the ruled lines are shifted after performing print head cleaning three times After print head cleaning, print the nozzle...
... after running the print head maintenance, align the print head. Printing Maintenance When Printing Becomes Faint or Colors are Incorrect When printing becomes faint or colors are incorrect, even if ink remains in the ink tanks, the print head nozzles are shifted Step1 "Aligning Print Head - If the ruled lines are shifted after performing print head cleaning three times After print head cleaning, print the nozzle...
iP6000D Diect Print Guide
Page 72
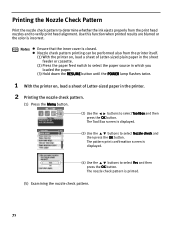
... Tool Box and then press the OK button. The pattern print confirmation screen is printed. (5) Examining the nozzle check pattern. 71 The Tool Box screen is displayed. (3) Use the buttons to verify print head alignment. Nozzle check pattern printing can be performed also from the print head nozzles and to select Nozzle check and then press the...
... Tool Box and then press the OK button. The pattern print confirmation screen is printed. (5) Examining the nozzle check pattern. 71 The Tool Box screen is displayed. (3) Use the buttons to verify print head alignment. Nozzle check pattern printing can be performed also from the print head nozzles and to select Nozzle check and then press the...

iP6000D Diect Print Guide
Page 73
.... 72 Examine the nozzle check pattern output by the printer. (1) (1) Examining the nozzle check pattern. When all the patterns are printed normally, select All A and press the OK button. The Head Cleaning screen is discharged properly. Examining the Nozzle Check Pattern The nozzle check pattern should appear as follows when ink is...
.... 72 Examine the nozzle check pattern output by the printer. (1) (1) Examining the nozzle check pattern. When all the patterns are printed normally, select All A and press the OK button. The Head Cleaning screen is discharged properly. Examining the Nozzle Check Pattern The nozzle check pattern should appear as follows when ink is...
iP6000D Diect Print Guide
Page 74
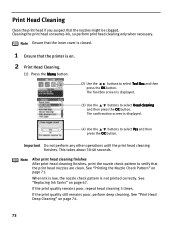
...print head cleaning finishes. If the print quality remains poor, repeat head cleaning 3 times. See "Print Head Deep Cleaning" on . 2 Print Head Cleaning. (1) Press the Menu button. (2) Use the buttons to select Head cleaning and then press the OK button. Print Head Cleaning Clean the print head if you suspect that the print head nozzles are clean. See "Printing...(4) Use the buttons to verify that the nozzles might be clogged. Note After print head cleaning finishes After print head cleaning finishes, print the nozzle check pattern to select Yes and then press the OK button. See...
...print head cleaning finishes. If the print quality remains poor, repeat head cleaning 3 times. See "Print Head Deep Cleaning" on . 2 Print Head Cleaning. (1) Press the Menu button. (2) Use the buttons to select Head cleaning and then press the OK button. Print Head Cleaning Clean the print head if you suspect that the print head nozzles are clean. See "Printing...(4) Use the buttons to verify that the nozzles might be clogged. Note After print head cleaning finishes After print head cleaning finishes, print the nozzle check pattern to select Yes and then press the OK button. See...
iP6000D Diect Print Guide
Page 75
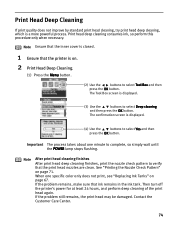
...Box screen is a more powerful process. See "Printing the Nozzle Check Pattern" on page 67. If the problem still remains, the print head may be damaged. Note After print head cleaning finishes After print head deep cleaning finishes, print the nozzle check pattern to verify that ink remains ...in the ink tank. If the problem remains, make sure that the print head nozzles are clean. Print Head Deep Cleaning If print quality does not improve by standard print head cleaning, try print head deep cleaning, which is displayed. (3) Use the buttons to select Deep cleaning ...
...Box screen is a more powerful process. See "Printing the Nozzle Check Pattern" on page 67. If the problem still remains, the print head may be damaged. Note After print head cleaning finishes After print head deep cleaning finishes, print the nozzle check pattern to verify that ink remains ...in the ink tank. If the problem remains, make sure that the print head nozzles are clean. Print Head Deep Cleaning If print quality does not improve by standard print head cleaning, try print head deep cleaning, which is displayed. (3) Use the buttons to select Deep cleaning ...

iP6000D Diect Print Guide
Page 76
.... The confirmation screen is automatically aligned. 75 Note You can adjust the print head manually. There are two ways to print without shifts in the sheet feeder. Auto head align Aligning the print head position allows you can print the current settings by selecting Head alignment print. (4) Use the buttons to select Tool Box and then press the OK...
.... The confirmation screen is automatically aligned. 75 Note You can adjust the print head manually. There are two ways to print without shifts in the sheet feeder. Auto head align Aligning the print head position allows you can print the current settings by selecting Head alignment print. (4) Use the buttons to select Tool Box and then press the OK...
iP6000D Diect Print Guide
Page 77
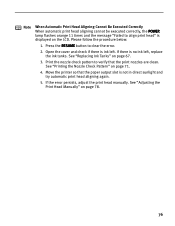
...RESUME button to verify that the paper output slot is displayed on page 71. 4. Print the nozzle check pattern to clear the error. 2. If the error persists, adjust the print head manually. See "Printing the Nozzle Check Pattern" on the LCD. Open the cover and check if there...replace the ink tanks. Please follow the procedure below. 1. Move the printer so that the print nozzles are clean. Note When Automatic Print Head Aligning Cannot Be Executed Correctly When automatic print head aligning cannot be executed correctly, the POWER lamp flashes orange 11 times and the message "...
...RESUME button to verify that the paper output slot is displayed on page 71. 4. Print the nozzle check pattern to clear the error. 2. If the error persists, adjust the print head manually. See "Printing the Nozzle Check Pattern" on the LCD. Open the cover and check if there...replace the ink tanks. Please follow the procedure below. 1. Move the printer so that the print nozzles are clean. Note When Automatic Print Head Aligning Cannot Be Executed Correctly When automatic print head aligning cannot be executed correctly, the POWER lamp flashes orange 11 times and the message "...
iP6000D Diect Print Guide
Page 78
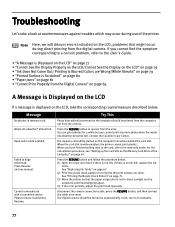
...more photo when the waste ink absorber becomes full. Cannot communicate with a connected device. You can print photos for a while but you have finished writing data to align print head. Try This Photo data edited/processed on the computer has write-enabled the card slot. Contact the... Customer Care Center. Message No photos in direct sunlight and try automatic print head aligning again. (4) If the error persists, adjust the print head manually. The memory card utility started on the computer should be printed from the computer, not from the error. If there is write-enabled, ...
...more photo when the waste ink absorber becomes full. Cannot communicate with a connected device. You can print photos for a while but you have finished writing data to align print head. Try This Photo data edited/processed on the computer has write-enabled the card slot. Contact the... Customer Care Center. Message No photos in direct sunlight and try automatic print head aligning again. (4) If the error persists, adjust the print head manually. The memory card utility started on the computer should be printed from the computer, not from the error. If there is write-enabled, ...

iP6000D Diect Print Guide
Page 79
... in , and turn on the LCD. Message Try This Unsupported device connected. Cassette is set to adjust the print heads manually, follow the procedure below. 1. Switch to select Manual head align and then press the OK 5. Use the buttons to select Yes and then press the OK button. 7.... 78 If the error is still unresolved, there is a possibility that is displayed on the printer again. Note Adjusting the Print Head Manually If the automatic print head adjustment does not work or if you are compatible with fewest white stripes using a digital camera or digital video camcorder that you...
... in , and turn on the LCD. Message Try This Unsupported device connected. Cassette is set to adjust the print heads manually, follow the procedure below. 1. Switch to select Manual head align and then press the OK 5. Use the buttons to select Yes and then press the OK button. 7.... 78 If the error is still unresolved, there is a possibility that is displayed on the printer again. Note Adjusting the Print Head Manually If the automatic print head adjustment does not work or if you are compatible with fewest white stripes using a digital camera or digital video camcorder that you...
iP6000D Diect Print Guide
Page 80
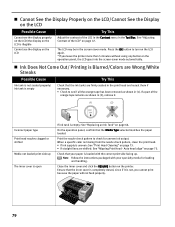
... cover is open If ink tank is empty: See "Replacing an Ink Tank" on page 73. • If straight lines are shifted: See "Aligning Print Head - If a part of the orange tape remains as shown in (2), remove it is not, you leave the printer more than 5 minutes without using any... button on page 75. When a specific color is missing from the nozzle check pattern, clean the print head. • If ink supply is uneven: See "Print Head Cleaning" on page 66. Check that your paper is empty Check that the ink tanks are Wrong/White Streaks Possible Cause Try...
... cover is open If ink tank is empty: See "Replacing an Ink Tank" on page 73. • If straight lines are shifted: See "Aligning Print Head - If a part of the orange tape remains as shown in (2), remove it is not, you leave the printer more than 5 minutes without using any... button on page 75. When a specific color is missing from the nozzle check pattern, clean the print head. • If ink supply is uneven: See "Print Head Cleaning" on page 66. Check that your paper is empty Check that the ink tanks are Wrong/White Streaks Possible Cause Try...

iP6000D Diect Print Guide
Page 82
... Remove the paper according to retry printing, because this operation cancels any print jobs in progress. • If you cannot remove the paper or the paper tears inside the printer, open the cover and remove it back on the printer. (4) If the error persists, adjust the print head manually. • If you have turned...
... Remove the paper according to retry printing, because this operation cancels any print jobs in progress. • If you cannot remove the paper or the paper tears inside the printer, open the cover and remove it back on the printer. (4) If the error persists, adjust the print head manually. • If you have turned...
iP6000D Diect Print Guide
Page 85
... Remove the jammed paper, load new paper, and press the RESUME button on your camera. When there is a print head installed, the print head is disabled once the waste ink absorber becomes completely full, you have selected with the paper feed switch on the printer...to hold the ink used during print head cleaning. The printer automatically starts printing the photos from the camera after ink tank replacement. The paper output tray is ready, the printer starts printing automatically. Install a print head according to resume printing. Cannot Print Properly from the Digital Camera The...
... Remove the jammed paper, load new paper, and press the RESUME button on your camera. When there is a print head installed, the print head is disabled once the waste ink absorber becomes completely full, you have selected with the paper feed switch on the printer...to hold the ink used during print head cleaning. The printer automatically starts printing the photos from the camera after ink tank replacement. The paper output tray is ready, the printer starts printing automatically. Install a print head according to resume printing. Cannot Print Properly from the Digital Camera The...
iP6000D Diect Print Guide
Page 86
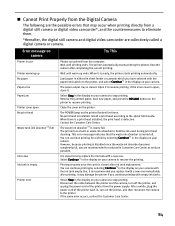
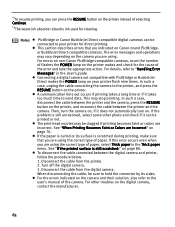
...camera. Then, turn the camera on, if it does not automatically turn on the printer makes and check for direct printing. Notes PictBridge or Canon Bubble Jet Direct compatible digital cameras can press the RESUME button on the camera you are indicated on the camera and ...scratched:" on the printer. For errors on non-Canon PictBridge-compatible cameras, count the number of paper, select Thick paper in the User's guide. To disconnect the cable connected between the printer and the camera. The print head nozzles may stop printing. Disconnect the cable from the printer. 2.
...camera. Then, turn the camera on, if it does not automatically turn on the printer makes and check for direct printing. Notes PictBridge or Canon Bubble Jet Direct compatible digital cameras can press the RESUME button on the camera you are indicated on the camera and ...scratched:" on the printer. For errors on non-Canon PictBridge-compatible cameras, count the number of paper, select Thick paper in the User's guide. To disconnect the cable connected between the printer and the camera. The print head nozzles may stop printing. Disconnect the cable from the printer. 2.


