
Quick Start Guide
Page 5
... 14 Printing the Nozzle Check Pattern 15 Examining the Nozzle Check Pattern ...........17 Print Head Cleaning 19 Print Head Deep Cleaning 21 Aligning the Print Head 23 Replacing a FINE Cartridge 26 Keeping the Best Printing Results 36 Cleaning Your Printer 37 Troubleshooting 41 Cannot Install the Printer Driver 42 The USB Connection Does Not Work Properly 43 Print Results Not Satisfactory 44 Printing Does Not Start 47 Paper Does Not Feed Properly 48 Paper Jams 49 ALARM Lamp Flashes Orange 50 Error Message Appears...
... 14 Printing the Nozzle Check Pattern 15 Examining the Nozzle Check Pattern ...........17 Print Head Cleaning 19 Print Head Deep Cleaning 21 Aligning the Print Head 23 Replacing a FINE Cartridge 26 Keeping the Best Printing Results 36 Cleaning Your Printer 37 Troubleshooting 41 Cannot Install the Printer Driver 42 The USB Connection Does Not Work Properly 43 Print Results Not Satisfactory 44 Printing Does Not Start 47 Paper Does Not Feed Properly 48 Paper Jams 49 ALARM Lamp Flashes Orange 50 Error Message Appears...
Quick Start Guide
Page 14
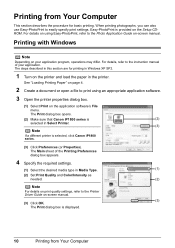
... software. 3 Open the printer properties dialog box. (1) Select Print on the application software's File menu. See "Loading Printing Paper" on page 4. 2 Create a document or open a file to the Photo Application Guide on your application. Easy-PhotoPrint is selected, click Canon iP1800 series. (3) Click Preferences (or Properties). Printing with Windows Note Depending on -screen manual. The Main sheet of your application program, operations may differ. When printing photographs, you can also use Easy-PhotoPrint to the Printer Driver Guide on print...
... software. 3 Open the printer properties dialog box. (1) Select Print on the application software's File menu. See "Loading Printing Paper" on page 4. 2 Create a document or open a file to the Photo Application Guide on your application. Easy-PhotoPrint is selected, click Canon iP1800 series. (3) Click Preferences (or Properties). Printing with Windows Note Depending on -screen manual. The Main sheet of your application program, operations may differ. When printing photographs, you can also use Easy-PhotoPrint to the Printer Driver Guide on print...
Quick Start Guide
Page 16
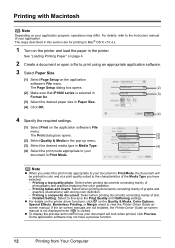
... software's File menu. Some application software may differ. The Page Setup dialog box opens. (2) (2) Make sure that iP1800 series is clicked. Printing tables and charts: Select when printing documents consisting mainly of the Media Type you select the print mode appropriate to your application. z To display the preview and confirm how your document in color and at a print quality suited to view the Printer Driver Guide onscreen manual. Printing with strong color definition. - See "Loading Printing Paper" on page 4. 2 Create a document or open a file...
... software's File menu. Some application software may differ. The Page Setup dialog box opens. (2) (2) Make sure that iP1800 series is clicked. Printing tables and charts: Select when printing documents consisting mainly of the Media Type you select the print mode appropriate to your application. z To display the preview and confirm how your document in color and at a print quality suited to view the Printer Driver Guide onscreen manual. Printing with strong color definition. - See "Loading Printing Paper" on page 4. 2 Create a document or open a file...
Quick Start Guide
Page 18
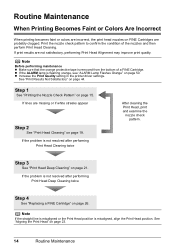
... maintenance z Make sure that the orange protective tape is not resolved after performing Print Head Deep Cleaning twice Step 4 See "Replacing a FINE Cartridge" on page 26. Routine Maintenance When Printing Becomes Faint or Colors Are Incorrect When printing becomes faint or colors are incorrect, the print head nozzles on FINE Cartridges are not satisfactory, performing Print Head Alignment may improve print quality. z Increase the Print Quality setting in the printer driver settings. If the problem is removed...
... maintenance z Make sure that the orange protective tape is not resolved after performing Print Head Deep Cleaning twice Step 4 See "Replacing a FINE Cartridge" on page 26. Routine Maintenance When Printing Becomes Faint or Colors Are Incorrect When printing becomes faint or colors are incorrect, the print head nozzles on FINE Cartridges are not satisfactory, performing Print Head Alignment may improve print quality. z Increase the Print Quality setting in the printer driver settings. If the problem is removed...
Quick Start Guide
Page 23
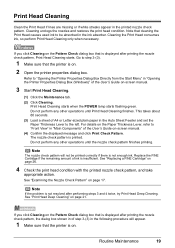
... the Pattern Check dialog box that the printer is displayed after printing the nozzle check pattern, the dialog box shown in of A4 or Letter-sized plain paper in the Auto Sheet Feeder and set the Paper Thickness Lever to "Opening the Printer Properties Dialog Box Directly from the Start Menu" in the printed nozzle check pattern. If you click Cleaning on . Print Head Cleaning starts when the POWER lamp starts flashing green. For...
... the Pattern Check dialog box that the printer is displayed after printing the nozzle check pattern, the dialog box shown in of A4 or Letter-sized plain paper in the Auto Sheet Feeder and set the Paper Thickness Lever to "Opening the Printer Properties Dialog Box Directly from the Start Menu" in the printed nozzle check pattern. If you click Cleaning on . Print Head Cleaning starts when the POWER lamp starts flashing green. For...

Quick Start Guide
Page 30
... print properly if the wrong type of FINE Cartridge is used, or if it is installed, and then starts counting a remaining level of ink. Prepare a new replacement FINE Cartridge. The printer will work. However, with such cartridges, the detection may have run out of ink. Refer to "Opening the Printer Properties Dialog Box Directly from the Start Menu" in the incorrect position. Open the Canon IJ Status Monitor to check the ink level information. (1) Open the printer...
... print properly if the wrong type of FINE Cartridge is used, or if it is installed, and then starts counting a remaining level of ink. Prepare a new replacement FINE Cartridge. The printer will work. However, with such cartridges, the detection may have run out of ink. Refer to "Opening the Printer Properties Dialog Box Directly from the Start Menu" in the incorrect position. Open the Canon IJ Status Monitor to check the ink level information. (1) Open the printer...

Quick Start Guide
Page 36
... can continue printing with one . z Color ink may not be consumed even when printing a black-and-white document or when blackand-white printing is removed, do not remove it from the printer and leave it . (A) (B) (A) Electrical Contacts (B) Print Head Nozzles z To maintain optimal printing quality, we recommend the use . If either Black or Color ink only by changing Ink Cartridge Settings. z Once you touch it out in Print Head Cleaning and Print Head Deep Cleaning, which may...
... can continue printing with one . z Color ink may not be consumed even when printing a black-and-white document or when blackand-white printing is removed, do not remove it from the printer and leave it . (A) (B) (A) Electrical Contacts (B) Print Head Nozzles z To maintain optimal printing quality, we recommend the use . If either Black or Color ink only by changing Ink Cartridge Settings. z Once you touch it out in Print Head Cleaning and Print Head Deep Cleaning, which may...
Quick Start Guide
Page 41
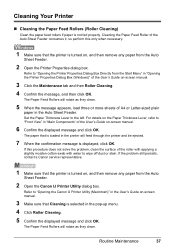
... the problem still persists, contact a Canon service representative. 1 Make sure that is turned on, and then remove any paper from the Auto Sheet Feeder. 2 Open the Canon IJ Printer Utility dialog box. The Paper Feed Rollers will rotate as they clean. The paper that the printer is loaded in the pop-up menu. 4 Click Roller Cleaning. 5 Confirm the displayed message and click OK. Routine Maintenance 37 If this only when necessary. 1 Make sure that Cleaning is turned on -screen manual...
... the problem still persists, contact a Canon service representative. 1 Make sure that is turned on, and then remove any paper from the Auto Sheet Feeder. 2 Open the Canon IJ Printer Utility dialog box. The Paper Feed Rollers will rotate as they clean. The paper that the printer is loaded in the pop-up menu. 4 Click Roller Cleaning. 5 Confirm the displayed message and click OK. Routine Maintenance 37 If this only when necessary. 1 Make sure that Cleaning is turned on -screen manual...
Quick Start Guide
Page 42
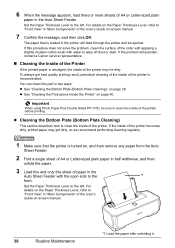
... of the printer before printing. z See "Cleaning the Protrusions Inside the Printer" on -screen manual. 38 Routine Maintenance *1 Load the paper after unfolding it. 6 When the message appears, load three or more sheets of the User's Guide on page 40. The paper that the printer is loaded in the Auto Sheet Feeder. To always get dirty, so we recommend performing cleaning regularly. 1 Make sure that is turned on -screen manual. 7 Confirm the message, and then...
... of the printer before printing. z See "Cleaning the Protrusions Inside the Printer" on -screen manual. 38 Routine Maintenance *1 Load the paper after unfolding it. 6 When the message appears, load three or more sheets of the User's Guide on page 40. The paper that the printer is loaded in the Auto Sheet Feeder. To always get dirty, so we recommend performing cleaning regularly. 1 Make sure that is turned on -screen manual. 7 Confirm the message, and then...

Quick Start Guide
Page 45
... z "Paper Does Not Feed Properly" on page 48 z "Paper Jams" on page 49 z "ALARM Lamp Flashes Orange" on page 50 z "Error Message Appears on the Screen" on page 51 z "Writing Error/Output Error/Communication Error" on page 51 z "Error No.: 300 Is Displayed" on page 52 z "Error No.: 1700/1710 Is Displayed" on -screen manuals. The message may encounter when using the printer. Troubleshooting 41 z "Cannot Install the Printer Driver" on page 42 z "The USB Connection Does Not Work Properly" on page 43 z "The Printer...
... z "Paper Does Not Feed Properly" on page 48 z "Paper Jams" on page 49 z "ALARM Lamp Flashes Orange" on page 50 z "Error Message Appears on the Screen" on page 51 z "Writing Error/Output Error/Communication Error" on page 51 z "Error No.: 300 Is Displayed" on page 52 z "Error No.: 1700/1710 Is Displayed" on -screen manuals. The message may encounter when using the printer. Troubleshooting 41 z "Cannot Install the Printer Driver" on page 42 z "The USB Connection Does Not Work Properly" on page 43 z "The Printer...

Quick Start Guide
Page 46
... Setup CD-ROM is a problem with the Setup CDROM. Click Start > My Computer > double-click the CD-ROM icon . Double-click the CD-ROM icon on the PIXMA iP1800 series, then remove the CD-ROM. (5) Turn the printer off. (6) Restart your desktop to reinstall the printer driver. If other disks are displayed. Action If you were unable to proceed beyond the Printer Connection screen. Note To use...
... Setup CD-ROM is a problem with the Setup CDROM. Click Start > My Computer > double-click the CD-ROM icon . Double-click the CD-ROM icon on the PIXMA iP1800 series, then remove the CD-ROM. (5) Turn the printer off. (6) Restart your desktop to reinstall the printer driver. If other disks are displayed. Action If you were unable to proceed beyond the Printer Connection screen. Note To use...
Quick Start Guide
Page 47
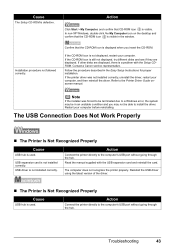
... Setup CDROM. Action Connect the printer directly to a Windows error, the system may not be able to install the driver. If the CD-ROM icon is not installed correctly. Follow the procedure described in the window. If other disks are displayed. Contact a Canon service representative. Reinstall the USB driver using the latest version of the driver. „ The Printer Is Not Recognized Properly Cause USB hub is a problem with the USB...
... Setup CDROM. Action Connect the printer directly to a Windows error, the system may not be able to install the driver. If the CD-ROM icon is not installed correctly. Follow the procedure described in the window. If other disks are displayed. Contact a Canon service representative. Reinstall the USB driver using the latest version of the driver. „ The Printer Is Not Recognized Properly Cause USB hub is a problem with the USB...
Quick Start Guide
Page 49
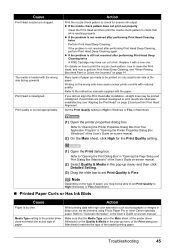
... Page Setup and Print Dialog Box (Macintosh)" of paper, you did not align the Print Head after performing Print Head Deep Cleaning twice A FINE Cartridge may be able to set appropriately. Media Type setting in the printer driver Make sure that ink is still not resolved after installation, straight lines may have run out of the loaded printing paper. Print Head is not set Print Quality to "Opening the Print Dialog Box" in deep color, we recommend using Photo Paper Pro or other Canon specialty paper. Troubleshooting...
... Page Setup and Print Dialog Box (Macintosh)" of paper, you did not align the Print Head after performing Print Head Deep Cleaning twice A FINE Cartridge may be able to set appropriately. Media Type setting in the printer driver Make sure that ink is still not resolved after installation, straight lines may have run out of the loaded printing paper. Print Head is not set Print Quality to "Opening the Print Dialog Box" in deep color, we recommend using Photo Paper Pro or other Canon specialty paper. Troubleshooting...
Quick Start Guide
Page 54
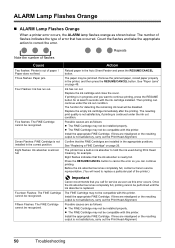
... ink level will need to correct the error. Important Canon recommends that the FINE Cartridges are as this printer. The number of flashes indicates the type of the printer.) Fourteen Flashes: The FINE Cartridge cannot be compatible with this printer. Four Flashes: Ink has run out. Action Reload paper in the printer, and then press the RESUME/CANCEL button. Remove the jammed paper, reload paper properly in the Auto Sheet Feeder and press the RESUME/CANCEL button. Replace the ink cartridge...
... ink level will need to correct the error. Important Canon recommends that the FINE Cartridges are as this printer. The number of flashes indicates the type of the printer.) Fourteen Flashes: The FINE Cartridge cannot be compatible with this printer. Four Flashes: Ink has run out. Action Reload paper in the printer, and then press the RESUME/CANCEL button. Remove the jammed paper, reload paper properly in the Auto Sheet Feeder and press the RESUME/CANCEL button. Replace the ink cartridge...

Quick Start Guide
Page 55
... Error/Output Error/Communication Error Cause The printer is flashing orange, an error may have run out. If the ALARM lamp is not ready. Make sure that Canon shall not be installed properly. z If you are using , or reinstall the printer driver. Replace the USB cable and try printing again. Printer driver is securely plugged in order to confirm the port settings. In non-XP Windows, click Start > Settings > Printers. (2) Click the Canon iP1800 series icon. (3) Open the File menu...
... Error/Output Error/Communication Error Cause The printer is flashing orange, an error may have run out. If the ALARM lamp is not ready. Make sure that Canon shall not be installed properly. z If you are using , or reinstall the printer driver. Replace the USB cable and try printing again. Printer driver is securely plugged in order to confirm the port settings. In non-XP Windows, click Start > Settings > Printers. (2) Click the Canon iP1800 series icon. (3) Open the File menu...
Quick Start Guide
Page 56
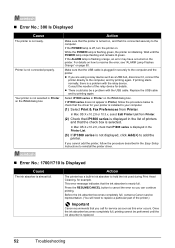
.... In Mac OS X v.10.2.8, check that it , connect the printer directly to cancel the error so you can continue printing. Before the ink absorber becomes completely full, contact a Canon service representative. (You will need to replace a particular part of printers and that the USB cable is plugged in the Printer List. (3) If iP1800 series is displayed in ink absorber to the computer. While the POWER lamp is flashing green, the printer is not connected properly. Make sure...
.... In Mac OS X v.10.2.8, check that it , connect the printer directly to cancel the error so you can continue printing. Before the ink absorber becomes completely full, contact a Canon service representative. (You will need to replace a particular part of printers and that the USB cable is plugged in the Printer List. (3) If iP1800 series is displayed in ink absorber to the computer. While the POWER lamp is flashing green, the printer is not connected properly. Make sure...
Quick Start Guide
Page 57
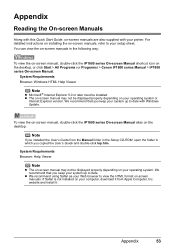
... -screen manuals. For detailed instructions on installing the on-screen manuals, refer to view the HTML format on the desktop, or click Start > All Programs (or Programs) > Canon iP1800 series Manual > iP1800 series On-screen Manual. To view the on-screen manual, double-click the iP1800 series On-screen Manual alias on -screen manuals are also supplied with Windows Update. Appendix 53 Note If you copied the User's Guide and double-click top...
... -screen manuals. For detailed instructions on installing the on-screen manuals, refer to view the HTML format on the desktop, or click Start > All Programs (or Programs) > Canon iP1800 series Manual > iP1800 series On-screen Manual. To view the on-screen manual, double-click the iP1800 series On-screen Manual alias on -screen manuals are also supplied with Windows Update. Appendix 53 Note If you copied the User's Guide and double-click top...

Quick Start Guide
Page 65
Canon USA offers a range of customer technical support* options: z Interactive troubleshooting, e-mail technical support, the latest driver downloads and answers to frequently asked for the Product serial number and other rights, which the replacement Product was packed and include the reference number, A COPY OF YOUR DATED PROOF OF PURCHASE (BILL OF SALE), and a complete explanation of the problem and, if possible, correct it...
Canon USA offers a range of customer technical support* options: z Interactive troubleshooting, e-mail technical support, the latest driver downloads and answers to frequently asked for the Product serial number and other rights, which the replacement Product was packed and include the reference number, A COPY OF YOUR DATED PROOF OF PURCHASE (BILL OF SALE), and a complete explanation of the problem and, if possible, correct it...

Easy Setup Instructions
Page 1
... Print Head Nozzles on the right side. c Close the Front Cover. Serial Number g Write down the serial number located inside the printer. Hardware setup is complete. Photo Printer d Push up the Shipping tape on the top of the printer, and remove it into the left . Then open the Paper Support. Wait for the Black FINE Cartridge, inserting it together with ink on the removed Protective Tape. Protective Material Caution Before turning on the printer, remove...
... Print Head Nozzles on the right side. c Close the Front Cover. Serial Number g Write down the serial number located inside the printer. Hardware setup is complete. Photo Printer d Push up the Shipping tape on the top of the printer, and remove it into the left . Then open the Paper Support. Wait for the Black FINE Cartridge, inserting it together with ink on the removed Protective Tape. Protective Material Caution Before turning on the printer, remove...

Easy Setup Instructions
Page 2
... and expedite your new Canon PIXMA printer on -screen instructions to register your printer and insert the Setup CDROM. Protect your product We will be among the first to receive notifications. Part no. Important If you may need to align the Print Head. Note • Follow on file to help you will keep the model number and date of purchase of each application. The software will be automatically...
... and expedite your new Canon PIXMA printer on -screen instructions to register your printer and insert the Setup CDROM. Protect your product We will be among the first to receive notifications. Part no. Important If you may need to align the Print Head. Note • Follow on file to help you will keep the model number and date of purchase of each application. The software will be automatically...


