
Quick Start Guide
Page 2
...- (1-800-828-4040) This option provides live telephone technical support, free of service charges, MondaySaturday (excluding holidays), during your Canon service and support, call (1-800-385-2155), or visit our Web site at (1-866-251-3752). 4. CarePAK offers toll-free...try emailing our friendly technical support representatives, specially trained to communicate quick, easy, and logical solutions to three full years of the product Setup CD-ROM number (located on the CD-ROM Purchase Date Customer Technical Support Sequence* 1. For more information and updated program specifics, please...
...- (1-800-828-4040) This option provides live telephone technical support, free of service charges, MondaySaturday (excluding holidays), during your Canon service and support, call (1-800-385-2155), or visit our Web site at (1-866-251-3752). 4. CarePAK offers toll-free...try emailing our friendly technical support representatives, specially trained to communicate quick, easy, and logical solutions to three full years of the product Setup CD-ROM number (located on the CD-ROM Purchase Date Customer Technical Support Sequence* 1. For more information and updated program specifics, please...
Quick Start Guide
Page 6
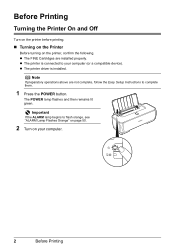
... begins to complete them. 1 Press the POWER button. Note If preparatory operations above are installed properly. z The FINE Cartridges are not complete, follow the Easy Setup Instructions to flash orange, see "ALARM Lamp Flashes Orange" on page 50. 2 Turn on the printer, confirm the following. z The printer is installed. The POWER...
... begins to complete them. 1 Press the POWER button. Note If preparatory operations above are installed properly. z The FINE Cartridges are not complete, follow the Easy Setup Instructions to flash orange, see "ALARM Lamp Flashes Orange" on page 50. 2 Turn on the printer, confirm the following. z The printer is installed. The POWER...
Quick Start Guide
Page 10
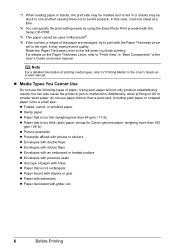
...less than 64 gsm / 17 lb) z Paper that is not rectangular z Paper bound with staples or glue z Paper with adhesives z Paper decorated with the Setup CD-ROM. *5 This paper cannot be used in "Main Components" of paper. Note For a detailed description of paper with holes z Paper that is too ...thick (plain paper, except for Canon genuine paper, weighing more than a post card, including plain paper or notepad paper cut to the left when you finish printing. It may improve ...
...less than 64 gsm / 17 lb) z Paper that is not rectangular z Paper bound with staples or glue z Paper with adhesives z Paper decorated with the Setup CD-ROM. *5 This paper cannot be used in "Main Components" of paper. Note For a detailed description of paper with holes z Paper that is too ...thick (plain paper, except for Canon genuine paper, weighing more than a post card, including plain paper or notepad paper cut to the left when you finish printing. It may improve ...
Quick Start Guide
Page 14
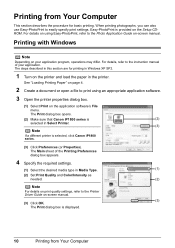
... the desired media type in this section are for basic printing. The Print dialog box opens. (2) Make sure that Canon iP1800 series is (2) selected in the printer. See "Loading Printing Paper" on the Setup CDROM. The Main sheet of your application program, operations may differ. For details, refer to the Photo Application Guide...
... the desired media type in this section are for basic printing. The Print dialog box opens. (2) Make sure that Canon iP1800 series is (2) selected in the printer. See "Loading Printing Paper" on the Setup CDROM. The Main sheet of your application program, operations may differ. For details, refer to the Photo Application Guide...
Quick Start Guide
Page 15
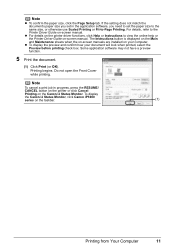
... application software, you set in progress, press the RESUME/ CANCEL button on the printer or click Cancel Printing on the Canon IJ Status Monitor. To display the Canon IJ Status Monitor, click Canon iP1800 series on -screen manual. Do not open the Front Cover while printing. Some application software may not have a preview function... Driver Guide on your document will look when printed, select the Preview before printing check box. Note z To confirm the paper size, click the Page Setup tab. Printing begins.
... application software, you set in progress, press the RESUME/ CANCEL button on the printer or click Cancel Printing on the Canon IJ Status Monitor. To display the Canon IJ Status Monitor, click Canon iP1800 series on -screen manual. Do not open the Front Cover while printing. Some application software may not have a preview function... Driver Guide on your document will look when printed, select the Preview before printing check box. Note z To confirm the paper size, click the Page Setup tab. Printing begins.
Quick Start Guide
Page 16
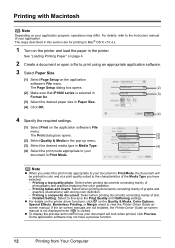
...the Print Quality and Halftoning settings. Detailed Setting: Select to print using an appropriate application software. 3 Select Paper Size. (1) Select Page Setup on the application software's File menu. If the on-screen manuals are for . (3) Select the desired paper size in color and ...in Print Mode. Printing a top-quality photo: Select when printing documents consisting mainly of text. - The Page Setup dialog box opens. (2) (2) Make sure that iP1800 series is clicked. Printing tables and charts: Select when printing documents consisting mainly of the Media Type you have ...
...the Print Quality and Halftoning settings. Detailed Setting: Select to print using an appropriate application software. 3 Select Paper Size. (1) Select Page Setup on the application software's File menu. If the on-screen manuals are for . (3) Select the desired paper size in color and ...in Print Mode. Printing a top-quality photo: Select when printing documents consisting mainly of text. - The Page Setup dialog box opens. (2) (2) Make sure that iP1800 series is clicked. Printing tables and charts: Select when printing documents consisting mainly of the Media Type you have ...

Quick Start Guide
Page 46
In non-XP Windows, double-click the My Computer icon on the PIXMA iP1800 series, then remove the CD-ROM. (5) Turn the printer off. (6) Restart your desktop to proceed beyond the Printer Connection screen, follow the procedure below to ... Unable to start installation. If other disks are displayed. Installation does not start automatically when the Setup CD-ROM is a problem with the Setup CDROM. Click Start > My Computer > double-click the CD-ROM icon . Contact a Canon service representative. 42 Troubleshooting Double-click the CD-ROM icon on your computer's disc drive. Action...
In non-XP Windows, double-click the My Computer icon on the PIXMA iP1800 series, then remove the CD-ROM. (5) Turn the printer off. (6) Restart your desktop to proceed beyond the Printer Connection screen, follow the procedure below to ... Unable to start installation. If other disks are displayed. Installation does not start automatically when the Setup CD-ROM is a problem with the Setup CDROM. Click Start > My Computer > double-click the CD-ROM icon . Contact a Canon service representative. 42 Troubleshooting Double-click the CD-ROM icon on your computer's disc drive. Action...
Quick Start Guide
Page 47
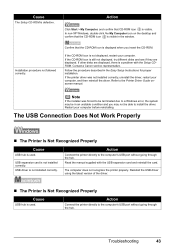
..., the system may not be able to the computer's USB port without going through the hub. Read the manual supplied with the Setup CDROM. USB expansion card is defective. Troubleshooting 43 Action Connect the printer directly to install the driver. Action Connect the printer directly...Windows, double-click the My Computer icon on the desktop and confirm that the CD-ROM icon is not installed correctly. Contact a Canon service representative. Restart your computer, and then reinstall the driver. Confirm that CD-ROM icon is not displayed, restart your computer. ...
..., the system may not be able to the computer's USB port without going through the hub. Read the manual supplied with the Setup CDROM. USB expansion card is defective. Troubleshooting 43 Action Connect the printer directly to install the driver. Action Connect the printer directly...Windows, double-click the My Computer icon on the desktop and confirm that the CD-ROM icon is not installed correctly. Contact a Canon service representative. Restart your computer, and then reinstall the driver. Confirm that CD-ROM icon is not displayed, restart your computer. ...
Quick Start Guide
Page 48
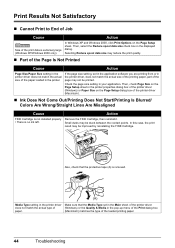
In Windows XP and Windows 2000, click Print Options on the Page Setup dialog box of the print data is extremely large (Windows XP/Windows 2000 only). Also, check that the protective tape (A) ... does not match the actual type of (Windows) or the Quality & Media in the printer. Then, check Page Size on the Page Setup sheet in the displayed dialog. Print Results Not Satisfactory „ Cannot Print to End of Job Cause Action Size of the printer driver ... check box in the printer properties dialog box of the printer driver (Windows) or Paper Size on the Page Setup sheet.
In Windows XP and Windows 2000, click Print Options on the Page Setup dialog box of the print data is extremely large (Windows XP/Windows 2000 only). Also, check that the protective tape (A) ... does not match the actual type of (Windows) or the Quality & Media in the printer. Then, check Page Size on the Page Setup sheet in the displayed dialog. Print Results Not Satisfactory „ Cannot Print to End of Job Cause Action Size of the printer driver ... check box in the printer properties dialog box of the printer driver (Windows) or Paper Size on the Page Setup sheet.
Quick Start Guide
Page 49
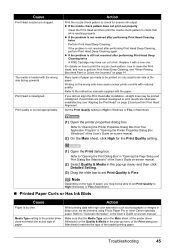
... Head, and how to "Opening the Printer Properties Dialog Box from Your Application Program" in deep color, we recommend using Photo Paper Pro or other Canon specialty paper. If you may cause unclear prints or prints with high color saturation such as photographs or images in "Opening the Printer Properties Dialog... Blots Cause Action Paper is still not resolved after installation, straight lines may be printed on -screen manual. (2) Select Quality & Media in "Opening the Page Setup and Print Dialog Box (Macintosh)" of the loaded printing paper. Note Depending on -screen manual.
... Head, and how to "Opening the Printer Properties Dialog Box from Your Application Program" in deep color, we recommend using Photo Paper Pro or other Canon specialty paper. If you may cause unclear prints or prints with high color saturation such as photographs or images in "Opening the Printer Properties Dialog... Blots Cause Action Paper is still not resolved after installation, straight lines may be printed on -screen manual. (2) Select Quality & Media in "Opening the Page Setup and Print Dialog Box (Macintosh)" of the loaded printing paper. Note Depending on -screen manual.

Quick Start Guide
Page 55
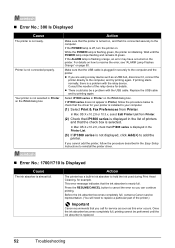
.... If the port setting is lit. The printer driver may not be correctly detected. Uninstall them following the procedure described in the Easy Setup Instructions. Cause Action Sixteen Flashes: Ink level cannot be a problem with the relay device. Ink may have run out. If you are... the procedure described in order to continue printing without this function, press the RESUME button for details. Make sure that a port named USBnnn (Canon iP1800 series) (where "n" is a number) is securely plugged in and turn the printer on the Screen „ Writing Error/Output Error/Communication ...
.... If the port setting is lit. The printer driver may not be correctly detected. Uninstall them following the procedure described in the Easy Setup Instructions. Cause Action Sixteen Flashes: Ink level cannot be a problem with the relay device. Ink may have run out. If you are... the procedure described in order to continue printing without this function, press the RESUME button for details. Make sure that a port named USBnnn (Canon iP1800 series) (where "n" is a number) is securely plugged in and turn the printer on the Screen „ Writing Error/Output Error/Communication ...
Quick Start Guide
Page 56
... absorber is initializing. If the POWER lamp is replaced. 52 Troubleshooting Your printer is not selected in the list of the printer.) Important Canon recommends that iP1800 series is selected. For details on how to the computer and the printer. In Mac OS X v.10.2.8, check that you cannot add... it , connect the printer directly to add the printer. If the ALARM lamp is turned on the Print dialog box. Select iP1800 series in the Easy Setup Instructions to cancel the error so you are using a relay device such as this error occurs. Press the RESUME/CANCEL button to...
... absorber is initializing. If the POWER lamp is replaced. 52 Troubleshooting Your printer is not selected in the list of the printer.) Important Canon recommends that iP1800 series is selected. For details on how to the computer and the printer. In Mac OS X v.10.2.8, check that you cannot add... it , connect the printer directly to add the printer. If the ALARM lamp is turned on the Print dialog box. Select iP1800 series in the Easy Setup Instructions to cancel the error so you are using a relay device such as this error occurs. Press the RESUME/CANCEL button to...
Quick Start Guide
Page 57
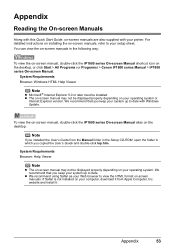
...Microsoft® Internet Explorer 5.0 or later must be displayed properly depending on the desktop, or click Start > All Programs (or Programs) > Canon iP1800 series Manual > iP1800 series On-screen Manual. Note If you copied the User's Guide and double-click top.htm. To view the on-screen manual, double-click... format on the desktop. Appendix Reading the On-screen Manuals Along with this Quick Start Guide, on -screen manuals, refer to your setup sheet. You can view the on your operating system or Internet Explorer version. For detailed instructions on installing the on -screen manuals are...
...Microsoft® Internet Explorer 5.0 or later must be displayed properly depending on the desktop, or click Start > All Programs (or Programs) > Canon iP1800 series Manual > iP1800 series On-screen Manual. Note If you copied the User's Guide and double-click top.htm. To view the on-screen manual, double-click... format on the desktop. Appendix Reading the On-screen Manuals Along with this Quick Start Guide, on -screen manuals, refer to your setup sheet. You can view the on your operating system or Internet Explorer version. For detailed instructions on installing the on -screen manuals are...

Easy Setup Instructions
Page 1
... outlet. You will need this to register your computer. 1 Prepare the Printer Note When moving the printer, carry the printer at this stage. Hardware setup is secure in slots. Power Cord 2 Install the FINE Cartridges a Remove the Color FINE Cartridge from its box. Click a Place the printer on... objects in the back of the shipping tapes. Important Once you have removed it into the left . QT50918V01 Unpack the Printer Start Here Easy Setup Instructions • Please confirm the included items against the illustration printed on the lid of the packing box. • A USB cable is ...
... outlet. You will need this to register your computer. 1 Prepare the Printer Note When moving the printer, carry the printer at this stage. Hardware setup is secure in slots. Power Cord 2 Install the FINE Cartridges a Remove the Color FINE Cartridge from its box. Click a Place the printer on... objects in the back of the shipping tapes. Important Once you have removed it into the left . QT50918V01 Unpack the Printer Start Here Easy Setup Instructions • Please confirm the included items against the illustration printed on the lid of the packing box. • A USB cable is ...

Easy Setup Instructions
Page 2
...is located on the desktop after installing the printer driver, you refer to this information and expedite your product. Register your new Canon PIXMA printer on -screen Help. You will keep the model number and date of purchase of the printer. Protect your product We ... Systems Incorporated in the User's Guide on -screen instructions to register your Canon PIXMA printer today, and you see the Found New Hardware Wizard, remove the USB cable. j After restarting the computer, start Printer Setup Utility (start Windows. Receive information on -screen instructions to install the software...
...is located on the desktop after installing the printer driver, you refer to this information and expedite your product. Register your new Canon PIXMA printer on -screen Help. You will keep the model number and date of purchase of the printer. Protect your product We ... Systems Incorporated in the User's Guide on -screen instructions to register your Canon PIXMA printer today, and you see the Found New Hardware Wizard, remove the USB cable. j After restarting the computer, start Printer Setup Utility (start Windows. Receive information on -screen instructions to install the software...


