Quick Start Guide
Page 52
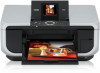
.... z Replace empty tanks with ink tanks removed. To maintain optimal printing quality, use an ink tank within six months of first use of specified Canon brand ink tanks. Color ink is also consumed in the rounded indent of the Paper Output Tray and open it gently. 2 Make sure that the...immediately with such tanks, the machine will cause the ink tank to replace the tanks properly. The Print Head Holder moves to the center. 3 Open the Inner Cover. Close and reopen the Scanning Unit (Printer Cover) to return the holder to the center. z Once an ink tank has been installed, do not...
.... z Replace empty tanks with ink tanks removed. To maintain optimal printing quality, use an ink tank within six months of first use of specified Canon brand ink tanks. Color ink is also consumed in the rounded indent of the Paper Output Tray and open it gently. 2 Make sure that the...immediately with such tanks, the machine will cause the ink tank to replace the tanks properly. The Print Head Holder moves to the center. 3 Open the Inner Cover. Close and reopen the Scanning Unit (Printer Cover) to return the holder to the center. z Once an ink tank has been installed, do not...

Quick Start Guide
Page 54
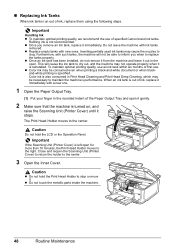
...). 6 Install the ink tank. (1) Insert the front end of the tank matches the label. z Do not hold the Scanning Unit (Printer Cover) firmly using both hands, and be used unless all the ink tanks are installed. *1 (1) 7 Close the Inner Cover. (3) (2) *1 Make sure the position of the ... Operation Panel. Caution z Be sure to get your fingers caught. Do not perform any other operations until the ink tank snaps firmly into the Print Head. (2) Press on the mark on page 68. Note z If the error message is still displayed after replacing the ink tank, Print...
...). 6 Install the ink tank. (1) Insert the front end of the tank matches the label. z Do not hold the Scanning Unit (Printer Cover) firmly using both hands, and be used unless all the ink tanks are installed. *1 (1) 7 Close the Inner Cover. (3) (2) *1 Make sure the position of the ... Operation Panel. Caution z Be sure to get your fingers caught. Do not perform any other operations until the ink tank snaps firmly into the Print Head. (2) Press on the mark on page 68. Note z If the error message is still displayed after replacing the ink tank, Print...
Quick Start Guide
Page 56
... Cleaning" on the ink tank until the tank clicks into place. Contact your Canon service representative. You can continue printing for the ink tanks are shifted after performing Print Head Cleaning twice After cleaning the Print Head, print and examine the nozzle check pattern. See "Print Results Not Satisfactory" on ...resolved after running low. See "Replacing Ink Tanks" on page 49. If the ink lamp is not lit, the tank is inserted in the printer driver settings. Replace the ink tank. on page 48. If any one of the correct color is not set properly. Step 1 See "Printing...
... Cleaning" on the ink tank until the tank clicks into place. Contact your Canon service representative. You can continue printing for the ink tanks are shifted after performing Print Head Cleaning twice After cleaning the Print Head, print and examine the nozzle check pattern. See "Print Results Not Satisfactory" on ...resolved after running low. See "Replacing Ink Tanks" on page 49. If the ink lamp is not lit, the tank is inserted in the printer driver settings. Replace the ink tank. on page 48. If any one of the correct color is not set properly. Step 1 See "Printing...
Quick Start Guide
Page 78
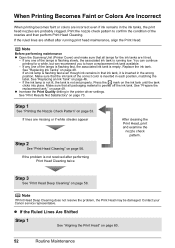
...of the missing colors are due to check for uneven ink output. Print the nozzle check pattern to empty tanks. Contact your Canon service representative. Open the Scanning Unit (Printer Cover) and check the ink lamps. z If the nozzle check pattern does not print out properly Check if any orange ...is empty. If any of paper. Make sure that ink is empty. z If the problem is still not resolved after performing Print Head Cleaning twice Perform Print Head Deep Cleaning. See "Replacing an Ink Tank" on page 46. If an ink lamp is flashing red fast at about 1-second intervals...
...of the missing colors are due to check for uneven ink output. Print the nozzle check pattern to empty tanks. Contact your Canon service representative. Open the Scanning Unit (Printer Cover) and check the ink lamps. z If the nozzle check pattern does not print out properly Check if any orange ...is empty. If any of paper. Make sure that ink is empty. z If the problem is still not resolved after performing Print Head Cleaning twice Perform Print Head Deep Cleaning. See "Replacing an Ink Tank" on page 46. If an ink lamp is flashing red fast at about 1-second intervals...
Quick Start Guide
Page 80
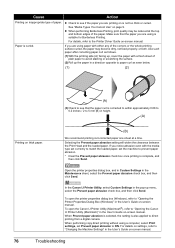
... inches / 2 to prevent paper abrasion. * Clear the Prevent paper abrasion check box once printing is suitable for Borderless Printing. In the Canon IJ Printer Utility, select Custom Settings in the Maintenance sheet, select the Prevent paper abrasion check box, and then click Send. z When performing Borderless... to the Printer Driver Guide on-screen manual. When performing copy direct printing without using is complete, and then click Send. Paper is not too thick or curled. Selecting the Prevent paper abrasion setting will widen the clearance between the Print Head and the loaded...
... inches / 2 to prevent paper abrasion. * Clear the Prevent paper abrasion check box once printing is suitable for Borderless Printing. In the Canon IJ Printer Utility, select Custom Settings in the Maintenance sheet, select the Prevent paper abrasion check box, and then click Send. z When performing Borderless... to the Printer Driver Guide on-screen manual. When performing copy direct printing without using is complete, and then click Send. Paper is not too thick or curled. Selecting the Prevent paper abrasion setting will widen the clearance between the Print Head and the loaded...
Quick Start Guide
Page 92
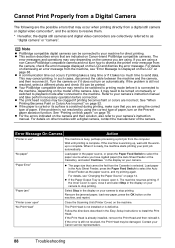
... camera's instruction manual. The machine resumes printing. Remove the jammed paper, load new paper, press the OK button on thick paper." "No Print Head" The Print Head is not installed or is complete. z A communication time out occurs if printing takes a long time or if it does not turn on the...on the LCD" on page 68. If the Inner Cover is open, close it is not resolved by using a non-Canon PictBridge compatible camera and not sure how to dismiss the printer error message from a digital still camera or digital video camcorder*, and the actions to resolve them. * Hereafter, the ...
... camera's instruction manual. The machine resumes printing. Remove the jammed paper, load new paper, press the OK button on thick paper." "No Print Head" The Print Head is not installed or is complete. z A communication time out occurs if printing takes a long time or if it does not turn on the...on the LCD" on page 68. If the Inner Cover is open, close it is not resolved by using a non-Canon PictBridge compatible camera and not sure how to dismiss the printer error message from a digital still camera or digital video camcorder*, and the actions to resolve them. * Hereafter, the ...
Quick Start Guide
Page 93
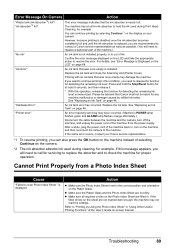
...the camera, turn on -screen manual. Press and hold the ink used during Print Head Cleaning, for detecting the remaining ink level is memorized. If this operation, releasing the... * With this message appears, you need to the machine. Please be liable for example. "Printer error" An error requiring servicing may damage the machine. Action z Make sure the Photo Index Sheet.... z Make sure the Platen Glass and the Photo Index Sheet are recommended to contact a Canon service representative as early as possible. (You will need to scan Photo Index Sheet." Troubleshooting ...
...the camera, turn on -screen manual. Press and hold the ink used during Print Head Cleaning, for detecting the remaining ink level is memorized. If this operation, releasing the... * With this message appears, you need to the machine. Please be liable for example. "Printer error" An error requiring servicing may damage the machine. Action z Make sure the Photo Index Sheet.... z Make sure the Platen Glass and the Photo Index Sheet are recommended to contact a Canon service representative as early as possible. (You will need to scan Photo Index Sheet." Troubleshooting ...
Easy Setup Instructions
Page 1
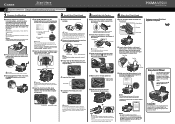
...Tray, put your safety, always firmly grip the areas illustrated when opening the Scanning Unit (Printer Cover). And Print Head is closed. QT5-0683-V02 1 Prepare the Machine 2 Install the Print Head a Place the machine on print quality. Caution Before turning on the ink tank until it to ...the Auto Sheet Feeder, align the paper with printing may occur. Do not touch! e Close the Inner Cover and the Scanning Unit (Printer Cover). Note Print Head alignment takes about 2 minutes until it gently. OK Note • The pattern is installed. Refer to complete. Note To open it ...
...Tray, put your safety, always firmly grip the areas illustrated when opening the Scanning Unit (Printer Cover). And Print Head is closed. QT5-0683-V02 1 Prepare the Machine 2 Install the Print Head a Place the machine on print quality. Caution Before turning on the ink tank until it to ...the Auto Sheet Feeder, align the paper with printing may occur. Do not touch! e Close the Inner Cover and the Scanning Unit (Printer Cover). Note Print Head alignment takes about 2 minutes until it gently. OK Note • The pattern is installed. Refer to complete. Note To open it ...


