User's Guide
Page 4
.../ Paper Does Not Feed Properly/ Printed Surface Is Scratched 103 Paper Jams 106 Cannot Print Properly From A Photo Index Sheet 107 An Unintended Language Is Displayed On The LCD 107 Cannot Print Properly From The Digital Camera 108 Cannot Print Properly Through Wireless Communication 110 Cannot Install The MP Driver 111 Cannot Connect To PC Properly 112 Problems With Scanning 113 An Error Message Appears On The Screen 117 For Windows Users...
.../ Paper Does Not Feed Properly/ Printed Surface Is Scratched 103 Paper Jams 106 Cannot Print Properly From A Photo Index Sheet 107 An Unintended Language Is Displayed On The LCD 107 Cannot Print Properly From The Digital Camera 108 Cannot Print Properly Through Wireless Communication 110 Cannot Install The MP Driver 111 Cannot Connect To PC Properly 112 Problems With Scanning 113 An Error Message Appears On The Screen 117 For Windows Users...
User's Guide
Page 7
..., the FINE Cartridge is approximately 4 inches (10 cm) away from electric products equipped with electrical components inside the machine. Installing in fire or electrical shock. Do not drop paper clips, staples, or other equipment. Then contact your local authorized Canon dealer or the Canon help line. This could cause a fire. 5 When turning OFF the power, be able to support its weight...
..., the FINE Cartridge is approximately 4 inches (10 cm) away from electric products equipped with electrical components inside the machine. Installing in fire or electrical shock. Do not drop paper clips, staples, or other equipment. Then contact your local authorized Canon dealer or the Canon help line. This could cause a fire. 5 When turning OFF the power, be able to support its weight...
User's Guide
Page 11
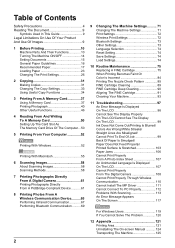
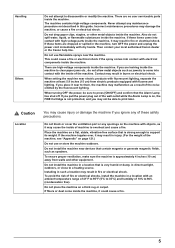
... unlawful to make copies of, scan, print or use the machine safely, always pay attention to the machine. Indicates operational warnings and restrictions. Read this guide. When in doubt, check with a legal representative in this when the machine is connected to persons if not performed correctly. The following documents. In order to use reproductions of the following symbols are used in your jurisdiction. z Paper money z Money...
... unlawful to make copies of, scan, print or use the machine safely, always pay attention to the machine. Indicates operational warnings and restrictions. Read this guide. When in doubt, check with a legal representative in this when the machine is connected to persons if not performed correctly. The following documents. In order to use reproductions of the following symbols are used in your jurisdiction. z Paper money z Money...
User's Guide
Page 13
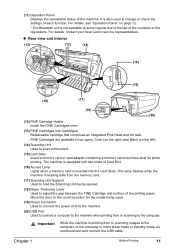
... the machine when printing from or scanning images to the computer. The machine is inserted into these slots for photo printing. For details, contact your local Canon service representatives. For details, see "Operation Panel" on the left). (14) Scanning Unit Used to adjust the gap between the FINE Cartridge and surface of the machine. FINE Cartridges are available in the sleep mode or standby mode, do not disconnect and connect the USB cable. z Rear...
... the machine when printing from or scanning images to the computer. The machine is inserted into these slots for photo printing. For details, contact your local Canon service representatives. For details, see "Operation Panel" on the left). (14) Scanning Unit Used to adjust the gap between the FINE Cartridge and surface of the machine. FINE Cartridges are available in the sleep mode or standby mode, do not disconnect and connect the USB cable. z Rear...
User's Guide
Page 14
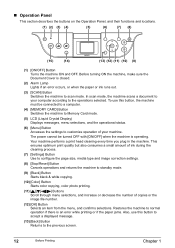
... mode. (9) [Black] Button Starts black & white copying. (10) [Color] Button Starts color copying, color photo printing. (11 Buttons Scroll through menu selections, and increase or decrease the number of ink during the cleaning process. (7) [Settings] Button Use to configure the page size, media type and image correction settings. (8) [Stop/Reset] Button Cancels operations and returns the machine to the operations selected. To use this button, the machine must be turned OFF with [ON/OFF] when the machine is closed. (2) Alarm Lamp Lights if an error occurs, or when the paper or ink...
... mode. (9) [Black] Button Starts black & white copying. (10) [Color] Button Starts color copying, color photo printing. (11 Buttons Scroll through menu selections, and increase or decrease the number of ink during the cleaning process. (7) [Settings] Button Use to configure the page size, media type and image correction settings. (8) [Stop/Reset] Button Cancels operations and returns the machine to the operations selected. To use this button, the machine must be turned OFF with [ON/OFF] when the machine is closed. (2) Alarm Lamp Lights if an error occurs, or when the paper or ink...
User's Guide
Page 41
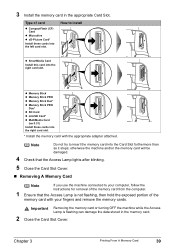
...) Install these cards into the right card slot. * Install the memory card with your computer, follow the instructions for removal of the memory card from the computer. 1 Ensure that the Access Lamp lights after blinking. 5 Close the Card Slot Cover. „ Removing A Memory Card Note If you use the machine connected to your fingers and remove the memory cards. otherwise the machine and/or the memory card will be damaged. 4 Check that the Access Lamp is flashing can damage the data...
...) Install these cards into the right card slot. * Install the memory card with your computer, follow the instructions for removal of the memory card from the computer. 1 Ensure that the Access Lamp lights after blinking. 5 Close the Card Slot Cover. „ Removing A Memory Card Note If you use the machine connected to your fingers and remove the memory cards. otherwise the machine and/or the memory card will be damaged. 4 Check that the Access Lamp is flashing can damage the data...
User's Guide
Page 60
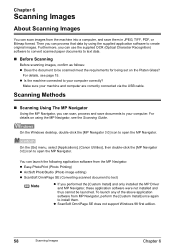
... software to install them in JPEG, TIFF, PDF, or Bitmap format. Scanning Methods „ Scanning Using The MP Navigator Using the MP Navigator, you can scan, process and save them . z Easy-PhotoPrint (Photo Printing) z ArcSoft PhotoStudio (Photo image editing) z ScanSoft OmniPage SE (Converting scanned document to your machine and computer are correctly connected via the USB cable. For details, see the Scanning Guide. On the [Go] menu, select [Applications], [Canon Utilities], then double...
... software to install them in JPEG, TIFF, PDF, or Bitmap format. Scanning Methods „ Scanning Using The MP Navigator Using the MP Navigator, you can scan, process and save them . z Easy-PhotoPrint (Photo Printing) z ArcSoft PhotoStudio (Photo image editing) z ScanSoft OmniPage SE (Converting scanned document to your machine and computer are correctly connected via the USB cable. For details, see the Scanning Guide. On the [Go] menu, select [Applications], [Canon Utilities], then double...
User's Guide
Page 62
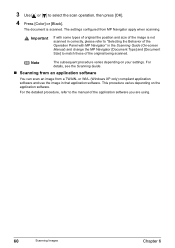
...- (Windows XP only) compliant application software and use the image in the Scanning Guide (On-screen Manual) and change the MP Navigator [Document Type] and [Document Size] to match those of the original being scanned. For the detailed procedure, refer to select the scan operation, then press [OK]. 4 Press [Color] or [Black]. The settings configured from a TWAIN- Important If with some types of original the position and size of the Operation Panel with...
...- (Windows XP only) compliant application software and use the image in the Scanning Guide (On-screen Manual) and change the MP Navigator [Document Type] and [Document Size] to match those of the original being scanned. For the detailed procedure, refer to select the scan operation, then press [OK]. 4 Press [Color] or [Black]. The settings configured from a TWAIN- Important If with some types of original the position and size of the Operation Panel with...
User's Guide
Page 80
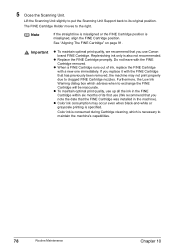
... removed, the machine may occur even when black-and-white or grayscale printing is misaligned, align the FINE Cartridge position. Furthermore, the Low Ink Warning dialog box which is also not recommended. Note If the straight line is misaligned or the FINE Cartridge position is specified. z Color ink consumption may not print properly due to clogged FINE Cartridge nozzles. z Replace the FINE Cartridge promptly. Lift the Scanning Unit...
... removed, the machine may occur even when black-and-white or grayscale printing is misaligned, align the FINE Cartridge position. Furthermore, the Low Ink Warning dialog box which is also not recommended. Note If the straight line is misaligned or the FINE Cartridge position is specified. z Color ink consumption may not print properly due to clogged FINE Cartridge nozzles. z Replace the FINE Cartridge promptly. Lift the Scanning Unit...
User's Guide
Page 99
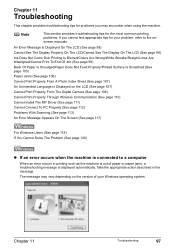
... Lines Are Misaligned/Cannot Print To End Of Job (See page 99) Back Of Paper Is Smudged/Paper Does Not Feed Properly/Printed Surface Is Scratched (See page 103) Paper Jams (See page 106) Cannot Print Properly From A Photo Index Sheet (See page 107) An Unintended Language is Displayed on the version of paper or paper jams, a troubleshooting message is connected to the onscreen manuals. Chapter 11 Troubleshooting 97 Note This section provides troubleshooting tips for your Windows operating...
... Lines Are Misaligned/Cannot Print To End Of Job (See page 99) Back Of Paper Is Smudged/Paper Does Not Feed Properly/Printed Surface Is Scratched (See page 103) Paper Jams (See page 106) Cannot Print Properly From A Photo Index Sheet (See page 107) An Unintended Language is Displayed on the version of paper or paper jams, a troubleshooting message is connected to the onscreen manuals. Chapter 11 Troubleshooting 97 Note This section provides troubleshooting tips for your Windows operating...
User's Guide
Page 100
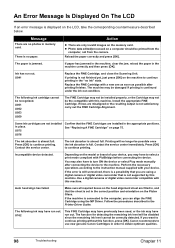
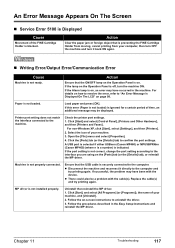
... model or brand of your device. Message There are using the MP Driver. The machine may have to use new genuine Canon Cartridges in the machine correctly and then press [OK]. The following ink may also have run out. Some ink cartridges are filled in the appropriate positions. See "Replacing A FINE Cartridge" on the head alignment sheet are not installed in the Printer Driver Guide. Printing will be disabled since the remaining ink level cannot be printed...
... model or brand of your device. Message There are using the MP Driver. The machine may have to use new genuine Canon Cartridges in the machine correctly and then press [OK]. The following ink may also have run out. Some ink cartridges are filled in the appropriate positions. See "Replacing A FINE Cartridge" on the head alignment sheet are not installed in the Printer Driver Guide. Printing will be disabled since the remaining ink level cannot be printed...
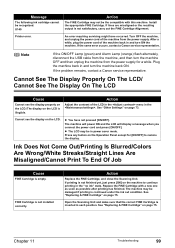
User's Guide
Page 101
... the display. Plug the machine back in power saver mode. z The LCD may be in and turn ON the machine. The machine may be damaged if printing is illegible. See "Replacing A FINE Cartridge" on page 73. Open the Scanning Unit and make sure that the correct FINE Cartridge is not satisfactory, carry out the FINE Cartridge Alignment. U140 Printer error. See "Other Settings" on page 75. Replace the FINE Cartridge with this machine. See "Replacing A FINE Cartridge...
... the display. Plug the machine back in power saver mode. z The LCD may be in and turn ON the machine. The machine may be damaged if printing is illegible. See "Replacing A FINE Cartridge" on page 73. Open the Scanning Unit and make sure that the correct FINE Cartridge is not satisfactory, carry out the FINE Cartridge Alignment. U140 Printer error. See "Other Settings" on page 75. Replace the FINE Cartridge with this machine. See "Replacing A FINE Cartridge...
User's Guide
Page 106
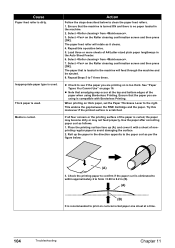
... gap between the FINE Cartridge and the paper. Try this operation twice. 5. Thick paper is scratched. Repeat Steps 5 to the right. See "Paper Types You Cannot Use" on the Roller cleaning confirmation screen and then press [OK]. Cause Paper feed roller is too thick. Roll up (A), and cover it cleans. 4. z Check to print on is dirty. Select on page 16. Ensure that the machine is turned ON and there...
... gap between the FINE Cartridge and the paper. Try this operation twice. 5. Thick paper is scratched. Repeat Steps 5 to the right. See "Paper Types You Cannot Use" on the Roller cleaning confirmation screen and then press [OK]. Cause Paper feed roller is too thick. Roll up (A), and cover it cleans. 4. z Check to print on is dirty. Select on page 16. Ensure that the machine is turned ON and there...
User's Guide
Page 110
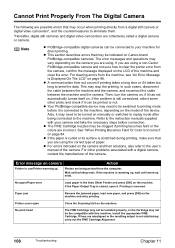
... be printed or not. Install the appropriate FINE Cartridge. Cannot Print Properly From The Digital Camera The following are possible errors that may occur when printing directly from the computer. If the problem is warming up, wait until printing ends. The error messages and operations may need to be switched to printing mode before connection. If the Paper Output Tray is resumed. Paper jam Remove the jammed paper, load new paper, and press [OK] on the machine. Then, turn the...
... be printed or not. Install the appropriate FINE Cartridge. Cannot Print Properly From The Digital Camera The following are possible errors that may occur when printing directly from the computer. If the problem is warming up, wait until printing ends. The error messages and operations may need to be switched to printing mode before connection. If the Paper Output Tray is resumed. Paper jam Remove the jammed paper, load new paper, and press [OK] on the machine. Then, turn the...

User's Guide
Page 111
... the Scanning Unit. Then printing can continue printing by selecting Continue*1 on the display on your camera. Select Continue*1 in progress and you are recommended to contact a Canon service representative as soon as possible. z The FINE Cartridge may be the compatible with the FINE Cartridge installed. Error message on your camera to resume printing. The machine has a built-in , turn OFF the machine, and unplug the power cord...
... the Scanning Unit. Then printing can continue printing by selecting Continue*1 on the display on your camera. Select Continue*1 in progress and you are recommended to contact a Canon service representative as soon as possible. z The FINE Cartridge may be the compatible with the FINE Cartridge installed. Error message on your camera to resume printing. The machine has a built-in , turn OFF the machine, and unplug the power cord...
User's Guide
Page 113
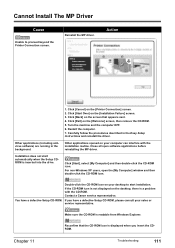
... to proceed beyond the Printer Connection screen. Make sure the CD-ROM is a problem with the installation routine. Restart the computer. 7. Click [Start], select [My Computer] and then double-click the CD-ROM icon. Cannot Install The MP Driver Cause Unable to start automatically when the Setup CDROM is displayed when you have a defective Setup CD-ROM. Turn the machine and the computer...
... to proceed beyond the Printer Connection screen. Make sure the CD-ROM is a problem with the installation routine. Restart the computer. 7. Click [Start], select [My Computer] and then double-click the CD-ROM icon. Cannot Install The MP Driver Cause Unable to start automatically when the Setup CDROM is displayed when you have a defective Setup CD-ROM. Turn the machine and the computer...
User's Guide
Page 119
... driver. Paper is not properly connected. Load paper and press [OK]. Check the printer port settings. 1. If the port setting is not correct, change the port setting according to the computer. Ensure that the USB cable is securely connected to the interface you are using on , an error may have been with the cable(s). Replace the cable(s) and try printing again. Follow the on . Open the [File] menu and select [Properties]. 4. If successful, the problem may be a problem...
... driver. Paper is not properly connected. Load paper and press [OK]. Check the printer port settings. 1. If the port setting is not correct, change the port setting according to the computer. Ensure that the USB cable is securely connected to the interface you are using on , an error may have been with the cable(s). Replace the cable(s) and try printing again. Follow the on . Open the [File] menu and select [Properties]. 4. If successful, the problem may be a problem...
User's Guide
Page 136
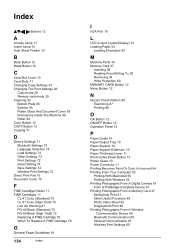
... A Access Lamp 11 Alarm Lamp 12 Auto Sheet Feeder 10 B Back Button 12 Black Button 12 C Card Slot Cover 10 Card Slots 11 Changing Copy Settings 33 Changing The Print Settings 26 Copy mode 28 Memory card mode 29 Cleaning 93 Bottom Plate 95 Exterior 93 Platen Glass And Document Cover 93 Protrusions Inside The Machine 96 Roller 94 Color Button 12 COPY Button 13 Copying 31 D Device Settings 71 Bluetooth Settings 73 Language Selection 74 Load Settings 74 Other Settings 73 Print Settings 72 Reset Setting 74 Save Settings 74 Wireless Print Settings 72 Direct Print Port...
... A Access Lamp 11 Alarm Lamp 12 Auto Sheet Feeder 10 B Back Button 12 Black Button 12 C Card Slot Cover 10 Card Slots 11 Changing Copy Settings 33 Changing The Print Settings 26 Copy mode 28 Memory card mode 29 Cleaning 93 Bottom Plate 95 Exterior 93 Platen Glass And Document Cover 93 Protrusions Inside The Machine 96 Roller 94 Color Button 12 COPY Button 13 Copying 31 D Device Settings 71 Bluetooth Settings 73 Language Selection 74 Load Settings 74 Other Settings 73 Print Settings 72 Reset Setting 74 Save Settings 74 Wireless Print Settings 72 Direct Print Port...
Easy Setup Instructions
Page 1
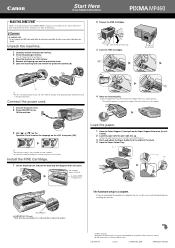
... exceed the Load Limit Mark (A). 3 Pinch and adjust the Paper Guide (3) to the User's Guide. 1 Lift the Scanning Unit and pull the Scanning Unit Support down the serial number. You will need this sheet for instructions on a flat surface. 4 Remove all items from the box. 2 Check the package contents. • See the flapped lid of their respective owners. See the reverse side of the stack. 4 Open the Paper Output Tray. (1) (3) (A) (2) The hardware setup is only...
... exceed the Load Limit Mark (A). 3 Pinch and adjust the Paper Guide (3) to the User's Guide. 1 Lift the Scanning Unit and pull the Scanning Unit Support down the serial number. You will need this sheet for instructions on a flat surface. 4 Remove all items from the box. 2 Check the package contents. • See the flapped lid of their respective owners. See the reverse side of the stack. 4 Open the Paper Output Tray. (1) (3) (A) (2) The hardware setup is only...

Easy Setup Instructions
Page 2
... machine from the [Go] menu. 2. The serial number is not displayed in the [Printer List], click [Add] in the [Printer List] and select [USB] from Mac OS X v.10.3.3 or earlier: Restarting the computer while connected to the machine may cause the machine not to use with the Operation Panel of the software. Select [Applications] from the [Product] list and click [Add]. • You can set the scan operation to ensure product support. Step 1: Prepare the Setup...
... machine from the [Go] menu. 2. The serial number is not displayed in the [Printer List], click [Add] in the [Printer List] and select [USB] from Mac OS X v.10.3.3 or earlier: Restarting the computer while connected to the machine may cause the machine not to use with the Operation Panel of the software. Select [Applications] from the [Product] list and click [Add]. • You can set the scan operation to ensure product support. Step 1: Prepare the Setup...


