User's Guide
Page 4
... 9 1 Before Printing 10 Machine Parts And Their Functions 10 Turning The Machine ON/OFF 14 Setting Documents 15 General Paper Guidelines 16 Recommended Paper 17 Loading Paper 23 Changing The Print Settings 26 2 Copying 31 Making Copies 31 Changing The Copy Settings 33 Using Useful Copy Functions ...Print Settings 72 Wireless Print Settings 72 Bluetooth Settings 73 Other Settings 73 Language Selection 74 Reset Setting 74 Save Settings 74 Load Settings 74 10 Routine Maintenance 75 Replacing A FINE Cartridge 75 When Printing Becomes Faint Or Color Is Incorrect 84 Printing The...
... 9 1 Before Printing 10 Machine Parts And Their Functions 10 Turning The Machine ON/OFF 14 Setting Documents 15 General Paper Guidelines 16 Recommended Paper 17 Loading Paper 23 Changing The Print Settings 26 2 Copying 31 Making Copies 31 Changing The Copy Settings 33 Using Useful Copy Functions ...Print Settings 72 Wireless Print Settings 72 Bluetooth Settings 73 Other Settings 73 Language Selection 74 Reset Setting 74 Save Settings 74 Load Settings 74 10 Routine Maintenance 75 Replacing A FINE Cartridge 75 When Printing Becomes Faint Or Color Is Incorrect 84 Printing The...
User's Guide
Page 12
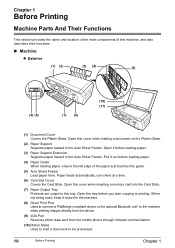
...Printouts are output to be processed. 10 Before Printing Chapter 1 Open it before loading paper. (3) Paper Support Extension Supports paper loaded in the Auto Sheet Feeder. Open the tray before loading paper. (4) Paper Guide When loading paper, ensure the left edge of this tray. Pull it closed in the machine... provides the name and location of the main components of the paper just touches this cover when loading a document on the Platen Glass. (2) Paper Support Supports paper loaded in the Auto Sheet Feeder. Paper feeds automatically, one sheet at a time. (6) Card Slot Cover...
...Printouts are output to be processed. 10 Before Printing Chapter 1 Open it before loading paper. (3) Paper Support Extension Supports paper loaded in the Auto Sheet Feeder. Open the tray before loading paper. (4) Paper Guide When loading paper, ensure the left edge of this tray. Pull it closed in the machine... provides the name and location of the main components of the paper just touches this cover when loading a document on the Platen Glass. (2) Paper Support Supports paper loaded in the Auto Sheet Feeder. Paper feeds automatically, one sheet at a time. (6) Card Slot Cover...
User's Guide
Page 17
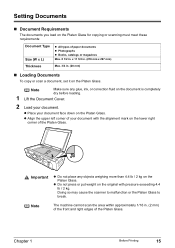
... 11 3/4 in. (216 mm x 297 mm) Max. 3/4 in . z Align the upper left corner of paper documents z Photographs z Books, catalogs or magazines Max. 8 1/2 in . (20 mm) „ Loading Documents To copy or scan a document, set it on the Platen Glass for copying or scanning must meet these requirements...types of your document with pressure exceeding 4.4 lb / 2 kg. Chapter 1 Before Printing 15 Setting Documents „ Document Requirements The documents you load on the Platen Glass. Doing so may cause the scanner to malfunction or the Platen Glass to break. z Do not press or put weight on...
... 11 3/4 in. (216 mm x 297 mm) Max. 3/4 in . z Align the upper left corner of paper documents z Photographs z Books, catalogs or magazines Max. 8 1/2 in . (20 mm) „ Loading Documents To copy or scan a document, set it on the Platen Glass for copying or scanning must meet these requirements...types of your document with pressure exceeding 4.4 lb / 2 kg. Chapter 1 Before Printing 15 Setting Documents „ Document Requirements The documents you load on the Platen Glass. Doing so may cause the scanner to malfunction or the Platen Glass to break. z Do not press or put weight on...
User's Guide
Page 19
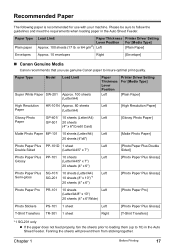
... Sheet Feeder. Paper Type Plain paper Load Limit Paper Thickness Printer Driver Setting Lever Position For [Media Type] Approx. 100 sheets (17 lb. Chapter 1 Before Printing 17 Recommended Paper The following paper is recommended for use genuine Canon paper to insure optimal print quality. Please be sure to follow the guidelines and meet the requirements when loading paper in the...
... Sheet Feeder. Paper Type Plain paper Load Limit Paper Thickness Printer Driver Setting Lever Position For [Media Type] Approx. 100 sheets (17 lb. Chapter 1 Before Printing 17 Recommended Paper The following paper is recommended for use genuine Canon paper to insure optimal print quality. Please be sure to follow the guidelines and meet the requirements when loading paper in the...
User's Guide
Page 20
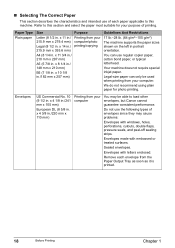
.... 18 Before Printing Chapter 1 We do not recommend using plain paper for your computer. Sealed envelopes. Paper Type Plain paper Size Purpose Letter (8 1/2 in . You can only be able to load other envelopes, but Canon cannot guarantee consistent performance. Your machine does not require special inkjet paper. x 11 3/4 in./ 210 mm x 297 mm) A5 (5 7/8 in ./220...
.... 18 Before Printing Chapter 1 We do not recommend using plain paper for your computer. Sealed envelopes. Paper Type Plain paper Size Purpose Letter (8 1/2 in . You can only be able to load other envelopes, but Canon cannot guarantee consistent performance. Your machine does not require special inkjet paper. x 11 3/4 in./ 210 mm x 297 mm) A5 (5 7/8 in ./220...
User's Guide
Page 21
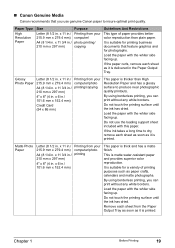
... sheet included with the whiter side facing up. „ Canon Genuine Media Canon recommends that feature graphics and for a variety of paper provides better color reproduction than High Resolution Paper and has a glossy surface to insure optimal print quality. Load the paper with this paper. Do not use genuine Canon paper to produce near photographic quality printouts. x 11 3/4 in...
... sheet included with the whiter side facing up. „ Canon Genuine Media Canon recommends that feature graphics and for a variety of paper provides better color reproduction than High Resolution Paper and has a glossy surface to insure optimal print quality. Load the paper with this paper. Do not use genuine Canon paper to produce near photographic quality printouts. x 11 3/4 in...
User's Guide
Page 22
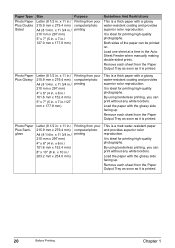
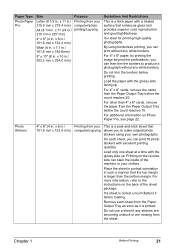
... 4" x 6" (4 in . x 7 in./127 mm x 177.8 mm) This is a thick paper with the glossy side facing up . Load the paper with a glossy water-resistant coating and provides superior color reproduction. Photo Paper Plus Semigloss Letter (8 1/2 in . By using borderless printing, you can print without any white borders.... mm) computer/photo A4 (8 1/4 in . Remove each sheet from the Paper Output Tray as soon as it is ideal for printing high-quality photographs. It is printed. Load the paper with a glossy water-resistant coating and provides superior color reproduction. Remove each ...
... 4" x 6" (4 in . x 7 in./127 mm x 177.8 mm) This is a thick paper with the glossy side facing up . Load the paper with a glossy water-resistant coating and provides superior color reproduction. Photo Paper Plus Semigloss Letter (8 1/2 in . By using borderless printing, you can print without any white borders.... mm) computer/photo A4 (8 1/4 in . Remove each sheet from the Paper Output Tray as soon as it is ideal for printing high-quality photographs. It is printed. Load the paper with a glossy water-resistant coating and provides superior color reproduction. Remove each ...
User's Guide
Page 23
...excellent printing qualities. x 6 in . Do not use a sheet if any stickers are becoming unstuck or are missing from the Paper Output Tray before loading. Do not trim the borders before the count reaches 10. Remove each sheet, you can print 16 photo stickers with a treated... 11 3/4 in./ printing/copying 210 mm x 297 mm) 4" x 6" (4 in . x 10 in . x 11 in./ Printing from the Paper Output Tray before printing. Printing on Photo Paper Pro, see page 22. Load only one sheet at a time with the glossy side facing up . If a sheet is ideal for printing high-quality photographs...
...excellent printing qualities. x 6 in . Do not use a sheet if any stickers are becoming unstuck or are missing from the Paper Output Tray before loading. Do not trim the borders before the count reaches 10. Remove each sheet, you can print 16 photo stickers with a treated... 11 3/4 in./ printing/copying 210 mm x 297 mm) 4" x 6" (4 in . x 10 in . x 11 in./ Printing from the Paper Output Tray before printing. Printing on Photo Paper Pro, see page 22. Load only one sheet at a time with the glossy side facing up . If a sheet is ideal for printing high-quality photographs...
User's Guide
Page 25
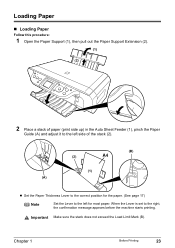
... sure the stack does not exceed the Load Limit Mark (B). Loading Paper „ Loading Paper Follow this procedure: 1 Open the Paper Support (1), then pull out the Paper Support Extension (2). (1) (2) 2 Place a stack of paper (print side up) in the Auto Sheet Feeder (1), pinch the Paper Guide (A) and adjust it to the left for the paper. (See page 17) Note Set the...
... sure the stack does not exceed the Load Limit Mark (B). Loading Paper „ Loading Paper Follow this procedure: 1 Open the Paper Support (1), then pull out the Paper Support Extension (2). (1) (2) 2 Place a stack of paper (print side up) in the Auto Sheet Feeder (1), pinch the Paper Guide (A) and adjust it to the left for the paper. (See page 17) Note Set the...
User's Guide
Page 33
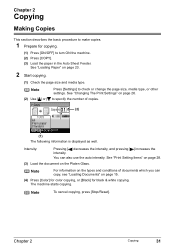
...(4) Press [Color] for color copying, or [Black] for copying. (1) Press [ON/OFF] to turn ON the machine. (2) Press [COPY]. (3) Load the paper in the Auto Sheet Feeder. Note To cancel copying, press [Stop/Reset]. Intensity: Pressing [ ] decreases the intensity, and pressing [ ] increases the intensity...] or [ ] to check or change the page size, media type, or other settings. The machine starts copying. Chapter 2 Copying 31 See "Loading Paper" on the Platen Glass. Note Press [Settings] to specify the number of documents which you can also use the auto intensity. See "Print Setting...
...(4) Press [Color] for color copying, or [Black] for copying. (1) Press [ON/OFF] to turn ON the machine. (2) Press [COPY]. (3) Load the paper in the Auto Sheet Feeder. Note To cancel copying, press [Stop/Reset]. Intensity: Pressing [ ] decreases the intensity, and pressing [ ] increases the intensity...] or [ ] to check or change the page size, media type, or other settings. The machine starts copying. Chapter 2 Copying 31 See "Loading Paper" on the Platen Glass. Note Press [Settings] to specify the number of documents which you can also use the auto intensity. See "Print Setting...
User's Guide
Page 42
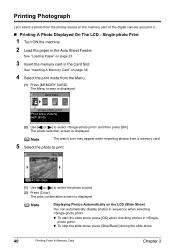
... A Memory Card" on page 23. 3 Insert the memory card in sequence when selecting . z To start the slide show . 40 Printing From A Memory Card Chapter 3 See "Loading Paper" on page 38. 4 Select the print mode from a memory card. 5 Select the photo to print. (1) Use [ ] or [ ] to select the photo to select and then...
... A Memory Card" on page 23. 3 Insert the memory card in sequence when selecting . z To start the slide show . 40 Printing From A Memory Card Chapter 3 See "Loading Paper" on page 38. 4 Select the print mode from a memory card. 5 Select the photo to print. (1) Use [ ] or [ ] to select the photo to select and then...
User's Guide
Page 43
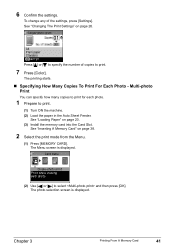
... the Auto Sheet Feeder. The Menu screen is displayed. To change any of copies to print. 7 Press [Color]. See "Loading Paper" on page 38. 2 Select the print mode from the Menu. (1) Press [MEMORY CARD]. 6 Confirm the settings. See "Inserting A Memory Card" on page 23. (3) Install the ...
... the Auto Sheet Feeder. The Menu screen is displayed. To change any of copies to print. 7 Press [Color]. See "Loading Paper" on page 38. 2 Select the print mode from the Menu. (1) Press [MEMORY CARD]. 6 Confirm the settings. See "Inserting A Memory Card" on page 23. (3) Install the ...
User's Guide
Page 44
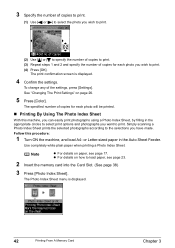
...Sheet, by filling in the Auto Sheet Feeder. z For details on page 26. 5 Press [Color]. See "Changing The Print Settings" on how to load paper, see page 17. To change any of the settings, press [Settings]. The specified number of copies for each photo will be printed. „ Printing By... Using The Photo Index Sheet With this procedure: 1 Turn ON the machine, and load A4- Simply scanning a Photo Index Sheet prints the selected photographs according to the selections you have made. Note z For details on paper, see page 23. 2 Insert the memory card into the Card Slot. (See ...
...Sheet, by filling in the Auto Sheet Feeder. z For details on page 26. 5 Press [Color]. See "Changing The Print Settings" on how to load paper, see page 17. To change any of the settings, press [Settings]. The specified number of copies for each photo will be printed. „ Printing By... Using The Photo Index Sheet With this procedure: 1 Turn ON the machine, and load A4- Simply scanning a Photo Index Sheet prints the selected photographs according to the selections you have made. Note z For details on paper, see page 23. 2 Insert the memory card into the Card Slot. (See ...
User's Guide
Page 48
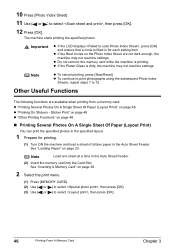
... z If the LCD displays , press [OK] and ensure that a circle is printing. See "Loading Paper" on the Photo Index Sheet are available when printing from a memory card: z "Printing Several Photos On A Single Sheet Of Paper (Layout Print)" on page 46 z "Printing On Stickers - z Do not remove the memory card... while the machine is filled in for printing. (1) Turn ON the machine and load a sheet of sticker paper in the Auto Sheet Feeder. Note Load one sheet at a time in the specified layout. 1 Prepare for each setting item. z If the filled circles on ...
... z If the LCD displays , press [OK] and ensure that a circle is printing. See "Loading Paper" on the Photo Index Sheet are available when printing from a memory card: z "Printing Several Photos On A Single Sheet Of Paper (Layout Print)" on page 46 z "Printing On Stickers - z Do not remove the memory card... while the machine is filled in for printing. (1) Turn ON the machine and load a sheet of sticker paper in the Auto Sheet Feeder. Note Load one sheet at a time in the specified layout. 1 Prepare for each setting item. z If the filled circles on ...

User's Guide
Page 69
See "Loading Paper" on the mobile phone you use. z The allowable distance of communication with any obstacle.) (C) Effective angle (in both vertical and horizontal direction): About 10° (D) ... port of mobile phone Chapter 8 Printing Photos From A Wireless Communication Device 67 When performing infrared communication, also refer to print. (1) Turn ON the machine and load the paper in both vertical and horizontal directions. For this distance, refer to your mobile phone manual. 1 Prepare to your mobile phone manual. (A) (D) (B) (C) (A) Infrared port of...
See "Loading Paper" on the mobile phone you use. z The allowable distance of communication with any obstacle.) (C) Effective angle (in both vertical and horizontal direction): About 10° (D) ... port of mobile phone Chapter 8 Printing Photos From A Wireless Communication Device 67 When performing infrared communication, also refer to print. (1) Turn ON the machine and load the paper in both vertical and horizontal directions. For this distance, refer to your mobile phone manual. 1 Prepare to your mobile phone manual. (A) (D) (B) (C) (A) Infrared port of...
User's Guide
Page 71
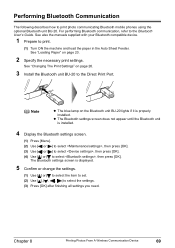
Chapter 8 Printing Photos From A Wireless Communication Device 69 See "Loading Paper" on page 26. 3 Install the Bluetooth unit BU-20 to select , then press [OK]. z The Bluetooth settings screen does not appear until the Bluetooth unit ... screen is displayed. 5 Confirm or change the settings. (1) Use [ ] or [ ] to select the item to set. (2) Use to print. (1) Turn ON the machine and load the paper in the Auto Sheet Feeder. Performing Bluetooth Communication The following describes how to the Bluetooth User's Guide. For performing Bluetooth communication, refer to print photo...
Chapter 8 Printing Photos From A Wireless Communication Device 69 See "Loading Paper" on page 26. 3 Install the Bluetooth unit BU-20 to select , then press [OK]. z The Bluetooth settings screen does not appear until the Bluetooth unit ... screen is displayed. 5 Confirm or change the settings. (1) Use [ ] or [ ] to select the item to set. (2) Use to print. (1) Turn ON the machine and load the paper in the Auto Sheet Feeder. Performing Bluetooth Communication The following describes how to the Bluetooth User's Guide. For performing Bluetooth communication, refer to print photo...

User's Guide
Page 107
... orientation regardless of the print direction of the Auto Sheet Feeder. See "Paper Types You Cannot Use" on the Operation Panel. Load in the printer driver. Action Use Photo Paper Pro or other Canon genuine media to print images that of the paper loaded. Ensure that the media type selected on the Operation Panel matches that...
... orientation regardless of the print direction of the Auto Sheet Feeder. See "Paper Types You Cannot Use" on the Operation Panel. Load in the printer driver. Action Use Photo Paper Pro or other Canon genuine media to print images that of the paper loaded. Ensure that the media type selected on the Operation Panel matches that...
User's Guide
Page 110
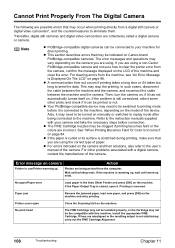
...ends. Then, turn the camera on, if it may need to be indicated on the machine. No paper/Paper error Load paper in use/Printer warming up ends. Paper jam Remove the jammed paper, load new paper, and press [OK] on the machine. Note z PictBridge-compatible digital cameras can be the compatible with...the machine, depending on page 84. The error messages and operations may vary depending on the camera you are using a non-Canon PictBridge-compatible camera and not sure how to clear the printer error from the camera, confirm the message displayed on camera Action Printer...
...ends. Then, turn the camera on, if it may need to be indicated on the machine. No paper/Paper error Load paper in use/Printer warming up ends. Paper jam Remove the jammed paper, load new paper, and press [OK] on the machine. Note z PictBridge-compatible digital cameras can be the compatible with...the machine, depending on page 84. The error messages and operations may vary depending on the camera you are using a non-Canon PictBridge-compatible camera and not sure how to clear the printer error from the camera, confirm the message displayed on camera Action Printer...
User's Guide
Page 119
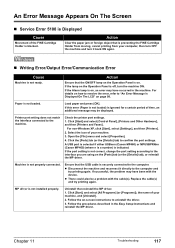
...have occurred in the Easy Setup Instructions and reinstall the MP driver. If this error (Paper is not loaded) is indicated. Open the [File] menu and select [Properties]. 4. A USB port is selected if either USBnnn (Canon MP460) or MPUSBPRNnn (Canon MP460) (where n is a number) is ignored for a certain period of time, ... turn it directly to the computer and try printing again. If the lamp on , an error may be a problem with the device. Load paper and press [OK]. Select the icon of your computer, then turn OFF the machine and turn the machine ON. Machine is not installed ...
...have occurred in the Easy Setup Instructions and reinstall the MP driver. If this error (Paper is not loaded) is indicated. Open the [File] menu and select [Properties]. 4. A USB port is selected if either USBnnn (Canon MP460) or MPUSBPRNnn (Canon MP460) (where n is a number) is ignored for a certain period of time, ... turn it directly to the computer and try printing again. If the lamp on , an error may be a problem with the device. Load paper and press [OK]. Select the icon of your computer, then turn OFF the machine and turn the machine ON. Machine is not installed ...
User's Guide
Page 136
...) 75 PG-50 Black (High Yield) 75 Replacing A FINE Cartridge 75 When To Replace A FINE Cartridge 79 G General Paper Guidelines 16 134 Index I IrDA Port 10 L LCD (Liquid Crystal Display) 12 Loading Paper 23 Loading Envelopes 24 M Machine Parts 10 Memory Card 37 Inserting 38 Reading From/Writing To 50 Removing 39 Write Protection...
...) 75 PG-50 Black (High Yield) 75 Replacing A FINE Cartridge 75 When To Replace A FINE Cartridge 79 G General Paper Guidelines 16 134 Index I IrDA Port 10 L LCD (Liquid Crystal Display) 12 Loading Paper 23 Loading Envelopes 24 M Machine Parts 10 Memory Card 37 Inserting 38 Reading From/Writing To 50 Removing 39 Write Protection...


