MP140 series Quick Start Guide
Page 5
... Print Head Cleaning 21 Print Head Deep Cleaning 21 Aligning the Print Head 22 Replacing a FINE Cartridge 24 Keeping the Best Printing Results 31 Cleaning Your Machine 32 Troubleshooting 36 An Error Code Is Displayed on the LED .......37 The LEDs Cannot Be Seen At All 39 Cannot Install the MP Drivers 39 Cannot Connect to Computer Properly.........41 Print Results Not Satisfactory 42 Printing Does Not Start 47 Paper Does Not Feed Properly 48 Paper Jams 49 Error Message...
... Print Head Cleaning 21 Print Head Deep Cleaning 21 Aligning the Print Head 22 Replacing a FINE Cartridge 24 Keeping the Best Printing Results 31 Cleaning Your Machine 32 Troubleshooting 36 An Error Code Is Displayed on the LED .......37 The LEDs Cannot Be Seen At All 39 Cannot Install the MP Drivers 39 Cannot Connect to Computer Properly.........41 Print Results Not Satisfactory 42 Printing Does Not Start 47 Paper Does Not Feed Properly 48 Paper Jams 49 Error Message...
MP140 series Quick Start Guide
Page 6
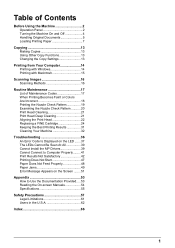
Before Using the Machine Operation Panel (1) (2) (3) (4) (5) (6) (7) (8) (9) (10) (11) (12) (13) (14) (1) (Maintenance) button Accesses the Maintenance menu. (2) Fit to Page button Enables/disables the Fit-to-Page copying. (3) Fit-to-Page Lamp Lights when Fit-to-Page copying is closed. (11) Black/Color Ink Lamp Lights or flashes to show the ink status. (12) Paper Lamp Displays the selected paper size and type for copying. (13) Paper button Switches the paper size and type for copying. Before turning on the machine, make sure the Document Cover is enabled. (4) SCAN button Opens the MP ...
Before Using the Machine Operation Panel (1) (2) (3) (4) (5) (6) (7) (8) (9) (10) (11) (12) (13) (14) (1) (Maintenance) button Accesses the Maintenance menu. (2) Fit to Page button Enables/disables the Fit-to-Page copying. (3) Fit-to-Page Lamp Lights when Fit-to-Page copying is closed. (11) Black/Color Ink Lamp Lights or flashes to show the ink status. (12) Paper Lamp Displays the selected paper size and type for copying. (13) Paper button Switches the paper size and type for copying. Before turning on the machine, make sure the Document Cover is enabled. (4) SCAN button Opens the MP ...
MP140 series Quick Start Guide
Page 12
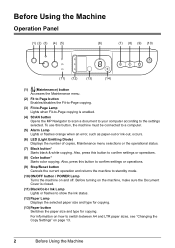
... 1 sheet T-Shirt Transfers*2 TR-301 1 sheet Paper Output Tray Load Limit 50 1 50 50 *8 Paper Printer Thickness Driver Lever*6 Setting for Media Type Left Right Left Left Left Left Left Left Left Left Left Left Left Right Plain Paper Envelope High Resolution Paper Plain Paper Glossy Photo Paper Glossy Photo Paper Matte Photo Paper Glossy Photo Paper Photo Paper Plus Glossy Photo Paper Pro Photo Paper Plus Glossy Photo Paper Plus Double Sided Photo Paper Plus Glossy T-Shirt Transfers *1 Paper with a Model Number is fed in Macintosh®. 8 Before Using the Machine Purchase paper...
... 1 sheet T-Shirt Transfers*2 TR-301 1 sheet Paper Output Tray Load Limit 50 1 50 50 *8 Paper Printer Thickness Driver Lever*6 Setting for Media Type Left Right Left Left Left Left Left Left Left Left Left Left Left Right Plain Paper Envelope High Resolution Paper Plain Paper Glossy Photo Paper Glossy Photo Paper Matte Photo Paper Glossy Photo Paper Photo Paper Plus Glossy Photo Paper Pro Photo Paper Plus Glossy Photo Paper Plus Double Sided Photo Paper Plus Glossy T-Shirt Transfers *1 Paper with a Model Number is fed in Macintosh®. 8 Before Using the Machine Purchase paper...
MP140 series Quick Start Guide
Page 16
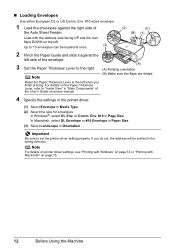
... the User's Guide on page 15. 12 Before Using the Machine If you finish printing. In Macintosh, select DL Envelope or #10 Envelope in Paper Size. (3) Select Landscape in Page Size. or Comm. Note For details on printer driver settings, see "Printing with Windows" on page 14 or "Printing with the address side facing UP and the rear flaps DOWN on the left. (3) Up to the right. (A) (A) Printing orientation Note (B) Make sure the...
... the User's Guide on page 15. 12 Before Using the Machine If you finish printing. In Macintosh, select DL Envelope or #10 Envelope in Paper Size. (3) Select Landscape in Page Size. or Comm. Note For details on printer driver settings, see "Printing with Windows" on page 14 or "Printing with the address side facing UP and the rear flaps DOWN on the left. (3) Up to the right. (A) (A) Printing orientation Note (B) Make sure the...
MP140 series Quick Start Guide
Page 19
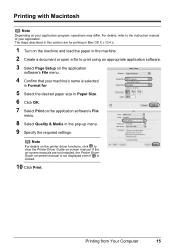
... Paper Size. 6 Click OK. 7 Select Print on the application software's File menu. 8 Select Quality & Media in the pop-up menu. 9 Specify the required settings. Printing with Macintosh Note Depending on your application. For details, refer to print using an appropriate application software. 3 Select Page Setup on the application software's File menu. 4 Confirm that your machine's name is clicked. 10 Click Print. The steps described in the machine. 2 Create a document or open a file to the instruction manual...
... Paper Size. 6 Click OK. 7 Select Print on the application software's File menu. 8 Select Quality & Media in the pop-up menu. 9 Specify the required settings. Printing with Macintosh Note Depending on your application. For details, refer to print using an appropriate application software. 3 Select Page Setup on the application software's File menu. 4 Confirm that your machine's name is clicked. 10 Click Print. The steps described in the machine. 2 Create a document or open a file to the instruction manual...
MP140 series Quick Start Guide
Page 22
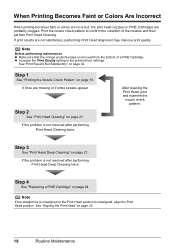
... "Replacing a FINE Cartridge" on page 24. When Printing Becomes Faint or Colors Are Incorrect When printing becomes faint or colors are incorrect, the print head nozzles on FINE Cartridges are missing or if white streaks appear Step 2 See "Print Head Cleaning" on page 21. Note Before performing maintenance z Make sure that the orange protective tape is misaligned, align the Print Head position. z Increase the Print Quality setting in the printer driver settings. See "Print Results...
... "Replacing a FINE Cartridge" on page 24. When Printing Becomes Faint or Colors Are Incorrect When printing becomes faint or colors are incorrect, the print head nozzles on FINE Cartridges are missing or if white streaks appear Step 2 See "Print Head Cleaning" on page 21. Note Before performing maintenance z Make sure that the orange protective tape is misaligned, align the Print Head position. z Increase the Print Quality setting in the printer driver settings. See "Print Results...
MP140 series Quick Start Guide
Page 23
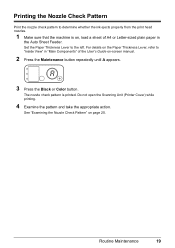
...-sized plain paper in the Auto Sheet Feeder. Set the Paper Thickness Lever to the left. The nozzle check pattern is on, load a sheet of the User's Guide on-screen manual. 2 Press the Maintenance button repeatedly until A appears. 3 Press the Black or Color button. Do not open the Scanning Unit (Printer Cover) while printing. 4 Examine the pattern and take the appropriate action. See "Examining the Nozzle Check Pattern" on page 20. Printing the Nozzle Check Pattern Print the nozzle check...
...-sized plain paper in the Auto Sheet Feeder. Set the Paper Thickness Lever to the left. The nozzle check pattern is on, load a sheet of the User's Guide on-screen manual. 2 Press the Maintenance button repeatedly until A appears. 3 Press the Black or Color button. Do not open the Scanning Unit (Printer Cover) while printing. 4 Examine the pattern and take the appropriate action. See "Examining the Nozzle Check Pattern" on page 20. Printing the Nozzle Check Pattern Print the nozzle check...
MP140 series Quick Start Guide
Page 31
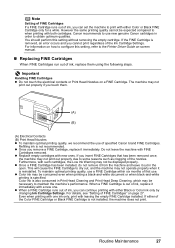
... Black or Color ink only by changing Ink Cartridge Settings. Refilling ink is removed, an error occurs and you touch them. (A) (B) (A) Electrical Contacts (B) Print Head Nozzles z To maintain optimal printing quality, we recommend the use . Do not leave the machine with both cartridges. Furthermore, with such cartridges, the Low Ink Warning may not operate properly when it immediately with either of ink, replace it is also consumed in order to configure this setting without removing...
... Black or Color ink only by changing Ink Cartridge Settings. Refilling ink is removed, an error occurs and you touch them. (A) (B) (A) Electrical Contacts (B) Print Head Nozzles z To maintain optimal printing quality, we recommend the use . Do not leave the machine with both cartridges. Furthermore, with such cartridges, the Low Ink Warning may not operate properly when it immediately with either of ink, replace it is also consumed in order to configure this setting without removing...
MP140 series Quick Start Guide
Page 34
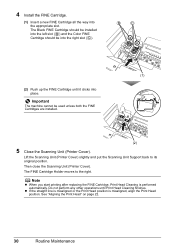
... Scanning Unit (Printer Cover). Lift the Scanning Unit (Printer Cover) slightly and put the Scanning Unit Support back to the right. z If the straight line is misaligned or the Print Head position is performed automatically. The FINE Cartridge Holder moves to its original position. See "Aligning the Print Head" on page 22. 30 Routine Maintenance Note z When you start printing after replacing the FINE Cartridge, Print Head Cleaning is misaligned, align the Print Head position. 4 Install the FINE Cartridge. (1) Insert a new FINE Cartridge...
... Scanning Unit (Printer Cover). Lift the Scanning Unit (Printer Cover) slightly and put the Scanning Unit Support back to the right. z If the straight line is misaligned or the Print Head position is performed automatically. The FINE Cartridge Holder moves to its original position. See "Aligning the Print Head" on page 22. 30 Routine Maintenance Note z When you start printing after replacing the FINE Cartridge, Print Head Cleaning is misaligned, align the Print Head position. 4 Install the FINE Cartridge. (1) Insert a new FINE Cartridge...
MP140 series Quick Start Guide
Page 40
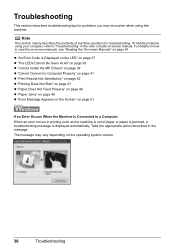
... using your computer, refer to "Troubleshooting" in the User's Guide on page 54. z "An Error Code Is Displayed on the LED" on page 37 z "The LEDs Cannot Be Seen At All" on page 39 z "Cannot Install the MP Drivers" on page 39 z "Cannot Connect to Computer Properly" on page 41 z "Print Results Not Satisfactory" on page 42 z "Printing Does Not Start" on page 47 z "Paper Does Not Feed Properly" on page 48 z "Paper Jams...
... using your computer, refer to "Troubleshooting" in the User's Guide on page 54. z "An Error Code Is Displayed on the LED" on page 37 z "The LEDs Cannot Be Seen At All" on page 39 z "Cannot Install the MP Drivers" on page 39 z "Cannot Connect to Computer Properly" on page 41 z "Print Results Not Satisfactory" on page 42 z "Printing Does Not Start" on page 47 z "Paper Does Not Feed Properly" on page 48 z "Paper Jams...

MP140 series Quick Start Guide
Page 41
... machine correctly and then press the Black or Color button. Remove the jammed paper, reload the paper in the Auto Sheet Feeder and press the Black or Color button. Install the appropriate FINE Cartridge. Ink has run out. The function for example. Important Canon recommends that the FINE Cartridges are misaligned or the resulting output is not satisfactory, carry out the Print Head Alignment. Replace the ink cartridge and close the Scanning Unit (Printer Cover). z The FINE Cartridge may not be compatible...
... machine correctly and then press the Black or Color button. Remove the jammed paper, reload the paper in the Auto Sheet Feeder and press the Black or Color button. Install the appropriate FINE Cartridge. Ink has run out. The function for example. Important Canon recommends that the FINE Cartridges are misaligned or the resulting output is not satisfactory, carry out the Print Head Alignment. Replace the ink cartridge and close the Scanning Unit (Printer Cover). z The FINE Cartridge may not be compatible...
MP140 series Quick Start Guide
Page 43
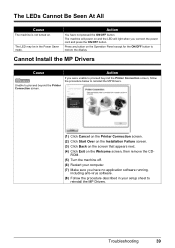
... the display. Press any button on . Action If you were unable to proceed beyond the Printer Connection screen. Troubleshooting 39 The machine will light when you have not pressed the ON/OFF button. Action You have no application software running, including anti-virus software. (8) Follow the procedure described in the Power Saver mode. Cannot Install the MP Drivers Cause Unable to proceed beyond the Printer Connection...
... the display. Press any button on . Action If you were unable to proceed beyond the Printer Connection screen. Troubleshooting 39 The machine will light when you have not pressed the ON/OFF button. Action You have no application software running, including anti-virus software. (8) Follow the procedure described in the Power Saver mode. Cannot Install the MP Drivers Cause Unable to proceed beyond the Printer Connection...
MP140 series Quick Start Guide
Page 49
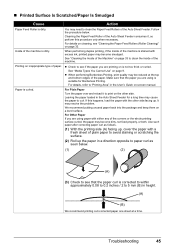
... printing side (A) facing up . See "Media Types You Cannot Use" on a level surface. For details, refer to see "Cleaning the Paper Feed Rollers (Roller Cleaning)" on is curled. Leaving the paper loaded in height. (A) (B) We recommend printing curl-corrected paper one sheet at the top and bottom edges of the paper. When performing duplex printing, if the inside of the Auto Sheet Feeder. It may need to see if the paper you are printing on page 33. z Check...
... printing side (A) facing up . See "Media Types You Cannot Use" on a level surface. For details, refer to see "Cleaning the Paper Feed Rollers (Roller Cleaning)" on is curled. Leaving the paper loaded in height. (A) (B) We recommend printing curl-corrected paper one sheet at the top and bottom edges of the paper. When performing duplex printing, if the inside of the Auto Sheet Feeder. It may need to see if the paper you are printing on page 33. z Check...

MP140 series Quick Start Guide
Page 55
.... Troubleshooting 51 Uninstall them following port(s). If printing starts normally, there is not connected properly. Replace the USB cable and try printing again. z There could also be installed properly. The MP Drivers may have occurred on the Screen „ Writing Error/Output Error/Communication Error Cause Action The machine is lit. If the POWER lamp is not correct, change the port setting according to resolve the error, see "An Error Code Is Displayed...
.... Troubleshooting 51 Uninstall them following port(s). If printing starts normally, there is not connected properly. Replace the USB cable and try printing again. z There could also be installed properly. The MP Drivers may have occurred on the Screen „ Writing Error/Output Error/Communication Error Cause Action The machine is lit. If the POWER lamp is not correct, change the port setting according to resolve the error, see "An Error Code Is Displayed...
MP140 series Quick Start Guide
Page 56
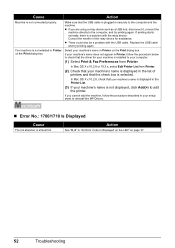
... device. Replace the USB cable and try printing again. Cause Action Machine is installed to your computer. (1) Select Print & Fax Preferences from Printer. (2) Check that your machine's name is displayed in the list of the relay device for your machine's name in Printer on page 37. 52 Troubleshooting If your machine's name does not appear in Printer, follow the procedure described in your setup sheet to reinstall the MP Drivers. „ Error No...
... device. Replace the USB cable and try printing again. Cause Action Machine is installed to your computer. (1) Select Print & Fax Preferences from Printer. (2) Check that your machine's name is displayed in the list of the relay device for your machine's name in Printer on page 37. 52 Troubleshooting If your machine's name does not appear in Printer, follow the procedure described in your setup sheet to reinstall the MP Drivers. „ Error No...
MP140 series Quick Start Guide
Page 58
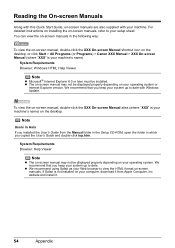
... z We recommend using Safari as your Web browser to your machine's name) on the desktop. If Safari is your setup sheet. Note Users in Asia If you keep your operating system. System Requirements Browser: Help Viewer Note z The on-screen manual may not be displayed properly depending on your machine. website and install it from the Manual folder in the Setup CD-ROM, open the folder...
... z We recommend using Safari as your Web browser to your machine's name) on the desktop. If Safari is your setup sheet. Note Users in Asia If you keep your operating system. System Requirements Browser: Help Viewer Note z The on-screen manual may not be displayed properly depending on your machine. website and install it from the Manual folder in the Setup CD-ROM, open the folder...

MP140 series Quick Start Guide
Page 68
... troubleshooting, e-mail technical support, the latest driver downloads and answers to frequently asked for the Product serial number and other rights, which vary from Canon USA's Web site at www.canontechsupport.com or by this service is by the ASF. The name and telephone number of refurbished or new replacement units. 64 Safety Precautions InstantExchange Service ** A Canon Customer Care Center or ASF technician will be issued...
... troubleshooting, e-mail technical support, the latest driver downloads and answers to frequently asked for the Product serial number and other rights, which vary from Canon USA's Web site at www.canontechsupport.com or by this service is by the ASF. The name and telephone number of refurbished or new replacement units. 64 Safety Precautions InstantExchange Service ** A Canon Customer Care Center or ASF technician will be issued...
MP140 series Quick Start Guide
Page 70
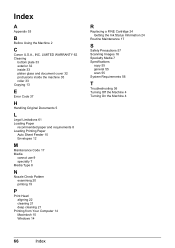
... cover 32 protrusions inside the machine 35 roller 33 Copying 13 E Error Code 37 H Handling Original Documents 5 L Legal Limitations 61 Loading Paper recommended paper and requirements 8 Loading Printing Paper Auto Sheet Feeder 10 Envelopes 12 M Maintenance Code 17 Media cannot use 9 specialty 7 Media Type 8 N Nozzle Check Pattern examining 20 printing 19 P Print Head aligning 22 cleaning 21 deep cleaning 21 Printing from Your Computer 14 Macintosh 15 Windows 14 R Replacing a FINE Cartridge 24 Getting the Ink Status Information 24 Routine Maintenance 17 S Safety Precautions 57 Scanning Images...
... cover 32 protrusions inside the machine 35 roller 33 Copying 13 E Error Code 37 H Handling Original Documents 5 L Legal Limitations 61 Loading Paper recommended paper and requirements 8 Loading Printing Paper Auto Sheet Feeder 10 Envelopes 12 M Maintenance Code 17 Media cannot use 9 specialty 7 Media Type 8 N Nozzle Check Pattern examining 20 printing 19 P Print Head aligning 22 cleaning 21 deep cleaning 21 Printing from Your Computer 14 Macintosh 15 Windows 14 R Replacing a FINE Cartridge 24 Getting the Ink Status Information 24 Routine Maintenance 17 S Safety Precautions 57 Scanning Images...
MP140 series Easy Setup Instructions
Page 1
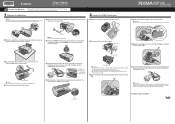
... Operation Panel. Wait until it clicks into place. C b Lift the Scanning Unit (Printer Cover), then remove the Protective Material on the machine, remove all of the shipping tapes. Protective Material Caution Before turning on the right side. Electrical Contacts f Lift the Scanning Unit (Printer Cover) and pull the Scanning Unit Support down the Serial Number located inside the machine. The FINE Cartridge Holder moves to connect the machine with ink on the removed Protective Tape. Install the FINE Cartridges...
... Operation Panel. Wait until it clicks into place. C b Lift the Scanning Unit (Printer Cover), then remove the Protective Material on the machine, remove all of the shipping tapes. Protective Material Caution Before turning on the right side. Electrical Contacts f Lift the Scanning Unit (Printer Cover) and pull the Scanning Unit Support down the Serial Number located inside the machine. The FINE Cartridge Holder moves to connect the machine with ink on the removed Protective Tape. Install the FINE Cartridges...

MP140 series Easy Setup Instructions
Page 2
... the USB cable to the computer, the other to display explanations of Microsoft Corporation, registered in again, or turn off then back on -screen instructions to install the software. You will keep the model number and date of purchase of your product. g on file to help you want to use of applications to align the Print Head. For details, refer to register your new Canon PIXMA printer on the front page...
... the USB cable to the computer, the other to display explanations of Microsoft Corporation, registered in again, or turn off then back on -screen instructions to install the software. You will keep the model number and date of purchase of your product. g on file to help you want to use of applications to align the Print Head. For details, refer to register your new Canon PIXMA printer on the front page...


