MP140 series Quick Start Guide
Page 6
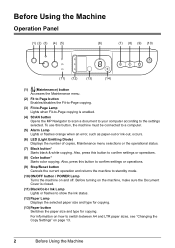
... Opens the MP Navigator to scan a document to your computer according to the settings selected. To use this button to confirm settings or operations. (9) Stop/Reset button Cancels the current operation and returns the machine to standby mode. (10) ON/OFF button / POWER Lamp Turns the machine on page 13. 2 Before...
... Opens the MP Navigator to scan a document to your computer according to the settings selected. To use this button to confirm settings or operations. (9) Stop/Reset button Cancels the current operation and returns the machine to standby mode. (10) ON/OFF button / POWER Lamp Turns the machine on page 13. 2 Before...
MP140 series Quick Start Guide
Page 13
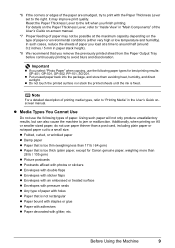
Reset the Paper Thickness Lever to the left when you select "Photo Paper" when copying, use the following types of paper. z Put unused paper back into ... the sheets of paper you load at the maximum capacity depending on A5 or smaller sized paper, do not use the following paper types for Canon genuine paper, weighing more than a post card, including plain paper or notepad paper cut to a small size. Important z If you finish printing. z Do not touch...
Reset the Paper Thickness Lever to the left when you select "Photo Paper" when copying, use the following types of paper. z Put unused paper back into ... the sheets of paper you load at the maximum capacity depending on A5 or smaller sized paper, do not use the following paper types for Canon genuine paper, weighing more than a post card, including plain paper or notepad paper cut to a small size. Important z If you finish printing. z Do not touch...
MP140 series Quick Start Guide
Page 15
Reset the Paper Thickness Lever to the right. For details on the Paper Thickness Lever, refer to "Inside View" in the Auto Sheet Feeder with the ...
Reset the Paper Thickness Lever to the right. For details on the Paper Thickness Lever, refer to "Inside View" in the Auto Sheet Feeder with the ...
MP140 series Quick Start Guide
Page 16
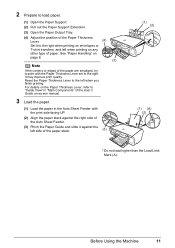
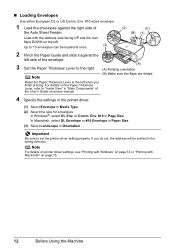
... against the right side of the Auto Sheet Feeder. In Macintosh, select DL Envelope or #10 Envelope in Paper Size. (3) Select Landscape in Page Size. Reset the Paper Thickness Lever to the right. (A) (A) Printing orientation Note (B) Make sure the flaps are folded. Important Be sure to 10 envelopes can be printed...
... against the right side of the Auto Sheet Feeder. In Macintosh, select DL Envelope or #10 Envelope in Paper Size. (3) Select Landscape in Page Size. Reset the Paper Thickness Lever to the right. (A) (A) Printing orientation Note (B) Make sure the flaps are folded. Important Be sure to 10 envelopes can be printed...

MP140 series Quick Start Guide
Page 41
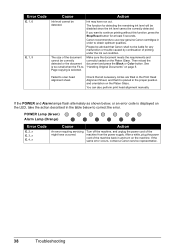
... after the printing. Possible causes are as follows: z The FINE Cartridge may not be disabled. Important Canon recommends that you can continue under the ink out condition. If lines are misaligned or the resulting output ...Cartridge may not be compatible with the ink cartridge installed. Before the ink absorber becomes completely full, contact a Canon service representative. (You will be installed properly. The paper may not be recognized. FINE Cartridge is in the... level will need to continue printing, press the Stop/Reset button for example. Ink has run out.
... after the printing. Possible causes are as follows: z The FINE Cartridge may not be disabled. Important Canon recommends that you can continue under the ink out condition. If lines are misaligned or the resulting output ...Cartridge may not be compatible with the ink cartridge installed. Before the ink absorber becomes completely full, contact a Canon service representative. (You will be installed properly. The paper may not be recognized. FINE Cartridge is in the... level will need to continue printing, press the Stop/Reset button for example. Ink has run out.
MP140 series Quick Start Guide
Page 42
...alignment sheet. Ink may have occurred. Make sure the document meets the requirements and correctly loaded on page 5. If the same error occurs, contact a Canon service representative. 38 Troubleshooting Error Code E, 1, 6 E, 1, 9 Cause Action Ink level cannot be correctly detected. The size of printing under the ... as shown below, or an error code is placed in the table below to continue printing without this function, press the Stop/Reset button for detecting the remaining ink level will be disabled since the ink level cannot be detected. The function for at least 5...
...alignment sheet. Ink may have occurred. Make sure the document meets the requirements and correctly loaded on page 5. If the same error occurs, contact a Canon service representative. 38 Troubleshooting Error Code E, 1, 6 E, 1, 9 Cause Action Ink level cannot be correctly detected. The size of printing under the ... as shown below, or an error code is placed in the table below to continue printing without this function, press the Stop/Reset button for detecting the remaining ink level will be disabled since the ink level cannot be detected. The function for at least 5...

MP140 series Quick Start Guide
Page 48
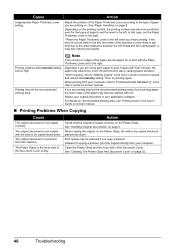
..., see "Aligning the Print Head" on only a particular side of paper to set the Paper Thickness Lever to the right. * Reset the Paper Thickness Lever to the instruction manuals supplied with the correct side facing upwards. It may cause unclear prints or prints with high... color saturation such as photographs or images in deep color, we recommend using Photo Paper Pro or other Canon specialty paper. Inappropriate Paper Thickness Lever setting. Cause Paper is misaligned. „ Printed Paper Curls Action Load the media with the paper...
..., see "Aligning the Print Head" on only a particular side of paper to set the Paper Thickness Lever to the right. * Reset the Paper Thickness Lever to the instruction manuals supplied with the correct side facing upwards. It may cause unclear prints or prints with high... color saturation such as photographs or images in deep color, we recommend using Photo Paper Pro or other Canon specialty paper. Inappropriate Paper Thickness Lever setting. Cause Paper is misaligned. „ Printed Paper Curls Action Load the media with the paper...
MP140 series Quick Start Guide
Page 50
... Original Documents" on the Platen Glass. Instead of copying a printout, print the original directly from this case, set the Paper Thickness Lever to the right. * Reset the Paper Thickness Lever to be reduced if you are printing on the Platen Glass, the side to the left , the inside of paper you...
... Original Documents" on the Platen Glass. Instead of copying a printout, print the original directly from this case, set the Paper Thickness Lever to the right. * Reset the Paper Thickness Lever to be reduced if you are printing on the Platen Glass, the side to the left , the inside of paper you...


