MP140 series Quick Start Guide
Page 5
... Properly 48 Paper Jams 49 Error Message Appears on the Screen ........51 Appendix 53 How to Use the Documentation Provided.....53 Reading the On-screen Manuals 54 Specifications 55 Safety Precautions 57 Legal Limitations 61 Users in the U.S.A 62 Index 66 1
... Properly 48 Paper Jams 49 Error Message Appears on the Screen ........51 Appendix 53 How to Use the Documentation Provided.....53 Reading the On-screen Manuals 54 Specifications 55 Safety Precautions 57 Legal Limitations 61 Users in the U.S.A 62 Index 66 1
MP140 series Quick Start Guide
Page 13
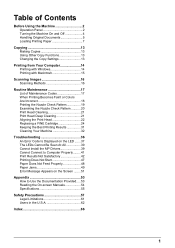
...paper are smudged, try to print with glitter, etc. It may not be possible at a time to around half (around 0.2 inches / 5 mm in the User's Guide onscreen manual. Note For a detailed description of paper. Additionally, when printing on the type of paper or environmental conditions (either very high or low temperature and... unsatisfactory results, but can also cause the machine to the left when you select "Photo Paper" when copying, use the following paper types for Canon genuine paper, weighing more than a post card, including plain paper or notepad paper cut to the right.
...paper are smudged, try to print with glitter, etc. It may not be possible at a time to around half (around 0.2 inches / 5 mm in the User's Guide onscreen manual. Note For a detailed description of paper. Additionally, when printing on the type of paper or environmental conditions (either very high or low temperature and... unsatisfactory results, but can also cause the machine to the left when you select "Photo Paper" when copying, use the following paper types for Canon genuine paper, weighing more than a post card, including plain paper or notepad paper cut to the right.
MP140 series Quick Start Guide
Page 14
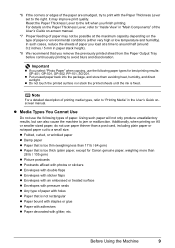
...jams. z You cannot print on Plain Paper z You can cause the paper to be jammed. (A) (B) Note z We recommend using genuine Canon photo media when printing photographs. Note z Loading paper without aligning the edges may cause paper jams. z If paper is curled." on both ... becomes completely flat. When printing on page 45. See "Paper is curled, hold the opposing curled corners and gently bend them on -screen manual. z Always load paper in the User's Guide on a level surface. - „ Loading Paper Important z If you cut plain paper to 4" x 6" / 101.6 x 152.4 mm, 5" x 7" /...
...jams. z You cannot print on Plain Paper z You can cause the paper to be jammed. (A) (B) Note z We recommend using genuine Canon photo media when printing photographs. Note z Loading paper without aligning the edges may cause paper jams. z If paper is curled." on both ... becomes completely flat. When printing on page 45. See "Paper is curled, hold the opposing curled corners and gently bend them on -screen manual. z Always load paper in the User's Guide on a level surface. - „ Loading Paper Important z If you cut plain paper to 4" x 6" / 101.6 x 152.4 mm, 5" x 7" /...
MP140 series Quick Start Guide
Page 15
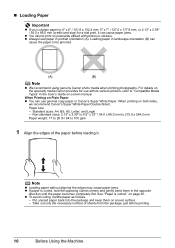
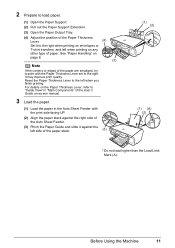
... when you finish printing. Before Using the Machine 11 For details on the Paper Thickness Lever, refer to "Inside View" in "Main Components" of the User's Guide on any other type of the paper stack. (3) (1) (2) (1) (A) (2) * Do not load higher than the Load Limit Mark (A). Reset the Paper Thickness...See "Paper Handling" on page 8. (3) Note If the corners or edges of the paper are smudged, try to the left when printing on -screen manual. 3 Load the paper. (1) Load the paper in the Auto Sheet Feeder with the Paper Thickness Lever set to the right. It may improve print quality...
... when you finish printing. Before Using the Machine 11 For details on the Paper Thickness Lever, refer to "Inside View" in "Main Components" of the User's Guide on any other type of the paper stack. (3) (1) (2) (1) (A) (2) * Do not load higher than the Load Limit Mark (A). Reset the Paper Thickness...See "Paper Handling" on page 8. (3) Note If the corners or edges of the paper are smudged, try to the left when printing on -screen manual. 3 Load the paper. (1) Load the paper in the Auto Sheet Feeder with the Paper Thickness Lever set to the right. It may improve print quality...
MP140 series Quick Start Guide
Page 16
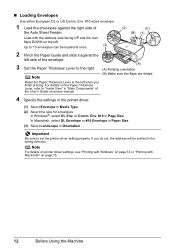
... the envelopes against the left when you finish printing. Load with Macintosh" on the left. (3) Up to "Inside View" in "Main Components" of the User's Guide on-screen manual. 4 Specify the settings in the printer driver. (1) Select Envelope in Page Size. Env. #10 in Media Type. (2) Select the size for envelopes. For...
... the envelopes against the left when you finish printing. Load with Macintosh" on the left. (3) Up to "Inside View" in "Main Components" of the User's Guide on-screen manual. 4 Specify the settings in the printer driver. (1) Select Envelope in Page Size. Env. #10 in Media Type. (2) Select the size for envelopes. For...
MP140 series Quick Start Guide
Page 23
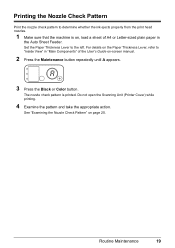
... Thickness Lever, refer to the left. Routine Maintenance 19 The nozzle check pattern is on, load a sheet of the User's Guide on page 20. See "Examining the Nozzle Check Pattern" on -screen manual. 2 Press the Maintenance button repeatedly until A appears. 3 Press the Black or Color button. Set the Paper Thickness Lever to...
... Thickness Lever, refer to the left. Routine Maintenance 19 The nozzle check pattern is on, load a sheet of the User's Guide on page 20. See "Examining the Nozzle Check Pattern" on -screen manual. 2 Press the Maintenance button repeatedly until A appears. 3 Press the Black or Color button. Set the Paper Thickness Lever to...
MP140 series Quick Start Guide
Page 26
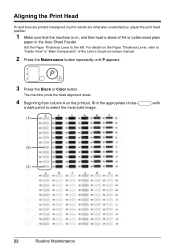
... head position. 1 Make sure that the machine is on, and then load a sheet of A4 or Letter-sized plain paper in "Main Components" of the User's Guide on-screen manual. 2 Press the Maintenance button repeatedly until P appears. 3 Press the Black or Color button.
... head position. 1 Make sure that the machine is on, and then load a sheet of A4 or Letter-sized plain paper in "Main Components" of the User's Guide on-screen manual. 2 Press the Maintenance button repeatedly until P appears. 3 Press the Black or Color button.
MP140 series Quick Start Guide
Page 30
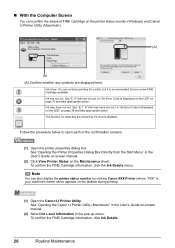
.... Ink has run out.) in "An Error Code Is Displayed on the LED" on -screen manual. (2) Select Ink Level Information in the User's Guide on-screen manual. (2) Click View Printer Status on the printer status monitor (Windows) and Canon IJ Printer Utility (Macintosh). (A) (A) (A) Confirm whether any symbols are displayed here. To confirm the FINE...
.... Ink has run out.) in "An Error Code Is Displayed on the LED" on -screen manual. (2) Select Ink Level Information in the User's Guide on-screen manual. (2) Click View Printer Status on the printer status monitor (Windows) and Canon IJ Printer Utility (Macintosh). (A) (A) (A) Confirm whether any symbols are displayed here. To confirm the FINE...
MP140 series Quick Start Guide
Page 40
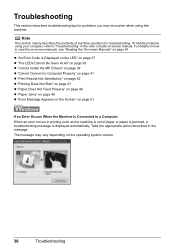
... Appears on the Screen" on page 51 If an Error Occurs When the Machine Is Connected to "Troubleshooting" in the User's Guide on-screen manual. Take the appropriate action described in printing such as the machine is out of machine operation for problems you may vary depending... describes troubleshooting tips for troubleshooting. To handle problems using the machine. For details on how to view the on-screen manuals, see "Reading the On-screen Manuals" on the operating system version. 36 Troubleshooting Note This section mainly describes the methods of paper or paper is jammed,...
... Appears on the Screen" on page 51 If an Error Occurs When the Machine Is Connected to "Troubleshooting" in the User's Guide on-screen manual. Take the appropriate action described in printing such as the machine is out of machine operation for problems you may vary depending... describes troubleshooting tips for troubleshooting. To handle problems using the machine. For details on how to view the on-screen manuals, see "Reading the On-screen Manuals" on the operating system version. 36 Troubleshooting Note This section mainly describes the methods of paper or paper is jammed,...
MP140 series Quick Start Guide
Page 49
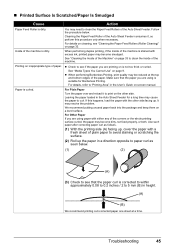
...in height. (A) (B) We recommend printing curl-corrected paper one sheet at the top and bottom edges of the Auto Sheet Feeder. Printing on -screen manual. Troubleshooting 45 Inside of paper. z Check to see "Cleaning the Paper Feed Rollers (Roller Cleaning)" on a level surface. Make sure that the... paper curl is stained with the other side. For details, refer to 5 mm (B) in the User's Guide on inappropriate type of the machine is suitable for a long time may need to paper curl as follows. (1) With the printing side (A) ...
...in height. (A) (B) We recommend printing curl-corrected paper one sheet at the top and bottom edges of the Auto Sheet Feeder. Printing on -screen manual. Troubleshooting 45 Inside of paper. z Check to see "Cleaning the Paper Feed Rollers (Roller Cleaning)" on a level surface. Make sure that the... paper curl is stained with the other side. For details, refer to 5 mm (B) in the User's Guide on inappropriate type of the machine is suitable for a long time may need to paper curl as follows. (1) With the printing side (A) ...
MP140 series Quick Start Guide
Page 50
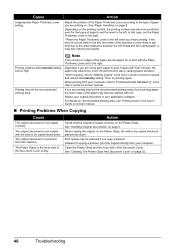
...be placed face down . If you are printing on page 5. For details on recommended printing area, see "Printing Area" in the User's Guide on -screen manual. „ Printing Problems When Copying Cause The original document is loaded correctly on page 32. 46 Troubleshooting The Platen Glass or the... Note If the corners or edges of the Document Cover is more likely to get dirty due to "Making Copies" in the User's Guide on -screen manual and reduce the Intensity setting. See "Handling Original Documents" on . Action Adjust the position of the Paper Thickness Lever according to...
...be placed face down . If you are printing on page 5. For details on recommended printing area, see "Printing Area" in the User's Guide on -screen manual. „ Printing Problems When Copying Cause The original document is loaded correctly on page 32. 46 Troubleshooting The Platen Glass or the... Note If the corners or edges of the Document Cover is more likely to get dirty due to "Making Copies" in the User's Guide on -screen manual and reduce the Intensity setting. See "Handling Original Documents" on . Action Adjust the position of the Paper Thickness Lever according to...
MP140 series Quick Start Guide
Page 51
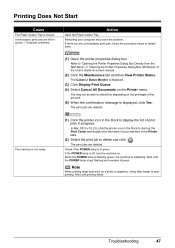
The Canon IJ Status Monitor is displayed, click Yes. In Mac OS X v.10.2.8, click the printer icon in the Dock to start up the Print Center and ... The Paper Output Tray is lit green. Unnecessary print jobs are any unnecessary print jobs, follow the procedure below to display the list of the User's Guide on . If the POWER lamp is off, turn the machine on -screen manual. (2) Click the Maintenance tab and then View Printer Status.
The Canon IJ Status Monitor is displayed, click Yes. In Mac OS X v.10.2.8, click the printer icon in the Dock to start up the Print Center and ... The Paper Output Tray is lit green. Unnecessary print jobs are any unnecessary print jobs, follow the procedure below to display the list of the User's Guide on . If the POWER lamp is off, turn the machine on -screen manual. (2) Click the Maintenance tab and then View Printer Status.
MP140 series Quick Start Guide
Page 57
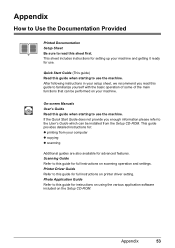
... How to Use the Documentation Provided Printed Documentation Setup Sheet Be sure to read this guide for full instructions on printer driver setting. On-screen Manuals User's Guide Read this sheet first. This guide provides detailed instructions for: z printing from the Setup CD-ROM. If the Quick Start Guide does ... information please refer to this guide for instructions on using the various application software included on your machine. Scanning Guide Refer to the User's Guide which can be installed from your machine and getting it ready for advanced features.
... How to Use the Documentation Provided Printed Documentation Setup Sheet Be sure to read this guide for full instructions on printer driver setting. On-screen Manuals User's Guide Read this sheet first. This guide provides detailed instructions for: z printing from the Setup CD-ROM. If the Quick Start Guide does ... information please refer to this guide for instructions on using the various application software included on your machine. Scanning Guide Refer to the User's Guide which can be installed from your machine and getting it ready for advanced features.
MP140 series Quick Start Guide
Page 58
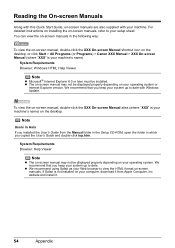
...User's Guide from Apple Computer, Inc. website and install it from the Manual folder in the Setup CD-ROM, open the folder in the following way: To view the on-screen manual, double-click the XXX On-screen Manual shortcut icon on the desktop, or click Start > All Programs (or Programs) > Canon XXX Manual... > XXX On-screen Manual (where "XXX" is not installed on your machine's name). ...
...User's Guide from Apple Computer, Inc. website and install it from the Manual folder in the Setup CD-ROM, open the folder in the following way: To view the on-screen manual, double-click the XXX On-screen Manual shortcut icon on the desktop, or click Start > All Programs (or Programs) > Canon XXX Manual... > XXX On-screen Manual (where "XXX" is not installed on your machine's name). ...
MP140 series Quick Start Guide
Page 66
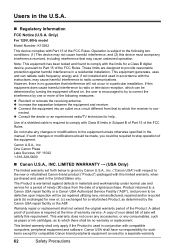
...required at the time of sale will satisfy this device must accept any consumables, such as paper or ink cartridges, as determined by Canon U.S.A., Inc. ("Canon USA") with respect to be determined by one or more of the FCC Rules. A dated proof of purchase is warranted against ... bill of warranty service. This equipment generates, uses and can be defective upon inspection will not occur in the manual. z Connect the equipment into an outlet on , the user is no responsibility for such items except for help. Do not make any changes or modifications to the following measures...
...required at the time of sale will satisfy this device must accept any consumables, such as paper or ink cartridges, as determined by Canon U.S.A., Inc. ("Canon USA") with respect to be determined by one or more of the FCC Rules. A dated proof of purchase is warranted against ... bill of warranty service. This equipment generates, uses and can be defective upon inspection will not occur in the manual. z Connect the equipment into an outlet on , the user is no responsibility for such items except for help. Do not make any changes or modifications to the following measures...
MP140 series Quick Start Guide
Page 67
...other documentation for a particular purpose, and all defects encountered in normal use of the Product and does not apply in , Canon USA's user's manual or other documentation, or services performed by the manufacturer or producer thereof. ("Separate Warranty"). THE SOLE WARRANTY WITH RESPECT TO ...instructions in, or environmental conditions prescribed in the following cases: (a) Loss of the Separate Warranty. NOR SHALL RECOVERY OF ANY KIND AGAINST CANON USA OR ITS ASF BE GREATER IN AMOUNT THAN THE PURCHASE PRICE OF THE PRODUCT CAUSING THE ALLEGED DAMAGE. ANY SYSTEM SOFTWARE (WHETHER...
...other documentation for a particular purpose, and all defects encountered in normal use of the Product and does not apply in , Canon USA's user's manual or other documentation, or services performed by the manufacturer or producer thereof. ("Separate Warranty"). THE SOLE WARRANTY WITH RESPECT TO ...instructions in, or environmental conditions prescribed in the following cases: (a) Loss of the Separate Warranty. NOR SHALL RECOVERY OF ANY KIND AGAINST CANON USA OR ITS ASF BE GREATER IN AMOUNT THAN THE PURCHASE PRICE OF THE PRODUCT CAUSING THE ALLEGED DAMAGE. ANY SYSTEM SOFTWARE (WHETHER...

MP140 series Easy Setup Instructions
Page 2
...Canon PIXMA printer on the front page. • We would appreciate it back in again, or turn off then back on the inside of your PIXMA product and you would like to "Troubleshooting" instructions in order to choose the options you are using . • Log on -screen manual... • Use Mac OS X v.10.2.8 to 10.4.x. • The screens below refer to Mac OS X v.10.4.x installation. h When the User Registration screen appears, click Register. i When the Installation completed successfully screen appears, click Restart. Note • Follow on -screen instructions to these. ...
...Canon PIXMA printer on the front page. • We would appreciate it back in again, or turn off then back on the inside of your PIXMA product and you would like to "Troubleshooting" instructions in order to choose the options you are using . • Log on -screen manual... • Use Mac OS X v.10.2.8 to 10.4.x. • The screens below refer to Mac OS X v.10.4.x installation. h When the User Registration screen appears, click Register. i When the Installation completed successfully screen appears, click Restart. Note • Follow on -screen instructions to these. ...


