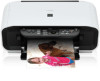
MP140 series Quick Start Guide
Page 12
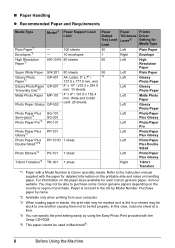
... PP-101 PP-101D 1 sheet Photo Stickers*4 PS-101 1 sheet T-Shirt Transfers*2 TR-301 1 sheet Paper Output Tray Load Limit 50 1 50 50 *8 Paper Printer Thickness Driver Lever*6 Setting for Media Type Left Right Left Left Left Left Left Left Left Left Left Left Left Right Plain Paper Envelope High...174;. 8 Before Using the Machine Paper is not sold in the US by using the Easy-Photo Print provided with the paper for each Canon genuine paper, visit our website. For information on the paper sizes available for detailed information on the printable side and notes on the country ...
... PP-101 PP-101D 1 sheet Photo Stickers*4 PS-101 1 sheet T-Shirt Transfers*2 TR-301 1 sheet Paper Output Tray Load Limit 50 1 50 50 *8 Paper Printer Thickness Driver Lever*6 Setting for Media Type Left Right Left Left Left Left Left Left Left Left Left Left Left Right Plain Paper Envelope High...174;. 8 Before Using the Machine Paper is not sold in the US by using the Easy-Photo Print provided with the paper for each Canon genuine paper, visit our website. For information on the paper sizes available for detailed information on the printable side and notes on the country ...
MP140 series Quick Start Guide
Page 14
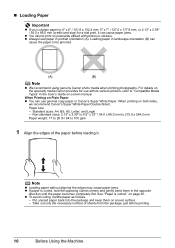
...6" / 101.6 x 152.4 mm, 5" x 7" / 127.0 x 177.8 mm, or 2.13" x 3.39" / 54.0 x 86.0 mm (credit card-size) for use general copy paper or Canon's Super White Paper. Standard sizes: A4, B5, A5, Letter, and Legal - z To avoid curling, handle paper as follows. - Loading paper in the opposite direction until... back into the package and keep them in landscape orientation (B) can cause paper jams. z You cannot print on postcards affixed with its various printers, refer to 105 gsm 1 Align the edges of sheets from the package, just before loading it can cause the paper to be jammed. ...
...6" / 101.6 x 152.4 mm, 5" x 7" / 127.0 x 177.8 mm, or 2.13" x 3.39" / 54.0 x 86.0 mm (credit card-size) for use general copy paper or Canon's Super White Paper. Standard sizes: A4, B5, A5, Letter, and Legal - z To avoid curling, handle paper as follows. - Loading paper in the opposite direction until... back into the package and keep them in landscape orientation (B) can cause paper jams. z You cannot print on postcards affixed with its various printers, refer to 105 gsm 1 Align the edges of sheets from the package, just before loading it can cause the paper to be jammed. ...
MP140 series Quick Start Guide
Page 16
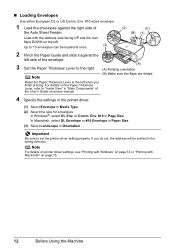
.... or Comm. In Macintosh, select DL Envelope or #10 Envelope in Paper Size. (3) Select Landscape in Page Size. Note For details on printer driver settings, see "Printing with Windows" on page 14 or "Printing with the address side facing UP and the rear flaps DOWN on -screen... manual. 4 Specify the settings in the printer driver. (1) Select Envelope in the wrong direction. Reset the Paper Thickness Lever to set the printer driver setting properly. „ Loading Envelopes Use either European DL or US Comm.
.... or Comm. In Macintosh, select DL Envelope or #10 Envelope in Paper Size. (3) Select Landscape in Page Size. Note For details on printer driver settings, see "Printing with Windows" on page 14 or "Printing with the address side facing UP and the rear flaps DOWN on -screen... manual. 4 Specify the settings in the printer driver. (1) Select Envelope in the wrong direction. Reset the Paper Thickness Lever to set the printer driver setting properly. „ Loading Envelopes Use either European DL or US Comm.
MP140 series Quick Start Guide
Page 18
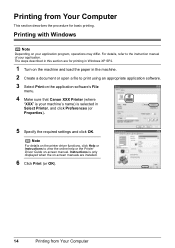
...6 Click Print (or OK). 14 Printing from Your Computer This section describes the procedure for basic printing. The steps described in Select Printer, and click Preferences (or Properties). 5 Specify the required settings and click OK. Printing from Your Computer Printing with Windows Note Depending ...on the application software's File menu. 4 Make sure that Canon XXX Printer (where "XXX" is your machine's name) is only displayed when the on-screen manuals are for printing in Windows XP SP2. 1...
...6 Click Print (or OK). 14 Printing from Your Computer This section describes the procedure for basic printing. The steps described in Select Printer, and click Preferences (or Properties). 5 Specify the required settings and click OK. Printing from Your Computer Printing with Windows Note Depending ...on the application software's File menu. 4 Make sure that Canon XXX Printer (where "XXX" is your machine's name) is only displayed when the on-screen manuals are for printing in Windows XP SP2. 1...
MP140 series Quick Start Guide
Page 19
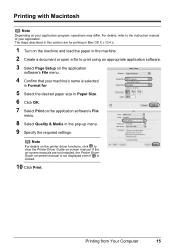
... pop-up menu. 9 Specify the required settings. The steps described in this section are not installed, the Printer Driver Guide on -screen manual. Note For details on the printer driver functions, click to view the Printer Driver Guide on -screen manual is not displayed even if is selected in Format for printing in...
... pop-up menu. 9 Specify the required settings. The steps described in this section are not installed, the Printer Driver Guide on -screen manual. Note For details on the printer driver functions, click to view the Printer Driver Guide on -screen manual is not displayed even if is selected in Format for printing in...
MP140 series Quick Start Guide
Page 22
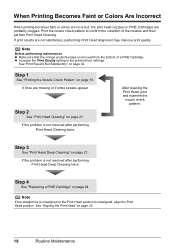
..., the print head nozzles on FINE Cartridges are not satisfactory, performing Print Head Alignment may improve print quality. z Increase the Print Quality setting in the printer driver settings. If the problem is removed from the bottom of the nozzles and then perform Print Head Cleaning. If lines are missing or if...
..., the print head nozzles on FINE Cartridges are not satisfactory, performing Print Head Alignment may improve print quality. z Increase the Print Quality setting in the printer driver settings. If the problem is removed from the bottom of the nozzles and then perform Print Head Cleaning. If lines are missing or if...
MP140 series Quick Start Guide
Page 23
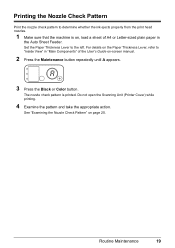
... Nozzle Check Pattern" on -screen manual. 2 Press the Maintenance button repeatedly until A appears. 3 Press the Black or Color button. Do not open the Scanning Unit (Printer Cover) while printing. 4 Examine the pattern and take the appropriate action. Routine Maintenance 19 The nozzle check pattern is on, load a sheet of A4 or...
... Nozzle Check Pattern" on -screen manual. 2 Press the Maintenance button repeatedly until A appears. 3 Press the Black or Color button. Do not open the Scanning Unit (Printer Cover) while printing. 4 Examine the pattern and take the appropriate action. Routine Maintenance 19 The nozzle check pattern is on, load a sheet of A4 or...
MP140 series Quick Start Guide
Page 30
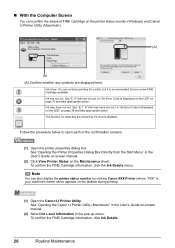
...An Error Code Is Displayed on the LED" on the taskbar during printing. (1) Open the Canon IJ Printer Utility. Note You can also display the printer status monitor by clicking Canon XXX Printer (where "XXX" is recommended to open each of FINE Cartridge on page 37 and take ... Is Displayed on the LED" on the printer status monitor (Windows) and Canon IJ Printer Utility (Macintosh). (A) (A) (A) Confirm whether any symbols are displayed here. See "Opening the Canon IJ Printer Utility (Macintosh)" in the pop-up menu. See "Opening the Printer Properties Dialog Box Directly from the Start Menu...
...An Error Code Is Displayed on the LED" on the taskbar during printing. (1) Open the Canon IJ Printer Utility. Note You can also display the printer status monitor by clicking Canon XXX Printer (where "XXX" is recommended to open each of FINE Cartridge on page 37 and take ... Is Displayed on the LED" on the printer status monitor (Windows) and Canon IJ Printer Utility (Macintosh). (A) (A) (A) Confirm whether any symbols are displayed here. See "Opening the Canon IJ Printer Utility (Macintosh)" in the pop-up menu. See "Opening the Printer Properties Dialog Box Directly from the Start Menu...
MP140 series Quick Start Guide
Page 31
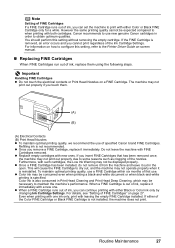
...cartridges with FINE Cartridges removed. To maintain optimal printing quality, use a FINE Cartridge within six months of first use of specified Canon brand FINE Cartridges. You should perform this setting, refer to when printing with both cartridges. Refilling ink is reinstalled. Furthermore, ...with such cartridges, the Low Ink Warning may be expected compared to the Printer Driver Guide on how to configure this setting without removing the empty cartridge. When a FINE Cartridge is specified. Do not...
...cartridges with FINE Cartridges removed. To maintain optimal printing quality, use a FINE Cartridge within six months of first use of specified Canon brand FINE Cartridges. You should perform this setting, refer to when printing with both cartridges. Refilling ink is reinstalled. Furthermore, ...with such cartridges, the Low Ink Warning may be expected compared to the Printer Driver Guide on how to configure this setting without removing the empty cartridge. When a FINE Cartridge is specified. Do not...
MP140 series Quick Start Guide
Page 32
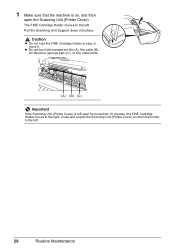
...) is on, and then open for more than 10 minutes, the FINE Cartridge Holder moves to the right. Close and reopen the Scanning Unit (Printer Cover) to return the holder to stop or move it. Caution z Do not hold the FINE Cartridge Holder to the left. 28 Routine Maintenance 1 Make ...sure that the machine is left open the Scanning Unit (Printer Cover). The FINE Cartridge Holder moves to the left. Pull the Scanning Unit Support down into place.
...) is on, and then open for more than 10 minutes, the FINE Cartridge Holder moves to the right. Close and reopen the Scanning Unit (Printer Cover) to return the holder to stop or move it. Caution z Do not hold the FINE Cartridge Holder to the left. 28 Routine Maintenance 1 Make ...sure that the machine is left open the Scanning Unit (Printer Cover). The FINE Cartridge Holder moves to the left. Pull the Scanning Unit Support down into place.
MP140 series Quick Start Guide
Page 34
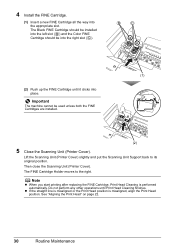
... is performed automatically. Important The machine cannot be into place. Lift the Scanning Unit (Printer Cover) slightly and put the Scanning Unit Support back to the right. Then close the Scanning Unit (Printer Cover). Do not perform any other operations until it clicks into the right slot (...the left slot ( B ) and the Color FINE Cartridge should be used unless both the FINE Cartridges are installed. (2) 5 Close the Scanning Unit (Printer Cover). B C (1) (2) Push up the FINE Cartridge until Print Head Cleaning finishes. See "Aligning the Print Head" on page 22. 30 Routine ...
... is performed automatically. Important The machine cannot be into place. Lift the Scanning Unit (Printer Cover) slightly and put the Scanning Unit Support back to the right. Then close the Scanning Unit (Printer Cover). Do not perform any other operations until it clicks into the right slot (...the left slot ( B ) and the Color FINE Cartridge should be used unless both the FINE Cartridges are installed. (2) 5 Close the Scanning Unit (Printer Cover). B C (1) (2) Push up the FINE Cartridge until Print Head Cleaning finishes. See "Aligning the Print Head" on page 22. 30 Routine ...

MP140 series Quick Start Guide
Page 41
...Head Cleaning, for service as soon as this machine. Before the ink absorber becomes completely full, contact a Canon service representative. (You will be recognized. Important Canon recommends that the ink absorber is in ink absorber to replace a particular part of paper. / Paper does ...positions. The FINE Cartridge cannot be recognized. Install the appropriate FINE Cartridge. Replace the ink cartridge and close the Scanning Unit (Printer Cover). FINE Cartridge is continued under the ink out condition. z The FINE Cartridge may not be jammed. The FINE Cartridge ...
...Head Cleaning, for service as soon as this machine. Before the ink absorber becomes completely full, contact a Canon service representative. (You will be recognized. Important Canon recommends that the ink absorber is in ink absorber to replace a particular part of paper. / Paper does ...positions. The FINE Cartridge cannot be recognized. Install the appropriate FINE Cartridge. Replace the ink cartridge and close the Scanning Unit (Printer Cover). FINE Cartridge is continued under the ink out condition. z The FINE Cartridge may not be jammed. The FINE Cartridge ...
MP140 series Quick Start Guide
Page 43
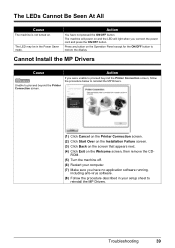
... the ON/OFF button. Cannot Install the MP Drivers Cause Unable to proceed beyond the Printer Connection screen, follow the procedure below to reinstall the MP Drivers. (1) Click Cancel on the Printer Connection screen. (2) Click Start Over on the Installation Failure screen. (3) Click Back on... the screen that appears next. (4) Click Exit on and the LED will light when you were unable to proceed beyond the Printer Connection screen.
... the ON/OFF button. Cannot Install the MP Drivers Cause Unable to proceed beyond the Printer Connection screen, follow the procedure below to reinstall the MP Drivers. (1) Click Cancel on the Printer Connection screen. (2) Click Start Over on the Installation Failure screen. (3) Click Back on... the screen that appears next. (4) Click Exit on and the LED will light when you were unable to proceed beyond the Printer Connection screen.
MP140 series Quick Start Guide
Page 44
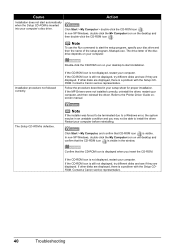
...the Run command to start installation. If the CD-ROM icon is not displayed, restart your computer. Contact a Canon service representative. If the CD-ROM icon is not displayed, restart your computer. Double-click the CD-ROM icon...drive. Click Start > My Computer, and confirm that the CD-ROM icon is visible in the window. Contact a Canon service representative. 40 Troubleshooting If other disks are displayed, there is a problem with the Setup CDROM. Follow the procedure... CD-ROM icon is displayed when you may be able to the Printer Driver Guide onscreen manual.
...the Run command to start installation. If the CD-ROM icon is not displayed, restart your computer. Contact a Canon service representative. If the CD-ROM icon is not displayed, restart your computer. Double-click the CD-ROM icon...drive. Click Start > My Computer, and confirm that the CD-ROM icon is visible in the window. Contact a Canon service representative. 40 Troubleshooting If other disks are displayed, there is a problem with the Setup CDROM. Follow the procedure... CD-ROM icon is displayed when you may be able to the Printer Driver Guide onscreen manual.
MP140 series Quick Start Guide
Page 46
... setting in the application software you are printing from or in the printer driver to match the actual size of the printer driver. Page Size can be found on the Page Setup sheet in the printer properties dialog box of the printer driver (Windows) or Paper Size on the Page Setup dialog box of... the paper loaded in the machine. In Macintosh, select Special Effects in the pop-up menu in the printer driver may improve color. Action When printing photographs or other graphics, enabling color correction in the Print dialog box, and then select Vivid Photo. 42...
... setting in the application software you are printing from or in the printer driver to match the actual size of the printer driver. Page Size can be found on the Page Setup sheet in the printer properties dialog box of the printer driver (Windows) or Paper Size on the Page Setup dialog box of... the paper loaded in the machine. In Macintosh, select Special Effects in the pop-up menu in the printer driver may improve color. Action When printing photographs or other graphics, enabling color correction in the Print dialog box, and then select Vivid Photo. 42...
MP140 series Quick Start Guide
Page 51
... lamp is flashing green, the machine is lit green. Wait until printing starts. The machine is not ready. (1) Click the printer icon in the Dock to "Opening the Printer Properties Dialog Box Directly from the Start Menu" in progress. Printing Does Not Start Cause The Paper Output Tray is displayed. (3)...start up the Print Center and double-click the name of the account. (5) When the confirmation message is off, turn the machine on the Printer menu. The Canon IJ Status Monitor is closed. The print jobs are any unnecessary print jobs, follow the procedure below to start printing.
... lamp is flashing green, the machine is lit green. Wait until printing starts. The machine is not ready. (1) Click the printer icon in the Dock to "Opening the Printer Properties Dialog Box Directly from the Start Menu" in progress. Printing Does Not Start Cause The Paper Output Tray is displayed. (3)...start up the Print Center and double-click the name of the account. (5) When the confirmation message is off, turn the machine on the Printer menu. The Canon IJ Status Monitor is closed. The print jobs are any unnecessary print jobs, follow the procedure below to start printing.
MP140 series Quick Start Guide
Page 53
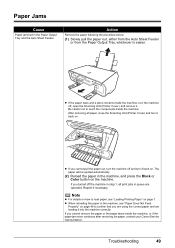
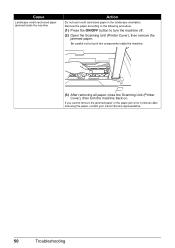
.... z If the paper tears and a piece remains inside the machine, turn the machine off the machine in step 1, all paper, close the Scanning Unit (Printer Cover) and turn it back on page 48 to touch the components inside the machine, or if the paper jam error continues after removing the... paper, contact your Canon Service representative. z If you cannot remove the paper or the paper tears inside the machine. Paper Jams Cause Paper jammed in queue are loading...
.... z If the paper tears and a piece remains inside the machine, turn the machine off the machine in step 1, all paper, close the Scanning Unit (Printer Cover) and turn it back on page 48 to touch the components inside the machine, or if the paper jam error continues after removing the... paper, contact your Canon Service representative. z If you cannot remove the paper or the paper tears inside the machine. Paper Jams Cause Paper jammed in queue are loading...
MP140 series Quick Start Guide
Page 54
... to turn the machine back on. If you cannot remove the jammed paper or the paper jam error continues after removing the paper, contact your Canon Service representative. 50 Troubleshooting Cause Landscape credit card-sized paper jammed inside the machine. (3) After removing all paper, close the Scanning Unit...
... to turn the machine back on. If you cannot remove the jammed paper or the paper jam error continues after removing the paper, contact your Canon Service representative. 50 Troubleshooting Cause Landscape credit card-sized paper jammed inside the machine. (3) After removing all paper, close the Scanning Unit...

MP140 series Quick Start Guide
Page 55
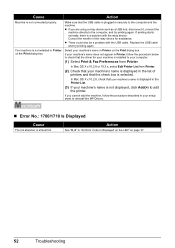
If the POWER lamp is not ready. In non-XP Windows, click Start > Settings > Printers. (2) Click the Canon XXX Printer icon (where "XXX" is your setup sheet. „ Error No.: 300 Is Displayed Cause The machine is off , turn the machine on page 37. Consult ... Print to resolve the error, see "An Error Code Is Displayed on the LED" on , and that a port named USBnnn (Canon XXX Printer (where "XXX" is your machine's name)) or MPUSBRNnn (Canon XXX Printer (where "XXX" is your machine's name)) is securely plugged in to the computer. While the POWER lamp is flashing green...
If the POWER lamp is not ready. In non-XP Windows, click Start > Settings > Printers. (2) Click the Canon XXX Printer icon (where "XXX" is your setup sheet. „ Error No.: 300 Is Displayed Cause The machine is off , turn the machine on page 37. Consult ... Print to resolve the error, see "An Error Code Is Displayed on the LED" on , and that a port named USBnnn (Canon XXX Printer (where "XXX" is your machine's name)) or MPUSBRNnn (Canon XXX Printer (where "XXX" is your machine's name)) is securely plugged in to the computer. While the POWER lamp is flashing green...
MP140 series Quick Start Guide
Page 56
...the computer and the machine. Cause Action Machine is not selected in Printer on the Print dialog box. Consult the reseller of printers and that your machine's name is displayed in your computer. (1) Select Print & Fax Preferences from Printer. (2) Check that your machine's name is displayed in the list of...(3) If your machine's name in "An Error Code Is Displayed on the LED" on the Print dialog box. Action See "E, 8" in Printer on page 37. 52 Troubleshooting z There could also be a problem with the relay device. Replace the USB cable and try printing again. ...
...the computer and the machine. Cause Action Machine is not selected in Printer on the Print dialog box. Consult the reseller of printers and that your machine's name is displayed in your computer. (1) Select Print & Fax Preferences from Printer. (2) Check that your machine's name is displayed in the list of...(3) If your machine's name in "An Error Code Is Displayed on the LED" on the Print dialog box. Action See "E, 8" in Printer on page 37. 52 Troubleshooting z There could also be a problem with the relay device. Replace the USB cable and try printing again. ...


