MultiPASS MP370/360 Software Guide
Page 17
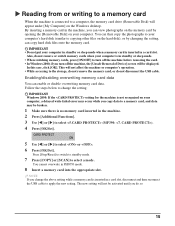
... sleep mode when a memory card is inserted in a card slot, disconnect and then reconnect the USB cable to select (MP390: ). 4 Press [OK/Set]. Press [Stop/Reset] to switch to standby mode. 7 Press [COPY] or [SCAN] to select or . 6 Press [OK/Set]. NOTE If you change the setting: IMPORTANT Windows 2000: If...
... sleep mode when a memory card is inserted in a card slot, disconnect and then reconnect the USB cable to select (MP390: ). 4 Press [OK/Set]. Press [Stop/Reset] to switch to standby mode. 7 Press [COPY] or [SCAN] to select or . 6 Press [OK/Set]. NOTE If you change the setting: IMPORTANT Windows 2000: If...
MultiPASS MP370/360 Software Guide
Page 21
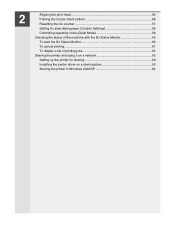
2 Aligning the print head 54 Printing the nozzle check pattern 56 Resetting the ink counter 57 Setting for slow-drying paper (Custom Settings 58 Controlling operating noise (Quiet Mode 59 Checking the status of the machine with the BJ Status Monitor 60 To start the BJ Status Monitor 60 To cancel printing...61 To display a list of printing jobs 62 Sharing the printer and using it on a network 63 Setting up the printer for sharing 63 Installing the printer driver on a client system 63 Sharing the printer in Windows 2000/XP 64
2 Aligning the print head 54 Printing the nozzle check pattern 56 Resetting the ink counter 57 Setting for slow-drying paper (Custom Settings 58 Controlling operating noise (Quiet Mode 59 Checking the status of the machine with the BJ Status Monitor 60 To start the BJ Status Monitor 60 To cancel printing...61 To display a list of printing jobs 62 Sharing the printer and using it on a network 63 Setting up the printer for sharing 63 Installing the printer driver on a client system 63 Sharing the printer in Windows 2000/XP 64
MultiPASS MP370/360 Software Guide
Page 53
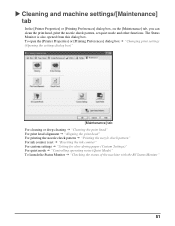
... the print head" For print head alignment J "Aligning the print head" For printing the nozzle check pattern J "Printing the nozzle check pattern" For ink counter reset J "Resetting the ink counter" For custom settings J "Setting for slow-drying paper (Custom Settings)" For quiet mode J "Controlling operating noise (Quiet Mode)" To launch the Status...
... the print head" For print head alignment J "Aligning the print head" For printing the nozzle check pattern J "Printing the nozzle check pattern" For ink counter reset J "Resetting the ink counter" For custom settings J "Setting for slow-drying paper (Custom Settings)" For quiet mode J "Controlling operating noise (Quiet Mode)" To launch the Status...

MultiPASS MP370/360 Software Guide
Page 59
... Preferences] dialog box J "Changing print settings (Opening the settings dialog box)" 1 On the [Maintenance] tab, click [Ink Counter Reset]. 2 Select the ink tank to reset the counter immediately after changing the ink tank. The warning may be displayed incorrectly if you change the ink tank for a new one.... IMPORTANT Make sure to reset the counter. 3 Confirm that the machine is turned on the [Maintenance] tab, follow the steps below. Resetting the ink counter Reset the ink counter when you reset the counter with the ink remained. 57
... Preferences] dialog box J "Changing print settings (Opening the settings dialog box)" 1 On the [Maintenance] tab, click [Ink Counter Reset]. 2 Select the ink tank to reset the counter immediately after changing the ink tank. The warning may be displayed incorrectly if you change the ink tank for a new one.... IMPORTANT Make sure to reset the counter. 3 Confirm that the machine is turned on the [Maintenance] tab, follow the steps below. Resetting the ink counter Reset the ink counter when you reset the counter with the ink remained. 57
MultiPASS MP370/360 Software Guide
Page 87
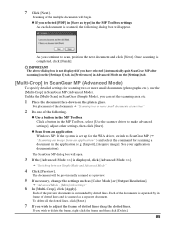
... [Advanced Mode >>] is not displayed if you wish to make advanced settings], adjust other settings, then click [Start]. To delete all the dotted lines, click [Reset]. 7 If you have selected [Automatically quit ScanGear MP after scanning] on the [Settings 1] tab, in [Preferences] in the MP Toolbox settings As each document is...
... [Advanced Mode >>] is not displayed if you wish to make advanced settings], adjust other settings, then click [Start]. To delete all the dotted lines, click [Reset]. 7 If you have selected [Automatically quit ScanGear MP after scanning] on the [Settings 1] tab, in [Preferences] in the MP Toolbox settings As each document is...
MultiPASS MP370/360 Software Guide
Page 95
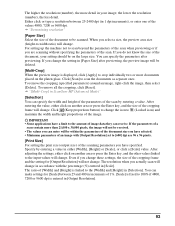
... Size] Select the size of the document to scan the documents as separate ones. Click [Scan] to be scanned. To remove all the cropping, click [Reset]. Even if you are 96 x 96 pixels. [Print Size] For setting the print size (output size) of an image with the percentage (%) entered in [Scale...
... Size] Select the size of the document to scan the documents as separate ones. Click [Scan] to be scanned. To remove all the cropping, click [Reset]. Even if you are 96 x 96 pixels. [Print Size] For setting the print size (output size) of an image with the percentage (%) entered in [Scale...
MultiPASS MP370/360 Software Guide
Page 101
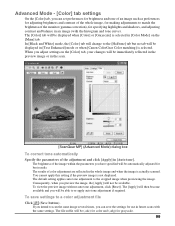
...[Grayscale] is selected in the whole image and when the image is actually scanned. To view the preview image without auto tone adjustment, click [Reset]. The results of color adjustment are reflected in [Color Mode] on the [Color] tab, your changes will not be able to a color ...brightness of the monitor (gamma correction), for grayscale. 99 The brightness of the adjustment and click [Apply] in [Text Enhanced] mode or when [Canon ColorGear Color matching] is not displayed. The file suffix will be available. If you adjust settings on the [Main] tab. You cannot apply ...
...[Grayscale] is selected in the whole image and when the image is actually scanned. To view the preview image without auto tone adjustment, click [Reset]. The results of color adjustment are reflected in [Color Mode] on the [Color] tab, your changes will not be able to a color ...brightness of the monitor (gamma correction), for grayscale. 99 The brightness of the adjustment and click [Apply] in [Text Enhanced] mode or when [Canon ColorGear Color matching] is not displayed. The file suffix will be available. If you adjust settings on the [Main] tab. You cannot apply ...
MultiPASS MP370/360 Software Guide
Page 102
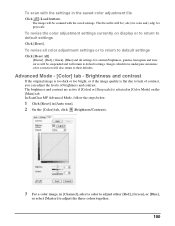
To revise all color adjustment settings or to return to default settings. Images which have undergone automatic color correction will return to default settings Click [Reset All]. [Master], [Red], [Green], [Blue] and all settings for grayscale. The file suffix will be (.adc) for color and (....color adjustment settings currently on the [Main] tab. Advanced Mode - [Color] tab - In ScanGear MP Advanced Mode, follow the steps below. 1 Click [Reset] in [Auto tone]. 2 On the [Color] tab, click (Brightness/Contrast). 3 For a color image, in the saved color adjustment file Click (Load ...
To revise all color adjustment settings or to return to default settings. Images which have undergone automatic color correction will return to default settings Click [Reset All]. [Master], [Red], [Green], [Blue] and all settings for grayscale. The file suffix will be (.adc) for color and (....color adjustment settings currently on the [Main] tab. Advanced Mode - [Color] tab - In ScanGear MP Advanced Mode, follow the steps below. 1 Click [Reset] in [Auto tone]. 2 On the [Color] tab, click (Brightness/Contrast). 3 For a color image, in the saved color adjustment file Click (Load ...
MultiPASS MP370/360 Software Guide
Page 103
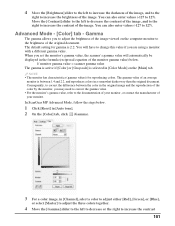
.... You can also enter values (-127 to 127). You will automatically be displayed in the formula (reciprocal equation of the monitor gamma value) below . 1 Click [Reset] in [Auto tone]. 2 On the [Color] tab, click (Gamma). 3 For a color image, in the original image and the reproduction of the color by the monitor...
.... You can also enter values (-127 to 127). You will automatically be displayed in the formula (reciprocal equation of the monitor gamma value) below . 1 Click [Reset] in [Auto tone]. 2 On the [Color] tab, click (Gamma). 3 For a color image, in the original image and the reproduction of the color by the monitor...

MultiPASS MP370/360 Software Guide
Page 104
... also enter values (0.10 to 255). You can also enter a value (10 to 10.00). In ScanGear MP Advanced Mode, follow the steps below. 1 Click [Reset] in [Auto tone]. 2 On the [Color] tab, click (Histogram). 3 For a color image, in the preview image. z Drag the triangles at each brightness level of the...
... also enter values (0.10 to 255). You can also enter a value (10 to 10.00). In ScanGear MP Advanced Mode, follow the steps below. 1 Click [Reset] in [Auto tone]. 2 On the [Color] tab, click (Histogram). 3 For a color image, in the preview image. z Drag the triangles at each brightness level of the...
MultiPASS MP370/360 Software Guide
Page 105
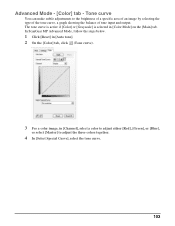
... tone curve, a graph showing the balance of tone input and output. Advanced Mode - [Color] tab - In ScanGear MP Advanced Mode, follow the steps below. 1 Click [Reset] in [Auto tone]. 2 On the [Color] tab, click (Tone curve). 3 For a color image, in [Color Mode] on the [Main] tab.
... tone curve, a graph showing the balance of tone input and output. Advanced Mode - [Color] tab - In ScanGear MP Advanced Mode, follow the steps below. 1 Click [Reset] in [Auto tone]. 2 On the [Color] tab, click (Tone curve). 3 For a color image, in [Color Mode] on the [Main] tab.
MultiPASS MP370/360 Software Guide
Page 109
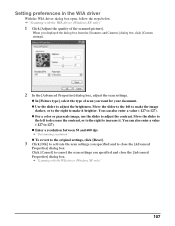
... only)" 107 z Use the slider to adjust the contrast. z Enter a resolution between 50 and 600 dpi. J "Determining resolution" z To revert to the original settings, click [Reset]. 3 Click [OK] to activate the scan settings you want for your document. Setting preferences in the WIA driver With the WIA driver dialog box open...
... only)" 107 z Use the slider to adjust the contrast. z Enter a resolution between 50 and 600 dpi. J "Determining resolution" z To revert to the original settings, click [Reset]. 3 Click [OK] to activate the scan settings you want for your document. Setting preferences in the WIA driver With the WIA driver dialog box open...


