MultiPASS MP370/360 Software Guide
Page 1
... or editing a recipient in the Address Book Contents About this guide, MP360/ MP370 is referred to as the "machine," and MP390 as a print profile/[Profiles] tab Cleaning and machine settings/[Maintenance] tab Checking the status of the machine with the WIA driver (Windows XP only) Faxing (Fax model only) Go To P.108 Click!
... or editing a recipient in the Address Book Contents About this guide, MP360/ MP370 is referred to as the "machine," and MP390 as a print profile/[Profiles] tab Cleaning and machine settings/[Maintenance] tab Checking the status of the machine with the WIA driver (Windows XP only) Faxing (Fax model only) Go To P.108 Click!
MultiPASS MP370/360 Software Guide
Page 2
... more pages 79 Scanning two or more small documents at one time 82 Setting preferences and scanning with ScanGear MP 87 Scanning with the WIA driver (Windows XP only 106 4: Faxing (Fax model only)....... 109 Sending a fax 109 Registering or editing a recipient in the Address Book 114 5: Troubleshooting 122 Problems outputting 122...
... more pages 79 Scanning two or more small documents at one time 82 Setting preferences and scanning with ScanGear MP 87 Scanning with the WIA driver (Windows XP only 106 4: Faxing (Fax model only)....... 109 Sending a fax 109 Registering or editing a recipient in the Address Book 114 5: Troubleshooting 122 Problems outputting 122...

MultiPASS MP370/360 Software Guide
Page 6
... Professional (Service Pack 4 or later) Microsoft Windows XP Professional/Home Edition (Service Pack 1 or later) CPU Pentium/Celeron... you can use it as a USB Full-Speed (USB1.1-equivalent) interface. 4 For the most up-to-date information, see the Canon home page. • As a USB2.0 Hi-Speed interface is fully compatible with a USB2.0 Hi-Speed interface. Use a cable ...space of 65 MB or more (150 MB or more recommended) MP Drivers: 50 MB or more MP Toolbox: 15 MB or more recommended) NOTE • Canon cannot guarantee the performance with all computers standard-equipped with USB Full-Speed ...
... Professional (Service Pack 4 or later) Microsoft Windows XP Professional/Home Edition (Service Pack 1 or later) CPU Pentium/Celeron... you can use it as a USB Full-Speed (USB1.1-equivalent) interface. 4 For the most up-to-date information, see the Canon home page. • As a USB2.0 Hi-Speed interface is fully compatible with a USB2.0 Hi-Speed interface. Use a cable ...space of 65 MB or more (150 MB or more recommended) MP Drivers: 50 MB or more MP Toolbox: 15 MB or more recommended) NOTE • Canon cannot guarantee the performance with all computers standard-equipped with USB Full-Speed ...

MultiPASS MP370/360 Software Guide
Page 7
...]. 2. Use a USB-IF-approved cable not longer than 16 3/8 feet (5 meters). For how to the computer, or the computer is in Windows, and are released by Microsoft. User privileges when using , you must have Administrator privileges. • This may not operate correctly with self-made ...computers, or store-brand computers. • When installing the MP Drivers in Windows 2000, you must have Service Pack 4 or later version installed. • When installing the MP Drivers in Windows XP, you must have User privileges or greater.
...]. 2. Use a USB-IF-approved cable not longer than 16 3/8 feet (5 meters). For how to the computer, or the computer is in Windows, and are released by Microsoft. User privileges when using , you must have Administrator privileges. • This may not operate correctly with self-made ...computers, or store-brand computers. • When installing the MP Drivers in Windows 2000, you must have Service Pack 4 or later version installed. • When installing the MP Drivers in Windows XP, you must have User privileges or greater.
MultiPASS MP370/360 Software Guide
Page 8
...you are currently running. 4 Insert the Setup CD-ROM into your computer, the [New Hardware Found], [Device Driver Wizard], [Add New Hardware Wizard] etc. NOTE If there is a copy of the MultiPASS Suite software installed on your computer, delete this version before installing the new version. • When installing the... on the local or network drive, you can install from a copy saved on a network or hard disk, double-click [Setup (Setup.exe)] in Windows 2000/XP, you must log on as displayed in the [Setup] screen. [Setup] screen If this case, disconnect the USB cable, then click [Cancel...
...you are currently running. 4 Insert the Setup CD-ROM into your computer, the [New Hardware Found], [Device Driver Wizard], [Add New Hardware Wizard] etc. NOTE If there is a copy of the MultiPASS Suite software installed on your computer, delete this version before installing the new version. • When installing the... on the local or network drive, you can install from a copy saved on a network or hard disk, double-click [Setup (Setup.exe)] in Windows 2000/XP, you must log on as displayed in the [Setup] screen. [Setup] screen If this case, disconnect the USB cable, then click [Cancel...
MultiPASS MP370/360 Software Guide
Page 10
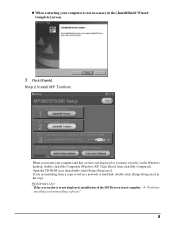
Open the CD-ROM icon, then double-click [Setup (Setup.exe)]. If you are installing from a copy saved on the Windows desktop, double-click [My Computer] (Windows XP: Click [Start], then click [My Computer]). J "Problems installing and uninstalling software" 8 z When restarting your computer and this screen is not ... (Setup.exe)] in the [InstallShield Wizard Complete] screen. 3 Click [Finish]. IMPORTANT If the screen above is not displayed, installation of the MP Drivers is not necessary in the copy. Step 2 Install MP Toolbox When you restart your computer is not complete.
Open the CD-ROM icon, then double-click [Setup (Setup.exe)]. If you are installing from a copy saved on the Windows desktop, double-click [My Computer] (Windows XP: Click [Start], then click [My Computer]). J "Problems installing and uninstalling software" 8 z When restarting your computer and this screen is not ... (Setup.exe)] in the [InstallShield Wizard Complete] screen. 3 Click [Finish]. IMPORTANT If the screen above is not displayed, installation of the MP Drivers is not necessary in the copy. Step 2 Install MP Toolbox When you restart your computer is not complete.
MultiPASS MP370/360 Software Guide
Page 14
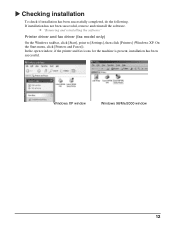
X Checking installation To check if installation has been successfully completed, do the following. J "Removing and reinstalling the software" Printer driver and fax driver (fax model only) On the Windows taskbar, click [Start], point to [Settings], then click [Printers] (Windows XP: On the Start menu, click [Printers and Faxes]). In the open window, if the printer and fax icons for the machine is present, installation has been successful. Windows XP window Windows 98/Me/2000 window 12 If installation has not been successful, remove and reinstall the software.
X Checking installation To check if installation has been successfully completed, do the following. J "Removing and reinstalling the software" Printer driver and fax driver (fax model only) On the Windows taskbar, click [Start], point to [Settings], then click [Printers] (Windows XP: On the Start menu, click [Printers and Faxes]). In the open window, if the printer and fax icons for the machine is present, installation has been successful. Windows XP window Windows 98/Me/2000 window 12 If installation has not been successful, remove and reinstall the software.
MultiPASS MP370/360 Software Guide
Page 15
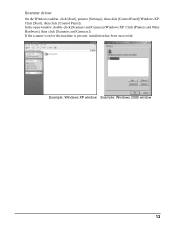
In the open window, double-click [Scanners and Cameras](Windows XP: Click [Printers and Other Hardware], then click [Scanners and Cameras]). Example: Windows XP window Example: Windows 2000 window 13 Scanner driver On the Windows taskbar, click [Start], point to [Settings], then click [Control Panel](Windows XP: Click [Start], then click [Control Panel]). If the scanner icon for the machine is present, installation has been successful.
In the open window, double-click [Scanners and Cameras](Windows XP: Click [Printers and Other Hardware], then click [Scanners and Cameras]). Example: Windows XP window Example: Windows 2000 window 13 Scanner driver On the Windows taskbar, click [Start], point to [Settings], then click [Control Panel](Windows XP: Click [Start], then click [Control Panel]). If the scanner icon for the machine is present, installation has been successful.
MultiPASS MP370/360 Software Guide
Page 16
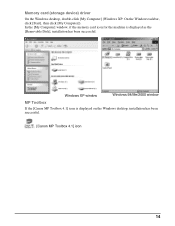
Windows XP window Windows 98/Me/2000 window MP Toolbox If the [Canon MP Toolbox 4.1] icon is displayed as the [Removable Disk], installation has been successful. In the [My Computer] window, if the memory card icon for the machine is displayed on the Windows desktop, installation has been successful. [Canon MP Toolbox 4.1] icon 14 Memory card (storage device) driver On the Windows desktop, double-click [My Computer] (Windows XP: On the Windows taskbar, click [Start], then click [My Computer]).
Windows XP window Windows 98/Me/2000 window MP Toolbox If the [Canon MP Toolbox 4.1] icon is displayed as the [Removable Disk], installation has been successful. In the [My Computer] window, if the memory card icon for the machine is displayed on the Windows desktop, installation has been successful. [Canon MP Toolbox 4.1] icon 14 Memory card (storage device) driver On the Windows desktop, double-click [My Computer] (Windows XP: On the Windows taskbar, click [Start], then click [My Computer]).
MultiPASS MP370/360 Software Guide
Page 18
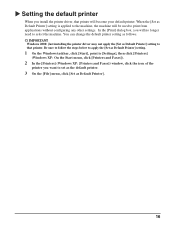
... [Set as Default Printer] setting. 1 On the Windows taskbar, click [Start], point to [Settings], then click [Printers] (Windows XP: On the Start menu, click [Printers and Faxes]). 2 In the [Printers] (Windows XP: [Printers and Faxes]) window, click the icon of the printer you install the printer driver, that printer. When the [Set as Default Printer...
... [Set as Default Printer] setting. 1 On the Windows taskbar, click [Start], point to [Settings], then click [Printers] (Windows XP: On the Start menu, click [Printers and Faxes]). 2 In the [Printers] (Windows XP: [Printers and Faxes]) window, click the icon of the printer you install the printer driver, that printer. When the [Set as Default Printer...

MultiPASS MP370/360 Software Guide
Page 19
... computer as an Administrator, or have Administrator privileges. If a message appears confirming whether to remove the application, click [Yes]. Windows 2000: The [Unsafe Removal of the open applications, including the MP Toolbox and virus checkers. IMPORTANT If you restarted your computer...([MP370 Series], [MP360 Series], or [MP390 Series]), then click [Perform]. When the screen appears for repairing or removing the program, select the [Remove] check box, then click [Next]. Then click [Uninstall Drivers]. 3 In [Please select the device to [(All) Programs], [Canon], then [MP Drivers]. ...
... computer as an Administrator, or have Administrator privileges. If a message appears confirming whether to remove the application, click [Yes]. Windows 2000: The [Unsafe Removal of the open applications, including the MP Toolbox and virus checkers. IMPORTANT If you restarted your computer...([MP370 Series], [MP360 Series], or [MP390 Series]), then click [Perform]. When the screen appears for repairing or removing the program, select the [Remove] check box, then click [Next]. Then click [Uninstall Drivers]. 3 In [Please select the device to [(All) Programs], [Canon], then [MP Drivers]. ...
MultiPASS MP370/360 Software Guide
Page 21
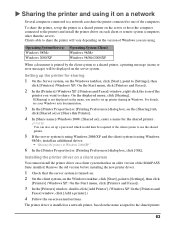
2 Aligning the print head 54 Printing the nozzle check pattern 56 Resetting the ink counter 57 Setting for slow-drying paper (Custom Settings 58 Controlling operating noise (Quiet Mode 59 Checking the status of the machine with the BJ Status Monitor 60 To start the BJ Status Monitor 60 To cancel printing...61 To display a list of printing jobs 62 Sharing the printer and using it on a network 63 Setting up the printer for sharing 63 Installing the printer driver on a client system 63 Sharing the printer in Windows 2000/XP 64
2 Aligning the print head 54 Printing the nozzle check pattern 56 Resetting the ink counter 57 Setting for slow-drying paper (Custom Settings 58 Controlling operating noise (Quiet Mode 59 Checking the status of the machine with the BJ Status Monitor 60 To start the BJ Status Monitor 60 To cancel printing...61 To display a list of printing jobs 62 Sharing the printer and using it on a network 63 Setting up the printer for sharing 63 Installing the printer driver on a client system 63 Sharing the printer in Windows 2000/XP 64
MultiPASS MP370/360 Software Guide
Page 65
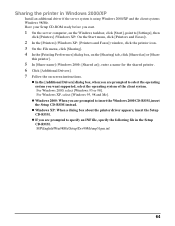
.../XP and the client system is not displayed on the name assigned to the printer) and install the printer driver on the server system. If [Sharing] is using . For details, see your Windows user documentation. 3 In the [Printer Properties] or [Printing Preferences] dialog box, on the [Sharing] tab... you want to share. The printer driver is printed by the client system to a shared printer, a printing message (status or error message) will vary depending on the version of Windows you need to share the printer will be required of the MultiPASS Suite installed. Clients able to set ...
.../XP and the client system is not displayed on the name assigned to the printer) and install the printer driver on the server system. If [Sharing] is using . For details, see your Windows user documentation. 3 In the [Printer Properties] or [Printing Preferences] dialog box, on the [Sharing] tab... you want to share. The printer driver is printed by the client system to a shared printer, a printing message (status or error message) will vary depending on the version of Windows you need to share the printer will be required of the MultiPASS Suite installed. Clients able to set ...
MultiPASS MP370/360 Software Guide
Page 66
... the [Printing Preferences] dialog box, on the [Sharing] tab, click [Shared as] or [Share this printer]. 5 In [Share name] (Windows 2000: [Shared as]), enter a name for the shared printer. 6 Click [Additional Drivers]. 7 Follow the on-screen instructions. z Windows 2000: When you are prompted to specify an INF file, specify the following file in...
... the [Printing Preferences] dialog box, on the [Sharing] tab, click [Shared as] or [Share this printer]. 5 In [Share name] (Windows 2000: [Shared as]), enter a name for the shared printer. 6 Click [Additional Drivers]. 7 Follow the on-screen instructions. z Windows 2000: When you are prompted to specify an INF file, specify the following file in...
MultiPASS MP370/360 Software Guide
Page 68
Tone curve 103 Advanced Mode - [Halftone] tab 104 Determining resolution 105 Scanning with the WIA driver (Windows XP only 106 Scanning from the [Scanners and Cameras] dialog box 106 Setting preferences in the WIA driver 107 Histogram 102 Advanced Mode - [Color] tab - Brightness and contrast 100 Advanced Mode - [Color] tab - Gamma 101 Advanced Mode - [Color] tab - 3 To revise the color adjustment settings currently on display or to return to default settings...100 To revise all color adjustment settings or to return to default settings 100 Advanced Mode - [Color] tab -
Tone curve 103 Advanced Mode - [Halftone] tab 104 Determining resolution 105 Scanning with the WIA driver (Windows XP only 106 Scanning from the [Scanners and Cameras] dialog box 106 Setting preferences in the WIA driver 107 Histogram 102 Advanced Mode - [Color] tab - Brightness and contrast 100 Advanced Mode - [Color] tab - Gamma 101 Advanced Mode - [Color] tab - 3 To revise the color adjustment settings currently on display or to return to default settings...100 To revise all color adjustment settings or to return to default settings 100 Advanced Mode - [Color] tab -

MultiPASS MP370/360 Software Guide
Page 72
in case the MP Toolbox is configured to open and the [Use the scanner driver to make advanced settings] check box is configured to open window, double-click [Scanners and Cameras] (Windows XP: Click [Printers and Other Hardware], then click [Scanners and Cameras]). 3 Right-click the printer icon for the machine, ...when you press the [Black Start] or [Color Start] key. In the following cases, ScanGear MP opens first when you restart your computer. IMPORTANT Windows 2000: The new settings are not applied until you press the [Black Start] or [Color Start] key on the machine: - in case an ...
in case the MP Toolbox is configured to open and the [Use the scanner driver to make advanced settings] check box is configured to open window, double-click [Scanners and Cameras] (Windows XP: Click [Printers and Other Hardware], then click [Scanners and Cameras]). 3 Right-click the printer icon for the machine, ...when you press the [Black Start] or [Color Start] key. In the following cases, ScanGear MP opens first when you restart your computer. IMPORTANT Windows 2000: The new settings are not applied until you press the [Black Start] or [Color Start] key on the machine: - in case an ...
MultiPASS MP370/360 Software Guide
Page 80
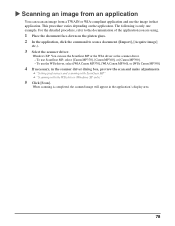
...TWAIN or WIA-compliant application and use ScanGear MP, select [Canon MP370], [Canon MP360], or [Canon MP390]. - To use the ScanGear MP or the WIA driver as the scanner driver. - J "Setting preferences and scanning with ScanGear MP" J "Scanning with the WIA driver (Windows XP only)" 5 Click [Scan]. When scanning is only ... image will appear in that application. X Scanning an image from an application You can use the WIA driver, select [WIA Canon MP370], [WIA Canon MP360], or [WIA Canon MP390]. 4 If necessary, in the scanner driver dialog box, preview the scan and make adjustments.
...TWAIN or WIA-compliant application and use ScanGear MP, select [Canon MP370], [Canon MP360], or [Canon MP390]. - To use the ScanGear MP or the WIA driver as the scanner driver. - J "Setting preferences and scanning with ScanGear MP" J "Scanning with the WIA driver (Windows XP only)" 5 Click [Scan]. When scanning is only ... image will appear in that application. X Scanning an image from an application You can use the WIA driver, select [WIA Canon MP370], [WIA Canon MP360], or [WIA Canon MP390]. 4 If necessary, in the scanner driver dialog box, preview the scan and make adjustments.
MultiPASS MP370/360 Software Guide
Page 81
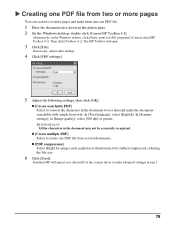
... documents. IMPORTANT All the characters in [Image quality], select [300 dpi] or greater. Alternatively, on the platen glass. 2 On the Windows desktop, double-click [Canon MP Toolbox 4.1]. If necessary, adjust other settings. 4 Click [PDF settings]. 5 Adjust the following settings, then click [OK]. In [.... X Creating one PDF file. 1 Place the document face-down on the Windows taskbar, click [Start], point to [(All) programs], [Canon], then [MP Toolbox 4.1]. ScanGear MP will open if you selected [Use the scanner driver to make the document searchable with simple keywords.
... documents. IMPORTANT All the characters in [Image quality], select [300 dpi] or greater. Alternatively, on the platen glass. 2 On the Windows desktop, double-click [Canon MP Toolbox 4.1]. If necessary, adjust other settings. 4 Click [PDF settings]. 5 Adjust the following settings, then click [OK]. In [.... X Creating one PDF file. 1 Place the document face-down on the Windows taskbar, click [Start], point to [(All) programs], [Canon], then [MP Toolbox 4.1]. ScanGear MP will open if you selected [Use the scanner driver to make the document searchable with simple keywords.

MultiPASS MP370/360 Software Guide
Page 108
...], [Scanners and Cameras], then [WIA Canon MP370], [WIA Canon MP360], or [WIA Canon MP390]. 3 Follow the instructions displayed in the WIA driver" 2 To display a preview, click [Preview]. To adjust settings in detail J "Setting preferences in [Scanner and Camera Wizard]. 106 X Scanning with the WIA driver (Windows XP only) With the WIA driver dialog box open, follow the steps...
...], [Scanners and Cameras], then [WIA Canon MP370], [WIA Canon MP360], or [WIA Canon MP390]. 3 Follow the instructions displayed in the WIA driver" 2 To display a preview, click [Preview]. To adjust settings in detail J "Setting preferences in [Scanner and Camera Wizard]. 106 X Scanning with the WIA driver (Windows XP only) With the WIA driver dialog box open, follow the steps...
MultiPASS MP370/360 Software Guide
Page 109
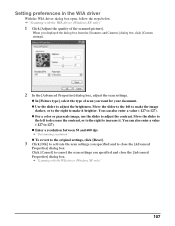
... z To revert to the original settings, click [Reset]. 3 Click [OK] to make it . z Use the slider to adjust the contrast. J "Scanning with the WIA driver (Windows XP only)" 1 Click [Adjust the quality of scan you displayed the dialog box from the [Scanners and Cameras] dialog box, click [Custom settings]. 2 In the... you specified and close the [Advanced Properties] dialog box. You can also enter a value (-127 to increase it brighter. J "Scanning with the WIA driver (Windows XP only)" 107 Move the slider to the left to decrease the contrast, or to the right to 127).
... z To revert to the original settings, click [Reset]. 3 Click [OK] to make it . z Use the slider to adjust the contrast. J "Scanning with the WIA driver (Windows XP only)" 1 Click [Adjust the quality of scan you displayed the dialog box from the [Scanners and Cameras] dialog box, click [Custom settings]. 2 In the... you specified and close the [Advanced Properties] dialog box. You can also enter a value (-127 to increase it brighter. J "Scanning with the WIA driver (Windows XP only)" 107 Move the slider to the left to decrease the contrast, or to the right to 127).


