
MX300 series Quick Start Guide
Page 5
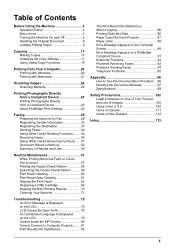
... Copy Settings 17 Using Useful Copy Functions 19 Printing from Your Computer 20 Printing with Windows 20 Printing with Macintosh 21 Scanning Images 22 Scanning Methods 22 Printing Photographs Directly from a Compliant Device 23 Printing Photographs Directly from a Compliant Device 23 About PictBridge Print... Functions ......51 Document Stored in Memory 52 Summary of Reports and Lists 55 Routine Maintenance 57 When Printing Becomes Faint or Colors Are Incorrect 57 Printing the Nozzle Check Pattern 58 Examining the Nozzle Check Pattern ...........59 Print Head Cleaning 60 Print Head...
... Copy Settings 17 Using Useful Copy Functions 19 Printing from Your Computer 20 Printing with Windows 20 Printing with Macintosh 21 Scanning Images 22 Scanning Methods 22 Printing Photographs Directly from a Compliant Device 23 Printing Photographs Directly from a Compliant Device 23 About PictBridge Print... Functions ......51 Document Stored in Memory 52 Summary of Reports and Lists 55 Routine Maintenance 57 When Printing Becomes Faint or Colors Are Incorrect 57 Printing the Nozzle Check Pattern 58 Examining the Nozzle Check Pattern ...........59 Print Head Cleaning 60 Print Head...
MX300 series Quick Start Guide
Page 6
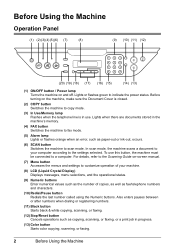
...settings to customize operation of your computer according to indicate the power status. Lights or flashes green to the settings selected. In scan mode, the machine scans a document to your machine. (8) LCD (Liquid Crystal Display) Displays messages, menu selections, and the operational status. (9) ...paper-out or ink-out, occurs. (6) SCAN button Switches the machine to fax mode. (5) Alarm lamp Lights or flashes orange when an error, such as copying, scanning, or faxing, or a print job in progress. (13) Color button Starts color copying, scanning, or faxing. 2 Before Using the Machine ...
...settings to customize operation of your computer according to indicate the power status. Lights or flashes green to the settings selected. In scan mode, the machine scans a document to your machine. (8) LCD (Liquid Crystal Display) Displays messages, menu selections, and the operational status. (9) ...paper-out or ink-out, occurs. (6) SCAN button Switches the machine to fax mode. (5) Alarm lamp Lights or flashes orange when an error, such as copying, scanning, or faxing, or a print job in progress. (13) Color button Starts color copying, scanning, or faxing. 2 Before Using the Machine ...
MX300 series Quick Start Guide
Page 7
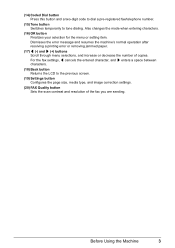
... Switches temporarily to the previous screen. (19) Settings button Configures the page size, media type, and image correction settings. (20) FAX Quality button Sets the scan contrast and resolution of copies.
... Switches temporarily to the previous screen. (19) Settings button Configures the page size, media type, and image correction settings. (20) FAX Quality button Sets the scan contrast and resolution of copies.
MX300 series Quick Start Guide
Page 8
... maintenance by using these setting items. Press the FAX Quality button to display the fax quality setting items in FAX mode. You can specify the scan contrast and fax resolution.
... maintenance by using these setting items. Press the FAX Quality button to display the fax quality setting items in FAX mode. You can specify the scan contrast and fax resolution.
MX300 series Quick Start Guide
Page 9
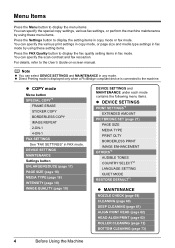
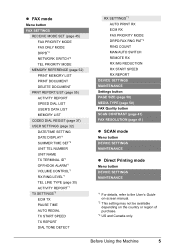
... REDUCTION RX START SPEED RX REPORT DEVICE SETTINGS MAINTENANCE Settings button PAGE SIZE (page 50) MEDIA TYPE (page 50) FAX Quality button SCAN CONTRAST (page 41) FAX RESOLUTION (page 41) z SCAN mode Menu button DEVICE SETTINGS MAINTENANCE z Direct Printing mode Menu button DEVICE SETTINGS MAINTENANCE *1 For details, refer to the User's Guide...
... REDUCTION RX START SPEED RX REPORT DEVICE SETTINGS MAINTENANCE Settings button PAGE SIZE (page 50) MEDIA TYPE (page 50) FAX Quality button SCAN CONTRAST (page 41) FAX RESOLUTION (page 41) z SCAN mode Menu button DEVICE SETTINGS MAINTENANCE z Direct Printing mode Menu button DEVICE SETTINGS MAINTENANCE *1 For details, refer to the User's Guide...

MX300 series Quick Start Guide
Page 11
Before Using the Machine 7 Perform a print operation to restore the display, perform any operation such as copying, faxing, or scanning, or press any button except for about five minutes*. When you want to restore the display. * You cannot change the wait time before the LCD goes out. z Screen-saver Mode The LCD goes out if the machine is in Screen-saver mode, the machine turns off. Note When you press the ON/OFF button while the machine is not operated for the ON/OFF button.
Before Using the Machine 7 Perform a print operation to restore the display, perform any operation such as copying, faxing, or scanning, or press any button except for about five minutes*. When you want to restore the display. * You cannot change the wait time before the LCD goes out. z Screen-saver Mode The LCD goes out if the machine is in Screen-saver mode, the machine turns off. Note When you press the ON/OFF button while the machine is not operated for the ON/OFF button.
MX300 series Quick Start Guide
Page 12
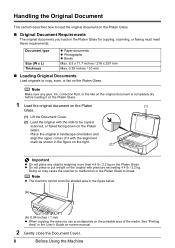
... break. See "Printing Area" in the figure below. (A) (A) 0.04 inches / 1 mm z When copying, the area you load on the Platen Glass for copying, scanning, or faxing must meet these requirements: Document type Size (W x L) Thickness z Paper documents z Photographs z Books Max. 8.5 x 11.7 inches / 216 x 297 mm... This section describes how to load the original document on the Platen Glass. „ Original Document Requirements The original documents you can scan depends on the printable area of it on the Platen Glass. 1 Load the original document on the Platen (1) Glass. (1) Lift...
... break. See "Printing Area" in the figure below. (A) (A) 0.04 inches / 1 mm z When copying, the area you load on the Platen Glass for copying, scanning, or faxing must meet these requirements: Document type Size (W x L) Thickness z Paper documents z Photographs z Books Max. 8.5 x 11.7 inches / 216 x 297 mm... This section describes how to load the original document on the Platen Glass. „ Original Document Requirements The original documents you can scan depends on the printable area of it on the Platen Glass. 1 Load the original document on the Platen (1) Glass. (1) Lift...
MX300 series Quick Start Guide
Page 26
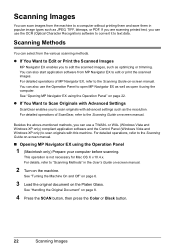
... with this machine. See "Opening MP Navigator EX using the Operation Panel" on page 8. 4 Press the SCAN button, then press the Color or Black button. 22 Scanning Images See "Handling the Original Document" on page 22. You can also start application software from the machine to a computer without printing them and save ...
... with this machine. See "Opening MP Navigator EX using the Operation Panel" on page 8. 4 Press the SCAN button, then press the Color or Black button. 22 Scanning Images See "Handling the Original Document" on page 22. You can also start application software from the machine to a computer without printing them and save ...
MX300 series Quick Start Guide
Page 44
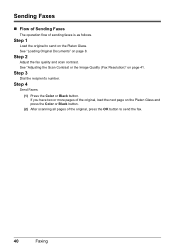
See "Loading Original Documents" on the Platen Glass and press the Color or Black button. (2) After scanning all pages of the original, press the OK button to send on page 41. Step 3 Dial the recipient's number. If you have two or more .... See "Adjusting the Scan Contrast or the Image Quality (Fax Resolution)" on the Platen Glass. Step 1 Load the original to send the fax. 40 Faxing Step 4 Send Faxes. (1) Press the Color or Black button. Sending Faxes „ Flow of Sending Faxes The operation flow of the original, load the next page on...
See "Loading Original Documents" on the Platen Glass and press the Color or Black button. (2) After scanning all pages of the original, press the OK button to send on page 41. Step 3 Dial the recipient's number. If you have two or more .... See "Adjusting the Scan Contrast or the Image Quality (Fax Resolution)" on the Platen Glass. Step 1 Load the original to send the fax. 40 Faxing Step 4 Send Faxes. (1) Press the Color or Black button. Sending Faxes „ Flow of Sending Faxes The operation flow of the original, load the next page on...

MX300 series Quick Start Guide
Page 45
... among three contrast levels. (1) Press the FAX button, then press the FAX Quality button. (2) Press the [ or ] button to select the contrast. 1.SCAN CONTRAST -LT DK+ Pressing the [ button decreases the contrast, and pressing the ] button increases the contrast. (3) Press the OK button. „ Before... better the output quality will be at the other end, but the longer it will take for fine-print documents. Increasing the scan contrast setting further blackens dark areas and whitens bright areas, whereas decreasing the contrast setting reduces the difference between light and dark....
... among three contrast levels. (1) Press the FAX button, then press the FAX Quality button. (2) Press the [ or ] button to select the contrast. 1.SCAN CONTRAST -LT DK+ Pressing the [ button decreases the contrast, and pressing the ] button increases the contrast. (3) Press the OK button. „ Before... better the output quality will be at the other end, but the longer it will take for fine-print documents. Increasing the scan contrast setting further blackens dark areas and whitens bright areas, whereas decreasing the contrast setting reduces the difference between light and dark....

MX300 series Quick Start Guide
Page 46
...] TRANSMIT [OK] If you pressed in step (2). (5) Repeat steps (3) and (4) to scan in all pages of originals which you can fax, see "Dialing the Coded Speed Dial" on page 43. (2) Press the Color button for color sending, or the Black button for faxing. (1) Turn on the machine. (2) Load the ... using the Numeric buttons or coded speed dialing. Note For details on the types and conditions of the document. (6) Press the OK button. Important Color sending is being sent, press the Stop/Reset button, then follow the instructions on page 8. (3) Press the FAX button. (4) Adjust fax settings ...
...] TRANSMIT [OK] If you pressed in step (2). (5) Repeat steps (3) and (4) to scan in all pages of originals which you can fax, see "Dialing the Coded Speed Dial" on page 43. (2) Press the Color button for color sending, or the Black button for faxing. (1) Turn on the machine. (2) Load the ... using the Numeric buttons or coded speed dialing. Note For details on the types and conditions of the document. (6) Press the OK button. Important Color sending is being sent, press the Stop/Reset button, then follow the instructions on page 8. (3) Press the FAX button. (4) Adjust fax settings ...
MX300 series Quick Start Guide
Page 68
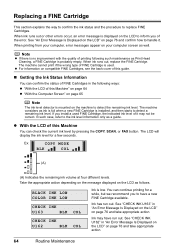
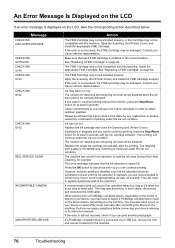
... out, replace the FINE Cartridge. The machine considers as ink is full when a new FINE Cartridge is low. If you install a used . BLACK INK LOW COLOR INK LOW CHECK INK U163 BLK COL CHECK INK U162 BLK COL Ink is installed, and then starts to handle it may have a new FINE... on the message displayed on page 76 and take appropriate action. 64 Routine Maintenance You can check the current ink level by pressing the COPY, SCAN, or FAX button. See "An Error Message Is Displayed on the LCD" on compatible FINE Cartridges, see the back cover of this guide. „ Getting...
... out, replace the FINE Cartridge. The machine considers as ink is full when a new FINE Cartridge is low. If you install a used . BLACK INK LOW COLOR INK LOW CHECK INK U163 BLK COL CHECK INK U162 BLK COL Ink is installed, and then starts to handle it may have a new FINE... on the message displayed on page 76 and take appropriate action. 64 Routine Maintenance You can check the current ink level by pressing the COPY, SCAN, or FAX button. See "An Error Message Is Displayed on the LCD" on compatible FINE Cartridges, see the back cover of this guide. „ Getting...
MX300 series Quick Start Guide
Page 71
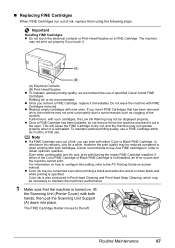
... is turned on, lift the Scanning Unit (Printer Cover) with either of the Color FINE Cartridge or Black FINE Cartridge is reinstalled. „ Replacing FINE Cartridges When FINE Cartridges run out of specified Canon brand FINE Cartridges. The machine may be displayed properly. Furthermore, with such ...the machine with leaving the empty FINE Cartridge installed. z Replace empty cartridges with both hands, then pull the Scanning Unit Support (A) down into place. If either Color or Black FINE Cartridge, in order to dry out, and the machine may not print out properly due to...
... is turned on, lift the Scanning Unit (Printer Cover) with either of the Color FINE Cartridge or Black FINE Cartridge is reinstalled. „ Replacing FINE Cartridges When FINE Cartridges run out of specified Canon brand FINE Cartridges. The machine may be displayed properly. Furthermore, with such ...the machine with leaving the empty FINE Cartridge installed. z Replace empty cartridges with both hands, then pull the Scanning Unit Support (A) down into place. If either Color or Black FINE Cartridge, in order to dry out, and the machine may not print out properly due to...
MX300 series Quick Start Guide
Page 72
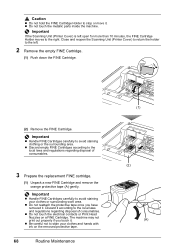
...may not print out properly if you have removed it according to the local laws and regulations regarding disposal of consumables. Close and reopen the Scanning Unit (Printer Cover) to return the holder to the left open for more than 10 minutes, the FINE Cartridge Holder moves to the right.... Important If the Scanning Unit (Printer Cover) is left . 2 Remove the empty FINE Cartridge. (1) Push down the FINE Cartridge. (2) Remove the FINE Cartridge. Discard it . Caution z Do ...
...may not print out properly if you have removed it according to the local laws and regulations regarding disposal of consumables. Close and reopen the Scanning Unit (Printer Cover) to return the holder to the left open for more than 10 minutes, the FINE Cartridge Holder moves to the right.... Important If the Scanning Unit (Printer Cover) is left . 2 Remove the empty FINE Cartridge. (1) Push down the FINE Cartridge. (2) Remove the FINE Cartridge. Discard it . Caution z Do ...
MX300 series Quick Start Guide
Page 73
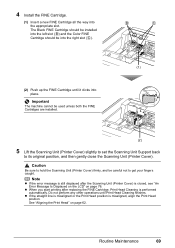
...Print Head Cleaning is misaligned, align the Print Head position. Caution Be sure to its original position, and then gently close the Scanning Unit (Printer Cover). Routine Maintenance 69 See "Aligning the Print Head" on page 76. The Black FINE Cartridge should be installed ...into the left slot ( B ) and the Color FINE Cartridge should be into the right slot ( C ). (2) Push up the FINE Cartridge until Print Head Cleaning finishes. 4 Install the FINE Cartridge....
...Print Head Cleaning is misaligned, align the Print Head position. Caution Be sure to its original position, and then gently close the Scanning Unit (Printer Cover). Routine Maintenance 69 See "Aligning the Print Head" on page 76. The Black FINE Cartridge should be installed ...into the left slot ( B ) and the Color FINE Cartridge should be into the right slot ( C ). (2) Push up the FINE Cartridge until Print Head Cleaning finishes. 4 Install the FINE Cartridge....
MX300 series Quick Start Guide
Page 79
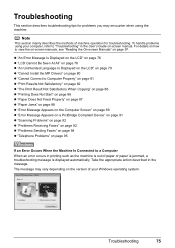
... z "Paper Jams" on page 88 z "Error Message Appears on the Computer Screen" on page 89 z "Error Message Appears on a PictBridge Compliant Device" on page 91 z "Scanning Problems" on page 92 z "Problems Receiving Faxes" on page 92 z "Problems Sending Faxes" on page 94 z "Telephone Problems" on page 95 If an Error Occurs...
... z "Paper Jams" on page 88 z "Error Message Appears on the Computer Screen" on page 89 z "Error Message Appears on a PictBridge Compliant Device" on page 91 z "Scanning Problems" on page 92 z "Problems Receiving Faxes" on page 92 z "Problems Sending Faxes" on page 94 z "Telephone Problems" on page 95 If an Error Occurs...
MX300 series Quick Start Guide
Page 80
...the FINE Cartridge may be disabled. Open the Scanning Unit (Printer Cover) and install the FINE Cartridge properly. Contact your Canon service representative. If you can print another photograph. Canon recommends to use new genuine Canon cartridges in ink absorber to the machine. Replace...device to hold the ink used during Print Head Cleaning, for example. Contact your Canon service representative. Install the appropriate FINE Cartridge. Replace the ink cartridge and close the Scanning Unit (Printer Cover). The function for at least 5 seconds with the ink cartridge ...
...the FINE Cartridge may be disabled. Open the Scanning Unit (Printer Cover) and install the FINE Cartridge properly. Contact your Canon service representative. If you can print another photograph. Canon recommends to use new genuine Canon cartridges in ink absorber to the machine. Replace...device to hold the ink used during Print Head Cleaning, for example. Contact your Canon service representative. Install the appropriate FINE Cartridge. Replace the ink cartridge and close the Scanning Unit (Printer Cover). The function for at least 5 seconds with the ink cartridge ...
MX300 series Quick Start Guide
Page 81
Reload the paper correctly and press the OK button. Return the Scanning Unit (Printer Cover) to the registered number. z The recipient's fax machine is not resolved, contact your machine is incorrect. For an overseas call, add pauses ... printing out received data. Set the paper size setting to OFF. See "Redialing" on your Canon service representative. z The touch tone/rotary pulse setting on page 43. If the problem is not working. You opened the Scanning Unit (Printer Cover) during an operation. The machine is full because it has received too...
Reload the paper correctly and press the OK button. Return the Scanning Unit (Printer Cover) to the registered number. z The recipient's fax machine is not resolved, contact your machine is incorrect. For an overseas call, add pauses ... printing out received data. Set the paper size setting to OFF. See "Redialing" on your Canon service representative. z The touch tone/rotary pulse setting on page 43. If the problem is not working. You opened the Scanning Unit (Printer Cover) during an operation. The machine is full because it has received too...
MX300 series Quick Start Guide
Page 92
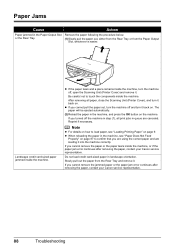
z If the paper tears and a piece remains inside the machine, or if the paper jam error continues after removing the paper, contact your Canon service representative. z When reloading the paper in the machine, and press the OK button on the machine. The paper will be ejected automatically. (2)... careful not to load paper, see "Paper Does Not Feed Properly" on page 9. After removing all print jobs in step (1), all paper, close the Scanning Unit (Printer Cover), and turn it back on . Do not load credit card-sized paper in the Paper Output Slot Remove the paper following the...
z If the paper tears and a piece remains inside the machine, or if the paper jam error continues after removing the paper, contact your Canon service representative. z When reloading the paper in the machine, and press the OK button on the machine. The paper will be ejected automatically. (2)... careful not to load paper, see "Paper Does Not Feed Properly" on page 9. After removing all print jobs in step (1), all paper, close the Scanning Unit (Printer Cover), and turn it back on . Do not load credit card-sized paper in the Paper Output Slot Remove the paper following the...
MX300 series Quick Start Guide
Page 95
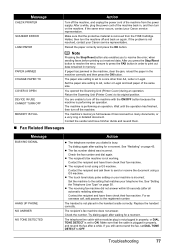
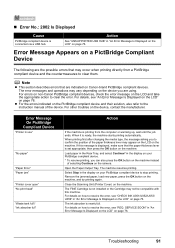
... on the device, contact the manufacturer. z For the errors indicated on a PictBridge Compliant Device The following are using. For other troubles on Canon-brand PictBridge compliant devices. When printing first after changing the media type, the message asking you to resolve the error, see "REQ. If ... ready, the machine starts printing automatically. Remove the jammed paper, load new paper, press the OK button on the machine. Close the Scanning Unit (Printer Cover) on page 76. For details on how to confirm the position of the paper thickness lever may vary depending on ...
... on the device, contact the manufacturer. z For the errors indicated on a PictBridge Compliant Device The following are using. For other troubles on Canon-brand PictBridge compliant devices. When printing first after changing the media type, the message asking you to resolve the error, see "REQ. If ... ready, the machine starts printing automatically. Remove the jammed paper, load new paper, press the OK button on the machine. Close the Scanning Unit (Printer Cover) on page 76. For details on how to confirm the position of the paper thickness lever may vary depending on ...


