Quick Start Guide
Page 5
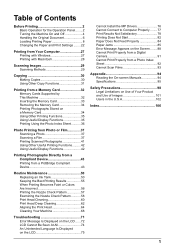
... the Photo Index Sheet...........36 Photo Printing from Photo or Film 37 Scanning a Photo 37 Scanning a Film 37 Printing Scanned Photographs 41 Using Other Useful Printing Functions..........42 Using Useful Display Functions ...42 Printing Photographs Directly from a Compliant Device 43 Printing from a PictBridge Compliant Device 43 Routine Maintenance 50 Replacing an Ink Tank 50 Keeping the Best Printing Results 55 When Printing Becomes Faint or Colors...
... the Photo Index Sheet...........36 Photo Printing from Photo or Film 37 Scanning a Photo 37 Scanning a Film 37 Printing Scanned Photographs 41 Using Other Useful Printing Functions..........42 Using Useful Display Functions ...42 Printing Photographs Directly from a Compliant Device 43 Printing from a PictBridge Compliant Device 43 Routine Maintenance 50 Replacing an Ink Tank 50 Keeping the Best Printing Results 55 When Printing Becomes Faint or Colors...
Quick Start Guide
Page 6
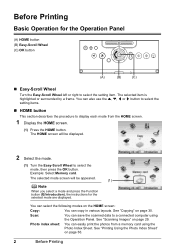
Example: Select Memory card. See "Copying" on page 29. See "Scanning Images" on page 30. Photo index sheet: You can also use the {, }, [ or .... (1) Press the HOME button. You can select the following modes on page 36. 2 Before Printing Scan: You can copy in various layouts. See "Printing Using the Photo Index Sheet" on the HOME screen: Copy: You... can save the scanned data to display each mode from a memory card using the Operation Panel. The selected mode screen will be...
Example: Select Memory card. See "Copying" on page 29. See "Scanning Images" on page 30. Photo index sheet: You can also use the {, }, [ or .... (1) Press the HOME button. You can select the following modes on page 36. 2 Before Printing Scan: You can copy in various layouts. See "Printing Using the Photo Index Sheet" on the HOME screen: Copy: You... can save the scanned data to display each mode from a memory card using the Operation Panel. The selected mode screen will be...
Quick Start Guide
Page 7
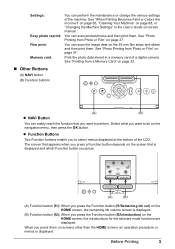
...Print the photo data stored in the User's Guide on-screen manual. See "When Printing Becomes Faint or Colors Are Incorrect" on page 56, "Cleaning Your Machine" on page 68, or "Changing the Machine Settings" in ...a memory card of the LCD. You can scan printed photos and then print them. The screen that appears when you press a Function button depends on the...See "Photo Printing from Photo or Film" on page 37. When you press them . You can scan the image data on the 35 mm film strips and slides and then print them on screens other...
...Print the photo data stored in the User's Guide on-screen manual. See "When Printing Becomes Faint or Colors Are Incorrect" on page 56, "Cleaning Your Machine" on page 68, or "Changing the Machine Settings" in ...a memory card of the LCD. You can scan printed photos and then print them. The screen that appears when you press a Function button depends on the...See "Photo Printing from Photo or Film" on page 37. When you press them . You can scan the image data on the 35 mm film strips and slides and then print them on screens other...

Quick Start Guide
Page 9
... Machine Settings" of User's Guide on-screen manual. z Setting the Power Save Mode The machine enters Power save mode. Press any button to copy or scan, the machine will exit from Power save mode, the internal fluorescent lamp is not operated for a certain interval. Before Printing 5
... Machine Settings" of User's Guide on-screen manual. z Setting the Power Save Mode The machine enters Power save mode. Press any button to copy or scan, the machine will exit from Power save mode, the internal fluorescent lamp is not operated for a certain interval. Before Printing 5
Quick Start Guide
Page 10
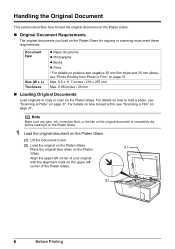
... the original face down on the upper left corner of the Platen Glass. (2) 6 Before Printing For details on how to copy or scan on the Platen Glass. For details on how to load the original document on the Platen Glass. „ Original Document Requirements The original... documents you load on the Platen Glass for copying or scanning must meet these requirements: Document type Size (W x L) Thickness z Paper documents z Photographs z Books z Films * For details on positive and negative...
... the original face down on the upper left corner of the Platen Glass. (2) 6 Before Printing For details on how to copy or scan on the Platen Glass. For details on how to load the original document on the Platen Glass. „ Original Document Requirements The original... documents you load on the Platen Glass for copying or scanning must meet these requirements: Document type Size (W x L) Thickness z Paper documents z Photographs z Books z Films * For details on positive and negative...
Quick Start Guide
Page 11
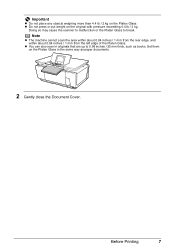
Before Printing 7 z You can also scan in the same way as books. Doing so may cause the scanner to malfunction or the Platen Glass to 0.98 inches / 25 mm thick, such ... than 4.4 lb / 2 kg on the original with pressure exceeding 4.4 lb / 2 kg. z Do not press or put weight on the Platen Glass. Note z The machine cannot scan the area within about 0.04 inches / 1 mm from the rear edge, and within about 0.04 inches / 1 mm from the left edge of the Platen Glass.
Before Printing 7 z You can also scan in the same way as books. Doing so may cause the scanner to malfunction or the Platen Glass to 0.98 inches / 25 mm thick, such ... than 4.4 lb / 2 kg on the original with pressure exceeding 4.4 lb / 2 kg. z Do not press or put weight on the Platen Glass. Note z The machine cannot scan the area within about 0.04 inches / 1 mm from the rear edge, and within about 0.04 inches / 1 mm from the left edge of the Platen Glass.
Quick Start Guide
Page 28
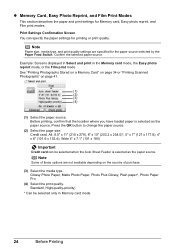
... Memory card mode, the Easy photo reprint mode, or the Film print mode See "Printing Photographs Stored on a Memory Card" on page 34 or "Printing Scanned Photographs" on the country of purchase. (3) Select the media type. Before printing, confirm that the location where you have loaded paper is selected as the...
... Memory card mode, the Easy photo reprint mode, or the Film print mode See "Printing Photographs Stored on a Memory Card" on page 34 or "Printing Scanned Photographs" on the country of purchase. (3) Select the media type. Before printing, confirm that the location where you have loaded paper is selected as the...
Quick Start Guide
Page 33
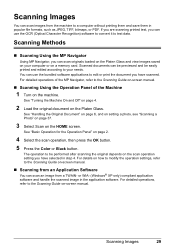
...a computer without printing them and save them in the application software. Scanning Images 29 Scanning Images You can scan images from a TWAIN- Scanned documents can scan an image from the machine to your computer or on the scan operation setting you have selected in step 4. See "Basic Operation for...needs. See "Handling the Original Document" on page 6, and on setting a photo, see "Scanning a Photo" on page 37. 3 Select Scan on page 2. 4 Select the scan operation, then press the OK button. 5 Press the Color or Black button. See "Turning the Machine On and Off" on page 4. 2 Load ...
...a computer without printing them and save them in the application software. Scanning Images 29 Scanning Images You can scan images from a TWAIN- Scanned documents can scan an image from the machine to your computer or on the scan operation setting you have selected in step 4. See "Basic Operation for...needs. See "Handling the Original Document" on page 6, and on setting a photo, see "Scanning a Photo" on page 37. 3 Select Scan on page 2. 4 Select the scan operation, then press the OK button. 5 Press the Color or Black button. See "Turning the Machine On and Off" on page 4. 2 Load ...

Quick Start Guide
Page 40
... 4 and "Loading Printing Paper" on page 33. 6 Select a range of images to include in the Photo Index Sheet, then press the OK button. 7 Press the Color button. 8 Fill in the appropriate circles in the Photo Index Sheet. 9 Load the type of paper you selected in the Photo Index Sheet. See "Inserting... the Memory Card" on page 8. 2 Make sure that the proper paper source is selected. See "Loading Printing Paper" on page 8. 10 Select Scan sheet and print, then press the OK button. 11 Place the Photo Index Sheet face-down on the machine, and load A4 or Letter-sized...
... 4 and "Loading Printing Paper" on page 33. 6 Select a range of images to include in the Photo Index Sheet, then press the OK button. 7 Press the Color button. 8 Fill in the appropriate circles in the Photo Index Sheet. 9 Load the type of paper you selected in the Photo Index Sheet. See "Inserting... the Memory Card" on page 8. 2 Make sure that the proper paper source is selected. See "Loading Printing Paper" on page 8. 10 Select Scan sheet and print, then press the OK button. 11 Place the Photo Index Sheet face-down on the machine, and load A4 or Letter-sized...

Quick Start Guide
Page 41
... the Machine On and Off" on the Platen Glass. Photo Printing from the machine. Photo Printing from Photo or Film You can be applied to scan, then press OK. See "Basic Operation for the Operation Panel" on page 2. 3 Select the type of film to the images before printing them from Photo... or Film 37 Various effects can scan photos and 35 mm film into and then print them . For film, both film strips (six connected frames per strip after regular developing) and slides...
... the Machine On and Off" on the Platen Glass. Photo Printing from the machine. Photo Printing from Photo or Film You can be applied to scan, then press OK. See "Basic Operation for the Operation Panel" on page 2. 3 Select the type of film to the images before printing them from Photo... or Film 37 Various effects can scan photos and 35 mm film into and then print them . For film, both film strips (six connected frames per strip after regular developing) and slides...

Quick Start Guide
Page 42
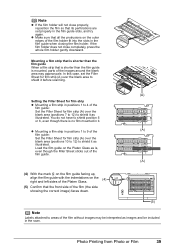
... Photo Printing from Photo or Film Gently squeeze in the film guide so that the white line marks of the FAU Protective Sheet. Note Before scanning 35 mm slides, prepare the film guide for film strip from the back of the film guide do not obscure the film frames. (3) Squeeze the... film holder inward lightly and close the Document Cover and press the Color button. „ Mounting Films z Mounting a 35 mm Film Strip (1) On the film guide, open the film holder. Position the film in the edges of the...
... Photo Printing from Photo or Film Gently squeeze in the film guide so that the white line marks of the FAU Protective Sheet. Note Before scanning 35 mm slides, prepare the film guide for film strip from the back of the film guide do not obscure the film frames. (3) Squeeze the... film holder inward lightly and close the Document Cover and press the Color button. „ Mounting Films z Mounting a 35 mm Film Strip (1) On the film guide, open the film holder. Position the film in the edges of the...
Quick Start Guide
Page 43
... area (positions 7 to 12) to shield it as illustrated. z Mounting a film strip in it as illustrated. In this case, set properly in the scan. Photo Printing from Photo or Film 39 If the film holder does not close properly, reposition the film so that its perforations are set the... Filler Sheet for film strip (A) over the blank area to shield it before scanning. (A) Setting the Filler Sheet for film strip z Mounting a film strip in the film guide when closing the film holder. z Make sure that all ...
... area (positions 7 to 12) to shield it as illustrated. z Mounting a film strip in it as illustrated. In this case, set properly in the scan. Photo Printing from Photo or Film 39 If the film holder does not close properly, reposition the film so that its perforations are set the... Filler Sheet for film strip (A) over the blank area to shield it before scanning. (A) Setting the Filler Sheet for film strip z Mounting a film strip in the film guide when closing the film holder. z Make sure that all ...

Quick Start Guide
Page 45
...the + or - button to specify the number of copies. (3) Repeat steps (1) and (2) to specify the number of the photograph towards you to prevent the scanned photographs from left to print and specify the number of the film. Photo Printing from the frame order of copies for printing. (1) Load paper. z Mount... the slides in the order from being displayed upside down on the model or brand of your camera, the scanning order may differ from Photo or Film 41 To change the settings, select the item and press the OK button. 3 Select the photo to...
...the + or - button to specify the number of copies. (3) Repeat steps (1) and (2) to specify the number of the photograph towards you to prevent the scanned photographs from left to print and specify the number of the film. Photo Printing from the frame order of copies for printing. (1) Load paper. z Mount... the slides in the order from being displayed upside down on the model or brand of your camera, the scanning order may differ from Photo or Film 41 To change the settings, select the item and press the OK button. 3 Select the photo to...
Quick Start Guide
Page 46
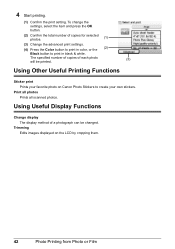
...Canon Photo Stickers to print in black & white. 4 Start printing. (1) Confirm the print setting. Print all photos Prints all scanned photos. To change the settings, select the item and press the OK button. (2) Confirm the total number of copies for selected photos. (1) (3) Change the advanced print settings. (4) Press the Color... button to print in color, or the (2)...
...Canon Photo Stickers to print in black & white. 4 Start printing. (1) Confirm the print setting. Print all photos Prints all scanned photos. To change the settings, select the item and press the OK button. (2) Confirm the total number of copies for selected photos. (1) (3) Change the advanced print settings. (4) Press the Color... button to print in color, or the (2)...
Quick Start Guide
Page 54
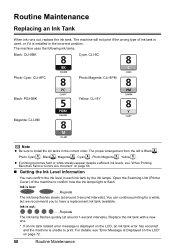
... , Photo Cyan , Black , Magenta , Cyan , Photo Magenta , Yellow . The machine uses the following ink tanks. For details, see "When Printing Becomes Faint or Colors Are Incorrect" on page 56. „ Getting the Ink Level Information You can continue printing for a while, but we recommend you to confirm how the... ink lamps light or flash. Open the Scanning Unit (Printer Cover) of ink tank is used, or if it is installed in the correct order. The proper arrangement from the left is...
... , Photo Cyan , Black , Magenta , Cyan , Photo Magenta , Yellow . The machine uses the following ink tanks. For details, see "When Printing Becomes Faint or Colors Are Incorrect" on page 56. „ Getting the Ink Level Information You can continue printing for a while, but we recommend you to confirm how the... ink lamps light or flash. Open the Scanning Unit (Printer Cover) of ink tank is used, or if it is installed in the correct order. The proper arrangement from the left is...
Quick Start Guide
Page 56
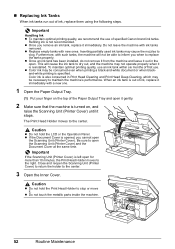
... it immediately with such tanks, the machine will cause the ink tank to open . Do not leave the machine with new ones. Color ink is reinstalled. Important If the Scanning Unit (Printer Cover) is not recommended. z Replace empty tanks with ink tanks removed. Furthermore, with a new one. 1 Open the Paper Output ...been installed, do not remove it from the machine and leave it gently. 2 Make sure that the machine is turned on the top of specified Canon brand ink tanks. When an ink tank is out of ink, replace them using the following steps. Caution z Do not hold the LCD or the...
... it immediately with such tanks, the machine will cause the ink tank to open . Do not leave the machine with new ones. Color ink is reinstalled. Important If the Scanning Unit (Printer Cover) is not recommended. z Replace empty tanks with ink tanks removed. Furthermore, with a new one. 1 Open the Paper Output ...been installed, do not remove it from the machine and leave it gently. 2 Make sure that the machine is turned on the top of specified Canon brand ink tanks. When an ink tank is out of ink, replace them using the following steps. Caution z Do not hold the LCD or the...
Quick Start Guide
Page 58
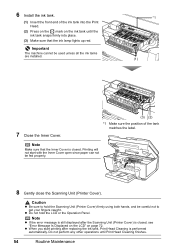
... error message is still displayed after replacing the ink tank, Print Head Cleaning is performed automatically. Printing will not start printing after the Scanning Unit (Printer Cover) is closed , see "Error Message Is Displayed on the LCD" on the ink tank until Print Head Cleaning finishes.... 54 Routine Maintenance Important The machine cannot be fed properly. 8 Gently close the Scanning Unit (Printer Cover). z Do not hold the Scanning Unit (Printer Cover) firmly using both hands, and be careful not to get your fingers caught. Note Make ...
... error message is still displayed after replacing the ink tank, Print Head Cleaning is performed automatically. Printing will not start printing after the Scanning Unit (Printer Cover) is closed , see "Error Message Is Displayed on the LCD" on the ink tank until Print Head Cleaning finishes.... 54 Routine Maintenance Important The machine cannot be fed properly. 8 Gently close the Scanning Unit (Printer Cover). z Do not hold the Scanning Unit (Printer Cover) firmly using both hands, and be careful not to get your fingers caught. Note Make ...
Quick Start Guide
Page 60
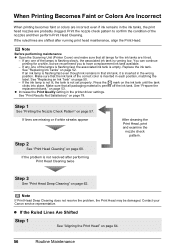
Note Before performing maintenance z Open the Scanning Unit (Printer Cover) and make sure that ink tank, it is inserted in the ... the Print Quality setting in the printer driver settings. If the problem is peeled off the ink tank. Contact your Canon service representative. If the ruled lines are missing or if white streaks appear Step 2 See "Print Head Cleaning" on...tank. Make sure that all lamps for a while, but we recommend you to confirm the condition of the correct color is not set properly. Make sure that the ink tank of the nozzles and then perform Print Head Cleaning. See...
Note Before performing maintenance z Open the Scanning Unit (Printer Cover) and make sure that ink tank, it is inserted in the ... the Print Quality setting in the printer driver settings. If the problem is peeled off the ink tank. Contact your Canon service representative. If the ruled lines are missing or if white streaks appear Step 2 See "Print Head Cleaning" on...tank. Make sure that all lamps for a while, but we recommend you to confirm the condition of the correct color is not set properly. Make sure that the ink tank of the nozzles and then perform Print Head Cleaning. See...
Quick Start Guide
Page 75
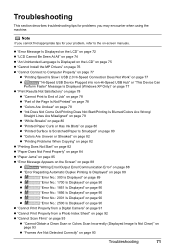
..." on page 80 z "Printed Paper Curls or Has Ink Blots" on page 80 z "Printed Surface Is Scratched/Paper Is Smudged" on page 80 z "Colors Are Uneven or Streaked" on page 82 z "Printing Problems When Copying" on page 82 z "Printing Does Not Start" on page 82 z "Paper Does ... 90 z "Cannot Print Properly from a Digital Camera" on page 91 z "Cannot Print Properly from a Photo Index Sheet" on page 92 z "Cannot Scan Films" on page 93 z "Cannot Obtain a Clean Scan or Colors Scan Incorrectly (Displayed Image Is Not Clear)" on page 93 z "Frames Are Not Detected Correctly" on -screen manuals.
..." on page 80 z "Printed Paper Curls or Has Ink Blots" on page 80 z "Printed Surface Is Scratched/Paper Is Smudged" on page 80 z "Colors Are Uneven or Streaked" on page 82 z "Printing Problems When Copying" on page 82 z "Printing Does Not Start" on page 82 z "Paper Does ... 90 z "Cannot Print Properly from a Digital Camera" on page 91 z "Cannot Print Properly from a Photo Index Sheet" on page 92 z "Cannot Scan Films" on page 93 z "Cannot Obtain a Clean Scan or Colors Scan Incorrectly (Displayed Image Is Not Clear)" on page 93 z "Frames Are Not Detected Correctly" on -screen manuals.

Quick Start Guide
Page 76
... is jammed, a troubleshooting message is displayed automatically. z Photo data edited or processed on the ink tank flashes.) Replace the ink tank and close the Scanning Unit (Printer Cover). Replacing the ink tank is recommended." See "Replacing an Ink Tank" on page 50. Ink has run out. Press and hold ... the function for detecting the remaining ink level is continued under the ink out condition. U041 If the lamp on the memory card that Canon shall not be liable for any malfunction or trouble which may not recognize the file if the file name or the folder path contains certain...
... is jammed, a troubleshooting message is displayed automatically. z Photo data edited or processed on the ink tank flashes.) Replace the ink tank and close the Scanning Unit (Printer Cover). Replacing the ink tank is recommended." See "Replacing an Ink Tank" on page 50. Ink has run out. Press and hold ... the function for detecting the remaining ink level is continued under the ink out condition. U041 If the lamp on the memory card that Canon shall not be liable for any malfunction or trouble which may not recognize the file if the file name or the folder path contains certain...


