Quick Start Guide
Page 5
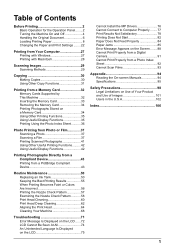
... the Operation Panel ........2 Turning the Machine On and Off 4 Handling the Original Document 6 Loading Printing Paper 8 Changing the Paper and Print Settings ........22 Printing from Your Computer 27 Printing with Windows 27 Printing with Macintosh 28 Scanning Images 29 Scanning Methods 29 Copying 30 Making Copies 30 Using Other Copy Functions 31 Printing from a Memory Card 32 Memory Cards Supported by This Machine 32 Inserting the Memory Card 33 Removing the Memory Card 34 Printing Photographs Stored on a Memory Card 34 Using Other Printing Functions 35 Using Useful Display...
... the Operation Panel ........2 Turning the Machine On and Off 4 Handling the Original Document 6 Loading Printing Paper 8 Changing the Paper and Print Settings ........22 Printing from Your Computer 27 Printing with Windows 27 Printing with Macintosh 28 Scanning Images 29 Scanning Methods 29 Copying 30 Making Copies 30 Using Other Copy Functions 31 Printing from a Memory Card 32 Memory Cards Supported by This Machine 32 Inserting the Memory Card 33 Removing the Memory Card 34 Printing Photographs Stored on a Memory Card 34 Using Other Printing Functions 35 Using Useful Display...
Quick Start Guide
Page 13
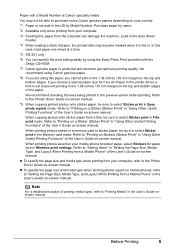
... bottom edges of printing media types, refer to the Printer Driver Guide on -screen manual. Paper with the Setup CD-ROM. *7 Canon genuine paper is not sold in the US by Model Number. In this case, load paper one sheet at a time. *5 SG-201 only *6 You can damage the machine. Load in the Auto Sheet Feeder. *4 When loading a stack of the User's Guide on -screen manual. We recommend checking the area being printed in "Using Other Useful Printing Functions" of the User's Guide on the...
... bottom edges of printing media types, refer to the Printer Driver Guide on -screen manual. Paper with the Setup CD-ROM. *7 Canon genuine paper is not sold in the US by Model Number. In this case, load paper one sheet at a time. *5 SG-201 only *6 You can damage the machine. Load in the Auto Sheet Feeder. *4 When loading a stack of the User's Guide on -screen manual. We recommend checking the area being printed in "Using Other Useful Printing Functions" of the User's Guide on the...
Quick Start Guide
Page 31
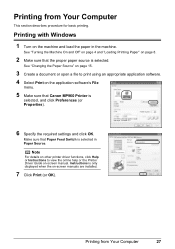
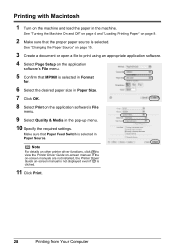
... "Changing the Paper Source" on page 15. 3 Create a document or open a file to view the online help or the Printer Driver Guide on the machine and load the paper in Paper Source. Note For details on other printer driver functions, click Help or Instructions to print using an appropriate application software. 4 Select Print on -screen manuals are installed. 7 Click Print (or OK). Printing from Your Computer 27 Printing with Windows 1 Turn on -screen manual. See "Turning the Machine On and Off" on page 4 and "Loading Printing Paper" on page 8. 2 Make sure that Canon MP960 Printer...
... "Changing the Paper Source" on page 15. 3 Create a document or open a file to view the online help or the Printer Driver Guide on the machine and load the paper in Paper Source. Note For details on other printer driver functions, click Help or Instructions to print using an appropriate application software. 4 Select Print on -screen manuals are installed. 7 Click Print (or OK). Printing from Your Computer 27 Printing with Windows 1 Turn on -screen manual. See "Turning the Machine On and Off" on page 4 and "Loading Printing Paper" on page 8. 2 Make sure that Canon MP960 Printer...
Quick Start Guide
Page 32
... page 4 and "Loading Printing Paper" on page 8. 2 Make sure that Paper Feed Switch is selected in the pop-up menu. 10 Specify the required settings. See "Changing the Paper Source" on page 15. 3 Create a document or open a file to view the Printer Driver Guide on the application software's File menu. 9 Select Quality & Media in Paper Source. If the on-screen manuals are not installed, the Printer Driver Guide on the machine and load the paper in Paper Size. 7 Click OK. 8 Select Print on -screen manual. Printing with Macintosh 1 Turn on -screen manual...
... page 4 and "Loading Printing Paper" on page 8. 2 Make sure that Paper Feed Switch is selected in the pop-up menu. 10 Specify the required settings. See "Changing the Paper Source" on page 15. 3 Create a document or open a file to view the Printer Driver Guide on the application software's File menu. 9 Select Quality & Media in Paper Source. If the on-screen manuals are not installed, the Printer Driver Guide on the machine and load the paper in Paper Size. 7 Click OK. 8 Select Print on -screen manual. Printing with Macintosh 1 Turn on -screen manual...
Quick Start Guide
Page 51
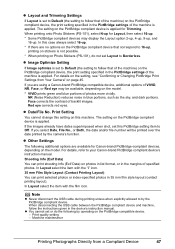
... Canon-brand PictBridge-compliant devices, depending on page 45. Machine maintenance Printing Photographs Directly from Your Camera" on the model. In this setting on photos in list format, or in the device's instruction manual. If you select Date, File No., or Both, the date and/or file number will be available, depending on the PictBridge compliant device is applied. For details, refer to Off. z Date/File No. Note z Never disconnect the USB cable...
... Canon-brand PictBridge-compliant devices, depending on page 45. Machine maintenance Printing Photographs Directly from Your Camera" on the model. In this setting on photos in list format, or in the device's instruction manual. If you select Date, File No., or Both, the date and/or file number will be available, depending on the PictBridge compliant device is applied. For details, refer to Off. z Date/File No. Note z Never disconnect the USB cable...
Quick Start Guide
Page 56
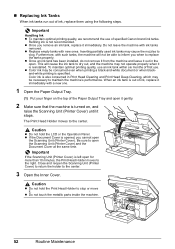
... LCD or the Operation Panel. Caution z Do not hold the Print Head Holder to maintain the machine's performance. z Replace empty tanks with a new one. 1 Open the Paper Output Tray. (1) Put your finger on , and raise the Scanning Unit (Printer Cover) until it stops. Important Handling Ink z To maintain optimal printing quality, we recommend the use of first use an ink tank within six months of specified Canon brand ink tanks. z Once you...
... LCD or the Operation Panel. Caution z Do not hold the Print Head Holder to maintain the machine's performance. z Replace empty tanks with a new one. 1 Open the Paper Output Tray. (1) Put your finger on , and raise the Scanning Unit (Printer Cover) until it stops. Important Handling Ink z To maintain optimal printing quality, we recommend the use of first use an ink tank within six months of specified Canon brand ink tanks. z Once you...
Quick Start Guide
Page 75
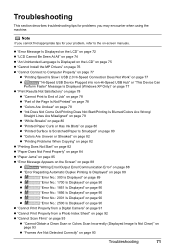
... Lines Are Misaligned" on page 79 z "White Streaks" on page 80 z "Printed Paper Curls or Has Ink Blots" on page 80 z "Printed Surface Is Scratched/Paper Is Smudged" on page 80 z "Colors Are Uneven or Streaked" on page 82 z "Printing Problems When Copying" on page 82 z "Printing Does Not Start" on page 82 z "Paper Does Not Feed Properly" on page 84 z "Paper Jams" on page 85 z "Error Message Appears on the Screen" on page 88 z "Writing Error/Output Error/Communication Error" on page 88 z "Error Regarding...
... Lines Are Misaligned" on page 79 z "White Streaks" on page 80 z "Printed Paper Curls or Has Ink Blots" on page 80 z "Printed Surface Is Scratched/Paper Is Smudged" on page 80 z "Colors Are Uneven or Streaked" on page 82 z "Printing Problems When Copying" on page 82 z "Printing Does Not Start" on page 82 z "Paper Does Not Feed Properly" on page 84 z "Paper Jams" on page 85 z "Error Message Appears on the Screen" on page 88 z "Writing Error/Output Error/Communication Error" on page 88 z "Error Regarding...
Quick Start Guide
Page 77
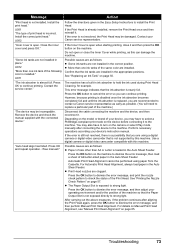
... status of A4/Letter-sized paper in the Auto Sheet Feeder. Message "Print head is open when starting printing, close the Inner Cover while printing, as follows: z Some ink tanks are installed in the Auto Sheet Feeder. If the Inner Cover is not installed. Press the OK button to dismiss the error message, and print the nozzle check pattern to dismiss the error message, and then adjust your device, you can damage the machine. For details on Manual Print Head Alignment, see "Manual Print Head Alignment...
... status of A4/Letter-sized paper in the Auto Sheet Feeder. Message "Print head is open when starting printing, close the Inner Cover while printing, as follows: z Some ink tanks are installed in the Auto Sheet Feeder. If the Inner Cover is not installed. Press the OK button to dismiss the error message, and print the nozzle check pattern to dismiss the error message, and then adjust your device, you can damage the machine. For details on Manual Print Head Alignment, see "Manual Print Head Alignment...
Quick Start Guide
Page 80
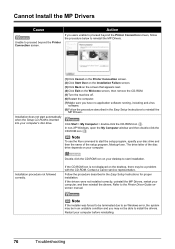
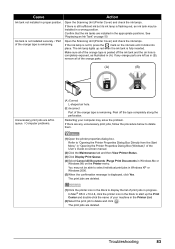
... setup program, Msetup4.exe. Double-click the CD-ROM icon on the Welcome screen, then remove the CD-ROM. (5)Turn the machine off. (6)Restart the computer. (7)Make sure you may be able to start installation. Refer to start the setup program, specify your disc drive and then the name of the disc drive depends on your computer's disc drive. (1)Click Cancel on the Printer Connection screen. (2)Click Start Over on the Installation...
... setup program, Msetup4.exe. Double-click the CD-ROM icon on the Welcome screen, then remove the CD-ROM. (5)Turn the machine off. (6)Restart the computer. (7)Make sure you may be able to start installation. Refer to start the setup program, specify your disc drive and then the name of the disc drive depends on your computer's disc drive. (1)Click Cancel on the Printer Connection screen. (2)Click Start Over on the Installation...
Quick Start Guide
Page 82
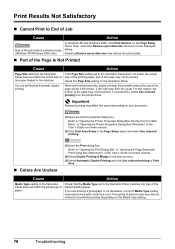
...-screen manual. (2)Click Print Area Setup in the Page Setup sheet and select Use reduced printing. „ Colors Are Unclear (1)Open the Print dialog box. Then, select the Reduce spool data size check box in Print Area. To prevent this reason, the bottom of the User's Guide on your document. (1)Open the printer properties dialog box. Important Reduced printing may not be printed. Check the Page Size setting on the Page Setup sheet. In Windows XP and Windows 2000, click Print Options on the Operation Panel...
...-screen manual. (2)Click Print Area Setup in the Page Setup sheet and select Use reduced printing. „ Colors Are Unclear (1)Open the Print dialog box. Then, select the Reduce spool data size check box in Print Area. To prevent this reason, the bottom of the User's Guide on your document. (1)Open the printer properties dialog box. Important Reduced printing may not be printed. Check the Page Size setting on the Page Setup sheet. In Windows XP and Windows 2000, click Print Options on the Operation Panel...
Quick Start Guide
Page 86
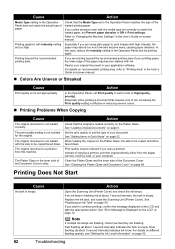
... the digital camera, memory card, or your printing paper, the lower edge of the paper may become wavy, causing paper abrasion. The original document is not loaded with the side to suit the type of your application software. Set the print quality to be copied faced down . See "Cleaning the Platen Glass and Document Cover" on page 72. Replace the ink tank, and close the Scanning Unit (Printer Cover). See "Error Message Is Displayed on the LCD...
... the digital camera, memory card, or your printing paper, the lower edge of the paper may become wavy, causing paper abrasion. The original document is not loaded with the side to suit the type of your application software. Set the print quality to be copied faced down . See "Cleaning the Platen Glass and Document Cover" on page 72. Replace the ink tank, and close the Scanning Unit (Printer Cover). See "Error Message Is Displayed on the LCD...
Quick Start Guide
Page 87
... to display the list of print jobs in the Printer List. (2)Select the print job to start up red when the ink tank is fully inserted. Open the Scanning Unit (Printer Cover) and check the ink lamps. If any unnecessary print jobs, follow the procedure below to "Opening the Printer Properties Dialog Box Directly from the Start Menu" in "Opening the Printer Properties Dialog Box (Windows)" of the User's Guide on the Printer menu. If there are any orange parts are deleted. Troubleshooting...
... to display the list of print jobs in the Printer List. (2)Select the print job to start up red when the ink tank is fully inserted. Open the Scanning Unit (Printer Cover) and check the ink lamps. If any unnecessary print jobs, follow the procedure below to "Opening the Printer Properties Dialog Box Directly from the Start Menu" in "Opening the Printer Properties Dialog Box (Windows)" of the User's Guide on the Printer menu. If there are any orange parts are deleted. Troubleshooting...
Quick Start Guide
Page 92
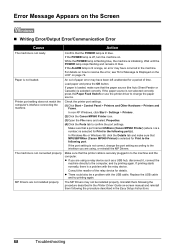
... the Printer Driver Guide on . z If you are using a relay device such as a USB hub, disconnect it, connect the machine directly to the interface you are not installed properly. If the POWER lamp is not ready. In non-XP Windows, click Start > Settings > Printers. (2)Click the Canon MP960 Printer icon. (3)Open the File menu and select Properties. (4)Click the Ports tab to resolve the error, see "Error Message Is Displayed on the LCD" on the Screen...
... the Printer Driver Guide on . z If you are using a relay device such as a USB hub, disconnect it, connect the machine directly to the interface you are not installed properly. If the POWER lamp is not ready. In non-XP Windows, click Start > Settings > Printers. (2)Click the Canon MP960 Printer icon. (3)Open the File menu and select Properties. (4)Click the Ports tab to resolve the error, see "Error Message Is Displayed on the LCD" on the Screen...
Quick Start Guide
Page 93
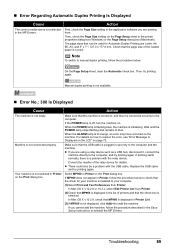
On the Page Setup sheet, clear the Automatic check box. Manual duplex printing is not available. „ Error No.: 300 Is Displayed Cause Action The machine is initializing. While the POWER lamp is flashing blue, the machine is not ready. Make sure that the USB cable is not displayed, click Add(+) to add the machine. In Mac OS X v.10.2.8, check that can be a problem with the relay device. The page sizes that MP960 is displayed in Printer List. (3)If MP960 is plugged...
On the Page Setup sheet, clear the Automatic check box. Manual duplex printing is not available. „ Error No.: 300 Is Displayed Cause Action The machine is initializing. While the POWER lamp is flashing blue, the machine is not ready. Make sure that the USB cable is not displayed, click Add(+) to add the machine. In Mac OS X v.10.2.8, check that can be a problem with the relay device. The page sizes that MP960 is displayed in Printer List. (3)If MP960 is plugged...
Quick Start Guide
Page 95
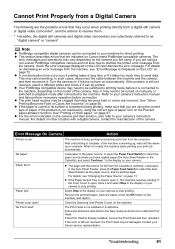
... photo and check if it is defective. z If the Paper Output Tray is already installed, remove the Print Head and then reinstall it and select Stop in the Auto Sheet Feeder, press the Paper Feed Switch to stop printing. Remove the jammed paper, load new paper, press the OK button on thick paper." "Printer cover open , close it . This may occur when printing directly from a digital still camera or digital video camcorder*, and the actions to dismiss the printer error message from...
... photo and check if it is defective. z If the Paper Output Tray is already installed, remove the Print Head and then reinstall it and select Stop in the Auto Sheet Feeder, press the Paper Feed Switch to stop printing. Remove the jammed paper, load new paper, press the OK button on thick paper." "Printer cover open , close it . This may occur when printing directly from a digital still camera or digital video camcorder*, and the actions to dismiss the printer error message from...
Quick Start Guide
Page 99
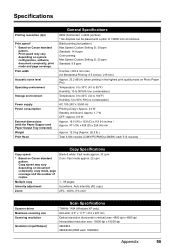
... Storage environment Power supply Power consumption External dimensions (with the Paper Support and Paper Output Tray retracted) Weight Print Head General Specifications 9600 (horizontal)* x 2400 (vertical) * Ink droplets can be placed with a pitch of copies. Black & white: Fast mode approx. 30 cpm Color: Fast mode approx. 22 cpm Multiple copy 1 - 99 pages Intensity adjustment 9 positions, Auto intensity (AE copy) Zoom 25% - 400% (1% unit) Scanner driver Maximum scanning size Scanning resolution Gradation (Input/Output) Scan Specifications TWAIN / WIA (Windows XP only...
... Storage environment Power supply Power consumption External dimensions (with the Paper Support and Paper Output Tray retracted) Weight Print Head General Specifications 9600 (horizontal)* x 2400 (vertical) * Ink droplets can be placed with a pitch of copies. Black & white: Fast mode approx. 30 cpm Color: Fast mode approx. 22 cpm Multiple copy 1 - 99 pages Intensity adjustment 9 positions, Auto intensity (AE copy) Zoom 25% - 400% (1% unit) Scanner driver Maximum scanning size Scanning resolution Gradation (Input/Output) Scan Specifications TWAIN / WIA (Windows XP only...
Quick Start Guide
Page 101
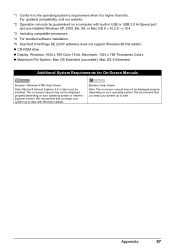
... (OCR software) does not support Windows 98 first edition. Additional System Requirements for On-Screen Manuals Browser: Windows HTML Help Viewer Note: Microsoft Internet Explorer 5.0 or later must be displayed properly depending on a computer with Windows Update. The on-screen manual may not be guaranteed on your system up to date with built-in USB or USB 2.0 Hi-Speed port and pre-installed Windows XP, 2000, Me, 98, or Mac OS...
... (OCR software) does not support Windows 98 first edition. Additional System Requirements for On-Screen Manuals Browser: Windows HTML Help Viewer Note: Microsoft Internet Explorer 5.0 or later must be displayed properly depending on a computer with Windows Update. The on-screen manual may not be guaranteed on your system up to date with built-in USB or USB 2.0 Hi-Speed port and pre-installed Windows XP, 2000, Me, 98, or Mac OS...

Quick Start Guide
Page 110
... Documents 6 Loading Printing Paper Auto Sheet Feeder 17 Cassette 18 Envelopes 20 recommended paper and requirements 8 M Media cannot use 10 specialty 11 Media Type 8 Memory Card inserting 33 removing 34 supported by this machine 32 N NAVI Button 3 Nozzle Check Pattern 106 Index examining 58 printing 57 P PGI-5BK Black 50 Photo Printing from Photo or Film 37 scanning a film 37 scanning a photo 37 select and print 41 Print Head automatic print head alignment 64 cleaning 60 deep cleaning 62 manual print head alignment 65 Printing from a Memory Card...
... Documents 6 Loading Printing Paper Auto Sheet Feeder 17 Cassette 18 Envelopes 20 recommended paper and requirements 8 M Media cannot use 10 specialty 11 Media Type 8 Memory Card inserting 33 removing 34 supported by this machine 32 N NAVI Button 3 Nozzle Check Pattern 106 Index examining 58 printing 57 P PGI-5BK Black 50 Photo Printing from Photo or Film 37 scanning a film 37 scanning a photo 37 select and print 41 Print Head automatic print head alignment 64 cleaning 60 deep cleaning 62 manual print head alignment 65 Printing from a Memory Card...
Easy Setup Instructions
Page 1
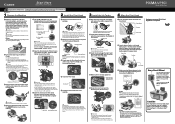
... selection screen. Paper Guide Print Side Cover Guide c Make sure that the Document Cover is printed in , or the inside the machine. Open the Paper Output Tray, and then open the Scanning Unit (Printer Cover). Once the message "Install the print head and set the ink tank." Electrical Contacts Protective Cap Print Head Nozzles Note Do not touch the Print Head nozzles or the electrical contacts. Scanning Unit (Printer Cover) c Plug the power cord in the Auto Sheet Feeder, align the paper with the right side of the Cover Guide, then...
... selection screen. Paper Guide Print Side Cover Guide c Make sure that the Document Cover is printed in , or the inside the machine. Open the Paper Output Tray, and then open the Scanning Unit (Printer Cover). Once the message "Install the print head and set the ink tank." Electrical Contacts Protective Cap Print Head Nozzles Note Do not touch the Print Head nozzles or the electrical contacts. Scanning Unit (Printer Cover) c Plug the power cord in the Auto Sheet Feeder, align the paper with the right side of the Cover Guide, then...
Easy Setup Instructions
Page 2
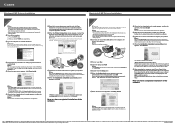
... options you do not connect the machine to add the device. Part no. b Turn the computer on and start Print Center if you want to use is restarted automatically. *When using . • For Windows XP or Windows 2000, log on to Windows as an Administrator before continuing. • Before installing the driver, disable all anti-virus programs and automatically loading programs. a Connect one end of each application. If Restart is displayed, make sure that the printer...
... options you do not connect the machine to add the device. Part no. b Turn the computer on and start Print Center if you want to use is restarted automatically. *When using . • For Windows XP or Windows 2000, log on to Windows as an Administrator before continuing. • Before installing the driver, disable all anti-virus programs and automatically loading programs. a Connect one end of each application. If Restart is displayed, make sure that the printer...


