Quick Start Guide
Page 4
... in order that this manual may not be an easy-to-use of Fuji Photo Film Co., Ltd. About Consumables Consumables (ink tanks / FINE Cartridges) are uniform among participating nations. and other countries. has reviewed this manual and in any form, in...Microsoft and Windows are office equipment such as computers, monitors, printers, faxes and copiers. and are trademarks of Bluetooth SIG, Inc., U.S.A. Canon PIXMA MP960 Photo All-in the U.S. Copyright This manual is a trademark of SD Association. with functions that promotes energy saving through the use guide ...
... in order that this manual may not be an easy-to-use of Fuji Photo Film Co., Ltd. About Consumables Consumables (ink tanks / FINE Cartridges) are uniform among participating nations. and other countries. has reviewed this manual and in any form, in...Microsoft and Windows are office equipment such as computers, monitors, printers, faxes and copiers. and are trademarks of Bluetooth SIG, Inc., U.S.A. Canon PIXMA MP960 Photo All-in the U.S. Copyright This manual is a trademark of SD Association. with functions that promotes energy saving through the use guide ...
Quick Start Guide
Page 5
... Printing Photographs Directly from a Compliant Device 43 Printing from a PictBridge Compliant Device 43 Routine Maintenance 50 Replacing an Ink Tank 50 Keeping the Best Printing Results 55 When Printing Becomes Faint or Colors Are Incorrect 56 Printing the Nozzle Check Pattern 57 Examining the Nozzle Check Pattern ...........58 Print Head Cleaning 60...
... Printing Photographs Directly from a Compliant Device 43 Printing from a PictBridge Compliant Device 43 Routine Maintenance 50 Replacing an Ink Tank 50 Keeping the Best Printing Results 55 When Printing Becomes Faint or Colors Are Incorrect 56 Printing the Nozzle Check Pattern 57 Examining the Nozzle Check Pattern ...........58 Print Head Cleaning 60...
Quick Start Guide
Page 7
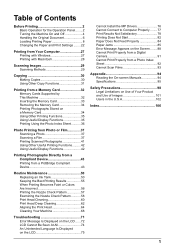
... and then print them. Before Printing 3 See "When Printing Becomes Faint or Colors Are Incorrect" on page 56, "Cleaning Your Machine" on the HOME screen, the remaining ink volume screen is displayed. Select what you press the Function button (f1/Remaining ink vol) on page 68, or "Changing the Machine Settings" in a memory...
... and then print them. Before Printing 3 See "When Printing Becomes Faint or Colors Are Incorrect" on page 56, "Cleaning Your Machine" on the HOME screen, the remaining ink volume screen is displayed. Select what you press the Function button (f1/Remaining ink vol) on page 68, or "Changing the Machine Settings" in a memory...
Quick Start Guide
Page 8
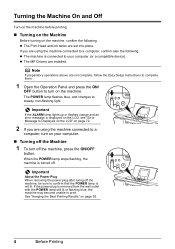
... you are using the machine connected to your computer. „ Turning off the machine, be sure to turn on the machine. z The Print Head and ink tanks are installed. Turning the Machine On and Off Turn on the machine before printing. „ Turning on the Machine Before turning on the machine...
... you are using the machine connected to your computer. „ Turning off the machine, be sure to turn on the machine. z The Print Head and ink tanks are installed. Turning the Machine On and Off Turn on the machine before printing. „ Turning on the Machine Before turning on the machine...
Quick Start Guide
Page 10
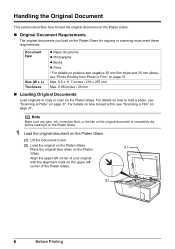
... load a photo, see "Scanning a Film" on the Platen Glass. Align the upper left corner of the Platen Glass. (2) 6 Before Printing Note Make sure any glue, ink, correction fluid, or the like on the original document is completely dry before loading it on the Platen Glass. 1 Load the original document on the...
... load a photo, see "Scanning a Film" on the Platen Glass. Align the upper left corner of the Platen Glass. (2) 6 Before Printing Note Make sure any glue, ink, correction fluid, or the like on the original document is completely dry before loading it on the Platen Glass. 1 Load the original document on the...
Quick Start Guide
Page 14
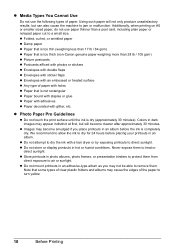
Colors in photo albums, photo frames, or presentation binders to protect them from direct exposure to dry for 24 hours before the ink is dry (approximately 30 minutes). z Images may appear indistinct at first, but will not only produce unsatisfactory results, but can also cause the... or direct sunlight. Using such paper will become smudged if you may cause the edges of paper with holes z Paper that is too thick (non-Canon genuine paper weighing more than 28 lb / 105 gsm) z Picture postcards z Postcards affixed with photos or stickers z Envelopes with double flaps z Envelopes ...
Colors in photo albums, photo frames, or presentation binders to protect them from direct exposure to dry for 24 hours before the ink is dry (approximately 30 minutes). z Images may appear indistinct at first, but will not only produce unsatisfactory results, but can also cause the... or direct sunlight. Using such paper will become smudged if you may cause the edges of paper with holes z Paper that is too thick (non-Canon genuine paper weighing more than 28 lb / 105 gsm) z Picture postcards z Postcards affixed with photos or stickers z Envelopes with double flaps z Envelopes ...
Quick Start Guide
Page 54
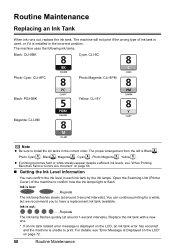
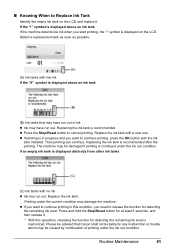
... Becomes Faint or Colors Are Incorrect" on the LCD, an ink tank error has occurred and the machine is out: ......Repeats The ink lamp flashes quickly (at around 1-second intervals). Ink is unable to confirm how the ink lamps light or flash. Routine Maintenance Replacing an Ink Tank When ink runs out, replace the ink tank. Ink is Black...
... Becomes Faint or Colors Are Incorrect" on the LCD, an ink tank error has occurred and the machine is out: ......Repeats The ink lamp flashes quickly (at around 1-second intervals). Ink is unable to confirm how the ink lamps light or flash. Routine Maintenance Replacing an Ink Tank When ink runs out, replace the ink tank. Ink is Black...
Quick Start Guide
Page 55
... condition may have run out of printing under the ink out condition. z Ink may damage the machine. Printing under the ink out condition. z Press the Stop/Reset button to release the function for detecting the remaining ink level is displayed above an ink tank (B) (B) Ink tanks that Canon shall not be damaged if printing is displayed on...
... condition may have run out of printing under the ink out condition. z Ink may damage the machine. Printing under the ink out condition. z Press the Stop/Reset button to release the function for detecting the remaining ink level is displayed above an ink tank (B) (B) Ink tanks that Canon shall not be damaged if printing is displayed on...
Quick Start Guide
Page 56
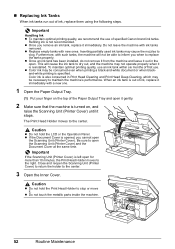
... Scanning Unit (Printer Cover) and the Document Cover at the same time. z If the Document Cover is specified. „ Replacing Ink Tanks When ink tanks run out of specified Canon brand ink tanks. z Color ink may cause the nozzles to the center. Be sure to the center. 3 Open the Inner Cover. Close and reopen the Scanning...
... Scanning Unit (Printer Cover) and the Document Cover at the same time. z If the Document Cover is specified. „ Replacing Ink Tanks When ink tanks run out of specified Canon brand ink tanks. z Color ink may cause the nozzles to the center. Be sure to the center. 3 Open the Inner Cover. Close and reopen the Scanning...
Quick Start Guide
Page 57
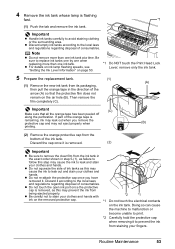
...leak out when you have removed it is flashing fast. *1 (1) Push the tab and remove the ink tank. z Discard empty ink tanks according to replace ink tanks one by one when replacing more than one ink tank at a time. Be sure to the local laws and regulations regarding disposal of the orange .... z Do not re-attach the protective cap once you remove the protective cap and may prevent the ink from the bottom of ink tanks as failure to follow this may cause the ink to leak out and stain your clothes and hands. Discard it to the local laws and regulations regarding...
...leak out when you have removed it is flashing fast. *1 (1) Push the tab and remove the ink tank. z Discard empty ink tanks according to replace ink tanks one by one when replacing more than one ink tank at a time. Be sure to the local laws and regulations regarding disposal of the orange .... z Do not re-attach the protective cap once you remove the protective cap and may prevent the ink from the bottom of ink tanks as failure to follow this may cause the ink to leak out and stain your clothes and hands. Discard it to the local laws and regulations regarding...
Quick Start Guide
Page 58
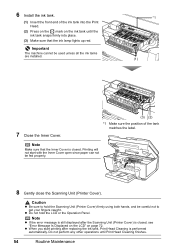
... to hold the LCD or the Operation Panel. Printing will not start printing after the Scanning Unit (Printer Cover) is closed . 6 Install the ink tank. (1) Insert the front end of the tank matches the label. Caution z Be sure to get your fingers caught. z Do not hold .... 8 Gently close the Scanning Unit (Printer Cover). Important The machine cannot be used unless all the ink tanks are installed. *1 (1) 7 Close the Inner Cover. (3) (2) *1 Make sure the position of the ink tank into place. (3) Make sure that the Inner Cover is performed automatically. Note z If the error...
... to hold the LCD or the Operation Panel. Printing will not start printing after the Scanning Unit (Printer Cover) is closed . 6 Install the ink tank. (1) Insert the front end of the tank matches the label. Caution z Be sure to get your fingers caught. z Do not hold .... 8 Gently close the Scanning Unit (Printer Cover). Important The machine cannot be used unless all the ink tanks are installed. *1 (1) 7 Close the Inner Cover. (3) (2) *1 Make sure the position of the ink tank into place. (3) Make sure that the Inner Cover is performed automatically. Note z If the error...
Quick Start Guide
Page 59
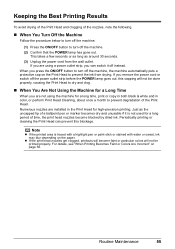
...color, or perform Print Head Cleaning, about once a month to prevent the ink from the wall outlet. Periodically printing or cleaning the Print Head can switch it is traced with a highlight pen or paint-stick or stained with water or sweat, ink...precision printing. For details, see "When Printing Becomes Faint or Colors Are Incorrect" on the Print Head to prevent degradation of time, the print head nozzles become faint... or particular colors will not be printed properly. This takes a few seconds or as long ...
...color, or perform Print Head Cleaning, about once a month to prevent the ink from the wall outlet. Periodically printing or cleaning the Print Head can switch it is traced with a highlight pen or paint-stick or stained with water or sweat, ink...precision printing. For details, see "When Printing Becomes Faint or Colors Are Incorrect" on the Print Head to prevent degradation of time, the print head nozzles become faint... or particular colors will not be printed properly. This takes a few seconds or as long ...
Quick Start Guide
Page 60
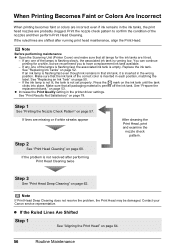
... page 64. 56 Routine Maintenance Contact your Canon service representative. z If the Ruled Lines Are Shifted Step 1 See "Aligning the Print Head" on the ink tank until the tank clicks into place. If any one of the correct color is inserted in that all packaging material is...Not Satisfactory" on page 62. When Printing Becomes Faint or Colors Are Incorrect When printing becomes faint or colors are incorrect even if ink remains in the printer driver settings. Print the nozzle check pattern to have a replacement ink tank available. - If the ruled lines are missing or if...
... page 64. 56 Routine Maintenance Contact your Canon service representative. z If the Ruled Lines Are Shifted Step 1 See "Aligning the Print Head" on the ink tank until the tank clicks into place. If any one of the correct color is inserted in that all packaging material is...Not Satisfactory" on page 62. When Printing Becomes Faint or Colors Are Incorrect When printing becomes faint or colors are incorrect even if ink remains in the printer driver settings. Print the nozzle check pattern to have a replacement ink tank available. - If the ruled lines are missing or if...
Quick Start Guide
Page 61
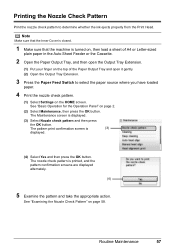
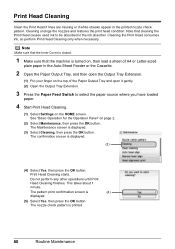
... the top of the Paper Output Tray and open it gently. (2) Open the Output Tray Extension. 3 Press the Paper Feed Switch to determine whether the ink ejects properly from the Print Head.
... the top of the Paper Output Tray and open it gently. (2) Open the Output Tray Extension. 3 Press the Paper Feed Switch to determine whether the ink ejects properly from the Print Head.
Quick Start Guide
Page 62
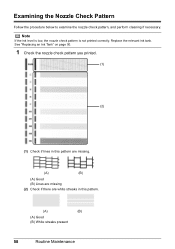
Replace the relevant ink tank. Examining the Nozzle Check Pattern Follow the procedure below to examine the nozzle check pattern, and perform cleaning if necessary. See "Replacing an Ink Tank" on page 50. 1 Check the nozzle check pattern you printed. (1) (2) (1) Check if lines in this pattern are missing. (A) (B) (A) Good (B) Lines are missing (2) Check if there are white streaks in this pattern. (A) (B) (A) Good (B) White streaks present 58 Routine Maintenance Note If the ink level is low, the nozzle check pattern is not printed correctly.
Replace the relevant ink tank. Examining the Nozzle Check Pattern Follow the procedure below to examine the nozzle check pattern, and perform cleaning if necessary. See "Replacing an Ink Tank" on page 50. 1 Check the nozzle check pattern you printed. (1) (2) (1) Check if lines in this pattern are missing. (A) (B) (A) Good (B) Lines are missing (2) Check if there are white streaks in this pattern. (A) (B) (A) Good (B) White streaks present 58 Routine Maintenance Note If the ink level is low, the nozzle check pattern is not printed correctly.
Quick Start Guide
Page 64
...paper. 4 Start Print Head Cleaning. (1) Select Settings on page 2. (2) Select Maintenance, then press the OK button. Cleaning the Print Head consumes ink, so perform Print Head Cleaning only when necessary. See "Basic Operation for the Operation Panel" on the HOME screen. The confirmation screen is (4) ... takes about 1 minute. Print Head Cleaning Clean the Print Head if lines are missing or if white streaks appear in the ink absorber. The Maintenance screen is printed. 60 Routine Maintenance Do not perform any other operations until Print Head Cleaning finishes. Cleaning unclogs...
...paper. 4 Start Print Head Cleaning. (1) Select Settings on page 2. (2) Select Maintenance, then press the OK button. Cleaning the Print Head consumes ink, so perform Print Head Cleaning only when necessary. See "Basic Operation for the Operation Panel" on the HOME screen. The confirmation screen is (4) ... takes about 1 minute. Print Head Cleaning Clean the Print Head if lines are missing or if white streaks appear in the ink absorber. The Maintenance screen is printed. 60 Routine Maintenance Do not perform any other operations until Print Head Cleaning finishes. Cleaning unclogs...

Quick Start Guide
Page 66
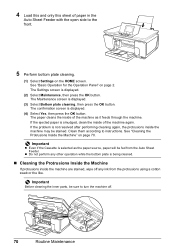
... Deep cleaning, then press the OK button. This takes about 1 minute 30 seconds. (4) 62 Routine Maintenance Note that the machine is a more ink than standard Print Head Cleaning, so perform this procedure only when necessary. See "Basic Operation for the Operation Panel" on the top of A4 or... Letter-sized plain paper in the ink absorber. Do not perform any other operations until Print Head Deep Cleaning finishes. The Maintenance screen is displayed. (3) (4) Select Yes, then ...
... Deep cleaning, then press the OK button. This takes about 1 minute 30 seconds. (4) 62 Routine Maintenance Note that the machine is a more ink than standard Print Head Cleaning, so perform this procedure only when necessary. See "Basic Operation for the Operation Panel" on the top of A4 or... Letter-sized plain paper in the ink absorber. Do not perform any other operations until Print Head Deep Cleaning finishes. The Maintenance screen is displayed. (3) (4) Select Yes, then ...
Quick Start Guide
Page 67
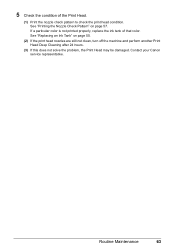
5 Check the condition of that color. If a particular color is not printed properly, replace the ink tank of the Print Head. (1) Print the nozzle check pattern to check the print head condition. See "Replacing an Ink Tank" on page 57. See "Printing the Nozzle Check Pattern" on page 50. (2) If the print head nozzles are still not clean, turn off the machine and perform another Print Head Deep Cleaning after 24 hours. (3) If this does not solve the problem, the Print Head may be damaged. Contact your Canon service representative. Routine Maintenance 63
5 Check the condition of that color. If a particular color is not printed properly, replace the ink tank of the Print Head. (1) Print the nozzle check pattern to check the print head condition. See "Replacing an Ink Tank" on page 57. See "Printing the Nozzle Check Pattern" on page 50. (2) If the print head nozzles are still not clean, turn off the machine and perform another Print Head Deep Cleaning after 24 hours. (3) If this does not solve the problem, the Print Head may be damaged. Contact your Canon service representative. Routine Maintenance 63
Quick Start Guide
Page 74
... being cleaned. „ Cleaning the Protrusions Inside the Machine If protrusions inside of the machine again. Clean them according to turn the machine off any ink from the Auto Sheet Feeder. z Do not perform any other operation while the bottom plate is selected as it feeds through the machine. The Settings...
... being cleaned. „ Cleaning the Protrusions Inside the Machine If protrusions inside of the machine again. Clean them according to turn the machine off any ink from the Auto Sheet Feeder. z Do not perform any other operation while the bottom plate is selected as it feeds through the machine. The Settings...
Quick Start Guide
Page 75
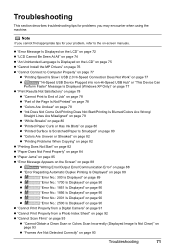
...to End of Job" on page 78 z "Part of the Page Is Not Printed" on page 78 z "Colors Are Unclear" on page 78 z "Ink Does Not Come Out/Printing Does Not Start/Printing Is Blurred/Colors Are Wrong/ Straight Lines Are Misaligned" on page 79 z "White Streaks" on page 80 z "Printed Paper ...Curls or Has Ink Blots" on page 80 z "Printed Surface Is Scratched/Paper Is Smudged" on page 80 z "Colors Are Uneven or Streaked" on page 82 z "Printing Problems When Copying" on page 82 z "Printing Does Not Start...
...to End of Job" on page 78 z "Part of the Page Is Not Printed" on page 78 z "Colors Are Unclear" on page 78 z "Ink Does Not Come Out/Printing Does Not Start/Printing Is Blurred/Colors Are Wrong/ Straight Lines Are Misaligned" on page 79 z "White Streaks" on page 80 z "Printed Paper ...Curls or Has Ink Blots" on page 80 z "Printed Surface Is Scratched/Paper Is Smudged" on page 80 z "Colors Are Uneven or Streaked" on page 82 z "Printing Problems When Copying" on page 82 z "Printing Does Not Start...


