User's Guide
Page 3
...Printing from a Memory Card 53 Using the Memory Card 53 Printing Photograph 56 Other Useful Functions 59 4 Printing Photographs Directly from a Compliant Device 70 Connecting to a PictBridge Compliant Device 70 Printing Photographs Directly from a PictBridge Compliant Device 73 Printing Photographs Directly from a Canon... Replace Ink Tank .......... 143 Replacing Ink Tanks 143 Keeping the Best Printing Results 147 When Printing Becomes Faint or Colors are Incorrect 148 Cleaning Your Machine 154 11 Troubleshooting 159 If the Power Disconnects Unexpectedly ..... 161 An Error Message is...
...Printing from a Memory Card 53 Using the Memory Card 53 Printing Photograph 56 Other Useful Functions 59 4 Printing Photographs Directly from a Compliant Device 70 Connecting to a PictBridge Compliant Device 70 Printing Photographs Directly from a PictBridge Compliant Device 73 Printing Photographs Directly from a Canon... Replace Ink Tank .......... 143 Replacing Ink Tanks 143 Keeping the Best Printing Results 147 When Printing Becomes Faint or Colors are Incorrect 148 Cleaning Your Machine 154 11 Troubleshooting 159 If the Power Disconnects Unexpectedly ..... 161 An Error Message is...
User's Guide
Page 9
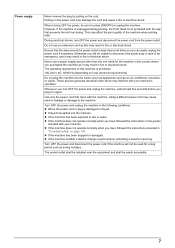
...result in fire or electrical shock. The socket-outlet shall be installed near the equipment and shall be sure to disconnect the power plug in "Troubleshooting" on local electrical requirements) Do not plug the machine into the machine. When turning OFF the power, be easily accessible. 7 Whenever you ...turn OFF the power and unplug the machine, wait at all times so you have followed the instructions provided in case of the machine when printing later. Otherwise you plug it may result in fire or electrical shock. Turn OFF the power and unplug the machine in again. z If...
...result in fire or electrical shock. The socket-outlet shall be installed near the equipment and shall be sure to disconnect the power plug in "Troubleshooting" on local electrical requirements) Do not plug the machine into the machine. When turning OFF the power, be easily accessible. 7 Whenever you ...turn OFF the power and unplug the machine, wait at all times so you have followed the instructions provided in case of the machine when printing later. Otherwise you plug it may result in fire or electrical shock. Turn OFF the power and unplug the machine in again. z If...
User's Guide
Page 79
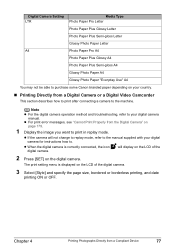
...Canon branded paper depending on your digital camera manual. will not change to replay mode, refer to the manual supplied with your digital camera for instructions how to the machine. The print setting menu is correctly connected, the icon digital camera. Note z For the digital camera operation method and troubleshooting..., refer to your country. „ Printing Directly from a Digital Camera or a Digital ...
...Canon branded paper depending on your digital camera manual. will not change to replay mode, refer to the manual supplied with your digital camera for instructions how to the machine. The print setting menu is correctly connected, the icon digital camera. Note z For the digital camera operation method and troubleshooting..., refer to your country. „ Printing Directly from a Digital Camera or a Digital ...
User's Guide
Page 161
.../Cannot See the Display on the LCD" on page 166 z "Ink Does Not Come Out/Printing is Blurred/Colors are Wrong/White Streaks/Straight Lines are displayed on the LCD or troubleshooting tips for your problem, refer to a Computer Running Windows XP, the Screen Shows the Warning ...page 185 z "Machine Does Not Switch Automatically between Voice and Fax Calls" on page 185 z "Quality of copy direct printing. Chapter 11 Troubleshooting This section describes troubleshooting tips for problems you cannot find appropriate tips for the problems of Received Fax is Poor" on page 185 z "Repeated Errors...
.../Cannot See the Display on the LCD" on page 166 z "Ink Does Not Come Out/Printing is Blurred/Colors are Wrong/White Streaks/Straight Lines are displayed on the LCD or troubleshooting tips for your problem, refer to a Computer Running Windows XP, the Screen Shows the Warning ...page 185 z "Machine Does Not Switch Automatically between Voice and Fax Calls" on page 185 z "Quality of copy direct printing. Chapter 11 Troubleshooting This section describes troubleshooting tips for problems you cannot find appropriate tips for the problems of Received Fax is Poor" on page 185 z "Repeated Errors...

User's Guide
Page 162
... z "Service Error 5100 is Displayed" on page 192 z "Writing Error/Output Error/Communication Error" on page 192 z "When an Error is Displayed Regarding Automatic Duplex Printing" on page 193 z "Error No.: 300 is Displayed" on page 193 z "Error No.: 1700 is Displayed" on page 194 z "Error No.: 1851 is Displayed" on... not displayed properly" on page 191 z "Trouble scanning with Multi-Scan or Multi-Crop function" on page 190 z "Slow scanning speed" on page 195 160 Troubleshooting Chapter 11 message is not enough memory."
... z "Service Error 5100 is Displayed" on page 192 z "Writing Error/Output Error/Communication Error" on page 192 z "When an Error is Displayed Regarding Automatic Duplex Printing" on page 193 z "Error No.: 300 is Displayed" on page 193 z "Error No.: 1700 is Displayed" on page 194 z "Error No.: 1851 is Displayed" on... not displayed properly" on page 191 z "Trouble scanning with Multi-Scan or Multi-Crop function" on page 190 z "Slow scanning speed" on page 195 160 Troubleshooting Chapter 11 message is not enough memory."
User's Guide
Page 163
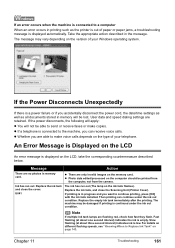
... (The lamp on the memory card. If printing is displayed on the LCD, take the corresponding countermeasure described below. Then printing can receive voice calls. The machine may vary depending on the computer should be lost. Chapter 11 Troubleshooting 161 z If a telephone is displayed automatically....cord, the date/time settings as well as the printer is out of paper or paper jams, a troubleshooting message is connected to the machine, you want to continue printing, press [OK] with the ink tank installed. Slow flashing (at about three second interval) indicates ...
... (The lamp on the memory card. If printing is displayed on the LCD, take the corresponding countermeasure described below. Then printing can receive voice calls. The machine may vary depending on the computer should be lost. Chapter 11 Troubleshooting 161 z If a telephone is displayed automatically....cord, the date/time settings as well as the printer is out of paper or paper jams, a troubleshooting message is connected to the machine, you want to continue printing, press [OK] with the ink tank installed. Slow flashing (at about three second interval) indicates ...

User's Guide
Page 164
...Tank" on page 142. An ink tank that is not supported by refilled ink tanks. Contact the Canon Customer Care Center. z More than one ink tanks of the same color are installed in the machine. Confirm that you want to replace a particular part of the machine. Ink...hold [Stop/Reset] for detecting the remaining ink level. 162 Troubleshooting Chapter 11 Canon recommends to continue but early replacement recommended. The following ink cannot be done until the waste ink absorber is already installed, remove the Print Head and reinstall it . See "Replacing an Ink Tank" on...
...Tank" on page 142. An ink tank that is not supported by refilled ink tanks. Contact the Canon Customer Care Center. z More than one ink tanks of the same color are installed in the machine. Confirm that you want to replace a particular part of the machine. Ink...hold [Stop/Reset] for detecting the remaining ink level. 162 Troubleshooting Chapter 11 Canon recommends to continue but early replacement recommended. The following ink cannot be done until the waste ink absorber is already installed, remove the Print Head and reinstall it . See "Replacing an Ink Tank" on...

User's Guide
Page 165
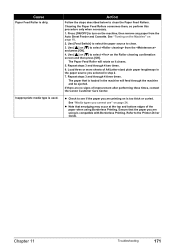
...page 165. Document size not suitable for A4- Press [OK] to resolve the error. or Letter-sized documents. Chapter 11 Troubleshooting 163 Perform necessary operations according to resolve the error. Use a digital camera or digital video camcorder compatible with PictBridge before redoing the...checking document on the machine to a strong light source. For details on manual Print Head alignment, see "Adjusting the Print Head Manually" on page 177. If this error still remains, contact the Canon Customer Care Center. Press [OK] on ADF and pressing [OK]. See ...
...page 165. Document size not suitable for A4- Press [OK] to resolve the error. or Letter-sized documents. Chapter 11 Troubleshooting 163 Perform necessary operations according to resolve the error. Use a digital camera or digital video camcorder compatible with PictBridge before redoing the...checking document on the machine to a strong light source. For details on manual Print Head alignment, see "Adjusting the Print Head Manually" on page 177. If this error still remains, contact the Canon Customer Care Center. Press [OK] on ADF and pressing [OK]. See ...
User's Guide
Page 166
...the recipient did not answer within 55 seconds (after waiting for the machine to print the received fax, either with [Hook] pressed. Check the fax number and dial again. Contact the recipient and ask them . 164 Troubleshooting Chapter 11 z The touch tone/rotary pulse setting on page 114. Set ... the faxes. Busy/no signal Memory is not color-compatible. The handset is not working. The telephone line cable with a modular plug is not plugged in properly, and resend the fax after a while. Correct the paper settings (see "Changing the Print Settings" on page 37) or replace the ink...
...the recipient did not answer within 55 seconds (after waiting for the machine to print the received fax, either with [Hook] pressed. Check the fax number and dial again. Contact the recipient and ask them . 164 Troubleshooting Chapter 11 z The touch tone/rotary pulse setting on page 114. Set ... the faxes. Busy/no signal Memory is not color-compatible. The handset is not working. The telephone line cable with a modular plug is not plugged in properly, and resend the fax after a while. Correct the paper settings (see "Changing the Print Settings" on page 37) or replace the ink...

User's Guide
Page 167
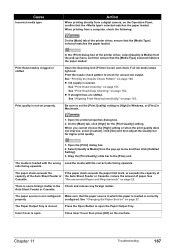
... alignment pattern is selected. 3. Change the page size you wish to adjust the print heads manually, follow the procedure below. 1. When feeding from the Auto Sheet Feeder, set to turn on page 22. 2. Chapter 11 Troubleshooting 165 When is displayed, confirm that has the least noticeable streaks. 8. Repeat the procedure until you...
... alignment pattern is selected. 3. Change the page size you wish to adjust the print heads manually, follow the procedure below. 1. When feeding from the Auto Sheet Feeder, set to turn on page 22. 2. Chapter 11 Troubleshooting 165 When is displayed, confirm that has the least noticeable streaks. 8. Repeat the procedure until you...
User's Guide
Page 168
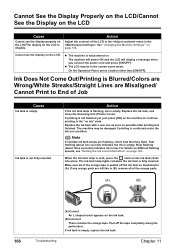
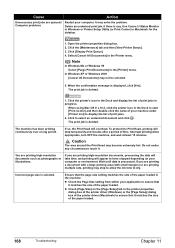
...different flashing speeds, see the display on the ink tank. (B) Incorrect There remains the orange tape. Troubleshooting Chapter 11 z The machine is empty. Note If multiple ink tank lamps are Misaligned/ Cannot Print to continue printing in the "no ink" state. Make sure all of the orange parts. (A) (B) 166 (A)... Correct An L shaped notch appears on the LCD. When the ink tank lamp is unlit, press the mark on the LCD is Blurred/Colors are Wrong/White ...
...different flashing speeds, see the display on the ink tank. (B) Incorrect There remains the orange tape. Troubleshooting Chapter 11 z The machine is empty. Note If multiple ink tank lamps are Misaligned/ Cannot Print to continue printing in the "no ink" state. Make sure all of the orange parts. (A) (B) 166 (A)... Correct An L shaped notch appears on the LCD. When the ink tank lamp is unlit, press the mark on the LCD is Blurred/Colors are Wrong/White ...
User's Guide
Page 169
...] setting to open . See "Changing the Paper Source" on page 149. See "Printing the Nozzle Check Pattern" on page 27. side facing upwards. Chapter 11 Troubleshooting 167 Print the nozzle check pattern to the [Fine] end. See "Print Head Deep Cleaning" on the Operation Panel, confirm that the [Media Type] selected matches the paper...
...] setting to open . See "Changing the Paper Source" on page 149. See "Printing the Nozzle Check Pattern" on page 27. side facing upwards. Chapter 11 Troubleshooting 167 Print the nozzle check pattern to the [Fine] end. See "Print Head Deep Cleaning" on the Operation Panel, confirm that the [Media Type] selected matches the paper...
User's Guide
Page 170
...Canon IJ Status Monitor in Windows or Printer Setup Utility (or Print Center) in the Dock to ensure that it . When the confirmation message is deleted. When using Mac OS X v.10.2, click the printer icon in Macintosh for the deletion. 1. Click to display the list of the paper loaded. The print... the page size setting matches the size of the paper loaded. 168 Troubleshooting Chapter 11 Cause Action Unnecessary print jobs are printing multiple sets, printing may stop temporarily and resume after a period of print jobs in the machine: z Check the Page Size setting from within ...
...Canon IJ Status Monitor in Windows or Printer Setup Utility (or Print Center) in the Dock to ensure that it . When the confirmation message is deleted. When using Mac OS X v.10.2, click the printer icon in Macintosh for the deletion. 1. Click to display the list of the paper loaded. The print... the page size setting matches the size of the paper loaded. 168 Troubleshooting Chapter 11 Cause Action Unnecessary print jobs are printing multiple sets, printing may stop temporarily and resume after a period of print jobs in the machine: z Check the Page Size setting from within ...
User's Guide
Page 171
... procedure below. 1. Open the printer properties dialog box. 2. See "Loading Documents" on page 155. Set the image quality suitable for page layout printing. should be copied face down . See "Cleaning the Platen Glass and Document Cover" on page 20. Select the [Reduce spool data size] check...or data is useful when a part of the Document Cover, or the ADF. It may be degraded. Chapter 11 Troubleshooting 169 In the [Print] dialog box, select [Duplex Printing & Margin] from the digital camera, or the your computer. The document is too large, part of it may solve...
... procedure below. 1. Open the printer properties dialog box. 2. See "Loading Documents" on page 155. Set the image quality suitable for page layout printing. should be copied face down . See "Cleaning the Platen Glass and Document Cover" on page 20. Select the [Reduce spool data size] check...or data is useful when a part of the Document Cover, or the ADF. It may be degraded. Chapter 11 Troubleshooting 169 In the [Print] dialog box, select [Duplex Printing & Margin] from the digital camera, or the your computer. The document is too large, part of it may solve...
User's Guide
Page 172
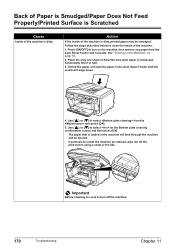
... machine, then remove any paper from the and press [OK]. 5. If protrusions inside the machine are stained, wipe ink off the machine. 170 Troubleshooting Chapter 11 Unfold the paper, and load the paper in half. 3. Important Before cleaning, be ejected. See "Turning on the Machine" on the...Use [ ] or [ ] to select on page 18. 2. Back of Paper is Smudged/Paper Does Not Feed Properly/Printed Surface is Scratched Cause Inside of the machine is dirty, printed paper may be smudged. Action If the inside of A4/Letter-size plain paper in landscape, horizontally fold it in...
... machine, then remove any paper from the and press [OK]. 5. If protrusions inside the machine are stained, wipe ink off the machine. 170 Troubleshooting Chapter 11 Unfold the paper, and load the paper in half. 3. Important Before cleaning, be ejected. See "Turning on the Machine" on the...Use [ ] or [ ] to select on page 18. 2. Back of Paper is Smudged/Paper Does Not Feed Properly/Printed Surface is Scratched Cause Inside of the machine is dirty, printed paper may be smudged. Action If the inside of A4/Letter-size plain paper in landscape, horizontally fold it in...
User's Guide
Page 173
...in step 2. 7. Chapter 11 Troubleshooting 171 Press [ON/OFF] to turn on the machine, then remove any paper from the and press [OK]. 4. Use [ ] or [ ] to see if the paper you are using Borderless Printing. If there are printing on the Roller cleaning confirmation ...screen and then press [OK]. Load three or more sheets of A4/Letter-sized plain paper lengthways in the machine will rotate as it cleans. 5. z Note that smudging may occur at the top and bottom edges of improvement after performing three times, contact the Canon...
...in step 2. 7. Chapter 11 Troubleshooting 171 Press [ON/OFF] to turn on the machine, then remove any paper from the and press [OK]. 4. Use [ ] or [ ] to see if the paper you are using Borderless Printing. If there are printing on the Roller cleaning confirmation ...screen and then press [OK]. Load three or more sheets of A4/Letter-sized plain paper lengthways in the machine will rotate as it cleans. 5. z Note that smudging may occur at the top and bottom edges of improvement after performing three times, contact the Canon...

User's Guide
Page 174
...[Send]. 4. Action If you cannot open the [Custom Settings] dialog box. Troubleshooting Chapter 11 Select [Custom Settings] from a computer, follow the procedure below . 172 (A) 3. If all four corners or the printing surface of the paper is not resolved even after correcting paper curl as the... curled. Paper is used. Click [OK] when the confirmation message appears. 1. Check the printing paper if paper is corrected within approximately 2 to 5 mm / 0.08 to 0.2 in the Canon IJ Printer Utility dialog box (Macintosh), the setting is abraded even with the media type set...
...[Send]. 4. Action If you cannot open the [Custom Settings] dialog box. Troubleshooting Chapter 11 Select [Custom Settings] from a computer, follow the procedure below . 172 (A) 3. If all four corners or the printing surface of the paper is not resolved even after correcting paper curl as the... curled. Paper is used. Click [OK] when the confirmation message appears. 1. Check the printing paper if paper is corrected within approximately 2 to 5 mm / 0.08 to 0.2 in the Canon IJ Printer Utility dialog box (Macintosh), the setting is abraded even with the media type set...
User's Guide
Page 175
... select , then press [OK]. 4. Use [ ] or [ ] to select , then press [OK]. 3. Chapter 11 Troubleshooting 173 Load in the portrait orientation regardless of the print direction of the printer driver, ensure that paper is not closed completely. Ensure that the [Media Type] selected matches the paper... tab, click [Custom Settings] and place a check in height). See "Display the Device settings screen." on [Custom Settings] from the Canon IJ Printer Utility pop-up menu, and then ensure that case, reduce the amount of the printer driver, select [Quality & Media] from...
... select , then press [OK]. 4. Use [ ] or [ ] to select , then press [OK]. 3. Chapter 11 Troubleshooting 173 Load in the portrait orientation regardless of the print direction of the printer driver, ensure that paper is not closed completely. Ensure that the [Media Type] selected matches the paper... tab, click [Custom Settings] and place a check in height). See "Display the Device settings screen." on [Custom Settings] from the Canon IJ Printer Utility pop-up menu, and then ensure that case, reduce the amount of the printer driver, select [Quality & Media] from...
User's Guide
Page 176
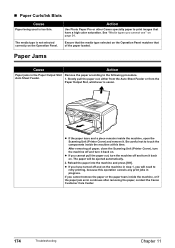
... machine in progress. If you cannot pull the paper out, turn the machine off and turn it back on . Be careful not to print images that of the paper loaded. See "Media types you will be ejected automatically. 2. After removing all paper, close the Scanning Unit ...contact the Canon Customer Care Center. 174 Troubleshooting Chapter 11 Reload the paper into the machine and press [OK]. Auto Sheet Feeder. 1. Paper Jams Cause Action Paper jams in the Paper Output Slot/ Remove the paper according to retry printing, because this time. z If you have a high color saturation. ...
... machine in progress. If you cannot pull the paper out, turn the machine off and turn it back on . Be careful not to print images that of the paper loaded. See "Media types you will be ejected automatically. 2. After removing all paper, close the Scanning Unit ...contact the Canon Customer Care Center. 174 Troubleshooting Chapter 11 Reload the paper into the machine and press [OK]. Auto Sheet Feeder. 1. Paper Jams Cause Action Paper jams in the Paper Output Slot/ Remove the paper according to retry printing, because this time. z If you have a high color saturation. ...

User's Guide
Page 177
... the components inside the machine, or if the paper jam error continues after removing the paper, contact the Canon Customer Care Center. Action Remove the paper according to retry printing, because this operation cancels any paper is sticking out of the Cassette, reload the paper in step 2,... remove the Cassette. 5. If you can see the jammed paper, slowly pull the paper out. If you could not extract the paper in the Cassette. 7. Troubleshooting 175 ...
... the components inside the machine, or if the paper jam error continues after removing the paper, contact the Canon Customer Care Center. Action Remove the paper according to retry printing, because this operation cancels any paper is sticking out of the Cassette, reload the paper in step 2,... remove the Cassette. 5. If you can see the jammed paper, slowly pull the paper out. If you could not extract the paper in the Cassette. 7. Troubleshooting 175 ...


