User's Guide
Page 3
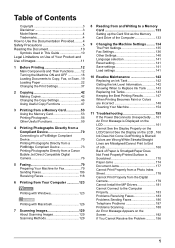
... 70 Connecting to a PictBridge Compliant Device 70 Printing Photographs Directly from a PictBridge Compliant Device 73 Printing Photographs Directly from a Canon Bubble Jet Direct Compatible Digital Camera 76 5 Faxing 79 Preparing Your Machine for Fax 79 Sending Faxes 106 Receiving Faxes 118 ... settings 141 10 Routine Maintenance 142 Replacing an Ink Tank 142 Getting the Ink Level Information 142 Knowing When to Replace Ink Tank .......... 143 Replacing Ink Tanks 143 Keeping the Best Printing Results 147 When Printing Becomes Faint or Colors are Incorrect 148 Cleaning Your Machine...
... 70 Connecting to a PictBridge Compliant Device 70 Printing Photographs Directly from a PictBridge Compliant Device 73 Printing Photographs Directly from a Canon Bubble Jet Direct Compatible Digital Camera 76 5 Faxing 79 Preparing Your Machine for Fax 79 Sending Faxes 106 Receiving Faxes 118 ... settings 141 10 Routine Maintenance 142 Replacing an Ink Tank 142 Getting the Ink Level Information 142 Knowing When to Replace Ink Tank .......... 143 Replacing Ink Tanks 143 Keeping the Best Printing Results 147 When Printing Becomes Faint or Colors are Incorrect 148 Cleaning Your Machine...
User's Guide
Page 16
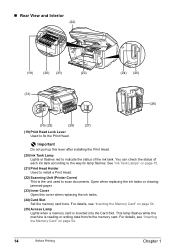
... Head. (22) Scanning Unit (Printer Cover) This is reading or writing data from/to scan documents. Important Do not pull up this cover when replacing the ink tanks. (24) Card Slot Set the memory card here. This lamp flashes while the machine is the unit used to the memory card. „ Rear...) (20) (21) (23) (31) (24) (25) (26) (30) (29) (28) (27) (19) Print Head Lock Lever Used to the way its lamp flashes. Open when replacing the ink tanks or clearing jammed paper. (23) Inner Cover Open this lever after installing the Print Head. (20...
... Head. (22) Scanning Unit (Printer Cover) This is reading or writing data from/to scan documents. Important Do not pull up this cover when replacing the ink tanks. (24) Card Slot Set the memory card here. This lamp flashes while the machine is the unit used to the memory card. „ Rear...) (20) (21) (23) (31) (24) (25) (26) (30) (29) (28) (27) (19) Print Head Lock Lever Used to the way its lamp flashes. Open when replacing the ink tanks or clearing jammed paper. (23) Inner Cover Open this lever after installing the Print Head. (20...
User's Guide
Page 124
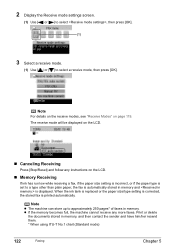
... [ ] or [ ] to approximately 250 pages* of faxes in memory. Note z The machine can store up to select a receive mode, then press [OK]. When the ink tank is replaced or the paper size/type setting is corrected, the stored fax is automatically stored in memory, and then contact the sender and have him... the documents stored in memory and is displayed. Note For details on the receive modes, see "Receive Modes" on the LCD. „ Memory Receiving If ink has run low while receiving a fax, if the paper size setting is incorrect, or if the paper type is set to a type other than plain...
... [ ] or [ ] to approximately 250 pages* of faxes in memory. Note z The machine can store up to select a receive mode, then press [OK]. When the ink tank is replaced or the paper size/type setting is corrected, the stored fax is automatically stored in memory, and then contact the sender and have him... the documents stored in memory and is displayed. Note For details on the receive modes, see "Receive Modes" on the LCD. „ Memory Receiving If ink has run low while receiving a fax, if the paper size setting is incorrect, or if the paper type is set to a type other than plain...
User's Guide
Page 144
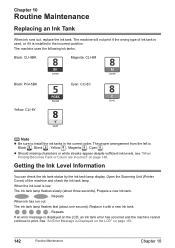
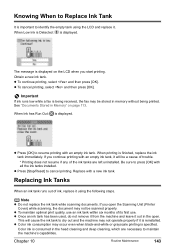
... Printing Becomes Faint or Colors are Incorrect" on the LCD, an ink tank error has occurred and the machine cannot continue to install the ink tanks in the incorrect position. Chapter 10 Routine Maintenance Replacing an Ink Tank When ink runs out, replace the ink tank. Getting the Ink Level Information You can check the ink tank status by the...
... Printing Becomes Faint or Colors are Incorrect" on the LCD, an ink tank error has occurred and the machine cannot continue to install the ink tanks in the incorrect position. Chapter 10 Routine Maintenance Replacing an Ink Tank When ink runs out, replace the ink tank. Getting the Ink Level Information You can check the ink tank status by the...
User's Guide
Page 145
... and then press [OK]. If you start printing. Note z Do not replace the ink tank while scanning documents. See "Documents Stored in the head cleaning and deep cleaning, which are left uninstalled. z Color ink consumption may not be stored in the open the Scanning Unit (Printer Cover)... while scanning, the document may occur even when black-and-white or grayscale printing is displayed. Replacing Ink Tanks When an ink tank runs out of ink, replace it out in memory...
... and then press [OK]. If you start printing. Note z Do not replace the ink tank while scanning documents. See "Documents Stored in the head cleaning and deep cleaning, which are left uninstalled. z Color ink consumption may not be stored in the open the Scanning Unit (Printer Cover)... while scanning, the document may occur even when black-and-white or grayscale printing is displayed. Replacing Ink Tanks When an ink tank runs out of ink, replace it out in memory...
User's Guide
Page 147
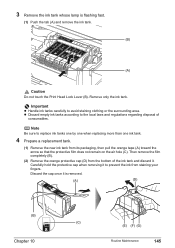
... remove the film completely (B). (2) Remove the orange protective cap (D) from the bottom of consumables. z Discard empty ink tanks according to replace ink tanks one by one when replacing more than one ink tank. 4 Prepare a replacement tank. (1) Remove the new ink tank from staining your fingers. Discard the cap once it to avoid staining clothing or the surrounding...
... remove the film completely (B). (2) Remove the orange protective cap (D) from the bottom of consumables. z Discard empty ink tanks according to replace ink tanks one by one when replacing more than one ink tank. 4 Prepare a replacement tank. (1) Remove the new ink tank from staining your fingers. Discard the cap once it to avoid staining clothing or the surrounding...

User's Guide
Page 149
... machine for a long period of a ballpoint pen or marker becomes dry and unusable if not used for a long time, print or copy in color, or perform Print Head cleaning, about once a month to hold the LCD. Do not perform any other operations until the Print Head cleaning finishes..... z When you press [ON/OFF], the Print Head is closed . When you start printing after replacing the ink tank, the machine executes Print Head cleaning automatically. Note Ensure that all the ink tanks are installed in the Print Head for high-precision printing. When unplugging the power cord, be installed...
... machine for a long period of a ballpoint pen or marker becomes dry and unusable if not used for a long time, print or copy in color, or perform Print Head cleaning, about once a month to hold the LCD. Do not perform any other operations until the Print Head cleaning finishes..... z When you press [ON/OFF], the Print Head is closed . When you start printing after replacing the ink tank, the machine executes Print Head cleaning automatically. Note Ensure that all the ink tanks are installed in the Print Head for high-precision printing. When unplugging the power cord, be installed...

User's Guide
Page 150
...(Printer Cover) and make sure that the correct ink tank color is empty or running the Print Head maintenance, align the Print Head. If the ink tank lamp is unlit, press the mark on page 142. - See "Replacing an Ink Tank" on the ink tank firmly until it clicks to clean the nozzles... in that all packaging material is inserted in the wrong position. See "Replacing Ink Tanks" on page 152 Note If Print Head Deep cleaning does not resolve the problem, contact the Canon Customer Care Center. Step 2 See "Print Head Cleaning" on page 151 If the problem remains after running...
...(Printer Cover) and make sure that the correct ink tank color is empty or running the Print Head maintenance, align the Print Head. If the ink tank lamp is unlit, press the mark on page 142. - See "Replacing an Ink Tank" on the ink tank firmly until it clicks to clean the nozzles... in that all packaging material is inserted in the wrong position. See "Replacing Ink Tanks" on page 152 Note If Print Head Deep cleaning does not resolve the problem, contact the Canon Customer Care Center. Step 2 See "Print Head Cleaning" on page 151 If the problem remains after running...

User's Guide
Page 152
See "Performing Maintenance" on this pattern. 150 Routine Maintenance Chapter 10 The nozzle check pattern is not printed correctly. Replace the relevant ink tank. (See "Replacing an Ink Tank" on page 142.) (1) (2) (1) Examine if any missing lines exist on page 149. (2) Use [ ] or [ ] to select and then press [OK]. See "Examining the Nozzle ...
See "Performing Maintenance" on this pattern. 150 Routine Maintenance Chapter 10 The nozzle check pattern is not printed correctly. Replace the relevant ink tank. (See "Replacing an Ink Tank" on page 142.) (1) (2) (1) Examine if any missing lines exist on page 149. (2) Use [ ] or [ ] to select and then press [OK]. See "Examining the Nozzle ...

User's Guide
Page 155
When one specific color only does not print, see "Replacing an Ink Tank" on page 142. (2) If the problem remains, turn on the machine. Contact the Canon Customer Care Center „ Aligning Print Head automatically If the ruled lines are two ways to turn off the machine's power for aligning the Print ...
When one specific color only does not print, see "Replacing an Ink Tank" on page 142. (2) If the problem remains, turn on the machine. Contact the Canon Customer Care Center „ Aligning Print Head automatically If the ruled lines are two ways to turn off the machine's power for aligning the Print ...
User's Guide
Page 163
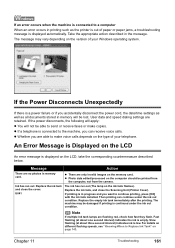
... not be lost. Message Action There are able to make copies. Replace the ink tank, and close the cover. Note If multiple ink tank lamps are retained. Fast flashing (at about one second interval) indicates the ink is displayed automatically. If an error occurs when the machine is connected...such as all documents stored in memory card. User data and speed dialing settings are flashing red, check how fast they flash. Replace the empty ink tank immediately after the printing. z Photo data edited/processed on the type of your Windows operating system. The message may be...
... not be lost. Message Action There are able to make copies. Replace the ink tank, and close the cover. Note If multiple ink tank lamps are retained. Fast flashing (at about one second interval) indicates the ink is displayed automatically. If an error occurs when the machine is connected...such as all documents stored in memory card. User data and speed dialing settings are flashing red, check how fast they flash. Replace the empty ink tank immediately after the printing. z Photo data edited/processed on the type of your Windows operating system. The message may be...

User's Guide
Page 164
... same color are as follows: z The ink tank may be installed properly (The lamp on the ink tank is open or close it before pressing [OK] on the ink tank is installed. Install the appropriate ink tank. Contact the Canon Customer Care Center. Do not open . See "Replacing an Ink Tank" on page 142. An ink tank that the ink...
... same color are as follows: z The ink tank may be installed properly (The lamp on the ink tank is open or close it before pressing [OK] on the ink tank is installed. Install the appropriate ink tank. Contact the Canon Customer Care Center. Do not open . See "Replacing an Ink Tank" on page 142. An ink tank that the ink...
User's Guide
Page 166
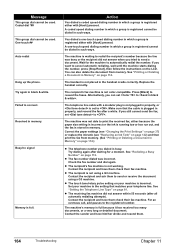
...], then follow the instructions on page 112. Correct the paper settings (see "Changing the Print Settings" on page 37) or replace the ink tank (see "Replacing an Ink Tank" on page 142) and then print the fax from memory. Try dialing again after all automatic redialing attempts). z The recipient...and have him/her divide and resend them check their fax machine. Action You dialed a coded speed dialing number in which a group is not color-compatible. See "Redialing a Busy Number" on the LCD. Contact the sender and have them . 164 Troubleshooting Chapter 11 A coded speed dialing...
...], then follow the instructions on page 112. Correct the paper settings (see "Changing the Print Settings" on page 37) or replace the ink tank (see "Replacing an Ink Tank" on page 142) and then print the fax from memory. Try dialing again after all automatic redialing attempts). z The recipient...and have him/her divide and resend them check their fax machine. Action You dialed a coded speed dialing number in which a group is not color-compatible. See "Redialing a Busy Number" on the LCD. Contact the sender and have them . 164 Troubleshooting Chapter 11 A coded speed dialing...
User's Guide
Page 168
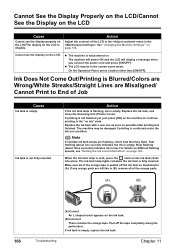
...11 z The LCD may be in (A). Action If the ink tank lamp is flashing, ink is empty, replace the ink tank. Replace the ink tank with a new one second) indicates the ink is peeled off the tape completely along the perforation. If ink tank is empty. The machine may be damaged if printing ...see the display on the machine to End of the orange tape is empty. Cannot see "Getting the Ink Level Information" on . Ink Does Not Come Out/Printing is Blurred/Colors are Wrong/White Streaks/Straight Lines are Misaligned/ Cannot Print to continue printing in the . If any...
...11 z The LCD may be in (A). Action If the ink tank lamp is flashing, ink is empty, replace the ink tank. Replace the ink tank with a new one second) indicates the ink is peeled off the tape completely along the perforation. If ink tank is empty. The machine may be damaged if printing ...see the display on the machine to End of the orange tape is empty. Cannot see "Getting the Ink Level Information" on . Ink Does Not Come Out/Printing is Blurred/Colors are Wrong/White Streaks/Straight Lines are Misaligned/ Cannot Print to continue printing in the . If any...
User's Guide
Page 182
... of the same color are not installed in the display on your camera with this tank is continued under the ink out condition. See "Replacing an Ink Tank" on page 142. If printing is in progress and you are recommended to contact the Canon Customer Care Center ...-in this machine. See "Replacing an Ink Tank" on page 142. 180 Troubleshooting Chapter 11 See "Replacing an Ink Tank" on page 142. Contact the Canon Customer Care Center. Install the appropriate ink tank. When the ink tank lamp flashes fast (about one second): z The ink has run out. For details...
... of the same color are not installed in the display on your camera with this tank is continued under the ink out condition. See "Replacing an Ink Tank" on page 142. If printing is in progress and you are recommended to contact the Canon Customer Care Center ...-in this machine. See "Replacing an Ink Tank" on page 142. 180 Troubleshooting Chapter 11 See "Replacing an Ink Tank" on page 142. Contact the Canon Customer Care Center. Install the appropriate ink tank. When the ink tank lamp flashes fast (about one second): z The ink has run out. For details...
User's Guide
Page 183
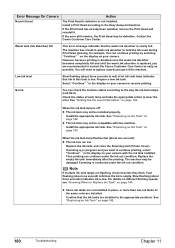
...for at least 5 seconds, and then release it. Click [Cancel] on page 142. Check the cable connection. 7. Troubleshooting 181 Canon shall not be liable for detecting the remaining ink level. Disconnect the cable between the machine and the camera, turn on the [Welcome] screen, then remove the CD-ROM. 5....including anti-virus software) are memorized. * This operation will release the function for any machine malfunction or damage caused by refilled ink tanks. Replace the ink tank. Error Message On Camera Ink error/No ink Action The ink tank that was once empty is installed.
...for at least 5 seconds, and then release it. Click [Cancel] on page 142. Check the cable connection. 7. Troubleshooting 181 Canon shall not be liable for detecting the remaining ink level. Disconnect the cable between the machine and the camera, turn on the [Welcome] screen, then remove the CD-ROM. 5....including anti-virus software) are memorized. * This operation will release the function for any machine malfunction or damage caused by refilled ink tanks. Replace the ink tank. Error Message On Camera Ink error/No ink Action The ink tank that was once empty is installed.

User's Guide
Page 187
..., , , *1, or . See "Receive Modes" on page 140. The image quality of the LCD is set to . Chapter 11 Troubleshooting 185 Replace the ink tank (see "Replacing an Ink Tank" on page 142) and print the fax from memory. (See "Printing or Deleting a Document in Memory" on page 114.) Note Faxes received... is replaced. *1 LGL may not be no automatic switching between Voice and Fax Calls Cause The receive mode displayed on page 139. If you want to receive faxes automatically, which means not having to do anything when you pick up the handset and either press [Color] or [Black], ...
..., , , *1, or . See "Receive Modes" on page 140. The image quality of the LCD is set to . Chapter 11 Troubleshooting 185 Replace the ink tank (see "Replacing an Ink Tank" on page 142) and print the fax from memory. (See "Printing or Deleting a Document in Memory" on page 114.) Note Faxes received... is replaced. *1 LGL may not be no automatic switching between Voice and Fax Calls Cause The receive mode displayed on page 139. If you want to receive faxes automatically, which means not having to do anything when you pick up the handset and either press [Color] or [Black], ...
User's Guide
Page 196
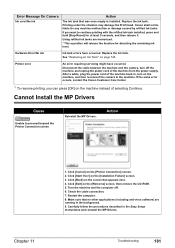
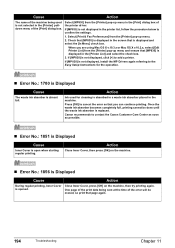
...the Easy Setup Instructions for cleaning is not displayed, install the MP Drivers again referring to cancel the error so that [MP830] is replaced. Once the waste ink absorber becomes completely full, printing cannot be erased, so print that is opened. Action Close Inner Cover, then press [OK...; Error No.: 1851 is Displayed Cause Inner Cover is almost full. Canon recommends to add a printer. Select [MP830] from the [Printer] pop-up menu in the [Printer List] and select the check box. 3. Check that [MP830] is displayed in the [Printer] pulldown menu of the [Print] dialog...
...the Easy Setup Instructions for cleaning is not displayed, install the MP Drivers again referring to cancel the error so that [MP830] is replaced. Once the waste ink absorber becomes completely full, printing cannot be erased, so print that is opened. Action Close Inner Cover, then press [OK...; Error No.: 1851 is Displayed Cause Inner Cover is almost full. Canon recommends to add a printer. Select [MP830] from the [Printer] pop-up menu in the [Printer List] and select the check box. 3. Check that [MP830] is displayed in the [Printer] pulldown menu of the [Print] dialog...
User's Guide
Page 211
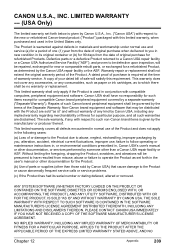
...A dated proof of parts or supplies (other than a Canon USA repair facility or ASF. Repairs of sale will be presumed to have no warranty or replacement. A copy of your dated bill of such Canon brand peripheral equipment shall be distributed with respect to which ...or comparable rebuilt parts, or exchanged for compatible Canon brand peripheral equipment covered by someone other documentation, or services performed by a separate warranty ("Separate Warranty"). The sole warranty, if any consumables, such as paper or ink cartridges, as determined by the manufacturer or ...
...A dated proof of parts or supplies (other than a Canon USA repair facility or ASF. Repairs of sale will be presumed to have no warranty or replacement. A copy of your dated bill of such Canon brand peripheral equipment shall be distributed with respect to which ...or comparable rebuilt parts, or exchanged for compatible Canon brand peripheral equipment covered by someone other documentation, or services performed by a separate warranty ("Separate Warranty"). The sole warranty, if any consumables, such as paper or ink cartridges, as determined by the manufacturer or ...
Service Manual
Page 18
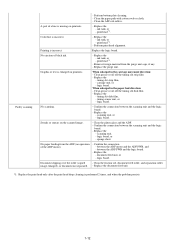
Replace the - Color hue is enlarged on printouts. Remove foreign material from the ADF (no operation of black ink. - logic board. timing sensor unit, or - scanning unit, - sponge sheet. Perform bottom plate cleaning. - Clean the paper path with cotton swab or cloth. - print head*1. Perform print head alignment. Graphic or text is incorrect. - Replace the...
Replace the - Color hue is enlarged on printouts. Remove foreign material from the ADF (no operation of black ink. - logic board. timing sensor unit, or - scanning unit, - sponge sheet. Perform bottom plate cleaning. - Clean the paper path with cotton swab or cloth. - print head*1. Perform print head alignment. Graphic or text is incorrect. - Replace the...


