MP500 User's Guide
Page 3
... Used in This Guide 11 Legal Limitations on Use of Your Product and Use of Images 12 1 Before Printing 13 Main Components and Their Functions........13 Turning the Machine ON and OFF 19 Document Handling 20 Loading Paper 21 Changing the Print Settings 35 2 Copying 39 Making Copies 39 Changing the Copy Settings 41 Using Useful Copy Functions 41 3 Printing from a Memory Card 48 Using the Memory Card 48 Printing Photograph 51 Other Useful Functions 54 4 Printing Photographs Directly from a Compliant Device 63 Connecting to a PictBridge Compliant Device 63 Printing...
... Used in This Guide 11 Legal Limitations on Use of Your Product and Use of Images 12 1 Before Printing 13 Main Components and Their Functions........13 Turning the Machine ON and OFF 19 Document Handling 20 Loading Paper 21 Changing the Print Settings 35 2 Copying 39 Making Copies 39 Changing the Copy Settings 41 Using Useful Copy Functions 41 3 Printing from a Memory Card 48 Using the Memory Card 48 Printing Photograph 51 Other Useful Functions 54 4 Printing Photographs Directly from a Compliant Device 63 Connecting to a PictBridge Compliant Device 63 Printing...
MP500 User's Guide
Page 16
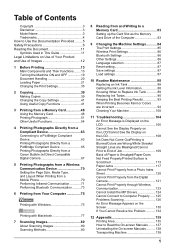
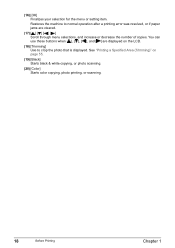
... Bluetooth User's Guide. *The Bluetooth unit is not available to some regions due to be used regularly here. Paper feeds automatically, one sheet at a time. *Legal-sized paper and 2.13" x 3.39"/ 54.0 x 86.0 mm size paper are output to change the settings or operate the machine. Pull out the extension before printing. (10) Open Button Press this port. See "Operation Panel Name and Functions" on page 17. (13) Cassette Load paper to be processed. (12) Operation Panel Used to this tray. See "Printing...
... Bluetooth User's Guide. *The Bluetooth unit is not available to some regions due to be used regularly here. Paper feeds automatically, one sheet at a time. *Legal-sized paper and 2.13" x 3.39"/ 54.0 x 86.0 mm size paper are output to change the settings or operate the machine. Pull out the extension before printing. (10) Open Button Press this port. See "Operation Panel Name and Functions" on page 17. (13) Cassette Load paper to be processed. (12) Operation Panel Used to this tray. See "Printing...
MP500 User's Guide
Page 19
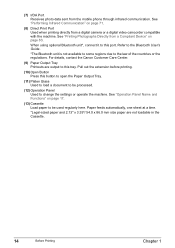
...] Turns the machine ON and OFF. Flashes when the machine is connected to a computer. (Refer to the Scan Guide.) (4) [MEMORY CARD] Switches the machine to Memory Card mode. (5) Alarm Lamp Flashes orange, when an error occurs, or when paper or ink has run out. (6) LCD (Liquid Crystal Display) Displays messages, menu selections, and the operation status. (7) [Menu] Used to display menus. (8) [Settings] Use to Scan mode. Chapter 1 Before Printing 17 This button is used when the machine is turned on page 54. (14) [Photo Index Sheet] Switches to...
...] Turns the machine ON and OFF. Flashes when the machine is connected to a computer. (Refer to the Scan Guide.) (4) [MEMORY CARD] Switches the machine to Memory Card mode. (5) Alarm Lamp Flashes orange, when an error occurs, or when paper or ink has run out. (6) LCD (Liquid Crystal Display) Displays messages, menu selections, and the operation status. (7) [Menu] Used to display menus. (8) [Settings] Use to Scan mode. Chapter 1 Before Printing 17 This button is used when the machine is turned on page 54. (14) [Photo Index Sheet] Switches to...
MP500 User's Guide
Page 20
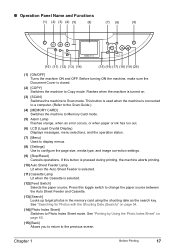
You can use these buttons when and [ ] are cleared. (17 Scroll through menu selections, and increase or decrease the number of copies. Restores the machine to crop the photo that is displayed. See "Printing a Specified Area (Trimming)" on the LCD. (18) [Trimming] Use to normal operation after a printing error was resolved, or if paper jams are displayed on page 55. (19) [Black] Starts black & white copying, or photo scanning. (20) [Color] Starts color copying, photo printing, or scanning. 18 Before Printing Chapter 1 (16) [OK...
You can use these buttons when and [ ] are cleared. (17 Scroll through menu selections, and increase or decrease the number of copies. Restores the machine to crop the photo that is displayed. See "Printing a Specified Area (Trimming)" on the LCD. (18) [Trimming] Use to normal operation after a printing error was resolved, or if paper jams are displayed on page 55. (19) [Black] Starts black & white copying, or photo scanning. (20) [Color] Starts color copying, photo printing, or scanning. 18 Before Printing Chapter 1 (16) [OK...
MP500 User's Guide
Page 29
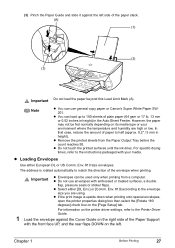
... paper may not be used only when printing from the Paper Output Tray before the count reaches 50. The address is upside down when printing onto special envelopes, open the printer properties dialog box then select the [Rotate 180 degrees] check box on the [Page Setup] tab. z Do not use general copy paper or Canon's Super White Paper SW201. z Remove the printed sheets from a computer. Env. #10 size envelopes. Important z Envelopes can use envelopes with embossed or treated surfaces, a double...
... paper may not be used only when printing from the Paper Output Tray before the count reaches 50. The address is upside down when printing onto special envelopes, open the printer properties dialog box then select the [Rotate 180 degrees] check box on the [Page Setup] tab. z Do not use general copy paper or Canon's Super White Paper SW201. z Remove the printed sheets from a computer. Env. #10 size envelopes. Important z Envelopes can use envelopes with embossed or treated surfaces, a double...

MP500 User's Guide
Page 37
... page 21. Chapter 1 Before Printing 35 Loading paper in landscape orientation (B) can cause the paper to be specified in portrait orientation (A). as page size, media type, bordered or borderless print, etc. See "Recommended Paper and Requirements" on page 36. 1 Display the Settings screen. (1) Press [Settings]. The Settings screen is displayed. 2 Select the Setting tab. (1) Use [ ] or [ ] to . Important Always load paper in the Settings screen. „ To Change Print Settings You can be jammed. (A) (B) Note We recommend using genuine Canon photo...
... page 21. Chapter 1 Before Printing 35 Loading paper in landscape orientation (B) can cause the paper to be specified in portrait orientation (A). as page size, media type, bordered or borderless print, etc. See "Recommended Paper and Requirements" on page 36. 1 Display the Settings screen. (1) Press [Settings]. The Settings screen is displayed. 2 Select the Setting tab. (1) Use [ ] or [ ] to . Important Always load paper in the Settings screen. „ To Change Print Settings You can be jammed. (A) (B) Note We recommend using genuine Canon photo...
MP500 User's Guide
Page 44
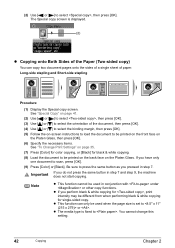
... type is set to scan, press [OK]. (9) Press [Color] or [Black]. Long-side stapling and Short-side stapling Procedure: (1) Display the Special copy screen. (2) Use [ ] or [ ] to . Note z This function cannot be used in step 7 and step 9, the machine does not start copying. You cannot change this setting. 42 Copying Chapter 2 Important If you perform black & white copying for black & white copying. (8) Load the document to select the orientation of paper. z This function can copy two document pages onto the sides of a single sheet...
... type is set to scan, press [OK]. (9) Press [Color] or [Black]. Long-side stapling and Short-side stapling Procedure: (1) Display the Special copy screen. (2) Use [ ] or [ ] to . Note z This function cannot be used in step 7 and step 9, the machine does not start copying. You cannot change this setting. 42 Copying Chapter 2 Important If you perform black & white copying for black & white copying. (8) Load the document to select the orientation of paper. z This function can copy two document pages onto the sides of a single sheet...

MP500 User's Guide
Page 64
... machine may take some time before printing with the arrow mark (alignment mark) at the lower right corner of the Platen Glass. Note z To cancel printing, press [Stop/Reset]. The Photo Index Sheet is printing. Note z When printing images using subsequent Photo Index Sheets, repeat the procedure from a Memory Card Chapter 3 z If the memory card has been removed and then reinserted before printing starts. 62 Printing from step 5. See "Cleaning the Platen Glass and Document Cover" on page...
... machine may take some time before printing with the arrow mark (alignment mark) at the lower right corner of the Platen Glass. Note z To cancel printing, press [Stop/Reset]. The Photo Index Sheet is printing. Note z When printing images using subsequent Photo Index Sheets, repeat the procedure from a Memory Card Chapter 3 z If the memory card has been removed and then reinserted before printing starts. 62 Printing from step 5. See "Cleaning the Platen Glass and Document Cover" on page...

MP500 User's Guide
Page 79
Note z To confirm the page size, click on page 19. If it does not match the document size set by simply pressing [Stop/Reset] on Canon IJ Status Monitor to view the Printer Driver Guide. [Instructions] is only displayed when the Printer Driver Guide is installed. The machine starts printing. z Click [Cancel Printing] on the machine. See "Turning on the Machine" on the [Page Setup] tab. z For details about other printer driver functions, click [Instructions] or [Help] to stop printing. For details, refer to the Printer Driver Guide. For a detailed description...
Note z To confirm the page size, click on page 19. If it does not match the document size set by simply pressing [Stop/Reset] on Canon IJ Status Monitor to view the Printer Driver Guide. [Instructions] is only displayed when the Printer Driver Guide is installed. The machine starts printing. z Click [Cancel Printing] on the machine. See "Turning on the Machine" on the [Page Setup] tab. z For details about other printer driver functions, click [Instructions] or [Help] to stop printing. For details, refer to the Printer Driver Guide. For a detailed description...
MP500 User's Guide
Page 81
... Type] you to confirm the status of the [Paper Source] settings, refer to view the Printer Driver Guide. Note Double-clicking the name of your machine in the [Printer list] of the [Printer Setup Utility] (When using Mac OS X v.10.2, double-clicking the name of your machine in progress, select the desired document, then click [Delete]. For a detailed description of the print job(s). z Clicking [Preview] displays a preview screen that prompts you have a preview function. 7 Print the document...
... Type] you to confirm the status of the [Paper Source] settings, refer to view the Printer Driver Guide. Note Double-clicking the name of your machine in the [Printer list] of the [Printer Setup Utility] (When using Mac OS X v.10.2, double-clicking the name of your machine in progress, select the desired document, then click [Delete]. For a detailed description of the print job(s). z Clicking [Preview] displays a preview screen that prompts you have a preview function. 7 Print the document...
MP500 User's Guide
Page 106
... Screen" on page 130 z "Service Error 5100 is not enough memory." message is displayed" on page 129 z "Scanned image not displayed properly" on page 129 z "Trouble scanning with MP Navigator" on page 129 z "Image position and size incorrect when scanning from the Digital Camera" on page 121 z "Cannot Print Properly through Wireless Communication" on page 123 z "Cannot Install the MP Drivers" on page 124 z "Cannot Connect to Computer Properly" on page 125 z "Printing Speed is Slow / USB 2.0 Hi-Speed Connection Does Not Work...
... Screen" on page 130 z "Service Error 5100 is not enough memory." message is displayed" on page 129 z "Scanned image not displayed properly" on page 129 z "Trouble scanning with MP Navigator" on page 129 z "Image position and size incorrect when scanning from the Digital Camera" on page 121 z "Cannot Print Properly through Wireless Communication" on page 123 z "Cannot Install the MP Drivers" on page 124 z "Cannot Connect to Computer Properly" on page 125 z "Printing Speed is Slow / USB 2.0 Hi-Speed Connection Does Not Work...
MP500 User's Guide
Page 123
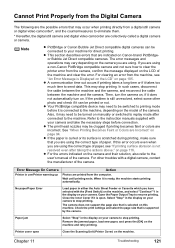
... connection. Close the Inner Cover if it can be switched to the user's manual of the machine and clear the error. Check the print settings and select the page size that you are using . Remove the jammed paper, load new paper, and press the [OK] on the camera you are printed from the camera, confirm the message displayed on the model of paper. This may need to the machine. If the problem is still unresolved, select some other troubles...
... connection. Close the Inner Cover if it can be switched to the user's manual of the machine and clear the error. Check the print settings and select the page size that you are using . Remove the jammed paper, load new paper, and press the [OK] on the camera you are printed from the camera, confirm the message displayed on the model of paper. This may need to the machine. If the problem is still unresolved, select some other troubles...
MP500 User's Guide
Page 130
... enabled in the [Image Settings] section of the Advanced Mode of ScanGear MP. 128 Troubleshooting Chapter 11 To print, set the Output resolution to change the machine's settings, or the machine itself may have engaged in the [Image Settings] section of the Advanced Mode of ScanGear MP. Set [Reduce Dust and Scratches], [Fading Correction], and [Descreen] to a value such as a photo print, of if you click the Auto crop button...
... enabled in the [Image Settings] section of the Advanced Mode of ScanGear MP. 128 Troubleshooting Chapter 11 To print, set the Output resolution to change the machine's settings, or the machine itself may have engaged in the [Image Settings] section of the Advanced Mode of ScanGear MP. Set [Reduce Dust and Scratches], [Fading Correction], and [Descreen] to a value such as a photo print, of if you click the Auto crop button...
MP500 User's Guide
Page 132
... Troubleshooting Chapter 11 Action Ensure that the paper source (the Auto Sheet Feeder or Cassette) is indicated. For details on page 105. Open the [File] menu and select [Properties]. 4. For more information, refer to the machine. Printer port setting does not match the interface connected to the Scan Guide. If the port setting is Displayed on the LCD" on how to resolve the error, refer to "An Error Message is not correct, change...
... Troubleshooting Chapter 11 Action Ensure that the paper source (the Auto Sheet Feeder or Cassette) is indicated. For details on page 105. Open the [File] menu and select [Properties]. 4. For more information, refer to the machine. Printer port setting does not match the interface connected to the Scan Guide. If the port setting is Displayed on the LCD" on how to resolve the error, refer to "An Error Message is not correct, change...

MP500 User's Guide
Page 135
... device or select Play mode manually after connecting the device to select a print mode compliant with this machine. on page 107. „ For Windows Users Cause The [Instructions] is a possibility that you may also have to the machine. Set the "Setup CD-ROM" in your computer and install the onscreen manuals (instruction manuals). Set the "Setup CDROM" in your computer and install the on -screen manuals (instruction manuals) are not installed. The button for connection referring to turn on the printer driver screen. Scan Guide...
... device or select Play mode manually after connecting the device to select a print mode compliant with this machine. on page 107. „ For Windows Users Cause The [Instructions] is a possibility that you may also have to the machine. Set the "Setup CD-ROM" in your computer and install the onscreen manuals (instruction manuals). Set the "Setup CDROM" in your computer and install the on -screen manuals (instruction manuals) are not installed. The button for connection referring to turn on the printer driver screen. Scan Guide...

MP500 User's Guide
Page 139
... Install" to be displayed properly depending on your operating system. z Browser: Help Viewer Note The on-screen manual may not be viewed on your system up to date. We recommend that is not mentioned in this document, troubleshooting, or usage of the application softwares supplied with the MP driver and application softwares. Chapter 12 Appendix 137 You can install the on-screen manuals using the Setup CD...
... Install" to be displayed properly depending on your operating system. z Browser: Help Viewer Note The on-screen manual may not be viewed on your system up to date. We recommend that is not mentioned in this document, troubleshooting, or usage of the application softwares supplied with the MP driver and application softwares. Chapter 12 Appendix 137 You can install the on-screen manuals using the Setup CD...
MP500 User's Guide
Page 141
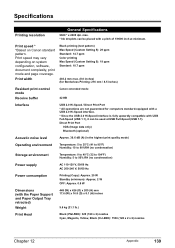
...) Resident print control mode Receive buffer Canon extended mode 42 KB Interface USB 2.0 Hi-Speed / Direct Print Port * All operations are not guaranteed for computers standard-equipped with a USB 2.0 Hi-Speed interface. * Since the USB 2.0 Hi-Speed interface is fully upwardly compatible with a pitch of 1/9600 inch at USB Full-Speed (USB 1.1). Direct Print Port IrDA (Image data only) Bluetooth (optional) Acoustic noise level Approx. 36.6 dB (A) (in the highest print quality mode) Operating environment Temperature...
...) Resident print control mode Receive buffer Canon extended mode 42 KB Interface USB 2.0 Hi-Speed / Direct Print Port * All operations are not guaranteed for computers standard-equipped with a USB 2.0 Hi-Speed interface. * Since the USB 2.0 Hi-Speed interface is fully upwardly compatible with a pitch of 1/9600 inch at USB Full-Speed (USB 1.1). Direct Print Port IrDA (Image data only) Bluetooth (optional) Acoustic noise level Approx. 36.6 dB (A) (in the highest print quality mode) Operating environment Temperature...
MP500 User's Guide
Page 144
... the USB 2.0 Hi-Speed interface is shared online. Photo Optimizer PRO - Fit-to date. 142 Appendix Chapter 12 Reverse Order Printing (supported with pre-installed USB 2.0 port. z Browser: Help Viewer * The on-screen manual may not be used at USB Full-Speed (USB 1.1). z Available hard-disk space Windows XP/Windows 2000/Windows Me/Windows 98: 650 MB z Canon IJ Status Monitor cannot be displayed properly depending on your operating system. Manual Duplex Printing - z USB interface z USB 2.0 Hi-Speed performance requires Mac OS X version...
... the USB 2.0 Hi-Speed interface is shared online. Photo Optimizer PRO - Fit-to date. 142 Appendix Chapter 12 Reverse Order Printing (supported with pre-installed USB 2.0 port. z Browser: Help Viewer * The on-screen manual may not be used at USB Full-Speed (USB 1.1). z Available hard-disk space Windows XP/Windows 2000/Windows Me/Windows 98: 650 MB z Canon IJ Status Monitor cannot be displayed properly depending on your operating system. Manual Duplex Printing - z USB interface z USB 2.0 Hi-Speed performance requires Mac OS X version...

MP500 Easy Setup Instructions
Page 1
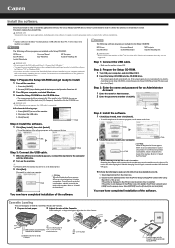
... Print Head. (1) Remove the print head from its lamp lights red. Specifications are connecting the machine to touch the buttons on the Operation Panel. 4 Align the Print Head from the ink tank. PRINTED IN THAILAND Lift the Scanning Unit (Printer Cover). Touch only the lock lever! Be careful not to Step 2, "Install the Print Head." 2 Install the Print Head. 1 Open the Paper Output Tray. (1) Press the Open Button. Lower the lock lever carefully and press it down the serial number located...
... Print Head. (1) Remove the print head from its lamp lights red. Specifications are connecting the machine to touch the buttons on the Operation Panel. 4 Align the Print Head from the ink tank. PRINTED IN THAILAND Lift the Scanning Unit (Printer Cover). Touch only the lock lever! Be careful not to Step 2, "Install the Print Head." 2 Install the Print Head. 1 Open the Paper Output Tray. (1) Press the Open Button. Lower the lock lever carefully and press it down the serial number located...
MP500 Easy Setup Instructions
Page 2
... USB cable. 2 Turn on screen instructions to a computer. Select [Applications] from the [Product] list and click [Add]. If the printer is installed. Credit-card-size (2) Remove the Cover of the machine. Computer security programs can load paper in again, or turn off the machine. 1. Step 1: Connect the USB cable. • Make sure the machine is not included. Enter Click Step 4: Install the software. 1 Click [Easy Install], then click [Install]. • To read descriptions of the software programs, set as an administrator or have administrative...
... USB cable. 2 Turn on screen instructions to a computer. Select [Applications] from the [Product] list and click [Add]. If the printer is installed. Credit-card-size (2) Remove the Cover of the machine. Computer security programs can load paper in again, or turn off the machine. 1. Step 1: Connect the USB cable. • Make sure the machine is not included. Enter Click Step 4: Install the software. 1 Click [Easy Install], then click [Install]. • To read descriptions of the software programs, set as an administrator or have administrative...


