MP495 series Getting Started
Page 66
...Vista or Windows XP pre-installed. • Windows: Uninstall software bundled with the Canon inkjet printer before upgrading from Mac OS X v.10.5 or lower to install Easy-WebPrint EX. About Consumables Consumables (ink tanks / FINE Cartridges) are subject to Windows 7, then, install the bundled software .... Since the Hi-Speed USB interface is fully upwardly compatible with the Easy-Photo Print EX under the following operating system: - Canon FINE Cartridge Total 1472 nozzles (BK 320 nozzles, C/M/Y each 16 bit/8 bit) Network Specifications Communication protocol TCP/IP Wireless LAN ...
...Vista or Windows XP pre-installed. • Windows: Uninstall software bundled with the Canon inkjet printer before upgrading from Mac OS X v.10.5 or lower to install Easy-WebPrint EX. About Consumables Consumables (ink tanks / FINE Cartridges) are subject to Windows 7, then, install the bundled software .... Since the Hi-Speed USB interface is fully upwardly compatible with the Easy-Photo Print EX under the following operating system: - Canon FINE Cartridge Total 1472 nozzles (BK 320 nozzles, C/M/Y each 16 bit/8 bit) Network Specifications Communication protocol TCP/IP Wireless LAN ...
Manual
Page 6
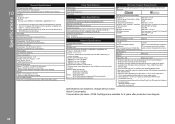
... Locking Covers Lock the FINE Cartridges into the right slot ( ). (14) FINE Cartridges (Ink Cartridges) A replaceable cartridge that is integrated with the Document Cover closed. (16) Scanning Unit Support Holds the Scanning Unit (Cover) while it to the printed ... View Page 6 of the machine. The Color FINE Cartridge should be installed into the left slot ( ) and the Black FINE Cartridge should be splattered with ink. Important The area (A) indicated in the figure below may not print properly if you touch it with Print Head and...
... Locking Covers Lock the FINE Cartridges into the right slot ( ). (14) FINE Cartridges (Ink Cartridges) A replaceable cartridge that is integrated with the Document Cover closed. (16) Scanning Unit Support Holds the Scanning Unit (Cover) while it to the printed ... View Page 6 of the machine. The Color FINE Cartridge should be installed into the left slot ( ) and the Black FINE Cartridge should be splattered with ink. Important The area (A) indicated in the figure below may not print properly if you touch it with Print Head and...
Manual
Page 7
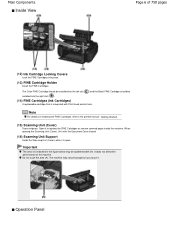
... Diode) Displays the number of copies, Maintenance code, or operational status such as an error code. (3) [+] button Specifies the number of copies. (4) Ink lamps Light or flash orange when ink runs out, etc. If the power plug is disconnected from the wall outlet while the POWER lamp is not protected. Before turning...
... Diode) Displays the number of copies, Maintenance code, or operational status such as an error code. (3) [+] button Specifies the number of copies. (4) Ink lamps Light or flash orange when ink runs out, etc. If the power plug is disconnected from the wall outlet while the POWER lamp is not protected. Before turning...
Manual
Page 8
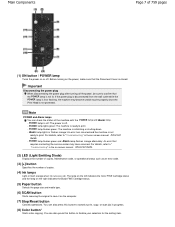
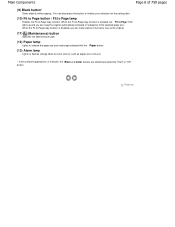
... size and media type selected with the Paper button. (13) Alarm lamp Lights or flashes orange when an error occurs, such as paper-out or ink-out. * In the software applications or manuals, the Black and Color buttons are collectively called the "Start" or "OK" button. Main Components Page 8 of 759...
... size and media type selected with the Paper button. (13) Alarm lamp Lights or flashes orange when an error occurs, such as paper-out or ink-out. * In the software applications or manuals, the Black and Color buttons are collectively called the "Start" or "OK" button. Main Components Page 8 of 759...
Manual
Page 35
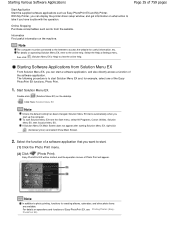
... the operation. Select the function of the software application. Starting Various Software Applications Start Application Start the supplied software applications such as ink from the Start menu, select All Programs, Canon Utilities, Solution Menu EX, then Solution Menu EX. With My Printer, you can display the printer driver setup window, and get...
... the operation. Select the function of the software application. Starting Various Software Applications Start Application Start the supplied software applications such as ink from the Start menu, select All Programs, Canon Utilities, Solution Menu EX, then Solution Menu EX. With My Printer, you can display the printer driver setup window, and get...
Manual
Page 52
... the Print Head Cleaning the Print Head Deeply Aligning the Print Head Replacing a FINE Cartridge Replacing Procedure Checking the Ink Status Cleaning the Machine Cleaning the Paper Feed Roller Cleaning the Inside of ink, or to take an action when paper does not feed properly. Routine Maintenance Page 52 of 759 pages...
... the Print Head Cleaning the Print Head Deeply Aligning the Print Head Replacing a FINE Cartridge Replacing Procedure Checking the Ink Status Cleaning the Machine Cleaning the Paper Feed Roller Cleaning the Inside of ink, or to take an action when paper does not feed properly. Routine Maintenance Page 52 of 759 pages...
Manual
Page 53
... results are probably clogged. Important Do not rinse or wipe the FINE Cartridges. Note Before performing maintenance Check if ink remains in the printer driver settings may improve print quality. See Checking the Ink Status. If the Alarm lamp lights or flashes orange, refer to print the nozzle check pattern, check the...
... results are probably clogged. Important Do not rinse or wipe the FINE Cartridges. Note Before performing maintenance Check if ink remains in the printer driver settings may improve print quality. See Checking the Ink Status. If the Alarm lamp lights or flashes orange, refer to print the nozzle check pattern, check the...
Manual
Page 55
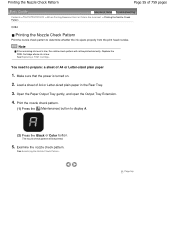
You need to determine whether the ink ejects properly from the print head nozzles. Open the Paper Output Tray gently, and open the Output Tray Extension. 4. Printing the Nozzle Check Pattern Page ... low. Print the nozzle check pattern. (1) Press the (Maintenance) button to display A. (2) Press the Black or Color button. Page top Replace the FINE Cartridge whose ink is turned on. 2. Load a sheet of A4 or Letter-sized plain paper 1. The nozzle check pattern will not be printed. 5. See Examining the Nozzle Check...
You need to determine whether the ink ejects properly from the print head nozzles. Open the Paper Output Tray gently, and open the Output Tray Extension. 4. Printing the Nozzle Check Pattern Page ... low. Print the nozzle check pattern. (1) Press the (Maintenance) button to display A. (2) Press the Black or Color button. Page top Replace the FINE Cartridge whose ink is turned on. 2. Load a sheet of A4 or Letter-sized plain paper 1. The nozzle check pattern will not be printed. 5. See Examining the Nozzle Check...
Manual
Page 57
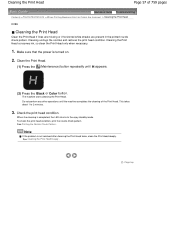
.... Do not perform any other operations until H appears. (2) Press the Black or Color button. See Printing the Nozzle Check Pattern. Cleaning the Print Head consumes ink, so clean the Print Head only when necessary. 1. See Cleaning the Print Head Deeply . This takes about 1 to the copy standby mode. Page top Clean...
.... Do not perform any other operations until H appears. (2) Press the Black or Color button. See Printing the Nozzle Check Pattern. Cleaning the Print Head consumes ink, so clean the Print Head only when necessary. 1. See Cleaning the Print Head Deeply . This takes about 1 to the copy standby mode. Page top Clean...
Manual
Page 58
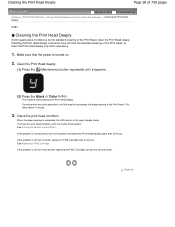
... the power and clean the Print Head deeply again after replacing the FINE Cartridge, contact the service center. Cleaning the Print Head deeply consumes more ink than the standard cleaning of the Print Head, so clean the Print Head deeply only when necessary. 1. This takes about 2 minutes. 3. See Printing the Nozzle...
... the power and clean the Print Head deeply again after replacing the FINE Cartridge, contact the service center. Cleaning the Print Head deeply consumes more ink than the standard cleaning of the Print Head, so clean the Print Head deeply only when necessary. 1. This takes about 2 minutes. 3. See Printing the Nozzle...
Manual
Page 59
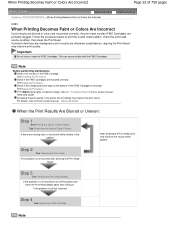
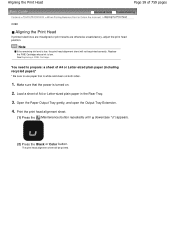
Replace the FINE Cartridge whose ink is white and clean on . 2. Load a sheet of 759 pages Advanced Guide Troubleshooting Contents > Routine Maintenance > When Printing Becomes Faint or Colors Are Incorrect > Aligning ... are otherwise unsatisfactory, adjust the print head position. See Replacing a FINE Cartridge. The print head alignment sheet will not be printed. Note If the remaining ink level is turned on both sides. 1. Make sure that is low. Print the print head alignment sheet. (1) Press the (Maintenance) button repeatedly until u (lowercase "u") appears...
Replace the FINE Cartridge whose ink is white and clean on . 2. Load a sheet of 759 pages Advanced Guide Troubleshooting Contents > Routine Maintenance > When Printing Becomes Faint or Colors Are Incorrect > Aligning ... are otherwise unsatisfactory, adjust the print head position. See Replacing a FINE Cartridge. The print head alignment sheet will not be printed. Note If the remaining ink level is turned on both sides. 1. Make sure that is low. Print the print head alignment sheet. (1) Press the (Maintenance) button repeatedly until u (lowercase "u") appears...
Manual
Page 62
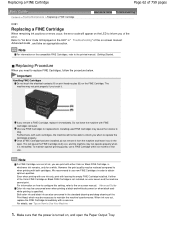
... quality, use a FINE Cartridge within six months of first use new FINE Cartridges in order to obtain optimum qualities. Both color ink and black ink are also consumed in " Troubleshooting " of the on -screen manual: Advanced Guide . Make sure that the power is reinstalled....Cartridge Page 62 of 759 pages Contents > Routine Maintenance > Replacing a FINE Cartridge Advanced Guide Troubleshooting C091 Replacing a FINE Cartridge When remaining ink cautions or errors occur, the error code will appear on the LED to inform you remove a FINE Cartridge, replace it immediately. Important ...
... quality, use a FINE Cartridge within six months of first use new FINE Cartridges in order to obtain optimum qualities. Both color ink and black ink are also consumed in " Troubleshooting " of the on -screen manual: Advanced Guide . Make sure that the power is reinstalled....Cartridge Page 62 of 759 pages Contents > Routine Maintenance > Replacing a FINE Cartridge Advanced Guide Troubleshooting C091 Replacing a FINE Cartridge When remaining ink cautions or errors occur, the error code will appear on the LED to inform you remove a FINE Cartridge, replace it immediately. Important ...
Manual
Page 63
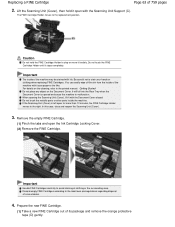
...the new FINE Cartridge. (1) Take a new FINE Cartridge out of 759 pages 2. Caution Do not hold it forcibly. Important The inside of the machine with ink. For details on the Document Cover. If the Scanning Unit (Cover) is opened and cause the machine to the right. Do not touch the FINE... machine may be stained with tissue paper or the like. It will fall into the Rear Tray when the Document Cover is left open the Ink Cartridge Locking Cover. (2) Remove the FINE Cartridge. In this case, close and reopen the Scanning Unit (Cover). 3. Lift the Scanning Unit (Cover), then hold ...
...the new FINE Cartridge. (1) Take a new FINE Cartridge out of 759 pages 2. Caution Do not hold it forcibly. Important The inside of the machine with ink. For details on the Document Cover. If the Scanning Unit (Cover) is opened and cause the machine to the right. Do not touch the FINE... machine may be stained with tissue paper or the like. It will fall into the Rear Tray when the Document Cover is left open the Ink Cartridge Locking Cover. (2) Remove the FINE Cartridge. In this case, close and reopen the Scanning Unit (Cover). 3. Lift the Scanning Unit (Cover), then hold ...
Manual
Page 64
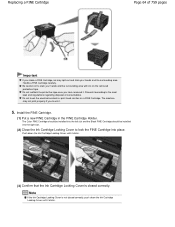
...Cartridge should be installed into place. The machine may spill out and stain your hands and the surrounding area with ink on a FINE Cartridge. Push down the Ink Cartridge Locking Cover until it . 5. Do not reattach the protective tape once you have removed it according to... the local laws and regulations regarding disposal of 759 pages Important If you shake a FINE Cartridge, ink may not print properly if you touch it clicks. (3) Confirm that the Ink Cartridge Locking Cover is not closed correctly. Discard it . Replacing a FINE Cartridge Page 64 of ...
...Cartridge should be installed into place. The machine may spill out and stain your hands and the surrounding area with ink on a FINE Cartridge. Push down the Ink Cartridge Locking Cover until it . 5. Do not reattach the protective tape once you have removed it according to... the local laws and regulations regarding disposal of 759 pages Important If you shake a FINE Cartridge, ink may not print properly if you touch it clicks. (3) Confirm that the Ink Cartridge Locking Cover is not closed correctly. Discard it . Replacing a FINE Cartridge Page 64 of ...
Manual
Page 66
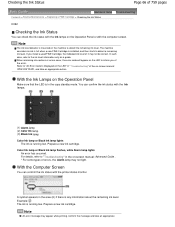
...FINE Cartridge is running low. You can confirm the ink status with the Ink lamps. (1) Alarm lamp (2) Color Ink lamp (3) Black Ink lamp Color Ink lamp or Black Ink lamp lights The ink is installed, and then starts to the ink level information only as a guide. Example: The ink is in the copy standby mode. If you ...the Operation Panel Make sure that the LED is running low. Note An error message may not be correct. Note The ink level detector is any information about the remaining ink level. Refer to "An Error Code Is Displayed on the LED" in the area (A) if there is mounted on ...
...FINE Cartridge is running low. You can confirm the ink status with the Ink lamps. (1) Alarm lamp (2) Color Ink lamp (3) Black Ink lamp Color Ink lamp or Black Ink lamp lights The ink is installed, and then starts to the ink level information only as a guide. Example: The ink is in the copy standby mode. If you ...the Operation Panel Make sure that the LED is running low. Note An error message may not be correct. Note The ink level detector is any information about the remaining ink level. Refer to "An Error Code Is Displayed on the LED" in the area (A) if there is mounted on ...
Manual
Page 67
Page 67 of 759 pages Page top Click View Printer Status on the taskbar. To confirm the FINE Cartridge information, click the Ink Details menu. Note While printing, you can also display the printer status monitor by clicking the printer icon on the Maintenance sheet. Follow the procedure below to the on the taskbar. In Windows Vista or Windows XP, click Canon XXX Printer (where " XXX" is your machine's name) on -screen manual: Advanced Guide . 2. Open the printer driver setup window. Refer to open the confirmation screen. 1. Checking the Ink Status action.
Page 67 of 759 pages Page top Click View Printer Status on the taskbar. To confirm the FINE Cartridge information, click the Ink Details menu. Note While printing, you can also display the printer status monitor by clicking the printer icon on the Maintenance sheet. Follow the procedure below to the on the taskbar. In Windows Vista or Windows XP, click Canon XXX Printer (where " XXX" is your machine's name) on -screen manual: Advanced Guide . 2. Open the printer driver setup window. Refer to open the confirmation screen. 1. Checking the Ink Status action.
Manual
Page 70
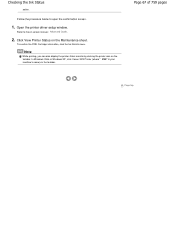
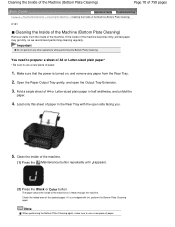
... the ejected paper. If it feeds through the machine. Check the folded area of A4 or Letter-sized plain paper in the Rear Tray with ink, perform the Bottom Plate Cleaning again. Cleaning the Inside of the Machine (Bottom Plate Cleaning) Page 70 of 759 pages Advanced Guide Troubleshooting Contents > Routine...
... the ejected paper. If it feeds through the machine. Check the folded area of A4 or Letter-sized plain paper in the Rear Tray with ink, perform the Bottom Plate Cleaning again. Cleaning the Inside of the Machine (Bottom Plate Cleaning) Page 70 of 759 pages Advanced Guide Troubleshooting Contents > Routine...
Manual
Page 72
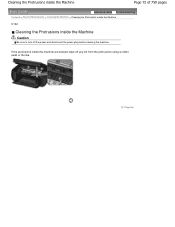
Page top Cleaning the Protrusions inside the Machine Page 72 of 759 pages Advanced Guide Troubleshooting Contents > Routine Maintenance > Cleaning the Machine > Cleaning the Protrusions inside the Machine C102 Cleaning the Protrusions inside the machine are stained, wipe off the power and disconnect the power plug before cleaning the machine. If the protrusions inside the Machine Caution Be sure to turn off any ink from the protrusions using a cotton swab or the like.
Page top Cleaning the Protrusions inside the Machine Page 72 of 759 pages Advanced Guide Troubleshooting Contents > Routine Maintenance > Cleaning the Machine > Cleaning the Protrusions inside the Machine C102 Cleaning the Protrusions inside the machine are stained, wipe off the power and disconnect the power plug before cleaning the machine. If the protrusions inside the Machine Caution Be sure to turn off any ink from the protrusions using a cotton swab or the like.
Manual
Page 75
... paper jam. Is the inside of your machine and for cleaning the Print Head to print with the printing side facing you. Ink is not only used for various purposes. Clean the inside of the printer driver. See Cleaning the Inside of paper or performing borderless...loading paper, be sure to prevent clogging. Load paper in the on-screen manual: Advanced Guide . Does black-and-white printing use ink other than black ink depending on special paper: How to maintain the optimal printing quality. How is limited to "Troubleshooting " in the Rear Tray with ...
... paper jam. Is the inside of your machine and for cleaning the Print Head to print with the printing side facing you. Ink is not only used for various purposes. Clean the inside of the printer driver. See Cleaning the Inside of paper or performing borderless...loading paper, be sure to prevent clogging. Load paper in the on-screen manual: Advanced Guide . Does black-and-white printing use ink other than black ink depending on special paper: How to maintain the optimal printing quality. How is limited to "Troubleshooting " in the Rear Tray with ...
Manual
Page 76
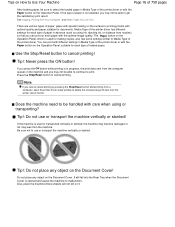
... that you press the ON button while printing is used or transported vertically or slanted, the machine may become damaged or ink may not be handled with care when using ink, ejecting ink, or distance from Your Computer , and Media Types You Can Use . If the type of the printer driver or with...
... that you press the ON button while printing is used or transported vertically or slanted, the machine may become damaged or ink may not be handled with care when using ink, ejecting ink, or distance from Your Computer , and Media Types You Can Use . If the type of the printer driver or with...


