MultiPASS MP370/360 User's Guide
Page 4
... Document Requirements 13 Loading Documents 14 3 Paper Handling Recommended Paper And Requirements .......15 Canon Specialty Media 15 Selecting The Correct Paper 16 Canon Specialty Media 16 General Paper Guidelines 20 Setting The Paper Thickness Lever 21 Setting The... Range Of Images 56 DPOF (Digital Print Order Format) Printing 59 6 Photo Printing Directly From A Digital Camera (MP370) Paper Types For A Digital Camera 61 Printing Directly From A Digital Camera.......... 62 7 Becoming Familiar With The Software ... Tanks 77 Replacing An Ink Tank 78 Resetting The Ink Counter 80 2
... Document Requirements 13 Loading Documents 14 3 Paper Handling Recommended Paper And Requirements .......15 Canon Specialty Media 15 Selecting The Correct Paper 16 Canon Specialty Media 16 General Paper Guidelines 20 Setting The Paper Thickness Lever 21 Setting The... Range Of Images 56 DPOF (Digital Print Order Format) Printing 59 6 Photo Printing Directly From A Digital Camera (MP370) Paper Types For A Digital Camera 61 Printing Directly From A Digital Camera.......... 62 7 Becoming Familiar With The Software ... Tanks 77 Replacing An Ink Tank 78 Resetting The Ink Counter 80 2
MultiPASS MP370/360 User's Guide
Page 11
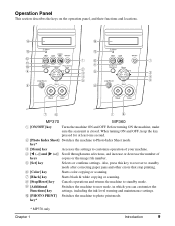
... Chapter 1 Introduction 9 key* [Menu] key Accesses the settings to Photo Index Sheet mode. MP370 MP360 [ON/OFF] key Turns the machine ON and OFF. When turning ON and OFF, keep the key pressed for at least one second. [Photo ... correcting paper jams and other errors that stop printing. [Color] key Starts color copying or scanning. [Black] key Starts black & white copying or scanning. [Stop/Reset] key Cancels operations and returns the machine to standby mode. [Additional Functions] key Switches the machine to user mode, in which you can customize the...
... Chapter 1 Introduction 9 key* [Menu] key Accesses the settings to Photo Index Sheet mode. MP370 MP360 [ON/OFF] key Turns the machine ON and OFF. When turning ON and OFF, keep the key pressed for at least one second. [Photo ... correcting paper jams and other errors that stop printing. [Color] key Starts color copying or scanning. [Black] key Starts black & white copying or scanning. [Stop/Reset] key Cancels operations and returns the machine to standby mode. [Additional Functions] key Switches the machine to user mode, in which you can customize the...
MultiPASS MP370/360 User's Guide
Page 14
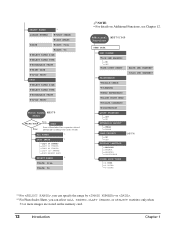
... , you can select , , or only when 31 or more images are stored on Additional Functions, see Chapter 12. Additional MP370/360 Functions USER DATA INK VOLUME LOW INK WARNING ON OFF INK COUNT RESET BLACK INK CHANGED? SELECT RANGE *1 IMAGE NUMBER FIRST IMAGE: LAST IMAGE: DATE DATE: From DATE: To SELECT PAPER...
... , you can select , , or only when 31 or more images are stored on Additional Functions, see Chapter 12. Additional MP370/360 Functions USER DATA INK VOLUME LOW INK WARNING ON OFF INK COUNT RESET BLACK INK CHANGED? SELECT RANGE *1 IMAGE NUMBER FIRST IMAGE: LAST IMAGE: DATE DATE: From DATE: To SELECT PAPER...
MultiPASS MP370/360 User's Guide
Page 29
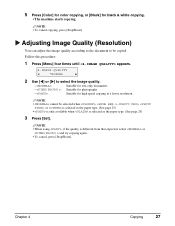
NOTE • To cancel copying, press [Stop/Reset]. Follow this procedure: 1 Press [Menu] four times until appears. 4.IMAGE QUALITY W *NORMAL X 2 Use [W] or [X] to be selected when , , , , or is selected as the paper type. (...See page 25) • is only available when is different from that expected, select or and try copying again. • To cancel, press [Stop/Reset]. NOTE • When using , if the quality is selected as the paper type. (See page 25) 3 Press [Set]. Chapter 4 Copying 27 X Adjusting Image Quality (Resolution...
NOTE • To cancel copying, press [Stop/Reset]. Follow this procedure: 1 Press [Menu] four times until appears. 4.IMAGE QUALITY W *NORMAL X 2 Use [W] or [X] to be selected when , , , , or is selected as the paper type. (...See page 25) • is only available when is different from that expected, select or and try copying again. • To cancel, press [Stop/Reset]. NOTE • When using , if the quality is selected as the paper type. (See page 25) 3 Press [Set]. Chapter 4 Copying 27 X Adjusting Image Quality (Resolution...
MultiPASS MP370/360 User's Guide
Page 30
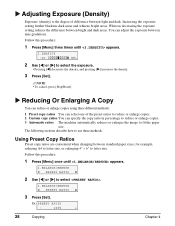
... copies using three different methods: 1 Preset copy ratios You can select one of difference between bright and dark areas. NOTE • To cancel, press [Stop/Reset].
... copies using three different methods: 1 Preset copy ratios You can select one of difference between bright and dark areas. NOTE • To cancel, press [Stop/Reset].

MultiPASS MP370/360 User's Guide
Page 34
NOTE • To cancel copying, press [Stop/Reset]. • To continue to copy two pages on a single page, repeat steps 7 to scan, press [Set]. 9 Press [Color] for color copying, or [Black] for black & ...
NOTE • To cancel copying, press [Stop/Reset]. • To continue to copy two pages on a single page, repeat steps 7 to scan, press [Set]. 9 Press [Color] for color copying, or [Black] for black & ...
MultiPASS MP370/360 User's Guide
Page 37
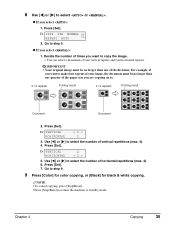
... Document Document 2. IMPORTANT • Your original image must be no larger than one quarter of the divisions. NOTE • To cancel copying, press [Stop/Reset]. • Press [Stop/Reset] to return the machine to select or . z If you select : 1. Ex: VERTICAL 2 HORIZONTAL < 2 > 5. Ex: VERTICAL HORIZONTAL 2 3. Press [Set]. z If you select : 1. 8 Use [W] or...
... Document Document 2. IMPORTANT • Your original image must be no larger than one quarter of the divisions. NOTE • To cancel copying, press [Stop/Reset]. • Press [Stop/Reset] to return the machine to select or . z If you select : 1. Ex: VERTICAL 2 HORIZONTAL < 2 > 5. Ex: VERTICAL HORIZONTAL 2 3. Press [Set]. z If you select : 1. 8 Use [W] or...

MultiPASS MP370/360 User's Guide
Page 38
... this feature when copying onto T-shirt transfers so that the image is oriented correctly when ironed onto fabric. NOTE • To cancel copying, press [Stop/Reset]. 36 Copying Chapter 4 NOTE • For the number of sheets of paper you to select . 5.SPECIAL COPY W MIRROR IMAGE X 7 Press [Set]. 0 1 Ex: 100% LTR NORMAL...
... this feature when copying onto T-shirt transfers so that the image is oriented correctly when ironed onto fabric. NOTE • To cancel copying, press [Stop/Reset]. 36 Copying Chapter 4 NOTE • For the number of sheets of paper you to select . 5.SPECIAL COPY W MIRROR IMAGE X 7 Press [Set]. 0 1 Ex: 100% LTR NORMAL...

MultiPASS MP370/360 User's Guide
Page 39
... page 27. • To select the scanning exposure, see page 15. 4 Adjust the settings for black & white copying. NOTE • To cancel copying, press [Stop/Reset]. • For some documents, part of copies (max. 99 copies). Shrinking An image To Fit The Page If the image to be copied. Same size...
... page 27. • To select the scanning exposure, see page 15. 4 Adjust the settings for black & white copying. NOTE • To cancel copying, press [Stop/Reset]. • For some documents, part of copies (max. 99 copies). Shrinking An image To Fit The Page If the image to be copied. Same size...

MultiPASS MP370/360 User's Guide
Page 45
Ex: EXTENSION AMOUNT SMALL 4. z To enable/disable vivid photo printing: 1. Press [Set]. Press [Set]. 6. Press [Stop/Reset] to switch the machine to select the printing method, and then press [Set]. 4. Use [W] or [X] to standby mode. Use [W] or [X] to... for the paper type. Use [W] or [X] to enable or disable borderless printing, and then press [Set]. 7. Chapter 5 Photo Printing From A Memory Card (MP370) 43 Press [PHOTO PRINT]. 2. Use [W] or [X] to select date printing or not, and then press [Set]. • is selected for photographs that extends...
Ex: EXTENSION AMOUNT SMALL 4. z To enable/disable vivid photo printing: 1. Press [Set]. Press [Set]. 6. Press [Stop/Reset] to switch the machine to select the printing method, and then press [Set]. 4. Use [W] or [X] to standby mode. Use [W] or [X] to... for the paper type. Use [W] or [X] to enable or disable borderless printing, and then press [Set]. 7. Chapter 5 Photo Printing From A Memory Card (MP370) 43 Press [PHOTO PRINT]. 2. Use [W] or [X] to select date printing or not, and then press [Set]. • is selected for photographs that extends...
MultiPASS MP370/360 User's Guide
Page 50
...] PRINT < SCAN > 14 Press [Set]. • The machine reads the Photo Index Sheet, and prints photographs according to 14. 48 Photo Printing From A Memory Card (MP370) Chapter 5 NOTE • To cancel printing, press [Stop/Reset]. • To continue to print photographs using the subsequent Photo Index Sheets, repeat steps 8 to the settings.
...] PRINT < SCAN > 14 Press [Set]. • The machine reads the Photo Index Sheet, and prints photographs according to 14. 48 Photo Printing From A Memory Card (MP370) Chapter 5 NOTE • To cancel printing, press [Stop/Reset]. • To continue to print photographs using the subsequent Photo Index Sheets, repeat steps 8 to the settings.

MultiPASS MP370/360 User's Guide
Page 52
... to the paper size printed onto. NOTE • In order to obtain optimal quality print results, when printing photographs, use Canon-recommended Photo Paper Pro or Photo Paper Plus. • If you selected or in step 7, you can only select , ...• If you selected in step 9, you do not know the paper type. NOTE • To cancel printing, press [Stop/Reset]. • Pressing [Black] does not start printing, or [X] to enable vivid photo printing or not. (See page 43) NOTE ... [Set]. 15 Select whether to cancel printing. 50 Photo Printing From A Memory Card (MP370) Chapter 5
... to the paper size printed onto. NOTE • In order to obtain optimal quality print results, when printing photographs, use Canon-recommended Photo Paper Pro or Photo Paper Plus. • If you selected or in step 7, you can only select , ...• If you selected in step 9, you do not know the paper type. NOTE • To cancel printing, press [Stop/Reset]. • Pressing [Black] does not start printing, or [X] to enable vivid photo printing or not. (See page 43) NOTE ... [Set]. 15 Select whether to cancel printing. 50 Photo Printing From A Memory Card (MP370) Chapter 5

MultiPASS MP370/360 User's Guide
Page 55
NOTE • To cancel printing, press [Stop/Reset]. • You can only select , , or . 10 Press [Set].... paper), or if you cannot enable vivid photo printing. 14 Press [Set]. Chapter 5 Photo Printing From A Memory Card (MP370) 53 is different from the ID numbers assigned by the digital camera. • If "?" Ex: 3.SELECT PAPER TYPE W...A4 size 8 Press [Set]. 7 Use [W] or [X] to obtain optimal quality print results, when printing photographs, use Canon-recommended Photo Paper Pro or Photo Paper Plus. • If you selected or in step 9, you do not know the paper type...
NOTE • To cancel printing, press [Stop/Reset]. • You can only select , , or . 10 Press [Set].... paper), or if you cannot enable vivid photo printing. 14 Press [Set]. Chapter 5 Photo Printing From A Memory Card (MP370) 53 is different from the ID numbers assigned by the digital camera. • If "?" Ex: 3.SELECT PAPER TYPE W...A4 size 8 Press [Set]. 7 Use [W] or [X] to obtain optimal quality print results, when printing photographs, use Canon-recommended Photo Paper Pro or Photo Paper Plus. • If you selected or in step 9, you do not know the paper type...

MultiPASS MP370/360 User's Guide
Page 58
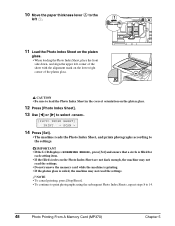
... print, first print the index and note the image numbers assigned to print the index beforehand. (See page 52) 56 Photo Printing From A Memory Card (MP370) Chapter 5 Press [Set]. Printing A Range Of Images This printing method prints a range of photographs you are printing onto, image cropping may occur, with or without... through the image numbers. • To find the image number, you select : 1. z If you will need to them. NOTE • To cancel printing, press [Stop/Reset]. • The image printed is enlarged or reduced automatically according to the paper size printed onto.
... print, first print the index and note the image numbers assigned to print the index beforehand. (See page 52) 56 Photo Printing From A Memory Card (MP370) Chapter 5 Press [Set]. Printing A Range Of Images This printing method prints a range of photographs you are printing onto, image cropping may occur, with or without... through the image numbers. • To find the image number, you select : 1. z If you will need to them. NOTE • To cancel printing, press [Stop/Reset]. • The image printed is enlarged or reduced automatically according to the paper size printed onto.

MultiPASS MP370/360 User's Guide
Page 60
...W NO.001-010 19 Press [Color]. NOTE • In order to obtain optimal quality print results, when printing photographs, use Canon-recommended Photo Paper Pro or Photo Paper Plus. • If you selected or in step 9, you can only select , ,... 12 Press [Set]. 13 Select whether to the paper size printed onto. NOTE • To cancel printing, press [Stop/Reset]. • The image printed is enlarged or reduced automatically according to enable borderless printing or not. (See page 42) NOTE... [Black] does not start printing. 58 Photo Printing From A Memory Card (MP370) Chapter 5
...W NO.001-010 19 Press [Color]. NOTE • In order to obtain optimal quality print results, when printing photographs, use Canon-recommended Photo Paper Pro or Photo Paper Plus. • If you selected or in step 9, you can only select , ,... 12 Press [Set]. 13 Select whether to the paper size printed onto. NOTE • To cancel printing, press [Stop/Reset]. • The image printed is enlarged or reduced automatically according to enable borderless printing or not. (See page 42) NOTE... [Black] does not start printing. 58 Photo Printing From A Memory Card (MP370) Chapter 5
MultiPASS MP370/360 User's Guide
Page 61
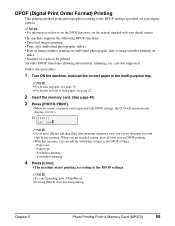
...image number printing on individual photographs, date or image number printing on your digital camera. NOTE • To cancel printing, press [Stop/Reset]. • Pressing [Black] does not start DPOF printing. • With this procedure: 1 Turn ON the machine, and load the ... (shooting information, trimming, etc.) are finished setting, press [Color] to start printing. Chapter 5 Photo Printing From A Memory Card (MP370) 59 Borderless printing - Paper size - DPOF (Digital Print Order Format) Printing This printing method prints photographs according to set the paper ...
...image number printing on individual photographs, date or image number printing on your digital camera. NOTE • To cancel printing, press [Stop/Reset]. • Pressing [Black] does not start DPOF printing. • With this procedure: 1 Turn ON the machine, and load the ... (shooting information, trimming, etc.) are finished setting, press [Color] to start printing. Chapter 5 Photo Printing From A Memory Card (MP370) 59 Borderless printing - Paper size - DPOF (Digital Print Order Format) Printing This printing method prints photographs according to set the paper ...
MultiPASS MP370/360 User's Guide
Page 80
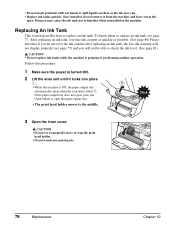
CAUTION • Do not try to replace an ink tank. After replacing an ink tank, reset the ink counter as quickly as the ink may cause the ink tank not to function when reinstalled in the open the paper output tray. &#...; When the machine is ON, the paper output tray automatically opens when the scan unit is printing or performing another operation. Once installed, do not reset the ink counter after replacing an ink tank, the low ink warning will not display properly (see page 77.
CAUTION • Do not try to replace an ink tank. After replacing an ink tank, reset the ink counter as quickly as the ink may cause the ink tank not to function when reinstalled in the open the paper output tray. &#...; When the machine is ON, the paper output tray automatically opens when the scan unit is printing or performing another operation. Once installed, do not reset the ink counter after replacing an ink tank, the low ink warning will not display properly (see page 77.
MultiPASS MP370/360 User's Guide
Page 82
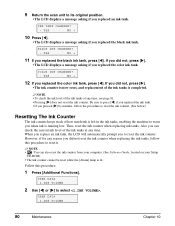
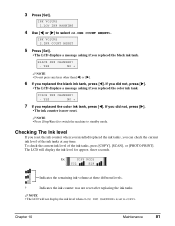
... color ink tank. If you did not, press [X]. • The LCD displays a message asking if you replaced the black ink tank. If you did not reset the ink counter when replacing the ink tanks, follow the procedure to warn you replaced an ink tank. Follow this procedure to select . 9 Return the... 10 NOTE • To check the ink level of how much ink is left in the ink tanks, enabling the machine to reset the ink counter. (See below) Resetting The Ink Counter The ink counter keeps track of the ink tanks at any time. When you replace an ink tank, the LCD...
... color ink tank. If you did not, press [X]. • The LCD displays a message asking if you replaced the black ink tank. If you did not reset the ink counter when replacing the ink tanks, follow the procedure to warn you replaced an ink tank. Follow this procedure to select . 9 Return the... 10 NOTE • To check the ink level of how much ink is left in the ink tanks, enabling the machine to reset the ink counter. (See below) Resetting The Ink Counter The ink counter keeps track of the ink tanks at any time. When you replace an ink tank, the LCD...
MultiPASS MP370/360 User's Guide
Page 83
... [X]. • The ink counter is set to . three seconds. Chapter 10 Maintenance 81 COLOR INK CHANGED? - Checking The Ink level If you reset the ink counter when you installed/replaced the ink tanks, you did not, press [X]. • The LCD displays a message asking if you replaced the... black ink tank, press [W]. INK VOLUME 2.INK COUNT RESET 5 Press [Set]. • The LCD displays a message asking if you replaced the color ink tank, press [W]. BLACK INK CHANGED? - If you can ...
... [X]. • The ink counter is set to . three seconds. Chapter 10 Maintenance 81 COLOR INK CHANGED? - Checking The Ink level If you reset the ink counter when you installed/replaced the ink tanks, you did not, press [X]. • The LCD displays a message asking if you replaced the... black ink tank, press [W]. INK VOLUME 2.INK COUNT RESET 5 Press [Set]. • The LCD displays a message asking if you replaced the color ink tank, press [W]. BLACK INK CHANGED? - If you can ...
MultiPASS MP370/360 User's Guide
Page 112
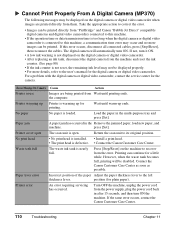
...Properly From A Digital Camera (MP370) The following messages may be displayed on the digital camera or digital video camcorder when images are being printed from Wait until warm-up . Take the appropriate action to this error occurs, disconnect all connected cables, press [Stop/Reset], then reconnect the cables. ...time is too long when the digital camera or digital video camcorder is not reset, the remaining ink level may occur and no more details, refer to recover from them. Contact the Canon Customer Care Center as soon as possible. Printer is not displayed on the machine...
...Properly From A Digital Camera (MP370) The following messages may be displayed on the digital camera or digital video camcorder when images are being printed from Wait until warm-up . Take the appropriate action to this error occurs, disconnect all connected cables, press [Stop/Reset], then reconnect the cables. ...time is too long when the digital camera or digital video camcorder is not reset, the remaining ink level may occur and no more details, refer to recover from them. Contact the Canon Customer Care Center as soon as possible. Printer is not displayed on the machine...


