
MP210 series Quick Start Guide
Page 12
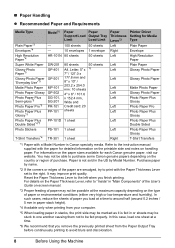
...We recommend that you finish printing. Purchase paper by Model Number. In this case, load one another causing them not to purchase some Canon genuine papers depending on handling paper. „ Paper Handling z Recommended Paper and Requirements Media Type Plain Paper*3 Envelopes*4 High Resolution Paper...sheet 1 sheet 1 sheet Paper Thickness Lever*2 Left Right Left Left Left Left Left Left Left Left Left Left Left Right Printer Driver Setting for each Canon genuine paper, visit our website. Reset the Paper Thickness Lever to the left when you remove the previously printed sheet from ...
...We recommend that you finish printing. Purchase paper by Model Number. In this case, load one another causing them not to purchase some Canon genuine papers depending on handling paper. „ Paper Handling z Recommended Paper and Requirements Media Type Plain Paper*3 Envelopes*4 High Resolution Paper...sheet 1 sheet 1 sheet Paper Thickness Lever*2 Left Right Left Left Left Left Left Left Left Left Left Left Left Right Printer Driver Setting for each Canon genuine paper, visit our website. Reset the Paper Thickness Lever to the left when you remove the previously printed sheet from ...
MP210 series Quick Start Guide
Page 15
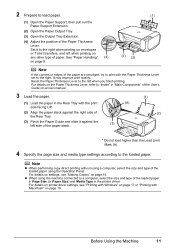
... (2) Align the paper stack against the left side of paper. Set it against the right side of the Paper Thickness Lever. For details on printer driver settings, see "Making Copies" on envelopes or T-shirt transfers, and left when you finish printing. See "Paper Handling" (4) on -screen manual...Thickness Lever set to the right. z When using the Operation Panel. For details on the Paper Thickness Lever, refer to "Inside" in the printer driver. 2 Prepare to load paper. (1) (1) Open the Paper Support, then pull out the Paper Support Extension. (2) Open the Paper Output Tray....
... (2) Align the paper stack against the left side of paper. Set it against the right side of the Paper Thickness Lever. For details on printer driver settings, see "Making Copies" on envelopes or T-shirt transfers, and left when you finish printing. See "Paper Handling" (4) on -screen manual...Thickness Lever set to the right. z When using the Operation Panel. For details on the Paper Thickness Lever, refer to "Inside" in the printer driver. 2 Prepare to load paper. (1) (1) Open the Paper Support, then pull out the Paper Support Extension. (2) Open the Paper Output Tray....
MP210 series Quick Start Guide
Page 17
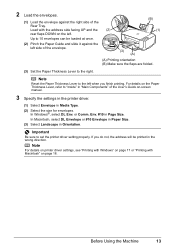
...Select the size for envelopes. Load with Macintosh" on page 18. Note Reset the Paper Thickness Lever to set the printer driver setting properly. or Comm. Note For details on printer driver settings, see "Printing with Windows" on page 17 or "Printing with the address side facing UP and the (2) ...rear flaps DOWN on -screen manual. 3 Specify the settings in the printer driver. (1) Select Envelope in the wrong direction. Env. #10 in Orientation. Important Be sure to the left side of the User's Guide on the...
...Select the size for envelopes. Load with Macintosh" on page 18. Note Reset the Paper Thickness Lever to set the printer driver setting properly. or Comm. Note For details on printer driver settings, see "Printing with Windows" on page 17 or "Printing with the address side facing UP and the (2) ...rear flaps DOWN on -screen manual. 3 Specify the settings in the printer driver. (1) Select Envelope in the wrong direction. Env. #10 in Orientation. Important Be sure to the left side of the User's Guide on the...
MP210 series Quick Start Guide
Page 18
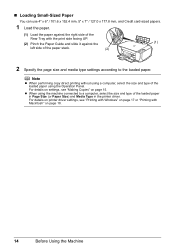
z When using the Operation Panel. For details on printer driver settings, see "Making Copies" on page 15. „ Loading Small-Sized Paper You can use 4" x 6" / 101.6 x 152.4 mm, 5" x 7" / 127.0 x 177.8 mm, and Credit card-sized ... type settings according to a computer, select the size and type of the loaded paper in Page Size (or Paper Size) and Media Type in the printer driver. Note z When performing copy direct printing without using a computer, select the size and type of the loaded paper using the machine connected to the loaded...
z When using the Operation Panel. For details on printer driver settings, see "Making Copies" on page 15. „ Loading Small-Sized Paper You can use 4" x 6" / 101.6 x 152.4 mm, 5" x 7" / 127.0 x 177.8 mm, and Credit card-sized ... type settings according to a computer, select the size and type of the loaded paper in Page Size (or Paper Size) and Media Type in the printer driver. Note z When performing copy direct printing without using a computer, select the size and type of the loaded paper using the machine connected to the loaded...
MP210 series Quick Start Guide
Page 21
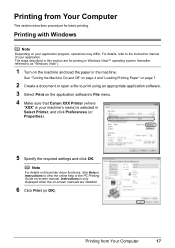
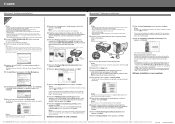
Instructions is selected in this section are installed. 6 Click Print (or OK). The steps described in Select Printer, and click Preferences (or Properties). 5 Specify the required settings and click OK. See "Turning the Machine On and Off" on page ... print using an appropriate application software. 3 Select Print on the printer driver functions, click Help or Instructions to the instruction manual of your application. Note For details on the application software's File menu. 4 Make sure that Canon XXX Printer (where "XXX" is your application program, operations may differ. ...
Instructions is selected in this section are installed. 6 Click Print (or OK). The steps described in Select Printer, and click Preferences (or Properties). 5 Specify the required settings and click OK. See "Turning the Machine On and Off" on page ... print using an appropriate application software. 3 Select Print on the printer driver functions, click Help or Instructions to the instruction manual of your application. Note For details on the application software's File menu. 4 Make sure that Canon XXX Printer (where "XXX" is your application program, operations may differ. ...
MP210 series Quick Start Guide
Page 22
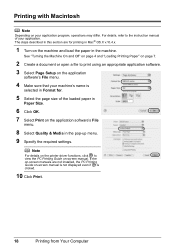
Note For details on the printer driver functions, click to view the PC Printing Guide on -screen manual is not displayed even if is selected in Format for printing in Mac® ...
Note For details on the printer driver functions, click to view the PC Printing Guide on -screen manual is not displayed even if is selected in Format for printing in Mac® ...
MP210 series Quick Start Guide
Page 30
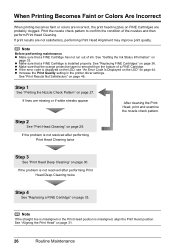
... a FINE Cartridge. Step 1 See "Printing the Nozzle Check Pattern" on page 44. When Printing Becomes Faint or Colors Are Incorrect When printing becomes faint or colors are incorrect, the print head nozzles on page 31. 26 Routine Maintenance z Make sure that a FINE Cartridge is ...position is installed properly. See "Aligning the Print Head" on FINE Cartridges are probably clogged. z Increase the Print Quality setting in the printer driver settings. Step 2 See "Print Head Cleaning" on page 33. If the problem is not resolved after performing Print Head Deep Cleaning twice ...
... a FINE Cartridge. Step 1 See "Printing the Nozzle Check Pattern" on page 44. When Printing Becomes Faint or Colors Are Incorrect When printing becomes faint or colors are incorrect, the print head nozzles on page 31. 26 Routine Maintenance z Make sure that a FINE Cartridge is ...position is installed properly. See "Aligning the Print Head" on FINE Cartridges are probably clogged. z Increase the Print Quality setting in the printer driver settings. Step 2 See "Print Head Cleaning" on page 33. If the problem is not resolved after performing Print Head Deep Cleaning twice ...
MP210 series Quick Start Guide
Page 49
... of the document cannot be installed properly. Canon recommends to use new genuine Canon cartridges in order to -Page copying is selected. Ink has run out. Replace the ink cartridge and close the Scanning Unit (Printer Cover). Replace the empty ink cartridge immediately ...appropriate FINE Cartridge. See "Loading Original Documents" on the printer driver. The FINE Cartridge may be advised that the sheet is not resolved, contact your Canon Service representative. Then reload the document and press the Black or Color button. Ink has run out. Ink may not be ...
... of the document cannot be installed properly. Canon recommends to use new genuine Canon cartridges in order to -Page copying is selected. Ink has run out. Replace the ink cartridge and close the Scanning Unit (Printer Cover). Replace the empty ink cartridge immediately ...appropriate FINE Cartridge. See "Loading Original Documents" on the printer driver. The FINE Cartridge may be advised that the sheet is not resolved, contact your Canon Service representative. Then reload the document and press the Black or Color button. Ink has run out. Ink may not be ...
MP210 series Quick Start Guide
Page 50
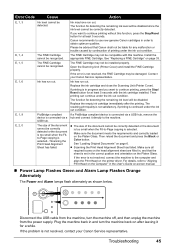
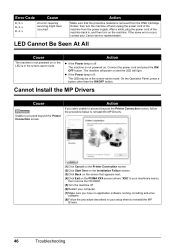
...error occurs, contact your setup sheet to proceed beyond the Printer Connection screen, follow the procedure below to reinstall the MP Drivers. (1)Click Cancel on the Printer Connection screen. (2)Click Start Over on the Installation Failure...Drivers. 46 Troubleshooting Error Code Cause E, 2, x E, 3, x E, 4, x An error requiring servicing might have no application software running, including anti-virus software. (8)Follow the procedure described in your Canon service representative. LED Cannot Be Seen At All Cause The machine is not powered on or the LED is not powered on the PIXMA...
...error occurs, contact your setup sheet to proceed beyond the Printer Connection screen, follow the procedure below to reinstall the MP Drivers. (1)Click Cancel on the Printer Connection screen. (2)Click Start Over on the Installation Failure...Drivers. 46 Troubleshooting Error Code Cause E, 2, x E, 3, x E, 4, x An error requiring servicing might have no application software running, including anti-virus software. (8)Follow the procedure described in your Canon service representative. LED Cannot Be Seen At All Cause The machine is not powered on or the LED is not powered on the PIXMA...

MP210 series Quick Start Guide
Page 52
... the quality of the loaded paper? See "Printing Photographs Directly from a computer Confirm by using the printer driver. See also the sections below. „ Colors Are Unclear Cause Color correction is not satisfactory, confirm the paper and print quality settings first. See "Printing Speed Is Slow...Your system environment is not fully compatible with an incorrect paper type setting, the printed surface may be other graphics, enabling color correction may occur depending on the machine. Select a print quality option suitable to the PC Printing Guide on what you print...
... the quality of the loaded paper? See "Printing Photographs Directly from a computer Confirm by using the printer driver. See also the sections below. „ Colors Are Unclear Cause Color correction is not satisfactory, confirm the paper and print quality settings first. See "Printing Speed Is Slow...Your system environment is not fully compatible with an incorrect paper type setting, the printed surface may be other graphics, enabling color correction may occur depending on the machine. Select a print quality option suitable to the PC Printing Guide on what you print...
MP210 series Quick Start Guide
Page 59
... and remains lit green. In Windows 2000, click Control Panel then Printers. (3)Click the Canon XXX Printer icon. (4)Select Set printer properties on how to the computer, and try printing again. The machine is not ready. The MP Drivers may have occurred on the machine. If the port setting is not... correct, reinstall the MP Drivers or change the port setting according to ...
... and remains lit green. In Windows 2000, click Control Panel then Printers. (3)Click the Canon XXX Printer icon. (4)Select Set printer properties on how to the computer, and try printing again. The machine is not ready. The MP Drivers may have occurred on the machine. If the port setting is not... correct, reinstall the MP Drivers or change the port setting according to ...
MP210 series Quick Start Guide
Page 60
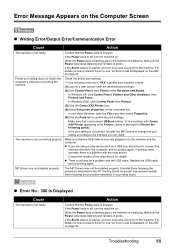
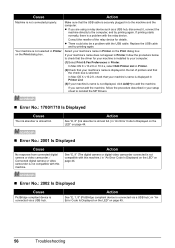
...The digital camera or digital video camcorder connected is connected via a USB hub.) in Printer on the Print dialog box. Make sure that your machine's name is displayed in your setup sheet to reinstall the MP Drivers. „ Error No.: 1700/1710 Is Displayed Cause The ink absorber is not selected.... In Mac OS X v.10.2.8, check that the driver for details. If you are using a relay device such as a USB hub, disconnect it, connect the machine directly to add the machine. Action See "E, 8" (Ink absorber is almost full.) in Printer List. (3)If your machine's name is installed to ...
...The digital camera or digital video camcorder connected is connected via a USB hub.) in Printer on the Print dialog box. Make sure that your machine's name is displayed in your setup sheet to reinstall the MP Drivers. „ Error No.: 1700/1710 Is Displayed Cause The ink absorber is not selected.... In Mac OS X v.10.2.8, check that the driver for details. If you are using a relay device such as a USB hub, disconnect it, connect the machine directly to add the machine. Action See "E, 8" (Ink absorber is almost full.) in Printer List. (3)If your machine's name is installed to ...
MP210 series Quick Start Guide
Page 63
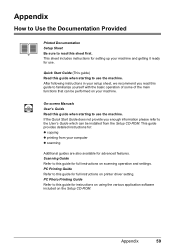
... guide for full instructions on scanning operation and settings. If the Quick Start Guide does not provide you read this guide for full instructions on printer driver setting. PC Printing Guide Refer to the User's Guide which can be installed from your machine. PC Photo Printing Guide Refer to use the machine...
... guide for full instructions on scanning operation and settings. If the Quick Start Guide does not provide you read this guide for full instructions on printer driver setting. PC Printing Guide Refer to the User's Guide which can be installed from your machine. PC Photo Printing Guide Refer to use the machine...
MP210 series Easy Setup Instructions
Page 2
...g When the list of applications to install appears, confirm the contents, then click Install. The MP Drivers will need to align the Print Head. m When the PIXMA Extended Survey Program screen appears, confirm the message. If you are misaligned or print quality is restarted ... b Turn the computer on -screen instructions to register your product. Then turn the machine off then back on the inside of Canon printers. The software installation screen may vary depending on Image Capture under Applications. i When the Setup Complete screen appears, click Next. Software...
...g When the list of applications to install appears, confirm the contents, then click Install. The MP Drivers will need to align the Print Head. m When the PIXMA Extended Survey Program screen appears, confirm the message. If you are misaligned or print quality is restarted ... b Turn the computer on -screen instructions to register your product. Then turn the machine off then back on the inside of Canon printers. The software installation screen may vary depending on Image Capture under Applications. i When the Setup Complete screen appears, click Next. Software...


