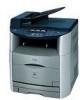
imageCLASS MF8180c Basic Guide
Page 24
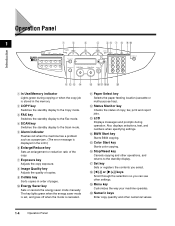
.... i Collate key Sorts copies in the LCD.) f Enlarge/Reduce key Sets an enlargement or reduction ratio of copy, fax, print and report jobs. p Stop/Reset key Cancels copying and other numerical values. 1-4 Operation Panel g Exposure key Adjusts the copy exposure. Operation Panel Introduction 1 a b c d e f g h... 09 10 In Use/ Memory COPY FAX SCAN Alarm Enlarge/ Reduce Exposure Image Quality Paper Select Menu Status Monitor B&W Start Set Color Start Stop/Reset ABC DEF 123 GHI JKL MNO 456 PQRS 7 TUV WXYZ 89 SYMBOLS 0 TONE Collate Energy Saver klm n a In Use...
.... i Collate key Sorts copies in the LCD.) f Enlarge/Reduce key Sets an enlargement or reduction ratio of copy, fax, print and report jobs. p Stop/Reset key Cancels copying and other numerical values. 1-4 Operation Panel g Exposure key Adjusts the copy exposure. Operation Panel Introduction 1 a b c d e f g h... 09 10 In Use/ Memory COPY FAX SCAN Alarm Enlarge/ Reduce Exposure Image Quality Paper Select Menu Status Monitor B&W Start Set Color Start Stop/Reset ABC DEF 123 GHI JKL MNO 456 PQRS 7 TUV WXYZ 89 SYMBOLS 0 TONE Collate Energy Saver klm n a In Use...
imageCLASS MF8180c Basic Guide
Page 46
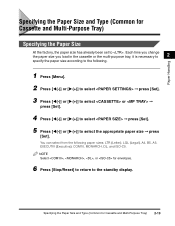
... Size At the factory, the paper size has already been set to . Paper Handling Specifying the Paper Size and Type (Common for envelopes. 6 Press [Stop/Reset] to return to the standby display. Specifying the Paper Size and Type (Common for Cassette and Multi-Purpose Tray) 2-19 You can select from the...
... Size At the factory, the paper size has already been set to . Paper Handling Specifying the Paper Size and Type (Common for envelopes. 6 Press [Stop/Reset] to return to the standby display. Specifying the Paper Size and Type (Common for Cassette and Multi-Purpose Tray) 2-19 You can select from the...
imageCLASS MF8180c Basic Guide
Page 47
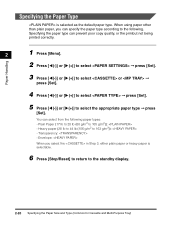
... ➞ press [Set]. 4 Press [((-)] or [)(+)] to select ➞ press [Set]. 5 Press [((-)] or [)(+)] to select ➞ press [Set]. Specifying the Paper Type is selectable. 6 Press [Stop/Reset] to return to the standby display. 2-20 Specifying the Paper Size and Type (Common for Cassette and Multi-Purpose Tray) When using paper other than...
... ➞ press [Set]. 4 Press [((-)] or [)(+)] to select ➞ press [Set]. 5 Press [((-)] or [)(+)] to select ➞ press [Set]. Specifying the Paper Type is selectable. 6 Press [Stop/Reset] to return to the standby display. 2-20 Specifying the Paper Size and Type (Common for Cassette and Multi-Purpose Tray) When using paper other than...

imageCLASS MF8180c Basic Guide
Page 65
... scanning a document from the ADF," on p. 7-3. • When you make copies immediately after making sure the whirring sound stops. 5 Copying Making Copies 5-3 5 Press [B&W Start] or [Color Start]. If the paper jam occurs, the LCD displays , or . (See "Removing Jammed Paper from the ADF, the document may deteriorate. Make copies after connecting... power cord, the print quality may jam in the LCD. You can also cancel copying using [Status Monitor]. NOTE • To cancel copying, press [Stop/Reset] ➞ follow the instructions in the ADF.
... scanning a document from the ADF," on p. 7-3. • When you make copies immediately after making sure the whirring sound stops. 5 Copying Making Copies 5-3 5 Press [B&W Start] or [Color Start]. If the paper jam occurs, the LCD displays , or . (See "Removing Jammed Paper from the ADF, the document may deteriorate. Make copies after connecting... power cord, the print quality may jam in the LCD. You can also cancel copying using [Status Monitor]. NOTE • To cancel copying, press [Stop/Reset] ➞ follow the instructions in the ADF.
imageCLASS MF8180c Basic Guide
Page 71
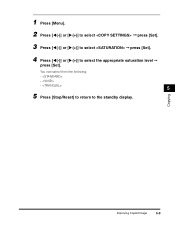
1 Press [Menu]. 2 Press [((-)] or [)(+)] to select ➞ press [Set]. 3 Press [((-)] or [)(+)] to select ➞ press [Set]. 4 Press [((-)] or [)(+)] to the standby display. Copying Improving Copied Image 5-9 You can select from the following: - - - 5 5 Press [Stop/Reset] to return to select the appropriate saturation level ➞ press [Set].
1 Press [Menu]. 2 Press [((-)] or [)(+)] to select ➞ press [Set]. 3 Press [((-)] or [)(+)] to select ➞ press [Set]. 4 Press [((-)] or [)(+)] to the standby display. Copying Improving Copied Image 5-9 You can select from the following: - - - 5 5 Press [Stop/Reset] to return to select the appropriate saturation level ➞ press [Set].
imageCLASS MF8180c Basic Guide
Page 72
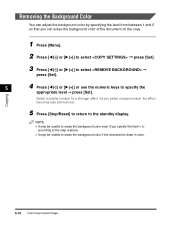
Copying 5 Press [Stop/Reset] to return to erase the background color if the document is deep in color. 5-10 Improving Copied Image Select a smaller number for a stronger effect. As you can erase the background color of the document on the copy. 1 Press [Menu]. 2 Press [((-)] or [)(+)] to select ➞ press [Set].... the numeric keys to specify the appropriate level ➞ press [Set]. NOTE • It may be unable to erase the background color even if you specify the level according to the step 4 above. • It may be unable to the standby display. Removing the Background...
Copying 5 Press [Stop/Reset] to return to erase the background color if the document is deep in color. 5-10 Improving Copied Image Select a smaller number for a stronger effect. As you can erase the background color of the document on the copy. 1 Press [Menu]. 2 Press [((-)] or [)(+)] to select ➞ press [Set].... the numeric keys to specify the appropriate level ➞ press [Set]. NOTE • It may be unable to erase the background color even if you specify the level according to the step 4 above. • It may be unable to the standby display. Removing the Background...
imageCLASS MF8180c Basic Guide
Page 75
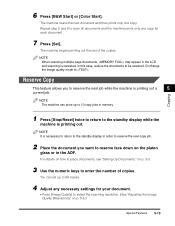
... can set up to reserve face down on p. 3-3. 3 Use the numeric keys to . NOTE When scanning multiple page documents, may appear in memory. 1 Press [Stop/Reset] twice to return to 99 copies. 4 Adjust any necessary settings for each document. 7 Press [Set]. Repeat step 5 and 6 to be scanned. Or change the image... glass or in the ADF. The machine begins printing out the rest of copies. NOTE It is printing out a 5 current job. Copying 6 Press [B&W Start] or [Color Start]. In this case, reduce the documents to scan all documents and the machine prints only one copy.
... can set up to reserve face down on p. 3-3. 3 Use the numeric keys to . NOTE When scanning multiple page documents, may appear in memory. 1 Press [Stop/Reset] twice to return to 99 copies. 4 Adjust any necessary settings for each document. 7 Press [Set]. Repeat step 5 and 6 to be scanned. Or change the image... glass or in the ADF. The machine begins printing out the rest of copies. NOTE It is printing out a 5 current job. Copying 6 Press [B&W Start] or [Color Start]. In this case, reduce the documents to scan all documents and the machine prints only one copy.
imageCLASS MF8180c Basic Guide
Page 81
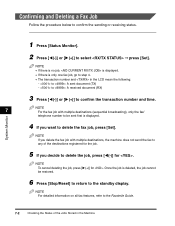
... any of the Jobs Stored in the LCD mean the following: - NOTE For detailed information on all fax features, refer to be restored. 6 Press [Stop/Reset] to return to step 4. • The transaction number and in the Machine Once the job is only one fax job, go to the standby display...
... any of the Jobs Stored in the LCD mean the following: - NOTE For detailed information on all fax features, refer to be restored. 6 Press [Stop/Reset] to return to step 4. • The transaction number and in the Machine Once the job is only one fax job, go to the standby display...
imageCLASS MF8180c Basic Guide
Page 82
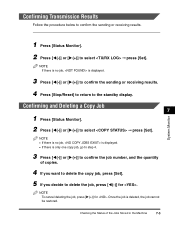
... the sending or receiving results. NOTE • If there is no job, is displayed. 3 Press [((-)] or [)(+)] to confirm the sending or receiving results. 4 Press [Stop/Reset] to return to select ➞ press [Set].
... the sending or receiving results. NOTE • If there is no job, is displayed. 3 Press [((-)] or [)(+)] to confirm the sending or receiving results. 4 Press [Stop/Reset] to return to select ➞ press [Set].
imageCLASS MF8180c Basic Guide
Page 83
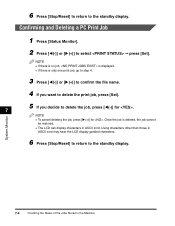
... or [)(+)] to confirm the file name. 4 If you want to delete the print job, press [Set]. 5 If you decide to the standby display. 6 Press [Stop/Reset] to return to select ➞ press [Set]. Using characters other than those in the Machine Confirming and Deleting a PC Print Job 1 Press [Status Monitor]. 2 Press...to the standby display. System Monitor 7-4 Checking the Status of the Jobs Stored in ASCII cord may have the LCD display garbled characters. 6 Press [Stop/Reset] to return to delete the job, press [((-)] for . 7 NOTE • To cancel deleting the job, press [)(+)] for .
... or [)(+)] to confirm the file name. 4 If you want to delete the print job, press [Set]. 5 If you decide to the standby display. 6 Press [Stop/Reset] to return to select ➞ press [Set]. Using characters other than those in the Machine Confirming and Deleting a PC Print Job 1 Press [Status Monitor]. 2 Press...to the standby display. System Monitor 7-4 Checking the Status of the Jobs Stored in ASCII cord may have the LCD display garbled characters. 6 Press [Stop/Reset] to return to delete the job, press [((-)] for . 7 NOTE • To cancel deleting the job, press [)(+)] for .

imageCLASS MF8180c Basic Guide
Page 84
... Stored in the Machine 7-5 NOTE • If there is no job, is displayed. • If there is deleted, the job cannot be restored. 7 6 Press [Stop/Reset] to return to the standby display. Once the job is only one report job, go to step 4. 3 Press [((-)] or [)(+)] to confirm the report. 4 If you...
... Stored in the Machine 7-5 NOTE • If there is no job, is displayed. • If there is deleted, the job cannot be restored. 7 6 Press [Stop/Reset] to return to the standby display. Once the job is only one report job, go to step 4. 3 Press [((-)] or [)(+)] to confirm the report. 4 If you...
imageCLASS MF8180c Basic Guide
Page 142
... Requirements," on p. 9-22.) 9 Make sure that the document is not ready for copying because you are displayed in of multiple page documents on p. 2-19.) Then reset the machine by opening the cartridge cover and then closing it encounters an error. Remedy Please wait for a while immediately after the power cable is...
... Requirements," on p. 9-22.) 9 Make sure that the document is not ready for copying because you are displayed in of multiple page documents on p. 2-19.) Then reset the machine by opening the cartridge cover and then closing it encounters an error. Remedy Please wait for a while immediately after the power cable is...
imageCLASS MF8180c Basic Guide
Page 143
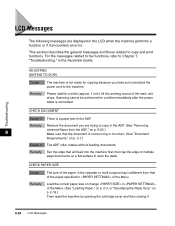
...still appears in the machine. DOCUMENT TOO LONG Cause Remedy The document is longer than 391/2" (1 m), or is not installed correctly. Remedy Reset the machine by opening the cartridge cover and then closing it . Cause 2 A cartridge is not feeding correctly. If the message persists, ...unplug the machine from the power supply and contact Canon Authorized Service Facilities or the Canon Customer Care Center. Reduce the length of the document to within 391/2" (1 m), and then copy it . CHECK PRINTER COVER...
...still appears in the machine. DOCUMENT TOO LONG Cause Remedy The document is longer than 391/2" (1 m), or is not installed correctly. Remedy Reset the machine by opening the cartridge cover and then closing it . Cause 2 A cartridge is not feeding correctly. If the message persists, ...unplug the machine from the power supply and contact Canon Authorized Service Facilities or the Canon Customer Care Center. Reduce the length of the document to within 391/2" (1 m), and then copy it . CHECK PRINTER COVER...
imageCLASS MF8180c Basic Guide
Page 145
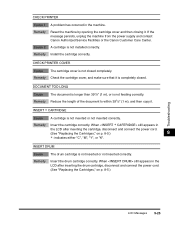
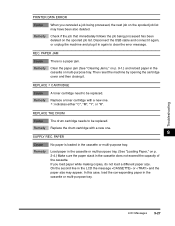
... Cause No paper is a paper jam. In this case, load the corresponding paper in again to clear the error message. Troubleshooting LCD Messages 9-27 Then reset the machine by opening the cartridge cover and then closing it in the cassette or multi-purpose tray. Remedy Check if the job that immediately...
... Cause No paper is a paper jam. In this case, load the corresponding paper in again to clear the error message. Troubleshooting LCD Messages 9-27 Then reset the machine by opening the cartridge cover and then closing it in the cassette or multi-purpose tray. Remedy Check if the job that immediately...
imageCLASS MF8180c Basic Guide
Page 159
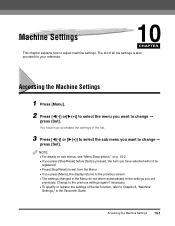
... settings is pressed, the item you have now accessed the settings in the list. 3 Press [((-)] or [)(+)] to select the sub menu you press [Stop/Reset] before [Set] is also provided for your reference. Accessing the Machine Settings 10-1 You have selected will not be registered. • Press [Stop.../Reset] to exit from the Menu. • If you press [Menu], the display returns to the settings you want to adjust machine settings. The list ...
... settings is pressed, the item you have now accessed the settings in the list. 3 Press [((-)] or [)(+)] to select the sub menu you press [Stop/Reset] before [Set] is also provided for your reference. Accessing the Machine Settings 10-1 You have selected will not be registered. • Press [Stop.../Reset] to exit from the Menu. • If you press [Menu], the display returns to the settings you want to adjust machine settings. The list ...

imageCLASS MF8180c Basic Guide
Page 162
...TONER SAVER OFF ON 4. DISPLAY LANGUAGE 5. Shows the language displayed in the LCD. Note: After correcting problems, reset to improve the result. However, if you have to print on both sides of high color density is printed, sometimes the image partially appears on the reverse. In this case, select to 3 (1) ...Sets the toner saver mode for color printing. LINE MONITOR VOL. 3. Read the each description carefully before specifying this case, select to print on the reverse of spattering...
...TONER SAVER OFF ON 4. DISPLAY LANGUAGE 5. Shows the language displayed in the LCD. Note: After correcting problems, reset to improve the result. However, if you have to print on both sides of high color density is printed, sometimes the image partially appears on the reverse. In this case, select to 3 (1) ...Sets the toner saver mode for color printing. LINE MONITOR VOL. 3. Read the each description carefully before specifying this case, select to print on the reverse of spattering...
imageCLASS MF8180c Basic Guide
Page 173
..., 3-2 beforehand, 6-1 documents, 6-2 problems, 9-38 Scanning platform, 1-2 Set key, 1-4 Setting Enlargement/Reduction, 5-4 SHARPNESS setting, 10-7 Size document, 3-1 marks, 3-3 print media, 2-2 SPECIAL PRT. IMAGEQUALITY setting, 10-6 Stop/Reset key, 1-4 SUPPLY REC. MODE settings, 10-4 Specifications, 11-1 STANDARD COPY QTY setting, 10-6 STANDARD EXPOSURE setting, 10-6 Standby display, 1-5 Status Monitor key, 1-4 using, 7-1 STD ZOOM...
..., 3-2 beforehand, 6-1 documents, 6-2 problems, 9-38 Scanning platform, 1-2 Set key, 1-4 Setting Enlargement/Reduction, 5-4 SHARPNESS setting, 10-7 Size document, 3-1 marks, 3-3 print media, 2-2 SPECIAL PRT. IMAGEQUALITY setting, 10-6 Stop/Reset key, 1-4 SUPPLY REC. MODE settings, 10-4 Specifications, 11-1 STANDARD COPY QTY setting, 10-6 STANDARD EXPOSURE setting, 10-6 Standby display, 1-5 Status Monitor key, 1-4 using, 7-1 STD ZOOM...


