Instruction Manual
Page 2
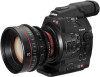
...OF ELECTRIC SHOCK, DO NOT EXPOSE THIS PRODUCT TO DRIPPING OR SPLASHING. FCC NOTICE HD Camcorder, EOS C300 / EOS C300 PL Systems. This device complies with class B limits in a particular installation. These limits are... Operation is encouraged to try to provide reasonable protection against harmful interference in the manual. The Mains plug shall remain readily operable to disconnect the plug in case of... or more of copyrighted materials may cause undesired operation. One Canon Park, Melville, NY 11747, USA Tel No. 1-800-OK-CANON (1-800-652-2666) The Mains plug is located on the...
...OF ELECTRIC SHOCK, DO NOT EXPOSE THIS PRODUCT TO DRIPPING OR SPLASHING. FCC NOTICE HD Camcorder, EOS C300 / EOS C300 PL Systems. This device complies with class B limits in a particular installation. These limits are... Operation is encouraged to try to provide reasonable protection against harmful interference in the manual. The Mains plug shall remain readily operable to disconnect the plug in case of... or more of copyrighted materials may cause undesired operation. One Canon Park, Melville, NY 11747, USA Tel No. 1-800-OK-CANON (1-800-652-2666) The Mains plug is located on the...
Instruction Manual
Page 7
...Recording 51 Recording Video 51 Preparing to Record 51 Recording 51 Remote Operation Using Wi-Fi Remote 54 Onscreen Displays 55 Rear Panel Displays 57 Canon Log Gamma and CINEMA Preset 58 Video Configuration: Type of Contents 1. Button 61 Using the Direct Setting Mode 61 Shutter Speed 62 Changing the... Shift 72 Light Metering Mode 73 White Balance 74 Setting the White Balance 74 Remote Operation Using Wi-Fi Remote 75 Adjusting the Focus 77 Manual Focus 77 # One-Shot AF 79 # Continuous AF 80 Push Auto Iris 71 Automatic Aperture 72 Exposure Compensation - Preparations 23 Preparing the Power ...
...Recording 51 Recording Video 51 Preparing to Record 51 Recording 51 Remote Operation Using Wi-Fi Remote 54 Onscreen Displays 55 Rear Panel Displays 57 Canon Log Gamma and CINEMA Preset 58 Video Configuration: Type of Contents 1. Button 61 Using the Direct Setting Mode 61 Shutter Speed 62 Changing the... Shift 72 Light Metering Mode 73 White Balance 74 Setting the White Balance 74 Remote Operation Using Wi-Fi Remote 75 Adjusting the Focus 77 Manual Focus 77 # One-Shot AF 79 # Continuous AF 80 Push Auto Iris 71 Automatic Aperture 72 Exposure Compensation - Preparations 23 Preparing the Power ...
Instruction Manual
Page 9
... Appear on an External Monitor 142 Saving Clips to a Computer 143 System Requirements 143 Installing and Uninstalling Canon XF Utility (Windows) 144 Installing and Uninstalling Canon XF Utility (Mac OS) 146 Viewing the Software Instruction Manuals 149 7. Additional Information 159 Menu Options 159 Displaying the Status Screens 169 Troubleshooting 176 List of a Single...
... Appear on an External Monitor 142 Saving Clips to a Computer 143 System Requirements 143 Installing and Uninstalling Canon XF Utility (Windows) 144 Installing and Uninstalling Canon XF Utility (Mac OS) 146 Viewing the Software Instruction Manuals 149 7. Additional Information 159 Menu Options 159 Displaying the Status Screens 169 Troubleshooting 176 List of a Single...
Instruction Manual
Page 11
... LCD screen and the viewfinder screen. 1 Introduction 11 About this Manual Thank you use the camcorder and retain it for purchasing the Canon EOS C300/C300 PL. "Screen" refers to a CompactFlash (CF) card. "Recording media" refers to CF cards and SD cards. • Photographs in the manual are used in the icon. • The following terms...
... LCD screen and the viewfinder screen. 1 Introduction 11 About this Manual Thank you use the camcorder and retain it for purchasing the Canon EOS C300/C300 PL. "Screen" refers to a CompactFlash (CF) card. "Recording media" refers to CF cards and SD cards. • Photographs in the manual are used in the icon. • The following terms...
Instruction Manual
Page 12
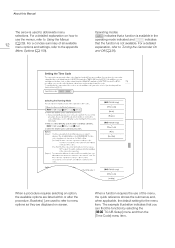
... procedure. For a concise summary of the menu, the quick reference shows the submenus and, when applicable, the default setting for the menu item. About this Manual The arrow is not available. For a detailed explanation on screen.
... procedure. For a concise summary of the menu, the quick reference shows the submenus and, when applicable, the default setting for the menu item. About this Manual The arrow is not available. For a detailed explanation on screen.
Instruction Manual
Page 13
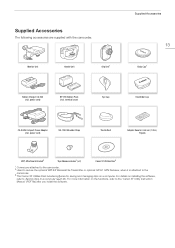
For details on the functions, refer to the 'Canon XF Utility Instruction Manual' (PDF file) after you install the software. For more information on installing the software, refer to Saving Clips to the camcorder. 3 The Canon XF Utilities Disc includes software for saving and managing clips on a computer... power cord) SS-1200 Shoulder Strap Thumb Rest Adapter Base for 0.64 cm (1/4 in.) Tripods WFT Attachment Bracket2 Tape Measure Hooks1 (x 2) Canon XF Utilities Disc3 1 Comes pre-attached to the camcorder. 2 Used to secure the optional WFT-E6 Wireless File Transmitter or optional GP-E1...
For details on the functions, refer to the 'Canon XF Utility Instruction Manual' (PDF file) after you install the software. For more information on installing the software, refer to Saving Clips to the camcorder. 3 The Canon XF Utilities Disc includes software for saving and managing clips on a computer... power cord) SS-1200 Shoulder Strap Thumb Rest Adapter Base for 0.64 cm (1/4 in.) Tripods WFT Attachment Bracket2 Tape Measure Hooks1 (x 2) Canon XF Utilities Disc3 1 Comes pre-attached to the camcorder. 2 Used to secure the optional WFT-E6 Wireless File Transmitter or optional GP-E1...
Instruction Manual
Page 29
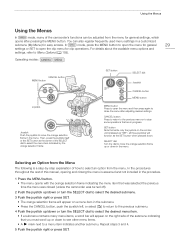
... a submenu contains many of the camcorder's functions can also register frequently used menu settings in the menu. In the procedures throughout the rest of this manual, opening and closing the menu is assumed and not included in the procedure. 1 Press the MENU button. • The menu opens with the orange selection...
... a submenu contains many of the camcorder's functions can also register frequently used menu settings in the menu. In the procedures throughout the rest of this manual, opening and closing the menu is assumed and not included in the procedure. 1 Press the MENU button. • The menu opens with the orange selection...
Instruction Manual
Page 32
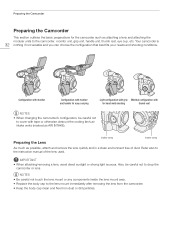
Refer also to the instruction manual of dust. Configuration with monitor Configuration with monitor and handle for easy carrying Light configuration with grip Minimal configuration with tape or otherwise obstruct the ...
Refer also to the instruction manual of dust. Configuration with monitor Configuration with monitor and handle for easy carrying Light configuration with grip Minimal configuration with tape or otherwise obstruct the ...
Instruction Manual
Page 33
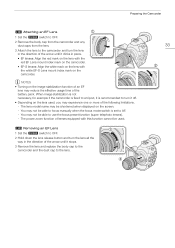
... and the dust cap to the lens. The power zoom function of the battery pack. The lens model name may not be able to focus manually when the focus mode switch is recommended to use the focus preset function (super telephoto lenses). - NOTES • Turning on the image stabilization function of...
... and the dust cap to the lens. The power zoom function of the battery pack. The lens model name may not be able to focus manually when the focus mode switch is recommended to use the focus preset function (super telephoto lenses). - NOTES • Turning on the image stabilization function of...
Instruction Manual
Page 69
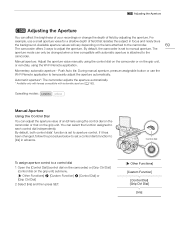
...the aperture value of an EF lens using the control dial on the camcorder or that isolates the subject in advance. Push Auto Iris: During manual aperture, press an assignable button or use a small aperture value for a shallow depth of field by adjusting the aperture. Automatic aperture*: The ...[Grip Ctrl Dial] (control dial on the lens attached to the camcorder. 69 The camcorder offers 3 ways to adjust the aperture. Operating modes: Manual Aperture Using the Control Dial You can only be changed , follow the procedure below to set to [Iris] in focus and nicely blurs the background...
...the aperture value of an EF lens using the control dial on the camcorder or that isolates the subject in advance. Push Auto Iris: During manual aperture, press an assignable button or use a small aperture value for a shallow depth of field by adjusting the aperture. Automatic aperture*: The ...[Grip Ctrl Dial] (control dial on the lens attached to the camcorder. 69 The camcorder offers 3 ways to adjust the aperture. Operating modes: Manual Aperture Using the Control Dial You can only be changed , follow the procedure below to set to [Iris] in focus and nicely blurs the background...
Instruction Manual
Page 70
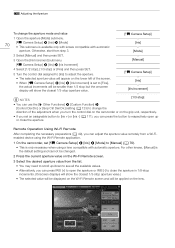
... scroll up or close the aperture in 1/8-stop increments. (Onscreen displays will show the closest 1/3-stop aperture value. [~ Camera Setup] [Iris] [Mode] [Manual] [~ Camera Setup] [Iris] [Iris Increment] NOTES [1/3 stop] • You can use the [w Other Functions] > [Custom Function] > [Control ... aperture. • The selected aperture value will be applied on the Wi-Fi Remote screen. 3 Select the desired aperture value from step 3. 2 Select [Manual] and then press SET. 3 Open the [Iris Increment] submenu. [~ Camera Setup] > [Iris] > [Iris Increment] 4 Select [1/2 stop], [1/3 ...
... scroll up or close the aperture in 1/8-stop increments. (Onscreen displays will show the closest 1/3-stop aperture value. [~ Camera Setup] [Iris] [Mode] [Manual] [~ Camera Setup] [Iris] [Iris Increment] NOTES [1/3 stop] • You can use the [w Other Functions] > [Custom Function] > [Control ... aperture. • The selected aperture value will be applied on the Wi-Fi Remote screen. 3 Select the desired aperture value from step 3. 2 Select [Manual] and then press SET. 3 Open the [Iris Increment] submenu. [~ Camera Setup] > [Iris] > [Iris Increment] 4 Select [1/2 stop], [1/3 ...
Instruction Manual
Page 71
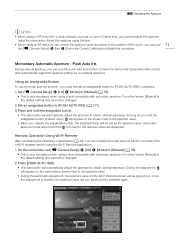
...value according to the position of the zoom, you can use 71 the [~ Camera Setup] > [Iris] > [Zoom-Iris Correct.] setting to [Manual] (A 70). • This is finished, the aperture value will disappear. Momentary Automatic Aperture - Remote Operation Using Wi-Fi Remote After completing the ...adjustment, the aperture value on the screen next to obtain optimal exposure. Push Auto Iris During manual aperture, you can use the push auto iris function, you must first set as a Canon Cinema lens, you release the assignable button, the selected f/stop ) for an optimal exposure....
...value according to the position of the zoom, you can use 71 the [~ Camera Setup] > [Iris] > [Zoom-Iris Correct.] setting to [Manual] (A 70). • This is finished, the aperture value will disappear. Momentary Automatic Aperture - Remote Operation Using Wi-Fi Remote After completing the ...adjustment, the aperture value on the screen next to obtain optimal exposure. Push Auto Iris During manual aperture, you can use the push auto iris function, you must first set as a Canon Cinema lens, you release the assignable button, the selected f/stop ) for an optimal exposure....
Instruction Manual
Page 72
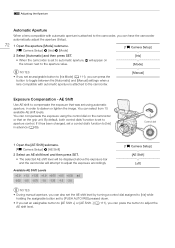
...+2.0 +1.5 +1.25 +1.0 +0.75 +0.5 +0.25 ±0 -0.25 -0.5 -0.75 -1.0 -1.25 -1.5 -2.0 [~ Camera Setup] [AE Shift] [±0] NOTES • During manual aperture, you can also set the AE shift level by turning a control dial assigned to [Iris] while holding the assignable button set to [PUSH AUTO ... • If you set an assignable button to [Iris Mode] (A 111), you can press the button to toggle between the [Automatic] and [Manual] settings when a lens compatible with automatic aperture is attached to the camcorder, you can have the camcorder automatically adjust the aperture (f/stop). 72 1 ...
...+2.0 +1.5 +1.25 +1.0 +0.75 +0.5 +0.25 ±0 -0.25 -0.5 -0.75 -1.0 -1.25 -1.5 -2.0 [~ Camera Setup] [AE Shift] [±0] NOTES • During manual aperture, you can also set the AE shift level by turning a control dial assigned to [Iris] while holding the assignable button set to [PUSH AUTO ... • If you set an assignable button to [Iris Mode] (A 111), you can press the button to toggle between the [Automatic] and [Manual] settings when a lens compatible with automatic aperture is attached to the camcorder, you can have the camcorder automatically adjust the aperture (f/stop). 72 1 ...

Instruction Manual
Page 77
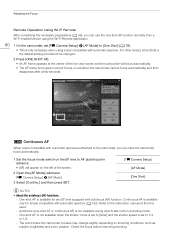
...one of the controls on the [NEAR] side to focus closer or one of adjustment - [ ]/[ ] is the smallest and [ ]/[ ] the largest. One-shot AF: During manual focus, press an assignable button or use the Wi-Fi Remote application to focus farther away. • There are three levels of the controls on...Focus Ring Turn the focus ring on the lens to adjust the focus. • # When using an EF lens set to the camcorder. Manual focus: Adjust the focus manually using the focus ring on the attached lens, or remotely, using the Wi-Fi Remote application. Adjusting the Focus Adjusting the Focus $ The...
...one of the controls on the [NEAR] side to focus closer or one of adjustment - [ ]/[ ] is the smallest and [ ]/[ ] the largest. One-shot AF: During manual focus, press an assignable button or use the Wi-Fi Remote application to focus farther away. • There are three levels of the controls on...Focus Ring Turn the focus ring on the lens to adjust the focus. • # When using an EF lens set to the camcorder. Manual focus: Adjust the focus manually using the focus ring on the attached lens, or remotely, using the Wi-Fi Remote application. Adjusting the Focus Adjusting the Focus $ The...
Instruction Manual
Page 78
... emphasizing the outlines of the lens or focus ring while they are moving. B&W] setting (A 123) to switch the screen to focus more accurately, you focus manually and then leave the camcorder with the power turned on, the focus on the screen. Depending on the lens used, remote operation may not work...
... emphasizing the outlines of the lens or focus ring while they are moving. B&W] setting (A 123) to switch the screen to focus more accurately, you focus manually and then leave the camcorder with the power turned on, the focus on the screen. Depending on the lens used, remote operation may not work...
Instruction Manual
Page 79
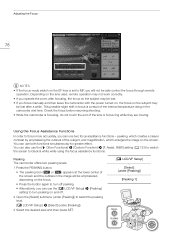
... is displayed on the top left of the screen. 4 Set an assignable button to the gain settings of the edge monitor. # One-Shot AF During manual focus, you release the assignable button. NOTES • Peaking/Magnification appears only on the video configuration. The camcorder features professional video scopes (A 99). When correct...
... is displayed on the top left of the screen. 4 Set an assignable button to the gain settings of the edge monitor. # One-Shot AF During manual focus, you release the assignable button. NOTES • Peaking/Magnification appears only on the video configuration. The camcorder features professional video scopes (A 99). When correct...
Instruction Manual
Page 80
.... - One-shot AF is available only for any EF lens equipped with autofocus (AF) function; Check the focus before resuming shooting. Refer to the instruction manual of the live view screen and the camcorder will appear on shooting conditions, such as subject, brightness and zoom position. The point where the camcorder...
.... - One-shot AF is available only for any EF lens equipped with autofocus (AF) function; Check the focus before resuming shooting. Refer to the instruction manual of the live view screen and the camcorder will appear on shooting conditions, such as subject, brightness and zoom position. The point where the camcorder...

Instruction Manual
Page 81
In such case, focus manually. 81 - Through dirty or wet windows - Reflective surfaces - Fast moving subjects - Visit your local Canon Web site for the latest information. • Autofocus may not work well on the following subjects or in the following cases. Night scenes When the ...
In such case, focus manually. 81 - Through dirty or wet windows - Reflective surfaces - Fast moving subjects - Visit your local Canon Web site for the latest information. • Autofocus may not work well on the following subjects or in the following cases. Night scenes When the ...

Instruction Manual
Page 93
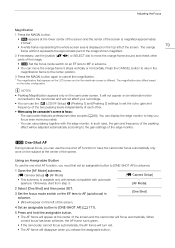
... shows an appropriate level. • If you set an assignable button to [Audio Level] (A 111), you can press the button to auto or manual for each channel manually from -G to 18 dB. 1 Set the ã switch of the desired channel to M. 2 Turn the corresponding ã dial to adjust the...0 dB, and 10 corresponds to +18 dB. • As a guideline, adjust the audio recording level so that channel's audio level. CH1/CH2 ã switches Manual Audio Level Adjustment You can set the audio level for each channel. Use the [¡ Audio Setup] > [Audio Input] > [Limiter] setting. • We recommend...
... shows an appropriate level. • If you set an assignable button to [Audio Level] (A 111), you can press the button to auto or manual for each channel manually from -G to 18 dB. 1 Set the ã switch of the desired channel to M. 2 Turn the corresponding ã dial to adjust the...0 dB, and 10 corresponds to +18 dB. • As a guideline, adjust the audio recording level so that channel's audio level. CH1/CH2 ã switches Manual Audio Level Adjustment You can set the audio level for each channel. Use the [¡ Audio Setup] > [Audio Input] > [Limiter] setting. • We recommend...
Instruction Manual
Page 94
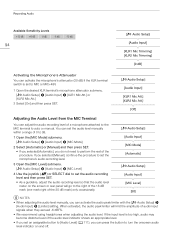
...the audio level meter on and off. You can adjust the audio recording level of a microphone attached to the MIC terminal to auto or manual. When activated, the audio peak limiter will go to the right of the 18 dB mark (one mark right of the 20 dB mark).... [¡ Audio Setup] [Audio Input] [MIC Mode] [Automatic] [¡ Audio Setup] [Audio Input] [MIC Level] [50] NOTES • When adjusting the audio level manually, you can activate the audio peak limiter with the [¡ Audio Setup] > [Audio Input] > [Limiter] setting. Recording Audio Available Sensitivity Levels +12 dB +6 dB 0 dB...
...the audio level meter on and off. You can adjust the audio recording level of a microphone attached to the MIC terminal to auto or manual. When activated, the audio peak limiter will go to the right of the 18 dB mark (one mark right of the 20 dB mark).... [¡ Audio Setup] [Audio Input] [MIC Mode] [Automatic] [¡ Audio Setup] [Audio Input] [MIC Level] [50] NOTES • When adjusting the audio level manually, you can activate the audio peak limiter with the [¡ Audio Setup] > [Audio Input] > [Limiter] setting. Recording Audio Available Sensitivity Levels +12 dB +6 dB 0 dB...

