Instruction Manual
Page 8
...from the MIC Terminal 94 Monitoring the Audio with Headphones 95 Selecting the Audio Channel 95 Using Metadata 96 Setting a User Memo Created with Canon XF Utility 96 Setting a User Memo Using Wi-Fi Remote 97 Colors Bars/Audio Reference Signal 98 Recording Color Bars 98 Recording an ... the Waveform Monitor 99 Configuring the Vectorscope 100 Configuring the Edge Monitor 100 Adding Marks while Recording 101 Adding Shot Marks while Recording 101 Remote Operation Using Wi-Fi Remote 101 Adding an $ Mark or % Mark to the Camcorder 91 Selecting the Audio Input from the XLR Terminals 92 Adjusting ...
...from the MIC Terminal 94 Monitoring the Audio with Headphones 95 Selecting the Audio Channel 95 Using Metadata 96 Setting a User Memo Created with Canon XF Utility 96 Setting a User Memo Using Wi-Fi Remote 97 Colors Bars/Audio Reference Signal 98 Recording Color Bars 98 Recording an ... the Waveform Monitor 99 Configuring the Vectorscope 100 Configuring the Edge Monitor 100 Adding Marks while Recording 101 Adding Shot Marks while Recording 101 Remote Operation Using Wi-Fi Remote 101 Adding an $ Mark or % Mark to the Camcorder 91 Selecting the Audio Input from the XLR Terminals 92 Adjusting ...
Instruction Manual
Page 9
... Accessories 187 Specifications 192 Index 197 6. 9 Clip Operations 130 Using the Clip Menu 131 Displaying Clip Information 131 Adding $ Marks or % Marks 132 Deleting $ Marks or % Marks 132 Copying Clips 133 Deleting Clips 134 Deleting the User Memo and GPS Information 134 Copying a Custom Picture File Embedded in ...Onscreen Displays to Appear on an External Monitor 142 Saving Clips to a Computer 143 System Requirements 143 Installing and Uninstalling Canon XF Utility (Windows) 144 Installing and Uninstalling Canon XF Utility (Mac OS) 146 Viewing the Software Instruction Manuals 149 7.
... Accessories 187 Specifications 192 Index 197 6. 9 Clip Operations 130 Using the Clip Menu 131 Displaying Clip Information 131 Adding $ Marks or % Marks 132 Deleting $ Marks or % Marks 132 Copying Clips 133 Deleting Clips 134 Deleting the User Memo and GPS Information 134 Copying a Custom Picture File Embedded in ...Onscreen Displays to Appear on an External Monitor 142 Saving Clips to a Computer 143 System Requirements 143 Installing and Uninstalling Canon XF Utility (Windows) 144 Installing and Uninstalling Canon XF Utility (Mac OS) 146 Viewing the Software Instruction Manuals 149 7.
Instruction Manual
Page 18
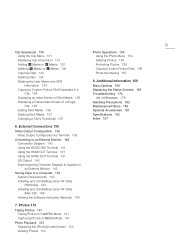
Names of Parts 66 18 67 68 65 69 65 Tape measure hooks Use the hooks to accurately measure the distance from the focal plane. 66 Focal plane marks 67 Socket for the WFT Attachment Bracket (A 49) 68 Strap mounts (A 41) 69 Accessory shoe with mounting hole for 0.64 cm (1/4 in.) screws For attaching accessories such as the optional VL-10Li II Battery Video Light. 72 73 70 71 70 TB-1 Tripod Base for tripods with 0.95 cm (3/8 in.) screws (A 40) 71 Tripod socket (A 40) 72 Attachment sockets for the optional TA-100 Tripod Adapter (A 40) 73 Tripod base screws (A 40)
Names of Parts 66 18 67 68 65 69 65 Tape measure hooks Use the hooks to accurately measure the distance from the focal plane. 66 Focal plane marks 67 Socket for the WFT Attachment Bracket (A 49) 68 Strap mounts (A 41) 69 Accessory shoe with mounting hole for 0.64 cm (1/4 in.) screws For attaching accessories such as the optional VL-10Li II Battery Video Light. 72 73 70 71 70 TB-1 Tripod Base for tripods with 0.95 cm (3/8 in.) screws (A 40) 71 Tripod socket (A 40) 72 Attachment sockets for the optional TA-100 Tripod Adapter (A 40) 73 Tripod base screws (A 40)
Instruction Manual
Page 29
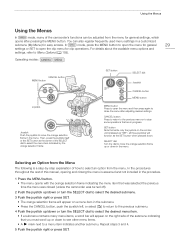
... only the joystick on the right side of the submenu indicating that you must scroll up or down to see other menu items. • A Ð mark next to a menu item indicates another submenu. SELECT dial Turn the dial to move the orange selection frame in the menu. For details about the...
... only the joystick on the right side of the submenu indicating that you must scroll up or down to see other menu items. • A Ð mark next to a menu item indicates another submenu. SELECT dial Turn the dial to move the orange selection frame in the menu. For details about the...
Instruction Manual
Page 32
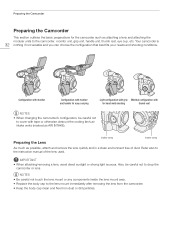
... Configuration with monitor and handle for easy carrying Light configuration with grip Minimal configuration with tape or otherwise obstruct the cooling fan's air intake vents (marked as AIR INTAKE). Intake vents Intake vents Preparing the Lens As much as attaching a lens and attaching the modular units to drop the camcorder or...
... Configuration with monitor and handle for easy carrying Light configuration with grip Minimal configuration with tape or otherwise obstruct the cooling fan's air intake vents (marked as AIR INTAKE). Intake vents Intake vents Preparing the Lens As much as attaching a lens and attaching the modular units to drop the camcorder or...
Instruction Manual
Page 33
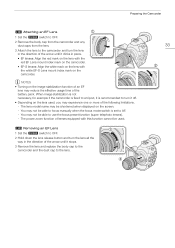
... lens. You may experience one or more of the following limitations. - The power zoom function of lenses equipped with the white EF-S Lens mount index mark on the camcorder. The lens model name may reduce the effective usage time of the battery pack. Preparing the Camcorder # Attaching an EF Lens 1 Set... and turn the lens all the way in place. • EF lenses: Align the red mark on the lens with the red EF Lens mount index mark on the camcorder. • EF-S lenses: Align the white mark on the lens with this function cannot be used , you may not be able to AF...
... lens. You may experience one or more of the following limitations. - The power zoom function of lenses equipped with the white EF-S Lens mount index mark on the camcorder. The lens model name may reduce the effective usage time of the battery pack. Preparing the Camcorder # Attaching an EF Lens 1 Set... and turn the lens all the way in place. • EF lenses: Align the red mark on the lens with the red EF Lens mount index mark on the camcorder. • EF-S lenses: Align the white mark on the lens with this function cannot be used , you may not be able to AF...
Instruction Manual
Page 36
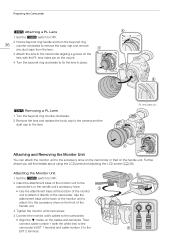
... at the bottom of the handle unit. 3 Tighten the monitor unit's lock screw. 4 Connect the monitor unit's cables to the camcorder. • Align the Î marks on the cables and terminals. Preparing the Camcorder $ Attaching a PL Lens 1 Set the Q switch to OFF. 2 Hold a bayonet ring handle and turn the bayonet ring...
... at the bottom of the handle unit. 3 Tighten the monitor unit's lock screw. 4 Connect the monitor unit's cables to the camcorder. • Align the Î marks on the cables and terminals. Preparing the Camcorder $ Attaching a PL Lens 1 Set the Q switch to OFF. 2 Hold a bayonet ring handle and turn the bayonet ring...

Instruction Manual
Page 45
... [Initialize Media] (A 111), you can select quick initialization, which deletes all the data it contains is erased. You can use any recording media with an $ mark, protected photos, and custom picture files. IMPORTANT • Initializing a recording media will be recovered. If both slots contain a CF card, you use the SD card...
... [Initialize Media] (A 111), you can select quick initialization, which deletes all the data it contains is erased. You can use any recording media with an $ mark, protected photos, and custom picture files. IMPORTANT • Initializing a recording media will be recovered. If both slots contain a CF card, you use the SD card...
Instruction Manual
Page 46
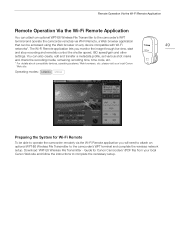
...open the cover of the selected slot, the camcorder will automatically switch to the other card. • Double slot recording cannot be used with a Î mark on top of the CF card icon. 46 NOTES • If both CF cards, which is activated. Relay recording is not available during slow motion... clip simultaneously to both CF card slots contain a CF card and you record. On the screen, the CF card selected is indicated with a Ð mark next to CF card icon and in green. Preparing Recording Media Press the SLOT SELECT button. • The access indicator of the selected CF card...
...open the cover of the selected slot, the camcorder will automatically switch to the other card. • Double slot recording cannot be used with a Î mark on top of the CF card icon. 46 NOTES • If both CF cards, which is activated. Relay recording is not available during slow motion... clip simultaneously to both CF card slots contain a CF card and you record. On the screen, the CF card selected is indicated with a Ð mark next to CF card icon and in green. Preparing Recording Media Press the SLOT SELECT button. • The access indicator of the selected CF card...
Instruction Manual
Page 49
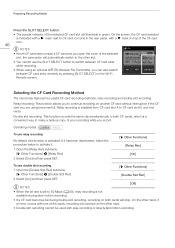
... to operate the camcorder remotely via Wi-Fi Remote, a Web browser application that can also create, edit and transfer a metadata profile, set various shot marks and check the recording media, remaining recording time, time code, etc. * For details about compatible devices, operating systems, Web browsers, etc. Remote Operation... live view, start and stop recording and remotely control the shutter speed, ISO speed/gain and other settings. please visit your local Canon Web site and follow the instructions to complete the necessary setup. Download 'WFT-E6 Wireless File Transmitter -
... to operate the camcorder remotely via Wi-Fi Remote, a Web browser application that can also create, edit and transfer a metadata profile, set various shot marks and check the recording media, remaining recording time, time code, etc. * For details about compatible devices, operating systems, Web browsers, etc. Remote Operation... live view, start and stop recording and remotely control the shutter speed, ISO speed/gain and other settings. please visit your local Canon Web site and follow the instructions to complete the necessary setup. Download 'WFT-E6 Wireless File Transmitter -
Instruction Manual
Page 52
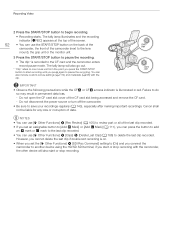
...) to review part or all of the last clip recorded. • If you set an assignable button to [Add $ Mark] or [Add % Mark] (A 111), you can press the button to add an $ mark or % mark to the last clip recorded. • You can use [w Other Functions] > [Clips] > [Delete Last Clip] (A 166) to begin recording...), the grip unit or the monitor unit. 3 Press the START/STOP button to pause the recording. • The clip* is illuminated in permanent data loss. - Canon shall not be liable for any loss or corruption of the CF card slot being accessed and remove the CF card. -
...) to review part or all of the last clip recorded. • If you set an assignable button to [Add $ Mark] or [Add % Mark] (A 111), you can press the button to add an $ mark or % mark to the last clip recorded. • You can use [w Other Functions] > [Clips] > [Delete Last Clip] (A 166) to begin recording...), the grip unit or the monitor unit. 3 Press the START/STOP button to pause the recording. • The clip* is illuminated in permanent data loss. - Canon shall not be liable for any loss or corruption of the CF card slot being accessed and remove the CF card. -
Instruction Manual
Page 56
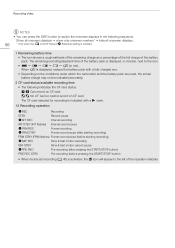
... status. 2/3 Can record on CF card 4/5 No CF card or cannot record on CF card The CF card selected for recording is indicated with a Ð mark. 14 Recording operation ÜREC Recording STBY Record pause ÜINT REC Interval recording INT STBY (INT flashes) Interval record pause ÜFRM REC Frame...
... status. 2/3 Can record on CF card 4/5 No CF card or cannot record on CF card The CF card selected for recording is indicated with a Ð mark. 14 Recording operation ÜREC Recording STBY Record pause ÜINT REC Interval recording INT STBY (INT flashes) Interval record pause ÜFRM REC Frame...

Instruction Manual
Page 73
..., for example, when the subject is lit by a spotlight. # Adjusting the Aperture The Exposure Bar The Î on the left of the screen. the scale markings indicate the deviation from the entire screen, giving more weight to the subject in the center. [Spotlight] ®: Use this option when recording a scene in...
..., for example, when the subject is lit by a spotlight. # Adjusting the Aperture The Exposure Bar The Î on the left of the screen. the scale markings indicate the deviation from the entire screen, giving more weight to the subject in the center. [Spotlight] ®: Use this option when recording a scene in...

Instruction Manual
Page 93
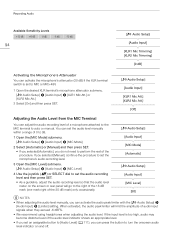
CH1/CH2 ã switches CH1/CH2 ã dials NOTES • If at least one mark right of the 20 dB mark) only occasionally. • Closing the protective cover for XLR audio controls will prevent the audio controls from -G to 18 dB. 1 Set the ã switch of ...audio input signals when they exceed -6 dBFS. When activated, the audio peak limiter will go to the right of the 18 dB mark (one of the channels is too high, audio may become distorted even if the audio level indicator shows an appropriate level. • If you set...
CH1/CH2 ã switches CH1/CH2 ã dials NOTES • If at least one mark right of the 20 dB mark) only occasionally. • Closing the protective cover for XLR audio controls will prevent the audio controls from -G to 18 dB. 1 Set the ã switch of ...audio input signals when they exceed -6 dBFS. When activated, the audio peak limiter will go to the right of the 18 dB mark (one of the channels is too high, audio may become distorted even if the audio level indicator shows an appropriate level. • If you set...
Instruction Manual
Page 94
...] or [Manual] and then press SET. • If you selected [Automatic], you do not need to the right of the 18 dB mark (one mark right of the 20 dB mark) only occasionally. [¡ Audio Setup] [Audio Input] [MIC Mode] [Automatic] [¡ Audio Setup] [Audio Input] [MIC Level] [50] NOTES • When adjusting...
...] or [Manual] and then press SET. • If you selected [Automatic], you do not need to the right of the 18 dB mark (one mark right of the 20 dB mark) only occasionally. [¡ Audio Setup] [Audio Input] [MIC Mode] [Automatic] [¡ Audio Setup] [Audio Input] [MIC Level] [50] NOTES • When adjusting...
Instruction Manual
Page 101
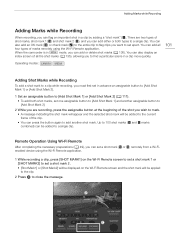
... a clip while recording, you must first set in advance an assignable button to [Add Shot Mark 1] or [Add Shot Mark 2]. 1 Set an assignable button to [Add Shot Mark 1] or [Add Shot Mark 2] (A 111). • To add both types to a single clip. There are recording, press the assignable ...or both shot marks, set one assignable button to [Add Shot Mark 1] and another assignable button to [Add Shot Mark 2]. 2 While you are two types of shot marks, shot mark 1 (") and shot mark 2 (#), and you wish to mark. • A message indicating the shot mark will appear and the selected shot mark will be ...
... a clip while recording, you must first set in advance an assignable button to [Add Shot Mark 1] or [Add Shot Mark 2]. 1 Set an assignable button to [Add Shot Mark 1] or [Add Shot Mark 2] (A 111). • To add both types to a single clip. There are recording, press the assignable ...or both shot marks, set one assignable button to [Add Shot Mark 1] and another assignable button to [Add Shot Mark 2]. 2 While you are two types of shot marks, shot mark 1 (") and shot mark 2 (#), and you wish to mark. • A message indicating the shot mark will appear and the selected shot mark will be ...
Instruction Manual
Page 102
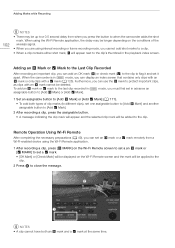
...on the conditions of clip marks (to different clips), set a % mark. • [OK Mark] or [Check Mark] will be displayed on the Wi-Fi Remote screen to set a an $ mark or [% MARK] to set one assignable button to [Add $ Mark] and another assignable button to [Add % Mark]. 2 After recording a clip...thumbnail in advance an assignable button to [Add $ Mark] or [Add % Mark]. 1 Set an assignable button to [Add $ Mark] or [Add % Mark] (A 111). • To add both an $ mark and a % mark at the same time. Adding an $ Mark or % Mark to the Last Clip Recorded After recording an important clip...
...on the conditions of clip marks (to different clips), set a % mark. • [OK Mark] or [Check Mark] will be displayed on the Wi-Fi Remote screen to set a an $ mark or [% MARK] to set one assignable button to [Add $ Mark] and another assignable button to [Add % Mark]. 2 After recording a clip...thumbnail in advance an assignable button to [Add $ Mark] or [Add % Mark]. 1 Set an assignable button to [Add $ Mark] or [Add % Mark] (A 111). • To add both an $ mark and a % mark at the same time. Adding an $ Mark or % Mark to the Last Clip Recorded After recording an important clip...

Instruction Manual
Page 111
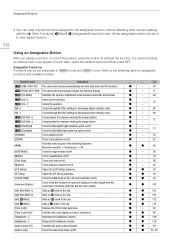
... Setting (NONE)] and the customizable slot will change and then press SET. [w Other Functions] [Assign Button] • A list of the selected menu setting will be marked by a .
... Setting (NONE)] and the customizable slot will change and then press SET. [w Other Functions] [Assign Button] • A list of the selected menu setting will be marked by a .
Instruction Manual
Page 112
... on video output from the camcorder's terminals (both HD and SD video output). [Add Shot Mark 1] Adds an " mark to the clip. [Add Shot Mark 2]* Adds an # mark to the clip. [Add $ Mark] Adds an $ mark to the clip. [Add % Mark] Adds a % mark to the assignable buttons, without affecting other camera settings, with the [w Other Functions] >[Reset] > [Assignable...
... on video output from the camcorder's terminals (both HD and SD video output). [Add Shot Mark 1] Adds an " mark to the clip. [Add Shot Mark 2]* Adds an # mark to the clip. [Add $ Mark] Adds an $ mark to the clip. [Add % Mark] Adds a % mark to the assignable buttons, without affecting other camera settings, with the [w Other Functions] >[Reset] > [Assignable...
Instruction Manual
Page 126
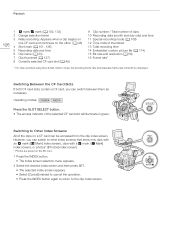
... frame rate will illuminate in green. v Switching Between the CF Card Slots If both be accessed from the clip index screen. Playback 126 1 $ mark/% mark (A 102, 132) 2 Orange selection frame 3 Relay recording: Appears when a clip begins on one CF card and continues on the other index screens... that show only clips with an $ mark ([$ Mark] index screen), clips with a % mark ([% Mark] index screen), or photos* ([Photos] index screen). * Photos are saved on a CF card can switch between them as necessary.
... frame rate will illuminate in green. v Switching Between the CF Card Slots If both be accessed from the clip index screen. Playback 126 1 $ mark/% mark (A 102, 132) 2 Orange selection frame 3 Relay recording: Appears when a clip begins on one CF card and continues on the other index screens... that show only clips with an $ mark ([$ Mark] index screen), clips with a % mark ([% Mark] index screen), or photos* ([Photos] index screen). * Photos are saved on a CF card can switch between them as necessary.