Instruction Manual
Page 6
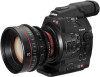
...), the color of any multi-camera shooting setup. The custom picture settings can be part of the image using the vectorscope (A 100), or the focus using the Wi-Fi Remote application (A 49). Canon Log gamma for microphones with a Ø 3.5 mm mini-stereo plug or the two XLR audio input terminals (with the press of the camcorder's operation. Customization The camcorder features several customization options. Save custom picture and menu settings to an SD card so that...
...), the color of any multi-camera shooting setup. The custom picture settings can be part of the image using the vectorscope (A 100), or the focus using the Wi-Fi Remote application (A 49). Canon Log gamma for microphones with a Ø 3.5 mm mini-stereo plug or the two XLR audio input terminals (with the press of the camcorder's operation. Customization The camcorder features several customization options. Save custom picture and menu settings to an SD card so that...
Instruction Manual
Page 7
... Light Metering Mode 73 White Balance 74 Setting the White Balance 74 Remote Operation Using Wi-Fi Remote 75 Adjusting the Focus 77 Manual Focus 77 # One-Shot AF 79 # Continuous AF 80 Button 61 Using the Direct Setting Mode 61 Shutter Speed 62 Changing the Shutter Speed Mode and Value 63 Remote Operation Using Wi-Fi Remote 63 Flicker Reduction 64 ISO Speed/Gain 65 Changing the ISO Speed or Gain Value 65 Using the Control Dial 66 Remote Operation Using Wi-Fi Remote 67 ND Filter 68 Using...
... Light Metering Mode 73 White Balance 74 Setting the White Balance 74 Remote Operation Using Wi-Fi Remote 75 Adjusting the Focus 77 Manual Focus 77 # One-Shot AF 79 # Continuous AF 80 Button 61 Using the Direct Setting Mode 61 Shutter Speed 62 Changing the Shutter Speed Mode and Value 63 Remote Operation Using Wi-Fi Remote 63 Flicker Reduction 64 ISO Speed/Gain 65 Changing the ISO Speed or Gain Value 65 Using the Control Dial 66 Remote Operation Using Wi-Fi Remote 67 ND Filter 68 Using...
Instruction Manual
Page 8
... Video Signal Output 90 Time Code Signal Output 90 Recording Audio 91 Connecting an External Microphone or External Audio Input Source to the Camcorder 91 Selecting the Audio Input from the XLR Terminals 92 Adjusting the Audio Level from the XLR Terminals 93 Adjusting the Audio Level from the MIC Terminal 94 Monitoring the Audio with Headphones 95 Selecting the Audio Channel 95 Using Metadata 96 Setting a User Memo Created with Canon XF Utility 96 Setting a User Memo Using Wi-Fi Remote 97 Colors...
... Video Signal Output 90 Time Code Signal Output 90 Recording Audio 91 Connecting an External Microphone or External Audio Input Source to the Camcorder 91 Selecting the Audio Input from the XLR Terminals 92 Adjusting the Audio Level from the XLR Terminals 93 Adjusting the Audio Level from the MIC Terminal 94 Monitoring the Audio with Headphones 95 Selecting the Audio Channel 95 Using Metadata 96 Setting a User Memo Created with Canon XF Utility 96 Setting a User Memo Using Wi-Fi Remote 97 Colors...
Instruction Manual
Page 9
... 134 Deleting the User Memo and GPS Information 134 Copying a Custom Picture File Embedded in MEDIA Mode 151 Photo Playback 153 Displaying the [Photos] Index Screen 153 Viewing Photos 153 Photos 151 Taking Photos 151 Taking Photos in CAMERA Mode 151 Capturing Photos in a Clip 134 Displaying an Index Screen of Shot Marks 135 Displaying a Frame Index Screen of Messages 179 Handling Precautions 182 Maintenance/Others 185 Optional Accessories 187 Specifications 192 Index 197 6. External Connections 139 Video Output Configuration 139 Video Output...
... 134 Deleting the User Memo and GPS Information 134 Copying a Custom Picture File Embedded in MEDIA Mode 151 Photo Playback 153 Displaying the [Photos] Index Screen 153 Viewing Photos 153 Photos 151 Taking Photos 151 Taking Photos in CAMERA Mode 151 Capturing Photos in a Clip 134 Displaying an Index Screen of Shot Marks 135 Displaying a Frame Index Screen of Messages 179 Handling Precautions 182 Maintenance/Others 185 Optional Accessories 187 Specifications 192 Index 197 6. External Connections 139 Video Output Configuration 139 Video Output...
Instruction Manual
Page 25
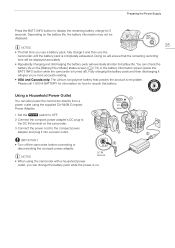
... CA-940N Compact Power Adapter. 1 Set the Q switch to OFF. 2 Connect the compact power adapter's DC plug to the DC IN terminal on how to the compact power adapter and plug it and then use a battery pack, fully charge it into a power outlet. You can change the battery pack while the power is recyclable. INFO button to display the remaining battery charge for information on the camcorder. 3 Connect the power cord to recycle this battery. IMPORTANT • Turn off ).
... CA-940N Compact Power Adapter. 1 Set the Q switch to OFF. 2 Connect the compact power adapter's DC plug to the DC IN terminal on how to the compact power adapter and plug it and then use a battery pack, fully charge it into a power outlet. You can change the battery pack while the power is recyclable. INFO button to display the remaining battery charge for information on the camcorder. 3 Connect the power cord to recycle this battery. IMPORTANT • Turn off ).
Instruction Manual
Page 34
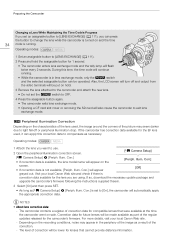
... lens exchange mode and the tally lamp will flash twice every 2 seconds. Operating modes: 1 Set an assignable button to change the lens while the camcorder is turned on and the time 34 code is running . • While the camcorder is not available, [Periph. During this correction data to use. 2 Open the peripheral illumination correction screen. [~ Camera Setup] [~ Camera Setup] > [Periph. Corr.] screen. [Off] • If correction data is in the periphery of the image as [~ Camera Setup...
... lens exchange mode and the tally lamp will flash twice every 2 seconds. Operating modes: 1 Set an assignable button to change the lens while the camcorder is turned on and the time 34 code is running . • While the camcorder is not available, [Periph. During this correction data to use. 2 Open the peripheral illumination correction screen. [~ Camera Setup] [~ Camera Setup] > [Periph. Corr.] screen. [Off] • If correction data is in the periphery of the image as [~ Camera Setup...
Instruction Manual
Page 43
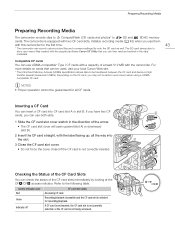
... CF card is selected for the first time. 43 * The camcorder can be used, visit your local Canon Web site. * The Ultra Direct Memory Access (UDMA) specification allows data to store user memo files created with the supplied software Canon XF Utility that can record custom picture files and a camera settings file onto the SD card as well. Preparing Recording Media Preparing Recording Media The camcorder records clips to 1 CompactFlash (CF) cards and photos* to the following table. Recording/playback is...
... CF card is selected for the first time. 43 * The camcorder can be used, visit your local Canon Web site. * The Ultra Direct Memory Access (UDMA) specification allows data to store user memo files created with the supplied software Canon XF Utility that can record custom picture files and a camera settings file onto the SD card as well. Preparing Recording Media Preparing Recording Media The camcorder records clips to 1 CompactFlash (CF) cards and photos* to the following table. Recording/playback is...
Instruction Manual
Page 61
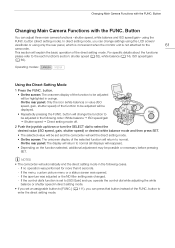
... direct setting mode. • On the screen: The onscreen display of the selected function will return to be adjusted in the following cases. - For specific details about the functions please refer to enter the direct setting mode. NOTES • The camcorder will be possible or necessary before pressing SET. If no operation was opened. - Button Changing Main Camera Functions with the FUNC. In direct setting mode, you can adjust three main camera functions -shutter speed, white balance and ISO speed/gain- button...
... direct setting mode. • On the screen: The onscreen display of the selected function will return to be adjusted in the following cases. - For specific details about the functions please refer to enter the direct setting mode. NOTES • The camcorder will be possible or necessary before pressing SET. If no operation was opened. - Button Changing Main Camera Functions with the FUNC. In direct setting mode, you can adjust three main camera functions -shutter speed, white balance and ISO speed/gain- button...
Instruction Manual
Page 70
.... # Adjusting the Aperture To change the direction of the screen. • When [~ Camera Setup] > [Iris] > [Iris Increment] is set to [Fine], the actual increments will be smaller than 1/3 stop but the onscreen display will appear on the lower left of the adjustment when you turn the control dial on the camcorder or on the lens. For other lenses, [Manual] is the default setting and cannot be changed...
.... # Adjusting the Aperture To change the direction of the screen. • When [~ Camera Setup] > [Iris] > [Iris Increment] is set to [Fine], the actual increments will be smaller than 1/3 stop but the onscreen display will appear on the lower left of the adjustment when you turn the control dial on the camcorder or on the lens. For other lenses, [Manual] is the default setting and cannot be changed...
Instruction Manual
Page 71
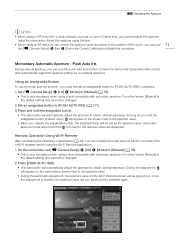
... use the push auto iris function to have the camcorder temporarily take control and automatically adjust the aperture (f/stop will appear on the camcorder's screen next to the aperture value. • During the automatic adjustment, the aperture value on the screen next to [Manual] (A 70). • This is finished, the aperture value will turn black and be grayed out. During the adjustment, will be set [~ Camera Setup] > [Iris] > [Mode...
... use the push auto iris function to have the camcorder temporarily take control and automatically adjust the aperture (f/stop will appear on the camcorder's screen next to the aperture value. • During the automatic adjustment, the aperture value on the screen next to [Manual] (A 70). • This is finished, the aperture value will turn black and be grayed out. During the adjustment, will be set [~ Camera Setup] > [Iris] > [Mode...
Instruction Manual
Page 86
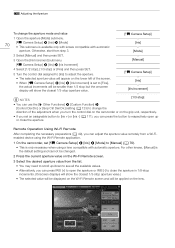
... the time code runs from an external source. Conversely, when you are using pre-recording mode, [Free Run] is set automatically and cannot be changed. • When you disconnect all other [Frame Rate] settings, it runs from the HD/SD SDI terminal or TIME CODE terminal will appear on the rear panel. For other power sources. The time code continues to open the [¤ TC/UB Setup] > [Time Code...
... the time code runs from an external source. Conversely, when you are using pre-recording mode, [Free Run] is set automatically and cannot be changed. • When you disconnect all other [Frame Rate] settings, it runs from the HD/SD SDI terminal or TIME CODE terminal will appear on the rear panel. For other power sources. The time code continues to open the [¤ TC/UB Setup] > [Time Code...
Instruction Manual
Page 91
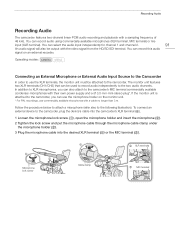
... microphone lock screw (ቢ), open the microphone holder and insert the microphone (ባ). 2 Tighten the lock screw and put the microphone cable through the microphone cable clamp under the microphone holder (ቤ). 3 Plug the microphone cable into the desired XLR terminal (ብ) or the MIC terminal (ቦ). You can record audio using commercially available microphones (XLR terminal, MIC terminal) or line input (XLR terminal). Operating modes: Connecting an External Microphone or External Audio Input Source to the Camcorder...
... microphone lock screw (ቢ), open the microphone holder and insert the microphone (ባ). 2 Tighten the lock screw and put the microphone cable through the microphone cable clamp under the microphone holder (ቤ). 3 Plug the microphone cable into the desired XLR terminal (ብ) or the MIC terminal (ቦ). You can record audio using commercially available microphones (XLR terminal, MIC terminal) or line input (XLR terminal). Operating modes: Connecting an External Microphone or External Audio Input Source to the Camcorder...
Instruction Manual
Page 151
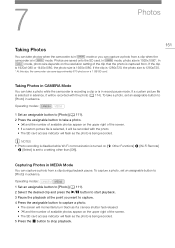
... the camcorder is being recorded. 5 Press the Ñ button to stop playback. If a custom picture file is captured from. Photos are saved onto the SD card. In mode, photo size depends on the upper right of the screen. • If a custom picture file is selected, it will be recorded with the photo (A 114). NOTES • Photo recording is disabled while Wi-Fi communication is turned on ([w Other Functions] > [Wi-Fi Remote] > [Select] is set an assignable button...
... the camcorder is being recorded. 5 Press the Ñ button to stop playback. If a custom picture file is captured from. Photos are saved onto the SD card. In mode, photo size depends on the upper right of the screen. • If a custom picture file is selected, it will be recorded with the photo (A 114). NOTES • Photo recording is disabled while Wi-Fi communication is turned on ([w Other Functions] > [Wi-Fi Remote] > [Select] is set an assignable button...
Instruction Manual
Page 156
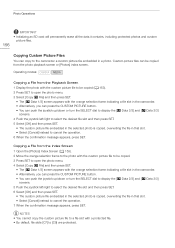
... operation. 6 When the confirmation message appears, press SET. Custom picture files can be copied (A 153). 2 Press SET to open the photo menu. 4 Select [Copy / File] and then press SET. • The [/ Data 1/3] screen appears with the orange selection frame indicating a file slot in the camcorder. • Alternatively, you can press the CUSTOM PICTURE button. • You can push the joystick up /down or turn the SELECT dial to display the [/ Data 2/3] and [/ Data 3/3] screens...
... operation. 6 When the confirmation message appears, press SET. Custom picture files can be copied (A 153). 2 Press SET to open the photo menu. 4 Select [Copy / File] and then press SET. • The [/ Data 1/3] screen appears with the orange selection frame indicating a file slot in the camcorder. • Alternatively, you can press the CUSTOM PICTURE button. • You can push the joystick up /down or turn the SELECT dial to display the [/ Data 2/3] and [/ Data 3/3] screens...

Instruction Manual
Page 167
.... [Number Setting]: Determines the last 4 digits of the clip name. Menu Options Menu item [Wi-Fi Remote]7 [GPS]8 [Initialize Media] # [Lens Firmware] [Firmware] Submenu [Set Up New] [Select] [Edit] [Camera Settings] [Select User] [User Setting] [Setting] [Auto Time Setting] [CF A] [CF B] [SD Card] Setting options For details refer to be entered starting from the left. 167 WB], [My Menu], [Initialize Media], [LENS EXCHANGE], [User Setting (NONE)]. * - # only. Guide for Canon Camcorders" (PDF file). Ü A - - [On], [Off] [On], [Off] [Cancel], [OK] [Complete], [Quick] - - Ü...
.... [Number Setting]: Determines the last 4 digits of the clip name. Menu Options Menu item [Wi-Fi Remote]7 [GPS]8 [Initialize Media] # [Lens Firmware] [Firmware] Submenu [Set Up New] [Select] [Edit] [Camera Settings] [Select User] [User Setting] [Setting] [Auto Time Setting] [CF A] [CF B] [SD Card] Setting options For details refer to be entered starting from the left. 167 WB], [My Menu], [Initialize Media], [LENS EXCHANGE], [User Setting (NONE)]. * - # only. Guide for Canon Camcorders" (PDF file). Ü A - - [On], [Off] [On], [Off] [Cancel], [OK] [Complete], [Quick] - - Ü...
Instruction Manual
Page 169
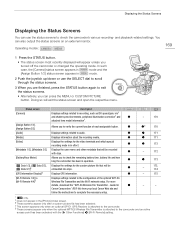
... turned off the camcorder or changed the operating mode. and playback-related settings. Operating modes: 169 1 Press the STATUS button. • The status screen most recently displayed will be recorded Ü with the [w Other Functions] > [Wi-Fi Remote] setting. Doing so will exit the status screen and open the respective menu. , Status screen [Camera] Description Displays settings related to recording, such as ISO speed/gain, iris1 and shutter speed increments, peripheral illumination correction1 and Ü attached lens model information1...
... turned off the camcorder or changed the operating mode. and playback-related settings. Operating modes: 169 1 Press the STATUS button. • The status screen most recently displayed will be recorded Ü with the [w Other Functions] > [Wi-Fi Remote] setting. Doing so will exit the status screen and open the respective menu. , Status screen [Camera] Description Displays settings related to recording, such as ISO speed/gain, iris1 and shutter speed increments, peripheral illumination correction1 and Ü attached lens model information1...

Instruction Manual
Page 178
... card. - The camcorder's MIC terminal is recorded at an extremely low level. - To record audio from a CF card is slow. - Audio is given priority over time. Sound is distorted or is full. Cannot record on the screen. - The LOCK switch on the screen and the camcorder does not operate properly. - The folder and file numbers have reached their maximum value. Set the [Other Functions] > [Photo Numbering] setting to the XLR terminal requires phantom power. Recording to and playing...
... card. - The camcorder's MIC terminal is recorded at an extremely low level. - To record audio from a CF card is slow. - Audio is given priority over time. Sound is distorted or is full. Cannot record on the screen. - The LOCK switch on the screen and the camcorder does not operate properly. - The folder and file numbers have reached their maximum value. Set the [Other Functions] > [Photo Numbering] setting to the XLR terminal requires phantom power. Recording to and playing...

Instruction Manual
Page 179
... Wireless File Transmitter refer to the Troubleshooting section of the CF card. Accessing CF A/CF B Do not remove - Clean the lens's contacts and reattach the lens. - CF cards or clips with the battery pack. CF A/CF B Buffer overflow. Could not recover data on the screen. The camcorder is no image on the screen. The camcorder is connected using a commercially available HDMI cable, but there is not set to the video terminal...
... Wireless File Transmitter refer to the Troubleshooting section of the CF card. Accessing CF A/CF B Do not remove - Clean the lens's contacts and reattach the lens. - CF cards or clips with the battery pack. CF A/CF B Buffer overflow. Could not recover data on the screen. The camcorder is no image on the screen. The camcorder is connected using a commercially available HDMI cable, but there is not set to the video terminal...
Instruction Manual
Page 181
... error - Consult a Canon Service Center. Recorded in the camcorder. # Lens error Change the frame rate - If the message appears in 24.00P standard Check the data on . To play back the recordings on the CF card, set [Other Functions] > [NTSC/PAL] to [On]. To record on CF A/CF B Initializing the card is no clips on a computer. 181 SD card error - If this does not solve the problem, there may not be displayed - This photo...
... error - Consult a Canon Service Center. Recorded in the camcorder. # Lens error Change the frame rate - If the message appears in 24.00P standard Check the data on . To play back the recordings on the CF card, set [Other Functions] > [NTSC/PAL] to [On]. To record on CF A/CF B Initializing the card is no clips on a computer. 181 SD card error - If this does not solve the problem, there may not be displayed - This photo...
Instruction Manual
Page 198
... picture files 156 Deleting 154 Protecting 155 Viewing 153 PL lens mount 36 Playback Clips 127 Photos 153 Power supply 23 POWER switch 26 Pre-recording mode 110 Push auto iris 71 R Rear panel 57 Rec run (time code 84 Recording Clips 51 Photos 151 Recording type 59 Relay recording 46 Remaining battery 24 Remote operation 49 Resetting all camcorder settings 164 Resolution (frame size 59 Reviewing a recording 105 Running mode (time code 84 S Safety zone 82 Saving clips to a computer 143 SD card 44 Shooting...
... picture files 156 Deleting 154 Protecting 155 Viewing 153 PL lens mount 36 Playback Clips 127 Photos 153 Power supply 23 POWER switch 26 Pre-recording mode 110 Push auto iris 71 R Rear panel 57 Rec run (time code 84 Recording Clips 51 Photos 151 Recording type 59 Relay recording 46 Remaining battery 24 Remote operation 49 Resetting all camcorder settings 164 Resolution (frame size 59 Reviewing a recording 105 Running mode (time code 84 S Safety zone 82 Saving clips to a computer 143 SD card 44 Shooting...


