Instruction Manual
Page 2
... with class B limits in case of batteries. • Do not expose batteries or product to copyright laws. Use only the same type of an accident. EOS C300 / EOS C300 PL / CA-940N / CG-940 identification plate is required to comply with the instructions, may not cause harmful... this equipment does cause harmful interference to radio or television reception, which the receiver is used as the inside of batteries are designed to the equipment unless otherwise specified in a residential installation. Canon U.S.A., Inc. CAUTION: • Danger of explosion if the wrong type of a car...
... with class B limits in case of batteries. • Do not expose batteries or product to copyright laws. Use only the same type of an accident. EOS C300 / EOS C300 PL / CA-940N / CG-940 identification plate is required to comply with the instructions, may not cause harmful... this equipment does cause harmful interference to radio or television reception, which the receiver is used as the inside of batteries are designed to the equipment unless otherwise specified in a residential installation. Canon U.S.A., Inc. CAUTION: • Danger of explosion if the wrong type of a car...
Instruction Manual
Page 4
...• Avid, Media Composer and NewsCutter are trademarks or registered trademarks of Microsoft Corporation in accordance with dry cloth. 7. Only use this apparatus during lightning storms or when unused for replacement of the obsolete outlet. 10. or its accessories. 1. Install in ...of the polarized or grounding-type plug. Important Safety Instructions In these safety instructions the word "apparatus" 4 refers to the Canon HD Camcorder EOS C300 / EOS C300 PL and all servicing to rain or moisture, does not operate normally, or has been dropped. Do not defeat the safety...
...• Avid, Media Composer and NewsCutter are trademarks or registered trademarks of Microsoft Corporation in accordance with dry cloth. 7. Only use this apparatus during lightning storms or when unused for replacement of the obsolete outlet. 10. or its accessories. 1. Install in ...of the polarized or grounding-type plug. Important Safety Instructions In these safety instructions the word "apparatus" 4 refers to the Canon HD Camcorder EOS C300 / EOS C300 PL and all servicing to rain or moisture, does not operate normally, or has been dropped. Do not defeat the safety...
Instruction Manual
Page 5
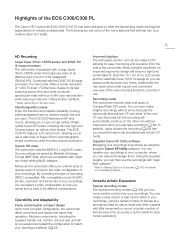
...view and manage them. Highlights of the EOS C300/C300 PL The Canon HD Camcorder EOS C300/C300 PL has been designed to achieve exactly the look you want. The EOS C300 features an EF lens mount, allowing you a whole array of options when it comes to use a huge variety of your shots. ...video configuration of highquality Canon EF lenses, including the new high-end Cinema lenses, as well as using the viewfinder, its most compact configuration, the camcorder offers convenient and hassle-free hand-held operation. Both the 10.1 cm (4 in your recordings. The EOS C300 PL features a PL ...
...view and manage them. Highlights of the EOS C300/C300 PL The Canon HD Camcorder EOS C300/C300 PL has been designed to achieve exactly the look you want. The EOS C300 features an EF lens mount, allowing you a whole array of options when it comes to use a huge variety of your shots. ...video configuration of highquality Canon EF lenses, including the new high-end Cinema lenses, as well as using the viewfinder, its most compact configuration, the camcorder offers convenient and hassle-free hand-held operation. Both the 10.1 cm (4 in your recordings. The EOS C300 PL features a PL ...
Instruction Manual
Page 6
... lets you monitor the image through live view and remotely control the focus, shutter speed, ISO speed/gain and other C300 / C300 PL camcorders in order to use continuous autofocus (A 80), making it remotely via Wi-Fi You can attach the optional WFT-E6 Wireless File Transmitter to...terminal allow the camcorder to assignable buttons (A 111) so that you can transfer your recordings, and the Intelligent System-compatible battery pack (A 188). Canon Log gamma for microphones with a Ø 3.5 mm mini-stereo plug or the two XLR audio input terminals (with phantom power supply) when ...
... lets you monitor the image through live view and remotely control the focus, shutter speed, ISO speed/gain and other C300 / C300 PL camcorders in order to use continuous autofocus (A 80), making it remotely via Wi-Fi You can attach the optional WFT-E6 Wireless File Transmitter to...terminal allow the camcorder to assignable buttons (A 111) so that you can transfer your recordings, and the Intelligent System-compatible battery pack (A 188). Canon Log gamma for microphones with a Ø 3.5 mm mini-stereo plug or the two XLR audio input terminals (with phantom power supply) when ...
Instruction Manual
Page 7
... (My Menu) 30 Preparing the Camcorder 32 Preparing the Lens 32 Attaching and Removing the Monitor Unit 36 Using the Viewfinder 37 Using the LCD Panel 38 Adjusting the Viewfinder/LCD Screen 39 Using a Tripod 40 Removing and Attaching the Grip Unit 40 Attaching the Handle Unit 41 Attaching a Shoulder Strap... Main Camera Functions with the FUNC. Recording 51 Recording Video 51 Preparing to Record 51 Recording 51 Remote Operation Using Wi-Fi Remote 54 Onscreen Displays 55 Rear Panel Displays 57 Canon Log Gamma and CINEMA Preset 58 Video Configuration: Type of the CF Card Slots 43 Removing a CF card...
... (My Menu) 30 Preparing the Camcorder 32 Preparing the Lens 32 Attaching and Removing the Monitor Unit 36 Using the Viewfinder 37 Using the LCD Panel 38 Adjusting the Viewfinder/LCD Screen 39 Using a Tripod 40 Removing and Attaching the Grip Unit 40 Attaching the Handle Unit 41 Attaching a Shoulder Strap... Main Camera Functions with the FUNC. Recording 51 Recording Video 51 Preparing to Record 51 Recording 51 Remote Operation Using Wi-Fi Remote 54 Onscreen Displays 55 Rear Panel Displays 57 Canon Log Gamma and CINEMA Preset 58 Video Configuration: Type of the CF Card Slots 43 Removing a CF card...
Instruction Manual
Page 8
...Recording Mode 107 Slow & Fast Motion Mode 108 Pre-recording Mode 110 4. Customization 111 Assignable Buttons 111 Changing the Assigned Function 111 Using an Assignable Button 112 Custom Picture Settings 114 Selecting Custom Picture Files 114 Editing a Custom Picture File's Settings 115 Renaming Custom Picture ...from the MIC Terminal 94 Monitoring the Audio with Headphones 95 Selecting the Audio Channel 95 Using Metadata 96 Setting a User Memo Created with Canon XF Utility 96 Setting a User Memo Using Wi-Fi Remote 97 Colors Bars/Audio Reference Signal 98 Recording Color Bars 98 Recording an...
...Recording Mode 107 Slow & Fast Motion Mode 108 Pre-recording Mode 110 4. Customization 111 Assignable Buttons 111 Changing the Assigned Function 111 Using an Assignable Button 112 Custom Picture Settings 114 Selecting Custom Picture Files 114 Editing a Custom Picture File's Settings 115 Renaming Custom Picture ...from the MIC Terminal 94 Monitoring the Audio with Headphones 95 Selecting the Audio Channel 95 Using Metadata 96 Setting a User Memo Created with Canon XF Utility 96 Setting a User Memo Using Wi-Fi Remote 97 Colors Bars/Audio Reference Signal 98 Recording Color Bars 98 Recording an...
Instruction Manual
Page 9
... an External Monitor 142 Saving Clips to a Computer 143 System Requirements 143 Installing and Uninstalling Canon XF Utility (Windows) 144 Installing and Uninstalling Canon XF Utility (Mac OS) 146 Viewing the Software Instruction Manuals 149 7. 9 Clip Operations 130 Using the Clip Menu 131 Displaying Clip Information 131 Adding $ Marks or % Marks 132 Deleting...
... an External Monitor 142 Saving Clips to a Computer 143 System Requirements 143 Installing and Uninstalling Canon XF Utility (Windows) 144 Installing and Uninstalling Canon XF Utility (Mac OS) 146 Viewing the Software Instruction Manuals 149 7. 9 Clip Operations 130 Using the Clip Menu 131 Displaying Clip Information 131 Adding $ Marks or % Marks 132 Deleting...
Instruction Manual
Page 11
"SD card" refers to CF cards and SD cards. • Photographs in the manual are used in the icon. • The following terms are simulated pictures taken with a Canon EF 50mm f/1.4 USM lens attached. "Recording media" refers to an SD or SDHC memory card.... applies only to Troubleshooting (A 176). Conventions Used in the manual show the Canon EOS C300 camcorder with a still camera. "Screen" refers to a CompactFlash (CF) card. 1 Introduction 11 About this Manual Thank you use the camcorder and retain it for purchasing the Canon EOS C300/C300 PL. "CF card" refers to the LCD...
"SD card" refers to CF cards and SD cards. • Photographs in the manual are used in the icon. • The following terms are simulated pictures taken with a Canon EF 50mm f/1.4 USM lens attached. "Recording media" refers to an SD or SDHC memory card.... applies only to Troubleshooting (A 176). Conventions Used in the manual show the Canon EOS C300 camcorder with a still camera. "Screen" refers to a CompactFlash (CF) card. 1 Introduction 11 About this Manual Thank you use the camcorder and retain it for purchasing the Canon EOS C300/C300 PL. "CF card" refers to the LCD...
Instruction Manual
Page 12
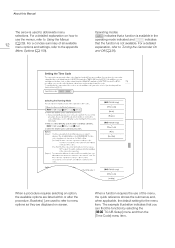
... menu item. The example illustration indicates that the function is not available. When a function requires the use the menus, refer to Using the Menus 12 (A 29). About this Manual The arrow is used to refer to the appendix Menu Options (A 159). For a detailed explanation on screen. For a..., refer to abbreviate menu selections. When a procedure requires selecting an option, the available options are displayed on how to use of all available menu options and settings, refer to menu options as they are listed within or after the procedure. Brackets [ ] are...
... menu item. The example illustration indicates that the function is not available. When a function requires the use the menus, refer to Using the Menus 12 (A 29). About this Manual The arrow is used to refer to the appendix Menu Options (A 159). For a detailed explanation on screen. For a..., refer to abbreviate menu selections. When a procedure requires selecting an option, the available options are displayed on how to use of all available menu options and settings, refer to menu options as they are listed within or after the procedure. Brackets [ ] are...
Instruction Manual
Page 13
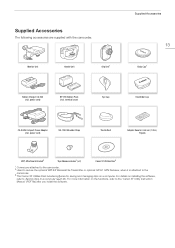
... (incl. power cord) SS-1200 Shoulder Strap Thumb Rest Adapter Base for saving and managing clips on the functions, refer to the 'Canon XF Utility Instruction Manual' (PDF file) after you install the software. power cord) BP-955 Battery Pack (incl. For details on installing... Utilities Disc includes software for 0.64 cm (1/4 in.) Tripods WFT Attachment Bracket2 Tape Measure Hooks1 (x 2) Canon XF Utilities Disc3 1 Comes pre-attached to the camcorder. 2 Used to secure the optional WFT-E6 Wireless File Transmitter or optional GP-E1 GPS Receiver, when it is attached to a ...
... (incl. power cord) SS-1200 Shoulder Strap Thumb Rest Adapter Base for saving and managing clips on the functions, refer to the 'Canon XF Utility Instruction Manual' (PDF file) after you install the software. power cord) BP-955 Battery Pack (incl. For details on installing... Utilities Disc includes software for 0.64 cm (1/4 in.) Tripods WFT Attachment Bracket2 Tape Measure Hooks1 (x 2) Canon XF Utilities Disc3 1 Comes pre-attached to the camcorder. 2 Used to secure the optional WFT-E6 Wireless File Transmitter or optional GP-E1 GPS Receiver, when it is attached to a ...
Instruction Manual
Page 18
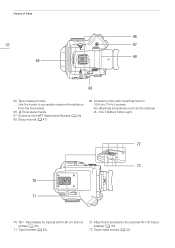
Names of Parts 66 18 67 68 65 69 65 Tape measure hooks Use the hooks to accurately measure the distance from the focal plane. 66 Focal plane marks 67 Socket for the WFT Attachment Bracket (A 49) 68 Strap mounts (A 41) 69 Accessory shoe with mounting hole for 0.64 cm (1/4 in.) screws For attaching accessories such as the optional VL-10Li II Battery Video Light. 72 73 70 71 70 TB-1 Tripod Base for tripods with 0.95 cm (3/8 in.) screws (A 40) 71 Tripod socket (A 40) 72 Attachment sockets for the optional TA-100 Tripod Adapter (A 40) 73 Tripod base screws (A 40)
Names of Parts 66 18 67 68 65 69 65 Tape measure hooks Use the hooks to accurately measure the distance from the focal plane. 66 Focal plane marks 67 Socket for the WFT Attachment Bracket (A 49) 68 Strap mounts (A 41) 69 Accessory shoe with mounting hole for 0.64 cm (1/4 in.) screws For attaching accessories such as the optional VL-10Li II Battery Video Light. 72 73 70 71 70 TB-1 Tripod Base for tripods with 0.95 cm (3/8 in.) screws (A 40) 71 Tripod socket (A 40) 72 Attachment sockets for the optional TA-100 Tripod Adapter (A 40) 73 Tripod base screws (A 40)
Instruction Manual
Page 23
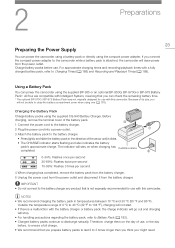
... go out and charging will not start. • If there is a malfunction with a fully charged battery pack, refer to close the battery compartment cover when using one (A 183). Before charging, remove the terminal cover of 0 ºC to 40 ºC (32 ºF to 104 ºF), charging will stop. •... the battery charger. 5 Unplug the power cord from the power outlet. 2 Preparations 23 Preparing the Power Supply You can power the camcorder using the supplied BP-955 or an optional BP-950G, BP-970G or BP-975 Battery Pack*. All four are compatible with Intelligent System, meaning...
... go out and charging will not start. • If there is a malfunction with a fully charged battery pack, refer to close the battery compartment cover when using one (A 183). Before charging, remove the terminal cover of 0 ºC to 40 ºC (32 ºF to 104 ºF), charging will stop. •... the battery charger. 5 Unplug the power cord from the power outlet. 2 Preparations 23 Preparing the Power Supply You can power the camcorder using the supplied BP-955 or an optional BP-950G, BP-970G or BP-975 Battery Pack*. All four are compatible with Intelligent System, meaning...
Instruction Manual
Page 24
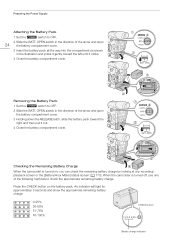
Checking the Remaining Battery Charge When the camcorder is turned off, use one of the arrow and open the battery compartment cover. 3 Holding down the RELEASE latch, slide the battery pack toward the left until it out. 4 ...
Checking the Remaining Battery Charge When the camcorder is turned off, use one of the arrow and open the battery compartment cover. 3 Holding down the RELEASE latch, slide the battery pack toward the left until it out. 4 ...
Instruction Manual
Page 25
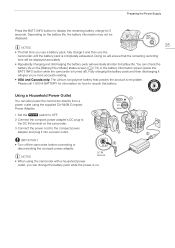
...then discharging it will give you can change the battery pack while the power is recyclable. Please call 1-800-8-BATTERY for 5 seconds. Using a Household Power Outlet You can check the battery life on how to display the remaining battery charge for information on the [Battery/Hour ... be displayed accurately. • Repeatedly charging and discharging the battery pack will be displayed. 25 NOTES • The first time you use the camcorder until the battery pack is turned off the camcorder before connecting or disconnecting the compact power adapter. NOTES DC IN terminal •...
...then discharging it will give you can change the battery pack while the power is recyclable. Please call 1-800-8-BATTERY for 5 seconds. Using a Household Power Outlet You can check the battery life on how to display the remaining battery charge for information on the [Battery/Hour ... be displayed accurately. • Repeatedly charging and discharging the battery pack will be displayed. 25 NOTES • The first time you use the camcorder until the battery pack is turned off the camcorder before connecting or disconnecting the compact power adapter. NOTES DC IN terminal •...
Instruction Manual
Page 26
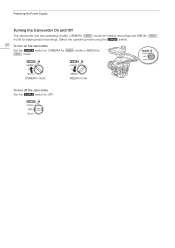
Select the operating mode using the Q switch. 26 To turn off the camcorder Set the Q switch to CAMERA for playing back recordings. MEDIA mode mode or MEDIA for CAMERA mode To turn on the camcorder Set the Q switch to OFF. Preparing the Power Supply Turning the Camcorder On and Off The camcorder has two operating modes: CAMERA ( ) mode for making recordings and MEDIA ( ) mode for mode.
Select the operating mode using the Q switch. 26 To turn off the camcorder Set the Q switch to CAMERA for playing back recordings. MEDIA mode mode or MEDIA for CAMERA mode To turn on the camcorder Set the Q switch to OFF. Preparing the Power Supply Turning the Camcorder On and Off The camcorder has two operating modes: CAMERA ( ) mode for making recordings and MEDIA ( ) mode for mode.
Instruction Manual
Page 27
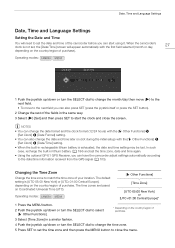
... itself or press the SET button). 2 Change the rest of the fields in the same way. 3 Select (Ð) [Set] and then press SET to start using it. The time zones are based on Coordinated Universal Time (UTC). When the camcorder's clock is not set, the [Date/Time] screen will need to...; To move to the next field you can also change the time zone. 5 Press SET to set the time zone, date and time again. • Using the optional GP-E1 GPS Receiver, you can have the camcorder adjust settings automatically according to close the screen. Operating modes: 1 Push the joystick up...
... itself or press the SET button). 2 Change the rest of the fields in the same way. 3 Select (Ð) [Set] and then press SET to start using it. The time zones are based on Coordinated Universal Time (UTC). When the camcorder's clock is not set, the [Date/Time] screen will need to...; To move to the next field you can also change the time zone. 5 Press SET to set the time zone, date and time again. • Using the optional GP-E1 GPS Receiver, you can have the camcorder adjust settings automatically according to close the screen. Operating modes: 1 Push the joystick up...
Instruction Manual
Page 29
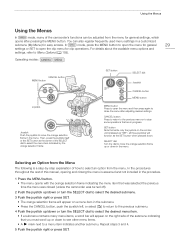
...the orange selection frame in the menu. Selecting an Option from the Menu The following is a step-by the orange selection frame. Using the Menus Using the Menus In mode, many menu items, a scroll bar will function as the SET button when pressed down in progress. SET ... and settings, refer to select the desired menu item. • If a submenu contains many of the camcorder's functions can also register frequently used menu settings in a customized submenu (My Menu) for general settings, which opens after adjusting desired settings. In the procedures throughout the rest of...
...the orange selection frame in the menu. Selecting an Option from the Menu The following is a step-by the orange selection frame. Using the Menus Using the Menus In mode, many menu items, a scroll bar will function as the SET button when pressed down in progress. SET ... and settings, refer to select the desired menu item. • If a submenu contains many of the camcorder's functions can also register frequently used menu settings in a customized submenu (My Menu) for general settings, which opens after adjusting desired settings. In the procedures throughout the rest of...
Instruction Manual
Page 30
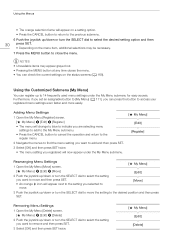
... the previous submenu. 6 Push the joystick up to close the menu. NOTES • Unavailable items may be necessary. 7 Press the MENU button to 14 frequently used menu settings under the My Menu submenu. [ My Menu] [Edit] [Register] Rearranging Menu Settings 1 Open the My Menu [Move] screen. [ My Menu] [ My...the setting you want to remove and then press SET. 3 Select [OK] and then press SET twice. [ My Menu] [Edit] [Delete] Using the Customized Submenu (My Menu) You can check the current settings on the menu item, additional selections may appear grayed out. • Pressing the MENU...
... the previous submenu. 6 Push the joystick up to close the menu. NOTES • Unavailable items may be necessary. 7 Press the MENU button to 14 frequently used menu settings under the My Menu submenu. [ My Menu] [Edit] [Register] Rearranging Menu Settings 1 Open the My Menu [Move] screen. [ My Menu] [ My...the setting you want to remove and then press SET. 3 Select [OK] and then press SET twice. [ My Menu] [Edit] [Delete] Using the Customized Submenu (My Menu) You can check the current settings on the menu item, additional selections may appear grayed out. • Pressing the MENU...

Instruction Manual
Page 31
Using the Menus [ My Menu] [Edit] 31 [Reset All] Resetting the My Menu Submenu 1 Reset all the menu settings registered to the My Menu submenu. [ My Menu] > [Edit] > [Reset All] 2 Select [OK] and then press SET twice.
Using the Menus [ My Menu] [Edit] 31 [Reset All] Resetting the My Menu Submenu 1 Reset all the menu settings registered to the My Menu submenu. [ My Menu] > [Edit] > [Reset All] 2 Select [OK] and then press SET twice.
Instruction Manual
Page 32
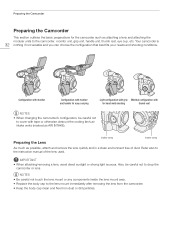
.... Intake vents Intake vents Preparing the Lens As much as possible, attach and remove the lens quickly and in a clean environment free of the lens used. NOTES • Be careful not touch the lens mount or any components inside the lens mount area. • Replace the body cap to drop the...
.... Intake vents Intake vents Preparing the Lens As much as possible, attach and remove the lens quickly and in a clean environment free of the lens used. NOTES • Be careful not touch the lens mount or any components inside the lens mount area. • Replace the body cap to drop the...


