Instruction Manual
Page 2
...INTERFERENCE, USE THE RECOMMENDED ACCESSORIES ONLY. Note: This equipment has been tested and found to excessive heat such as the disconnect device. Canon U.S.A., Inc. Use only the same type of batteries. • Do not expose batteries or product to comply with the instructions, ... between the equipment and receiver. • Connect the equipment into an outlet on the rights of FCC Rules. FCC NOTICE HD Camcorder, EOS C300 / EOS C300 PL Systems. This device complies with class B limits in case of batteries are designed to radio or television reception, which can radiate...
...INTERFERENCE, USE THE RECOMMENDED ACCESSORIES ONLY. Note: This equipment has been tested and found to excessive heat such as the disconnect device. Canon U.S.A., Inc. Use only the same type of batteries. • Do not expose batteries or product to comply with the instructions, ... between the equipment and receiver. • Connect the equipment into an outlet on the rights of FCC Rules. FCC NOTICE HD Camcorder, EOS C300 / EOS C300 PL Systems. This device complies with class B limits in case of batteries are designed to radio or television reception, which can radiate...
Instruction Manual
Page 4
... is required when the apparatus has been damaged in any ventilation openings. Important Safety Instructions In these safety instructions the word "apparatus" 4 refers to the Canon HD Camcorder EOS C300 / EOS C300 PL and all its subsidiaries in the United States and/or other countries. • Wi-Fi is a trademark of CompactFlash Association. • Microsoft and...
... is required when the apparatus has been damaged in any ventilation openings. Important Safety Instructions In these safety instructions the word "apparatus" 4 refers to the Canon HD Camcorder EOS C300 / EOS C300 PL and all its subsidiaries in the United States and/or other countries. • Wi-Fi is a trademark of CompactFlash Association. • Microsoft and...
Instruction Manual
Page 5
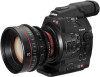
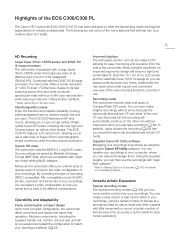
... on the other lenses. Using the supplied plugins, you a whole array of options when it comes to both CF cards. Highlights of the EOS C300/C300 PL The Canon HD Camcorder EOS C300/C300 PL has been designed to CompactFlash (CF) cards. Interchangeable Lenses Enjoy the freedom and creative versatility of using the viewfinder, its most compact configuration...
... on the other lenses. Using the supplied plugins, you a whole array of options when it comes to both CF cards. Highlights of the EOS C300/C300 PL The Canon HD Camcorder EOS C300/C300 PL has been designed to CompactFlash (CF) cards. Interchangeable Lenses Enjoy the freedom and creative versatility of using the viewfinder, its most compact configuration...
Instruction Manual
Page 6
... multi-camera shooting setup. Video scopes Check the brightness of the image using the waveform monitor (A 99), the color of the camcorder's operation. Canon Log gamma for spectacular dynamic range You can easily apply the [/ CINEMA Locked] preset settings, especially designed with amazing dynamic range,... through live view and remotely control the focus, shutter speed, ISO speed/gain and other C300 / C300 PL camcorders in order to use continuous autofocus (A 80), making it easier to the camcorder and operate it remotely via Wi-Fi using the edge monitor (A 100). You can also...
... multi-camera shooting setup. Video scopes Check the brightness of the image using the waveform monitor (A 99), the color of the camcorder's operation. Canon Log gamma for spectacular dynamic range You can easily apply the [/ CINEMA Locked] preset settings, especially designed with amazing dynamic range,... through live view and remotely control the focus, shutter speed, ISO speed/gain and other C300 / C300 PL camcorders in order to use continuous autofocus (A 80), making it easier to the camcorder and operate it remotely via Wi-Fi using the edge monitor (A 100). You can also...
Instruction Manual
Page 7
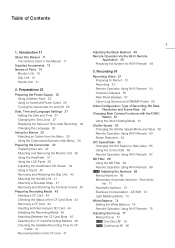
...- Recording 51 Recording Video 51 Preparing to Record 51 Recording 51 Remote Operation Using Wi-Fi Remote 54 Onscreen Displays 55 Rear Panel Displays 57 Canon Log Gamma and CINEMA Preset 58 Video Configuration: Type of Contents 1. Table of Recording, Bit Rate, Resolution and Frame Rate 59 Changing Main ...Changing the Language 28 Using the Menus 29 Selecting an Option from the Menu 29 Using the Customized Submenu (My Menu) 30 Preparing the Camcorder 32 Preparing the Lens 32 Attaching and Removing the Monitor Unit 36 Using the Viewfinder 37 Using the LCD Panel 38 Adjusting the Viewfinder/...
...- Recording 51 Recording Video 51 Preparing to Record 51 Recording 51 Remote Operation Using Wi-Fi Remote 54 Onscreen Displays 55 Rear Panel Displays 57 Canon Log Gamma and CINEMA Preset 58 Video Configuration: Type of Contents 1. Table of Recording, Bit Rate, Resolution and Frame Rate 59 Changing Main ...Changing the Language 28 Using the Menus 29 Selecting an Option from the Menu 29 Using the Customized Submenu (My Menu) 30 Preparing the Camcorder 32 Preparing the Lens 32 Attaching and Removing the Monitor Unit 36 Using the Viewfinder 37 Using the LCD Panel 38 Adjusting the Viewfinder/...
Instruction Manual
Page 8
...89 Reference Video Signal Output 90 Time Code Signal Output 90 Recording Audio 91 Connecting an External Microphone or External Audio Input Source to the Camcorder 91 Selecting the Audio Input from the XLR Terminals 92 Adjusting the Audio Level from the XLR Terminals 93 Adjusting the Audio Level from ...the MIC Terminal 94 Monitoring the Audio with Headphones 95 Selecting the Audio Channel 95 Using Metadata 96 Setting a User Memo Created with Canon XF Utility 96 Setting a User Memo Using Wi-Fi Remote 97 Colors Bars/Audio Reference Signal 98 Recording Color Bars 98 Recording an Audio ...
...89 Reference Video Signal Output 90 Time Code Signal Output 90 Recording Audio 91 Connecting an External Microphone or External Audio Input Source to the Camcorder 91 Selecting the Audio Input from the XLR Terminals 92 Adjusting the Audio Level from the XLR Terminals 93 Adjusting the Audio Level from ...the MIC Terminal 94 Monitoring the Audio with Headphones 95 Selecting the Audio Channel 95 Using Metadata 96 Setting a User Memo Created with Canon XF Utility 96 Setting a User Memo Using Wi-Fi Remote 97 Colors Bars/Audio Reference Signal 98 Recording Color Bars 98 Recording an Audio ...
Instruction Manual
Page 11
...used in this manual carefully before you for future reference. 1 Introduction 11 About this Manual Thank you use the camcorder and retain it for purchasing the Canon EOS C300/C300 PL. Some screenshots have been altered to make them easier to CF cards and SD cards. • Photographs... in the manual show the Canon EOS C300 camcorder with a still camera. "Screen" refers to a CompactFlash (CF) card. Should the camcorder fail to operate correctly, refer to an SD or SDHC memory card. "SD card" refers to ...
...used in this manual carefully before you for future reference. 1 Introduction 11 About this Manual Thank you use the camcorder and retain it for purchasing the Canon EOS C300/C300 PL. Some screenshots have been altered to make them easier to CF cards and SD cards. • Photographs... in the manual show the Canon EOS C300 camcorder with a still camera. "Screen" refers to a CompactFlash (CF) card. Should the camcorder fail to operate correctly, refer to an SD or SDHC memory card. "SD card" refers to ...
Instruction Manual
Page 12
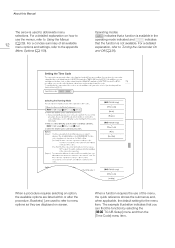
... a procedure requires selecting an option, the available options are displayed on how to use of all available menu options and settings, refer to Turning the Camcorder On and Off (A 26). For a detailed explanation on screen. When a function requires the use the menus, refer to Using the Menus 12 (A 29). For a concise...
... a procedure requires selecting an option, the available options are displayed on how to use of all available menu options and settings, refer to Turning the Camcorder On and Off (A 26). For a detailed explanation on screen. When a function requires the use the menus, refer to Using the Menus 12 (A 29). For a concise...
Instruction Manual
Page 13
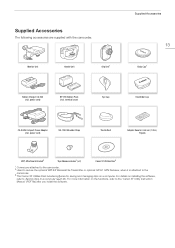
...Shoulder Strap Thumb Rest Adapter Base for 0.64 cm (1/4 in.) Tripods WFT Attachment Bracket2 Tape Measure Hooks1 (x 2) Canon XF Utilities Disc3 1 Comes pre-attached to the camcorder. 2 Used to secure the optional WFT-E6 Wireless File Transmitter or optional GP-E1 GPS Receiver, when it is ...Computer (A 143). For details on installing the software, refer to Saving Clips to the camcorder. 3 The Canon XF Utilities Disc includes software for saving and managing clips on the functions, refer to the 'Canon XF Utility Instruction Manual' (PDF file) after you install the software. For more ...
...Shoulder Strap Thumb Rest Adapter Base for 0.64 cm (1/4 in.) Tripods WFT Attachment Bracket2 Tape Measure Hooks1 (x 2) Canon XF Utilities Disc3 1 Comes pre-attached to the camcorder. 2 Used to secure the optional WFT-E6 Wireless File Transmitter or optional GP-E1 GPS Receiver, when it is ...Computer (A 143). For details on installing the software, refer to Saving Clips to the camcorder. 3 The Canon XF Utilities Disc includes software for saving and managing clips on the functions, refer to the 'Canon XF Utility Instruction Manual' (PDF file) after you install the software. For more ...
Instruction Manual
Page 23
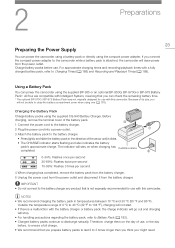
... discharge naturally. The indicator will draw power from the battery charger. Outside the temperature range of use, or the day before use with this camcorder. If you connect the compact power adapter to ensure a full charge. • We recommend that you might need. Before charging, remove the...using the supplied BP-955 or an optional BP-950G, BP-970G or BP-975 Battery Pack*. Using a Battery Pack You can power the camcorder using the compact power adapter. IMPORTANT • Do not connect to the battery charger any product that is a malfunction with a fully charged ...
... discharge naturally. The indicator will draw power from the battery charger. Outside the temperature range of use, or the day before use with this camcorder. If you connect the compact power adapter to ensure a full charge. • We recommend that you might need. Before charging, remove the...using the supplied BP-955 or an optional BP-950G, BP-970G or BP-975 Battery Pack*. Using a Battery Pack You can power the camcorder using the compact power adapter. IMPORTANT • Do not connect to the battery charger any product that is a malfunction with a fully charged ...
Instruction Manual
Page 24
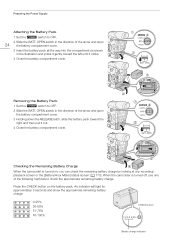
...battery charge by looking at any recording/ playback screen or the [Battery/Hour Meter] status screen (A 173). Checking the Remaining Battery Charge When the camcorder is turned off, use one of the arrow and open 24 the battery compartment cover. 3 Insert the battery pack all the way into the ... 3 seconds and show the approximate remaining battery charge. 0-25% 26-50% 51-75% 76-100% CHECK button 0 100% Battery charge indicator When the camcorder is turned on the battery pack. Preparing the Power Supply Attaching the Battery Pack 1 Set the Q switch to OFF. 2 Slide the BATT.
...battery charge by looking at any recording/ playback screen or the [Battery/Hour Meter] status screen (A 173). Checking the Remaining Battery Charge When the camcorder is turned off, use one of the arrow and open 24 the battery compartment cover. 3 Insert the battery pack all the way into the ... 3 seconds and show the approximate remaining battery charge. 0-25% 26-50% 51-75% 76-100% CHECK button 0 100% Battery charge indicator When the camcorder is turned on the battery pack. Preparing the Power Supply Attaching the Battery Pack 1 Set the Q switch to OFF. 2 Slide the BATT.
Instruction Manual
Page 25
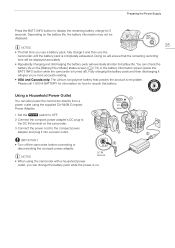
... a household power outlet, you use a battery pack, fully charge it and then use the camcorder until the battery pack is on. Fully charging the battery pack and then discharging it into a power outlet. Please call 1-800-8-BATTERY for ...discharging the battery pack will ensure that powers the product is turned off the camcorder before connecting or disconnecting the compact power adapter. Depending on the camcorder. 3 Connect the power cord to recycle this battery. INFO button while the camcorder is recyclable. IMPORTANT • Turn off ). Using a Household Power Outlet ...
... a household power outlet, you use a battery pack, fully charge it and then use the camcorder until the battery pack is on. Fully charging the battery pack and then discharging it into a power outlet. Please call 1-800-8-BATTERY for ...discharging the battery pack will ensure that powers the product is turned off the camcorder before connecting or disconnecting the compact power adapter. Depending on the camcorder. 3 Connect the power cord to recycle this battery. INFO button while the camcorder is recyclable. IMPORTANT • Turn off ). Using a Household Power Outlet ...
Instruction Manual
Page 26
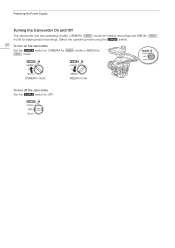
MEDIA mode Preparing the Power Supply Turning the Camcorder On and Off The camcorder has two operating modes: CAMERA ( ) mode for making recordings and MEDIA ( ) mode for mode. Select the operating mode using the Q switch. 26 To turn off the camcorder Set the Q switch to CAMERA for playing back recordings. mode or MEDIA for CAMERA mode To turn on the camcorder Set the Q switch to OFF.
MEDIA mode Preparing the Power Supply Turning the Camcorder On and Off The camcorder has two operating modes: CAMERA ( ) mode for making recordings and MEDIA ( ) mode for mode. Select the operating mode using the Q switch. 26 To turn off the camcorder Set the Q switch to CAMERA for playing back recordings. mode or MEDIA for CAMERA mode To turn on the camcorder Set the Q switch to OFF.
Instruction Manual
Page 27
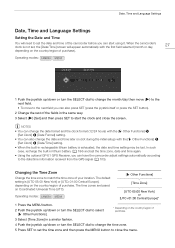
... month/day then move (Ð) to the next field. • To move to the date/time information received from the GPS signal (A 103). When the camcorder's clock is not set, the [Date/Time] screen will need to select [w Other Functions]. * Depending on Coordinated Universal Time (UTC). Operating modes: 1 Push...the SELECT dial to set the time zone, date and time again. • Using the optional GP-E1 GPS Receiver, you can have the camcorder adjust settings automatically according to the next field you can also press SET (press the joystick itself or press the SET button). 2 Change the ...
... month/day then move (Ð) to the next field. • To move to the date/time information received from the GPS signal (A 103). When the camcorder's clock is not set, the [Date/Time] screen will need to select [w Other Functions]. * Depending on Coordinated Universal Time (UTC). Operating modes: 1 Push...the SELECT dial to set the time zone, date and time again. • Using the optional GP-E1 GPS Receiver, you can have the camcorder adjust settings automatically according to the next field you can also press SET (press the joystick itself or press the SET button). 2 Change the ...
Instruction Manual
Page 28
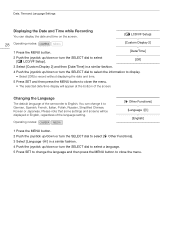
... /down or turn the SELECT dial to select [£ LCD/VF Setup]. [Off] 3 Select [Custom Display 2] and then [Date/Time] in English, regardless of the camcorder is English.
... /down or turn the SELECT dial to select [£ LCD/VF Setup]. [Off] 3 Select [Custom Display 2] and then [Date/Time] in English, regardless of the camcorder is English.
Instruction Manual
Page 29
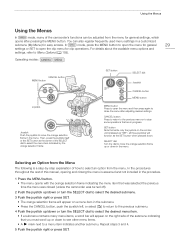
.... • The menu opens with the orange selection frame indicating the menu item that was selected the previous time the menu was closed (unless the camcorder was turned off). 2 Push the joystick up/down or turn the SELECT dial to select the desired submenu. 3 Push the joystick right or press SET... the menu. For details about the available menu options and settings, refer to select the desired menu item. • If a submenu contains many of the camcorder's functions can also register frequently used menu settings in the menu. You can be adjusted from the menu for clip operations.
.... • The menu opens with the orange selection frame indicating the menu item that was selected the previous time the menu was closed (unless the camcorder was turned off). 2 Push the joystick up/down or turn the SELECT dial to select the desired submenu. 3 Push the joystick right or press SET... the menu. For details about the available menu options and settings, refer to select the desired menu item. • If a submenu contains many of the camcorder's functions can also register frequently used menu settings in the menu. You can be adjusted from the menu for clip operations.
Instruction Manual
Page 32
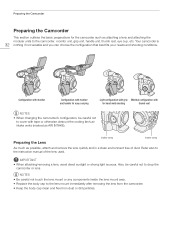
...lens quickly and in a clean environment free of the lens used. Refer also to the lens mount immediately after removing the lens from the camcorder. • Keep the body cap clean and free from dust or dirt particles. NOTES • Be careful not touch the lens mount or...easy carrying Light configuration with grip Minimal configuration with tape or otherwise obstruct the cooling fan's air intake vents (marked as AIR INTAKE). Your camcorder is 32 nothing if not versatile and you can choose the configuration that best fits your needs and shooting conditions. IMPORTANT • When ...
...lens quickly and in a clean environment free of the lens used. Refer also to the lens mount immediately after removing the lens from the camcorder. • Keep the body cap clean and free from dust or dirt particles. NOTES • Be careful not touch the lens mount or...easy carrying Light configuration with grip Minimal configuration with tape or otherwise obstruct the cooling fan's air intake vents (marked as AIR INTAKE). Your camcorder is 32 nothing if not versatile and you can choose the configuration that best fits your needs and shooting conditions. IMPORTANT • When ...
Instruction Manual
Page 33
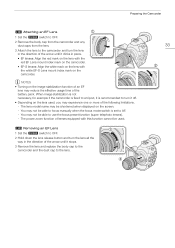
... all the way in the direction of the arrow until it stops. 3 Remove the lens and replace the body cap to the camcorder and the dust cap to the camcorder and turn the lens in the direction of the arrow until it clicks in place. • EF lenses: Align the red mark... on the lens with the red EF Lens mount index mark on the camcorder. • EF-S lenses: Align the white mark on the lens with the white EF-S Lens mount index mark on the image stabilization function of an...
... all the way in the direction of the arrow until it stops. 3 Remove the lens and replace the body cap to the camcorder and the dust cap to the camcorder and turn the lens in the direction of the arrow until it clicks in place. • EF lenses: Align the red mark... on the lens with the red EF Lens mount index mark on the camcorder. • EF-S lenses: Align the white mark on the lens with the white EF-S Lens mount index mark on the image stabilization function of an...
Instruction Manual
Page 34
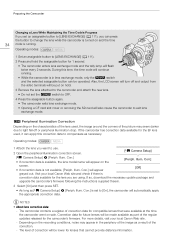
... Q switch and the selected assignable button can press the button to change the lens while the camcorder is correction data available for compatible lenses that cannot provide distance information. For more details, visit your local Canon Web site and check if there is turned on the recording conditions, noise may seem darker...
... Q switch and the selected assignable button can press the button to change the lens while the camcorder is correction data available for compatible lenses that cannot provide distance information. For more details, visit your local Canon Web site and check if there is turned on the recording conditions, noise may seem darker...
Instruction Manual
Page 35
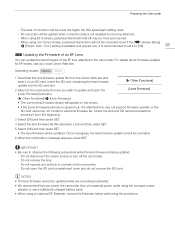
... out), it is not available for EF lenses, visit your local Canon Web site. Insert the SD card containing the lens firmware update into the SD card slot. 2 Attach to the camcorder the lens you power the camcorder from a household power outlet using the compact power adapter or use ...corrected. For details about firmware updates for the lens attached. - Check the lens and SD card and repeat the procedure from the Canon Web site and save it to the camcorder. No correction will appear on the screen. [w Other Functions] [Lens Firmware] • If the [Lens Firmware] submenu is ...
... out), it is not available for EF lenses, visit your local Canon Web site. Insert the SD card containing the lens firmware update into the SD card slot. 2 Attach to the camcorder the lens you power the camcorder from a household power outlet using the compact power adapter or use ...corrected. For details about firmware updates for the lens attached. - Check the lens and SD card and repeat the procedure from the Canon Web site and save it to the camcorder. No correction will appear on the screen. [w Other Functions] [Lens Firmware] • If the [Lens Firmware] submenu is ...


