User manual for the BJC-55
Page 56
If the optional Auto Sheet Feeder is exhausted. Open the front cover. Maintaining the Printer 56 However, remember that new battery packs must replace a battery pack after it is installed on the printer, remove it . 1 2 3 Press the POWER button to purchase and carry extra battery ... the battery pack becomes exhausted. When the battery pack is exhausted, you cannot recharge it . You must be fully charged before you travel, make sure new battery packs are fully charged. You may want to turn off the printer. Before you can replace the battery pack at any time. Using the...
If the optional Auto Sheet Feeder is exhausted. Open the front cover. Maintaining the Printer 56 However, remember that new battery packs must replace a battery pack after it is installed on the printer, remove it . 1 2 3 Press the POWER button to purchase and carry extra battery ... the battery pack becomes exhausted. When the battery pack is exhausted, you cannot recharge it . You must be fully charged before you travel, make sure new battery packs are fully charged. You may want to turn off the printer. Before you can replace the battery pack at any time. Using the...
User manual for the BJC-55
Page 57
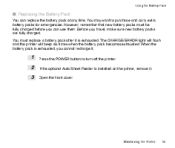
The battery pack will spring slightly out of the printer. 5 6 Remove the battery pack from its packaging. Remove the new battery pack from the printer. Maintaining the Printer 57 Using the Battery Pack 4 Push the battery pack release button to the right.
The battery pack will spring slightly out of the printer. 5 6 Remove the battery pack from its packaging. Remove the new battery pack from the printer. Maintaining the Printer 57 Using the Battery Pack 4 Push the battery pack release button to the right.
User manual for the BJC-55
Page 58
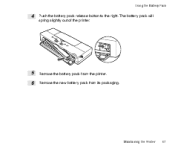
... in place, and close the front cover. Maintaining the Printer 58 If you must allow it to local regulations. Note If you have just installed a new battery pack, you have replaced an exhausted battery pack, dispose of the battery pack into the printer at a slight angle. Using the Battery Pack 7 Align...
... in place, and close the front cover. Maintaining the Printer 58 If you must allow it to local regulations. Note If you have just installed a new battery pack, you have replaced an exhausted battery pack, dispose of the battery pack into the printer at a slight angle. Using the Battery Pack 7 Align...

User manual for the BJC-55
Page 71
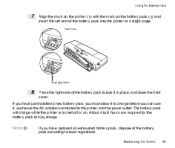
be sure to ensure optimum performance of the BJ cartridge, do not touch the open ink port on a BJ tank. Remove the new BJ tank from the printer. BCI-11 Black or BCI-12 Black Orange protective cap BCI-11 Color or BCI-12 Color To avoid interfering with the flow of ink and to use the same type that you removed from its package and remove the orange protective cap. Orange protective cap BCI-10 Black Orange protective cap Maintaining the Printer 71 Replacing BJ Tanks 4 Select a new BJ tank;
be sure to ensure optimum performance of the BJ cartridge, do not touch the open ink port on a BJ tank. Remove the new BJ tank from the printer. BCI-11 Black or BCI-12 Black Orange protective cap BCI-11 Color or BCI-12 Color To avoid interfering with the flow of ink and to use the same type that you removed from its package and remove the orange protective cap. Orange protective cap BCI-10 Black Orange protective cap Maintaining the Printer 71 Replacing BJ Tanks 4 Select a new BJ tank;

User manual for the BJC-55
Page 78
Changing or Replacing a BJ Cartridge 5 Prepare the new BJ cartridge. Maintaining the Printer 78 Remove the orange protective cap. If you are installing a previously used BJ cartridge, remove it from its storage box. Print Head Do not touch this area. Remove the orange protective tape. Invert the BJ cartridge with the label side down; then remove the orange protective cap and the orange protective tape. If you are installing a new BJ cartridge, pull off the top of the package and remove the BJ cartridge.
Changing or Replacing a BJ Cartridge 5 Prepare the new BJ cartridge. Maintaining the Printer 78 Remove the orange protective cap. If you are installing a previously used BJ cartridge, remove it from its storage box. Print Head Do not touch this area. Remove the orange protective tape. Invert the BJ cartridge with the label side down; then remove the orange protective cap and the orange protective tape. If you are installing a new BJ cartridge, pull off the top of the package and remove the BJ cartridge.

User manual for the BJC-55
Page 79
.... • To avoid spilling ink on your hands or damaging the print head, do not touch the print head. Ink stains cannot be removed from a new BJ cartridge before you always remove the orange protective cap and orange protective tape from clothing. • To prevent staining your clothing or around the...
.... • To avoid spilling ink on your hands or damaging the print head, do not touch the print head. Ink stains cannot be removed from a new BJ cartridge before you always remove the orange protective cap and orange protective tape from clothing. • To prevent staining your clothing or around the...

User manual for the BJC-55
Page 104
Printing With Windows 98 or Windows CE 104 You can save the new print mode, and then select it easily the next time. If you intend to use these settings often, you see the words "User-Modified" displayed below the icon. Selecting the Print Mode I Adjusting and Saving Print Mode Settings If you change any of the default settings, you can print with the modified setting(s) one time (the defaults are restored immediately after the print job executes).
Printing With Windows 98 or Windows CE 104 You can save the new print mode, and then select it easily the next time. If you intend to use these settings often, you see the words "User-Modified" displayed below the icon. Selecting the Print Mode I Adjusting and Saving Print Mode Settings If you change any of the default settings, you can print with the modified setting(s) one time (the defaults are restored immediately after the print job executes).

User manual for the BJC-55
Page 105
Selecting the Print Mode To save a new print mode 1 After changing the setting(s), right-click the User-modified icon and select Save As from the pop-up menu. Printing With Windows 98 or Windows CE 105
Selecting the Print Mode To save a new print mode 1 After changing the setting(s), right-click the User-modified icon and select Save As from the pop-up menu. Printing With Windows 98 or Windows CE 105

User manual for the BJC-55
Page 106
When the message asks you to confirm that you want to delete the print mode, click the OK button. The new print mode is saved and the settings are enabled as the current settings. Printing With Windows 98 or Windows CE 106 To remove a print mode 1 2 In the Choose Print Mode panel, right-click the icon that you want to delete and select Delete from the pop-up menu. Selecting the Print Mode 2 Click the Title box and enter a name for the Print Mode settings. 3 Click the Save button and click the OK button.
When the message asks you to confirm that you want to delete the print mode, click the OK button. The new print mode is saved and the settings are enabled as the current settings. Printing With Windows 98 or Windows CE 106 To remove a print mode 1 2 In the Choose Print Mode panel, right-click the icon that you want to delete and select Delete from the pop-up menu. Selecting the Print Mode 2 Click the Title box and enter a name for the Print Mode settings. 3 Click the Save button and click the OK button.

User manual for the BJC-55
Page 113
... use the current settings to select it. 3 4 BJ Cartridge Grayscale Print Select a BJ cartridge from the drop-down list. You can register the settings as a new print mode. Select Black, Color, or Photo. In this case, click another icon to execute the next print job, or you change any setting for...
... use the current settings to select it. 3 4 BJ Cartridge Grayscale Print Select a BJ cartridge from the drop-down list. You can register the settings as a new print mode. Select Black, Color, or Photo. In this case, click another icon to execute the next print job, or you change any setting for...
User manual for the BJC-55
Page 129
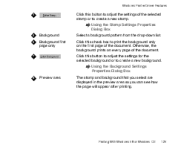
... the document. Otherwise, the background prints on the first page of the selected stamp or to create a new stamp. Click this button to adjust the settings for the selected background or to create a new background. Using the Background Settings Properties Dialog Box 6 6 7 7 8 8 Preview area The stamp and background that you select...
... the document. Otherwise, the background prints on the first page of the selected stamp or to create a new stamp. Click this button to adjust the settings for the selected background or to create a new background. Using the Background Settings Properties Dialog Box 6 6 7 7 8 8 Preview area The stamp and background that you select...

User manual for the BJC-55
Page 130
... Stamp/Background tab, nothing is selected under Stamp on the Stamp/Background tab to find out about each setting. Specify the name of the new stamp. 2 2 3 3 4 4 Placement tab Specify the position of the stamp. Use the Text, Color, Placement, and Save Setting tabs to create and position a ...stamp for the new stamp in the preview area after you click the Define Stamp button until you enter some text for printing. Printing With Windows 98 ...
... Stamp/Background tab, nothing is selected under Stamp on the Stamp/Background tab to find out about each setting. Specify the name of the new stamp. 2 2 3 3 4 4 Placement tab Specify the position of the stamp. Use the Text, Color, Placement, and Save Setting tabs to create and position a ...stamp for the new stamp in the preview area after you click the Define Stamp button until you enter some text for printing. Printing With Windows 98 ...

User manual for the BJC-55
Page 131
Use this dialog box to open the Background Settings Properties dialog box. Specify the name of the file, and the intensity. Windows Printer Driver Features I Using the Background Settings Properties Dialog Box Click the Select Background button to select backgrounds for display. Two artistic backgrounds, Sample 1 and Sample 2, are provided. 1 2 1 1 Background tab Save settings Specify the file to use as the background, the layout of the new background. 2 2 Note Use the online help to find out about each setting. Printing With Windows 98 or Windows CE 131
Use this dialog box to open the Background Settings Properties dialog box. Specify the name of the file, and the intensity. Windows Printer Driver Features I Using the Background Settings Properties Dialog Box Click the Select Background button to select backgrounds for display. Two artistic backgrounds, Sample 1 and Sample 2, are provided. 1 2 1 1 Background tab Save settings Specify the file to use as the background, the layout of the new background. 2 2 Note Use the online help to find out about each setting. Printing With Windows 98 or Windows CE 131
User manual for the BJC-55
Page 134
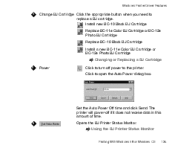
... Windows CE 134 Windows Printer Driver Features 4 Change BJ Cartridge Click the appropriate button when you need to open the Auto Power dialog box. Install new BC-10 Black BJ Cartridge Replace BC-11e Color BJ Cartridge or BC-12e Photo BJ Cartridge Replace BC-10 Black BJ Cartridge Install... a new BC-11e Color BJ Cartridge or BC-12e Photo BJ Cartridge Changing or Replacing a BJ Cartridge 5 5 Power Click to turn off if it does not ...
... Windows CE 134 Windows Printer Driver Features 4 Change BJ Cartridge Click the appropriate button when you need to open the Auto Power dialog box. Install new BC-10 Black BJ Cartridge Replace BC-11e Color BJ Cartridge or BC-12e Photo BJ Cartridge Replace BC-10 Black BJ Cartridge Install... a new BC-11e Color BJ Cartridge or BC-12e Photo BJ Cartridge Changing or Replacing a BJ Cartridge 5 5 Power Click to turn off if it does not ...

User manual for the BJC-55
Page 146
... the button. Select an icon from this button to move it one position to the right every time you click the button. To save with a new print mode, or to change the order of appearance of the print mode icons in the Choose Print Mode panel on the Main tab. Select... the icon in the Saved Settings panel and click this panel to save the current Quality and Color tab settings to a new print mode setting, enter a title here. You can edit the description displayed here. 3 3 Title 4 4 Icon Selection 5 5 Description Printing With Windows 98 or Windows CE 146...
... the button. Select an icon from this button to move it one position to the right every time you click the button. To save with a new print mode, or to change the order of appearance of the print mode icons in the Choose Print Mode panel on the Main tab. Select... the icon in the Saved Settings panel and click this panel to save the current Quality and Color tab settings to a new print mode setting, enter a title here. You can edit the description displayed here. 3 3 Title 4 4 Icon Selection 5 5 Description Printing With Windows 98 or Windows CE 146...

User manual for the BJC-55
Page 147
Windows Printer Driver Features 6 6 Click this button to save an icon selected in the Saved Settings panel. You can then select the new print mode from the Choose Print Mode panel on the Main tab so it is selected. 7 7 8 8 Click this button to open a saved icon and ...restore it to save all the tab settings (Quality, Special Effects, Color) with the new selected icon and description. Printing With Windows 98 or Windows CE 147 Deletes the icon selected in the Saved Settings panel under another name. Tip...
Windows Printer Driver Features 6 6 Click this button to save an icon selected in the Saved Settings panel. You can then select the new print mode from the Choose Print Mode panel on the Main tab so it is selected. 7 7 8 8 Click this button to open a saved icon and ...restore it to save all the tab settings (Quality, Special Effects, Color) with the new selected icon and description. Printing With Windows 98 or Windows CE 147 Deletes the icon selected in the Saved Settings panel under another name. Tip...

User manual for the BJC-55
Page 150
Using the BJ Background Monitor I Changing the Print Order in the BJ Background Monitor Note • The print job that is currently printing cannot be removed from its position at the head of the queue. • While the order of execution is being changed, the current print job will automatically pause temporarily. 1 Point to the name of the document that you want to move in the queue. 2 Click and drag the document to the new position in the queue. Printing With Windows 98 or Windows CE 150
Using the BJ Background Monitor I Changing the Print Order in the BJ Background Monitor Note • The print job that is currently printing cannot be removed from its position at the head of the queue. • While the order of execution is being changed, the current print job will automatically pause temporarily. 1 Point to the name of the document that you want to move in the queue. 2 Click and drag the document to the new position in the queue. Printing With Windows 98 or Windows CE 150

User manual for the BJC-55
Page 151
Printing With Windows 98 or Windows CE 151 Using the BJ Background Monitor 3 When you want to cancel. I Cancelling a Print Job With the BJ Background Monitor 1 Click on the name of the print job you release the mouse button, the document will be in the new position.
Printing With Windows 98 or Windows CE 151 Using the BJ Background Monitor 3 When you want to cancel. I Cancelling a Print Job With the BJ Background Monitor 1 Click on the name of the print job you release the mouse button, the document will be in the new position.

User manual for the BJC-55
Page 220
... button to open the Paper Size pop-up menu, select Cleaning, Test Print, Change BJ Tank, Change BJ Cartridge, or Special Settings to register the new paper size under the name you entered. Then click the panel switch and from the pop-up menu, this button to change the panel display...
... button to open the Paper Size pop-up menu, select Cleaning, Test Print, Change BJ Tank, Change BJ Cartridge, or Special Settings to register the new paper size under the name you entered. Then click the panel switch and from the pop-up menu, this button to change the panel display...

User manual for the BJC-55
Page 245
... You can register all the previous selected printer driver settings under a new name. If a registered setting already exists with the same name that you have entered, a message will ask you to confirm that you want to open the New Settings Name dialog box. You can write over the file... or enter a new name. 5 Click the name of the registered setting in the list that you want to write over it...
... You can register all the previous selected printer driver settings under a new name. If a registered setting already exists with the same name that you have entered, a message will ask you to confirm that you want to open the New Settings Name dialog box. You can write over the file... or enter a new name. 5 Click the name of the registered setting in the list that you want to write over it...


