
FAXPHONE B45 Set-up Sheet
Page 2
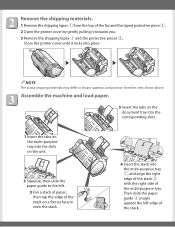
...the edge of the stack on the unit. 2 Squeeze, then slide the paper guide to the left edge of the multi-purpose tray. Assemble the machine and load paper. 5 Insert the tabs on the document tray into the corresponding slots. 1 Insert the tabs on the multi-purpose tray into the ...the stack. 1 2 3 4 Insert the stack into place. 1 2 1 2 1 2 NOTE The actual shipping materials may differ in shape, quantity, and position from the top of the fax and the taped protective piece w . 2 Open the printer cover by gently pulling it locks into the multi-purpose tray q, and align the right edge of...
...the edge of the stack on the unit. 2 Squeeze, then slide the paper guide to the left edge of the multi-purpose tray. Assemble the machine and load paper. 5 Insert the tabs on the document tray into the corresponding slots. 1 Insert the tabs on the multi-purpose tray into the ...the stack. 1 2 3 4 Insert the stack into place. 1 2 1 2 1 2 NOTE The actual shipping materials may differ in shape, quantity, and position from the top of the fax and the taped protective piece w . 2 Open the printer cover by gently pulling it locks into the multi-purpose tray q, and align the right edge of...
FAXPHONE B45 Set-up Sheet
Page 3
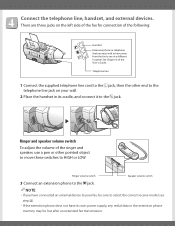
...L jack, then the other pointed object to move these switches to the telephone line jack on the left side of the fax for connection of the User's Guide. Ringer volume switch Speaker volume switch 3 Connect an extension phone to the h jack.... to select the correct receive mode (see step ). • If the extention phone dose not have away from the fax to use a pen or other end to HIGH or LOW. Ringer and speaker volume switch To adjust the volume of the... jack. Connect the telephone line, handset, and external devices. There are three jacks on your fax, be lost after an extended...
...L jack, then the other pointed object to move these switches to the telephone line jack on the left side of the fax for connection of the User's Guide. Ringer volume switch Speaker volume switch 3 Connect an extension phone to the h jack.... to select the correct receive mode (see step ). • If the extention phone dose not have away from the fax to use a pen or other end to HIGH or LOW. Ringer and speaker volume switch To adjust the volume of the... jack. Connect the telephone line, handset, and external devices. There are three jacks on your fax, be lost after an extended...

FAXPHONE B45 Set-up Sheet
Page 4
...; Store BJ cartridges out of the reach of the power cord into the rear of the fax. 2 Plug the other end of children. The fax is on as long as it is no power switch on the fax. Never attempt to reattach them to the BJ cartridge print head. If anyone inadvertently ingests...
...; Store BJ cartridges out of the reach of the power cord into the rear of the fax. 2 Plug the other end of children. The fax is on as long as it is no power switch on the fax. Never attempt to reattach them to the BJ cartridge print head. If anyone inadvertently ingests...

FAXPHONE B45 Set-up Sheet
Page 5
... refill BJ cartridges. • Do not shake or drop BJ cartridges. 5 Align the slot in the cartridge with the yellow post in the fax, and with the label facing outwards, insert the BJ cartridge into the cartridge holder. Ribbon cable Guide rail Round shaft Circuit board NOTE The yellow... post (BJ cartridge guide) should be visible through the slot. The fax automatically prints a test page. The BJ cartridge tilts slightly to clean up if spilled. Follow the precautions below or any metal parts. If you...
... refill BJ cartridges. • Do not shake or drop BJ cartridges. 5 Align the slot in the cartridge with the yellow post in the fax, and with the label facing outwards, insert the BJ cartridge into the cartridge holder. Ribbon cable Guide rail Round shaft Circuit board NOTE The yellow... post (BJ cartridge guide) should be visible through the slot. The fax automatically prints a test page. The BJ cartridge tilts slightly to clean up if spilled. Follow the precautions below or any metal parts. If you...
FAXPHONE B45 Set-up Sheet
Page 6
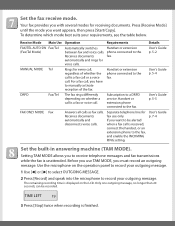
..., connect the handset, or an extension phone to receive telephone messages and fax transmissions while the fax is finished. If you use only. User's Guide p. 7-4 Set the built-in answering machine (TAM MODE). Before you want appears, then press [Start/Copy]. To... determine which mode best suits your outgoing message. 1 Use [3] or [4] to select OUTGOING MESSAGE. 2 Press [Record] and speak into the microphone to the fax. Receives documents automatically and...
..., connect the handset, or an extension phone to receive telephone messages and fax transmissions while the fax is finished. If you use only. User's Guide p. 7-4 Set the built-in answering machine (TAM MODE). Before you want appears, then press [Start/Copy]. To... determine which mode best suits your outgoing message. 1 Use [3] or [4] to select OUTGOING MESSAGE. 2 Press [Record] and speak into the microphone to the fax. Receives documents automatically and...

FAXPHONE B45 Set-up Sheet
Page 7
... [4] to standby mode. ECM RX 3 Use [3] or [4] to select CALLER ID, then press [Start/Copy]. Select the Caller ID setting. The fax will display the caller's name and phone/fax number on the LCD when no outgoing message has been recorded. 4 Press [TAM Mode] to set TAM MODE. • When you set...
... [4] to standby mode. ECM RX 3 Use [3] or [4] to select CALLER ID, then press [Start/Copy]. Select the Caller ID setting. The fax will display the caller's name and phone/fax number on the LCD when no outgoing message has been recorded. 4 Press [TAM Mode] to set TAM MODE. • When you set...

FAXPHONE B45 Set-up Sheet
Page 8
...opening the printer cover since you may tear or smudge the document. 2 Push the document release button on the left-side panel of Canon Inc. Canon, FAXPHONE, and BJ are registered trademarks or trademarks of their respective owners. Specifications subject to close the printer cover. NOTE • If .... HT3-2140-000-V.1.1 © 2003 Canon Inc. Part no. All other products and brand names are trademarks of the fax. 3 Remove the document. • Pull it locks into place, or the fax will not function properly. 5 Press [Stop]. If the fax does not feed out the document after you...
...opening the printer cover since you may tear or smudge the document. 2 Push the document release button on the left-side panel of Canon Inc. Canon, FAXPHONE, and BJ are registered trademarks or trademarks of their respective owners. Specifications subject to close the printer cover. NOTE • If .... HT3-2140-000-V.1.1 © 2003 Canon Inc. Part no. All other products and brand names are trademarks of the fax. 3 Remove the document. • Pull it locks into place, or the fax will not function properly. 5 Press [Stop]. If the fax does not feed out the document after you...
FAXPHONE B45 User's Guide
Page 2
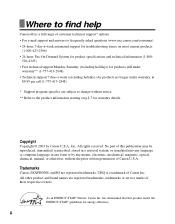
... and answers to frequently asked questions (www.usa.canon.com/consumer) • 24-hour, 7-day-a-week automated support for troubleshooting issues on most current products (1-800-423-2366) • 24-hour, Fax-On-Demand System for product specifications and technical information...Refer to the product information starting on p.I-7 for energy efficiency. Trademarks Canon, FAXPHONE, and BJ are registered trademarks, trademarks or service marks of Canon U.S.A. Where to find help Canon offers a full range of Canon Inc. has determined that this publication may be reproduced, transmitted, ...
... and answers to frequently asked questions (www.usa.canon.com/consumer) • 24-hour, 7-day-a-week automated support for troubleshooting issues on most current products (1-800-423-2366) • 24-hour, Fax-On-Demand System for product specifications and technical information...Refer to the product information starting on p.I-7 for energy efficiency. Trademarks Canon, FAXPHONE, and BJ are registered trademarks, trademarks or service marks of Canon U.S.A. Where to find help Canon offers a full range of Canon Inc. has determined that this publication may be reproduced, transmitted, ...
FAXPHONE B45 User's Guide
Page 3
... ii Using this guide v Important safety instructions vi Users in the U.S.A viii Pre-Installation Requirements for Canon Facsimile Equipment viii Connection of the Equipment viii Registering coded speed dialing numbers and names ....... 2-13 Registering...UP 3 DOCUMENTS AND PAPER Unpacking 1-1 Preparing documents 3-1 Removing the shipping materials 1-2 Types of documents you can scan 3-1 Assembling the fax 1-3 Problem documents 3-1 Attaching components 1-3 Loading documents 3-2 Making connections 1-4 Problems with one-touch/coded speed dialing numbers and names .............
... ii Using this guide v Important safety instructions vi Users in the U.S.A viii Pre-Installation Requirements for Canon Facsimile Equipment viii Connection of the Equipment viii Registering coded speed dialing numbers and names ....... 2-13 Registering...UP 3 DOCUMENTS AND PAPER Unpacking 1-1 Preparing documents 3-1 Removing the shipping materials 1-2 Types of documents you can scan 3-1 Assembling the fax 1-3 Problem documents 3-1 Attaching components 1-3 Loading documents 3-2 Making connections 1-4 Problems with one-touch/coded speed dialing numbers and names .............
FAXPHONE B45 User's Guide
Page 4
...documents 8-1 Saving ink while printing documents 5-6 Receiving documents in the multi-purpose tray 9-2 Periodic cleaning 9-3 Cleaning the exterior of the fax 9-3 (TAM MODE) Recording the outgoing message .... 6-1 Types of messages that can be recorded ...... 6-1 Recording the outgoing message ...Different ways to receive documents 5-6 Canceling receiving 5-7 Clearing jams 9-1 Jams in the document tray 9-1 6 USING THE BUILT-IN ANSWERING MACHINE Jams in memory while performing another task or when a problem occurs .... 5-6 9 SOLUTIONS TO COMMON PROBLEMS Polling to receive a ...
...documents 8-1 Saving ink while printing documents 5-6 Receiving documents in the multi-purpose tray 9-2 Periodic cleaning 9-3 Cleaning the exterior of the fax 9-3 (TAM MODE) Recording the outgoing message .... 6-1 Types of messages that can be recorded ...... 6-1 Recording the outgoing message ...Different ways to receive documents 5-6 Canceling receiving 5-7 Clearing jams 9-1 Jams in the document tray 9-1 6 USING THE BUILT-IN ANSWERING MACHINE Jams in memory while performing another task or when a problem occurs .... 5-6 9 SOLUTIONS TO COMMON PROBLEMS Polling to receive a ...
FAXPHONE B45 User's Guide
Page 5
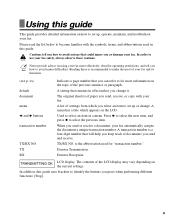
...TX/RX NO. TRANSMITTING OK LCD display. Using this guide This guide provides detailed information on how to set up , operate, maintain, and troubleshoot your fax. c Cautions tell you how to avoid actions that remains in effect unless you send, receive, or copy with the symbols, terms, and abbreviations used ...you keep track of the LCD display may vary depending on the LCD. A menu has a title which you can refer to become familiar with your fax. In addition, this guide. Press 4 to select the next item, and press 3 to select an item in this guide uses brackets to set ...
...TX/RX NO. TRANSMITTING OK LCD display. Using this guide This guide provides detailed information on how to set up , operate, maintain, and troubleshoot your fax. c Cautions tell you how to avoid actions that remains in effect unless you send, receive, or copy with the symbols, terms, and abbreviations used ...you keep track of the LCD display may vary depending on the LCD. A menu has a title which you can refer to become familiar with your fax. In addition, this guide. Press 4 to select the next item, and press 3 to select an item in this guide uses brackets to set ...

FAXPHONE B45 User's Guide
Page 6
...eat or drink near it immediately and contact the Canon Customer Care Center (see p. If liquid has spilled into the fax, unplug the fax immediately and contact the Canon Customer Care Center (see p. Improper adjustment of other risks. If the fax has been dropped or the body has been ...conditions: - s Handling and maintenance • Follow all service, contact the Canon Customer Care Center (see p. If something does fall into the slots or openings on the fax as shown below. If the fax exhibits a distinct change in this guide. This will expose you spill liquid or...
...eat or drink near it immediately and contact the Canon Customer Care Center (see p. If liquid has spilled into the fax, unplug the fax immediately and contact the Canon Customer Care Center (see p. Improper adjustment of other risks. If the fax has been dropped or the body has been ...conditions: - s Handling and maintenance • Follow all service, contact the Canon Customer Care Center (see p. If something does fall into the slots or openings on the fax as shown below. If the fax exhibits a distinct change in this guide. This will expose you spill liquid or...

FAXPHONE B45 User's Guide
Page 7
...with a clean, dry cloth. Install the fax approximately 4 in a cool, dry, clean, well ventilated place. - Keep the area free so you plug it on a bed, sofa, rug, or other similar surface. Make sure the area is not knotted or kinked. Contact the Canon Customer Care Center (see p. Make sure ...the area's relative humidity is not affected by placing it in the fax's memory will be deleted when you unplug the fax.) • Whenever you unplug the fax, wait at least five seconds before you can ...
...with a clean, dry cloth. Install the fax approximately 4 in a cool, dry, clean, well ventilated place. - Keep the area free so you plug it on a bed, sofa, rug, or other similar surface. Make sure the area is not knotted or kinked. Contact the Canon Customer Care Center (see p. Make sure ...the area's relative humidity is not affected by placing it in the fax's memory will be deleted when you unplug the fax.) • Whenever you unplug the fax, wait at least five seconds before you can ...
FAXPHONE B45 User's Guide
Page 8
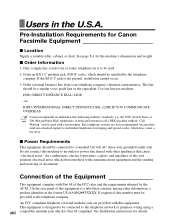
...should be used . 2. The line should be installed by the ACTA. IDDD (INTERNATIONAL DIRECT DISTANCE DIAL) LINE IF YOU COMMUNICATE OVERSEAS n Canon recommends an individual line following industry standards, e.g. Only a single line, touch-tone or rotary telephone set is a label that cause "electrical... the sending and receiving of this equipment. Order an RJ11-C modular jack (USOC code), which may cause a fax error. Order a normal business line from your machine. DDD (DIRECT DISTANCE DIAL) LINE -or- Users in the format US:AAAEQ##TXXXX. s Power Requirements This ...
...should be used . 2. The line should be installed by the ACTA. IDDD (INTERNATIONAL DIRECT DISTANCE DIAL) LINE IF YOU COMMUNICATE OVERSEAS n Canon recommends an individual line following industry standards, e.g. Only a single line, touch-tone or rotary telephone set is a label that cause "electrical... the sending and receiving of this equipment. Order an RJ11-C modular jack (USOC code), which may cause a fax error. Order a normal business line from your machine. DDD (DIRECT DISTANCE DIAL) LINE -or- Users in the format US:AAAEQ##TXXXX. s Power Requirements This ...

FAXPHONE B45 User's Guide
Page 10
... make any message via a telephone fax machine unless such message clearly contains in a margin at the top or bottom of each transmitted page or on the first page of the transmission, the date and time it is required to the equipment unless otherwise specified in the User's Guide. Canon U.S.A. Use of shielded cable...
... make any message via a telephone fax machine unless such message clearly contains in a margin at the top or bottom of each transmitted page or on the first page of the transmission, the date and time it is required to the equipment unless otherwise specified in the User's Guide. Canon U.S.A. Use of shielded cable...

FAXPHONE B45 User's Guide
Page 11
... remove all items from the box. • It is best to move or ship 1 the fax in case you lift the fax and its protective packaging out of these items are damaged or missing, contact the Canon Customer Care Center (see p. Make sure you have the following items: SETTING UP Main unit Multi... also have someone hold the box while you want to have the followings: • Power cord • Telephone line cord • Documentation Set-Up Sheet FAXPHONE B45 User's Guide Registration Card • Destination labels If any of the carton.
... remove all items from the box. • It is best to move or ship 1 the fax in case you lift the fax and its protective packaging out of these items are damaged or missing, contact the Canon Customer Care Center (see p. Make sure you have the following items: SETTING UP Main unit Multi... also have someone hold the box while you want to have the followings: • Power cord • Telephone line cord • Documentation Set-Up Sheet FAXPHONE B45 User's Guide Registration Card • Destination labels If any of the carton.
FAXPHONE B45 User's Guide
Page 12
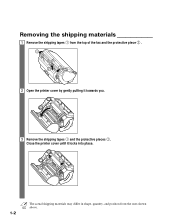
Close the printer cover until it locks into place. 2 1 2 n The actual shipping materials may differ in shape, quantity, and position from the top of the fax and the protective piece w . 1 2 1 2 Open the printer cover by gently pulling it towards you. 3 Remove the shipping tapes q and the protective pieces w. Removing the shipping materials 1 Remove the shipping tapes q from the ones shown above. 1-2
Close the printer cover until it locks into place. 2 1 2 n The actual shipping materials may differ in shape, quantity, and position from the top of the fax and the protective piece w . 1 2 1 2 Open the printer cover by gently pulling it towards you. 3 Remove the shipping tapes q and the protective pieces w. Removing the shipping materials 1 Remove the shipping tapes q from the ones shown above. 1-2
FAXPHONE B45 User's Guide
Page 13
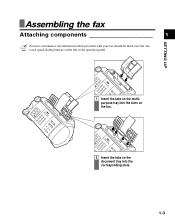
SETTING UP Assembling the fax Attaching components 1 n For user convenience, the destination labels provided with your fax should be fitted over the onetouch speed dialing buttons on the left of the operation panel. 1 Insert the tabs on the multipurpose tray into the slots on the fax. 2 Insert the tabs on the document tray into the corresponding slots. 1-3
SETTING UP Assembling the fax Attaching components 1 n For user convenience, the destination labels provided with your fax should be fitted over the onetouch speed dialing buttons on the left of the operation panel. 1 Insert the tabs on the multipurpose tray into the slots on the fax. 2 Insert the tabs on the document tray into the corresponding slots. 1-3
FAXPHONE B45 User's Guide
Page 14
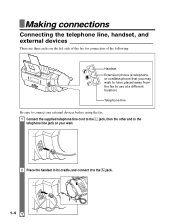
Making connections Connecting the telephone line, handset, and external devices There are three jacks on the left side of the fax for connection of the following: Handset Extension phone (a telephone or cordless phone that you may wish to have placed away from the fax to use at a different location) Telephone line Be sure to connect any external devices before using the fax. 1 Connect the supplied telephone line cord to the L jack, then the other end to the telephone line jack on your wall. 2 Place the handset in its cradle, and connect it to the h jack. 1-4
Making connections Connecting the telephone line, handset, and external devices There are three jacks on the left side of the fax for connection of the following: Handset Extension phone (a telephone or cordless phone that you may wish to have placed away from the fax to use at a different location) Telephone line Be sure to connect any external devices before using the fax. 1 Connect the supplied telephone line cord to the L jack, then the other end to the telephone line jack on your wall. 2 Place the handset in its cradle, and connect it to the h jack. 1-4

FAXPHONE B45 User's Guide
Page 15
Ringer and speaker volume switches To adjust the volume of the ringer and speaker, use a pen or other pointed object to move these 1 switches to the t jack. SETTING UP Speaker volume switch Ringer volume switch 3 Connect an extension phone to HIGH or LOW. n • If you have connected an external device to your fax, be sure to select the correct receive mode (see Chapter 5). • If the extension phone does not have its own power supply, any redial data in the extension phone memory may be lost after an extended fax transmission. 1-5
Ringer and speaker volume switches To adjust the volume of the ringer and speaker, use a pen or other pointed object to move these 1 switches to the t jack. SETTING UP Speaker volume switch Ringer volume switch 3 Connect an extension phone to HIGH or LOW. n • If you have connected an external device to your fax, be sure to select the correct receive mode (see Chapter 5). • If the extension phone does not have its own power supply, any redial data in the extension phone memory may be lost after an extended fax transmission. 1-5


