
EOS 5D Mark II Instruction Manual
Page 2
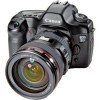
...EOS 5D...12,13). If the camera or memory card is not included. Thank you have captured. Also be held liable for anything but private enjoyment. and Full HD (Full HighDefinition) movie shooting. Please purchase it separately. 2 Take a Few Test Shots to Familiarize Yourself with 21.10 effective megapixels. The camera is a high-performance, digital SLR camera... with a full-frame (approx. 36mm x 24mm) CMOS sensor with the Camera With a digital camera, you can then better understand the camera. The CF card (for purchasing a Canon ...
...EOS 5D...12,13). If the camera or memory card is not included. Thank you have captured. Also be held liable for anything but private enjoyment. and Full HD (Full HighDefinition) movie shooting. Please purchase it separately. 2 Take a Few Test Shots to Familiarize Yourself with 21.10 effective megapixels. The camera is a high-performance, digital SLR camera... with a full-frame (approx. 36mm x 24mm) CMOS sensor with the Camera With a digital camera, you can then better understand the camera. The CF card (for purchasing a Canon ...

EOS 5D Mark II Instruction Manual
Page 3
...-E6E comes with a power cord.) If you purchased a Lens Kit, check that all the following items have been included with your dealer. Camera (with eyecup and body cap) Battery Pack LP-E6 (with protective cover) Battery Charger LC-E6/LC-E6E* Wide Strap EW-EOS5DMKII Interface ...Cable IFC-200U Stereo Video Cable STV-250N EOS DIGITAL Solution Disk (Software) Software Instruction Manual (1) Instruction Manual (this booklet) (2) Pocket Guide Quick start guide to shooting. (3) CD-ROM Guide ...
...-E6E comes with a power cord.) If you purchased a Lens Kit, check that all the following items have been included with your dealer. Camera (with eyecup and body cap) Battery Pack LP-E6 (with protective cover) Battery Charger LC-E6/LC-E6E* Wide Strap EW-EOS5DMKII Interface ...Cable IFC-200U Stereo Video Cable STV-250N EOS DIGITAL Solution Disk (Software) Software Instruction Manual (1) Instruction Manual (this booklet) (2) Pocket Guide Quick start guide to shooting. (3) CD-ROM Guide ...
EOS 5D Mark II Instruction Manual
Page 4
... explained in this manual assume that all the menu settings and Custom Functions are set to the default. For explanatory purposes, the instructions show the camera attached with an EF50mm f/1.4 USM lens (or EF24-105mm f/4L IS USM). 4 M : When shown on the LCD monitor. 3 : Indicates a ...respectively after you let go of the button. * In this manual, the icons and markings indicating the camera's buttons, dials, and settings correspond to the icons and markings on the camera and on the right of the page, it indicates that the respective function remains active for better shooting....
... explained in this manual assume that all the menu settings and Custom Functions are set to the default. For explanatory purposes, the instructions show the camera attached with an EF50mm f/1.4 USM lens (or EF24-105mm f/4L IS USM). 4 M : When shown on the LCD monitor. 3 : Indicates a ...respectively after you let go of the button. * In this manual, the icons and markings indicating the camera's buttons, dials, and settings correspond to the icons and markings on the camera and on the right of the page, it indicates that the respective function remains active for better shooting....
EOS 5D Mark II Instruction Manual
Page 5
Introduction 2 Camera basics. 1 Getting Started 23 2 Basic Shooting Fully automatic shooting. 47 3 Image Settings 53 4 Setting the AF and Drive Modes 77 5 Advanced Operations Shooting features for specific types of subjects. 87 6 Live View Shooting and Movies Shoot while viewing the LCD monitor. 107 7 Image Playback 127 8 Sensor Cleaning 147 9 Printing Images and Transferring Images to a Computer 153 10 Customizing the Camera 171 11 Reference 189 5 Chapters For first-time DSLR users, chapters 1 and 2 explain the camera's basic operations and shooting procedures.
Introduction 2 Camera basics. 1 Getting Started 23 2 Basic Shooting Fully automatic shooting. 47 3 Image Settings 53 4 Setting the AF and Drive Modes 77 5 Advanced Operations Shooting features for specific types of subjects. 87 6 Live View Shooting and Movies Shoot while viewing the LCD monitor. 107 7 Image Playback 127 8 Sensor Cleaning 147 9 Printing Images and Transferring Images to a Computer 153 10 Customizing the Camera 171 11 Reference 189 5 Chapters For first-time DSLR users, chapters 1 and 2 explain the camera's basic operations and shooting procedures.
EOS 5D Mark II Instruction Manual
Page 6
Contents Introduction Item Check List 3 Conventions Used in this Manual 4 Chapters ...5 Index to Features 10 Handling Precautions 12 Quick Start Guide 14 Nomenclature 16 1 Getting Started 23 Charging the Battery 24 Installing and Removing the Battery 26 Turning on the Power 27 ... the Interface Language 42 Setting the Date and Time 42 Formatting the Card 43 Set the Power-off Time/Auto Power Off 44 Reverting the Camera to the Default Settings 45 About Copyright Information 46 2 Basic Shooting 47 1 Fully Automatic Shooting 48 1 Full Auto Techniques 50 C Creative Auto Shooting ...
Contents Introduction Item Check List 3 Conventions Used in this Manual 4 Chapters ...5 Index to Features 10 Handling Precautions 12 Quick Start Guide 14 Nomenclature 16 1 Getting Started 23 Charging the Battery 24 Installing and Removing the Battery 26 Turning on the Power 27 ... the Interface Language 42 Setting the Date and Time 42 Formatting the Card 43 Set the Power-off Time/Auto Power Off 44 Reverting the Camera to the Default Settings 45 About Copyright Information 46 2 Basic Shooting 47 1 Fully Automatic Shooting 48 1 Full Auto Techniques 50 C Creative Auto Shooting ...

EOS 5D Mark II Instruction Manual
Page 9
... Preparing to Print 154 wPrinting...156 Trimming the Image 161 W Digital Print Order Format (DPOF 163 Direct Printing with DPOF 166 d Transferring Images to a Personal Computer 167 10 Customizing the Camera 171 Setting Custom Functions 172 Custom Functions 173 Custom Function Settings 174...176 C.Fn III : Autofocus/Drive 178 C.Fn IV: Operation/Others 182 Registering My Menu 186 w Register Camera User Settings 187 11 Reference 189 B Checking Camera Settings 190 Checking the Battery Information 192 Using a Household Power Outlet 196 Replacing the Date/Time Battery 197...
... Preparing to Print 154 wPrinting...156 Trimming the Image 161 W Digital Print Order Format (DPOF 163 Direct Printing with DPOF 166 d Transferring Images to a Personal Computer 167 10 Customizing the Camera 171 Setting Custom Functions 172 Custom Functions 173 Custom Function Settings 174...176 C.Fn III : Autofocus/Drive 178 C.Fn IV: Operation/Others 182 Registering My Menu 186 w Register Camera User Settings 187 11 Reference 189 B Checking Camera Settings 190 Checking the Battery Information 192 Using a Household Power Outlet 196 Replacing the Date/Time Battery 197...
EOS 5D Mark II Instruction Manual
Page 11
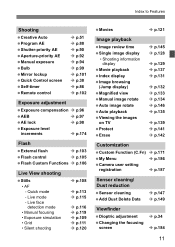
...; p.132 Î p.133 Î p.134 Î p.146 Î p.135 Î p.139 Î p.141 Î p.142 Customization Custom Function (C.Fn) Î p.171 My Menu Î p.186 Camera user setting registration Î p.187 Sensor cleaning/ Dust reduction Sensor cleaning Add Dust Delete Data Î p.147 Î p.149 Viewfinder Dioptric adjustment Changing the focusing...
...; p.132 Î p.133 Î p.134 Î p.146 Î p.135 Î p.139 Î p.141 Î p.142 Customization Custom Function (C.Fn) Î p.171 My Menu Î p.186 Camera user setting registration Î p.187 Sensor cleaning/ Dust reduction Sensor cleaning Add Dust Delete Data Î p.147 Î p.149 Viewfinder Dioptric adjustment Changing the focusing...

EOS 5D Mark II Instruction Manual
Page 12
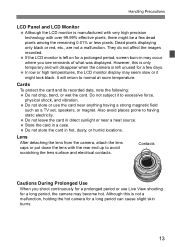
... once in a cool, dry, well-ventilated location. Never attempt to the nearest Canon Service Center. Do not touch the camera's electrical contacts with your nearest Canon Service Center. If the camera will not be used for some time or if there is an important shoot coming...not use the camera. This is still working properly. 12 If you accidentally drop the camera into a warm room, condensation may form on the camera and internal parts. The camera is working . Use a blower to clean the camera body or lens. Handling Precautions Camera Care This camera is condensation, remove...
... once in a cool, dry, well-ventilated location. Never attempt to the nearest Canon Service Center. Do not touch the camera's electrical contacts with your nearest Canon Service Center. If the camera will not be used for some time or if there is an important shoot coming...not use the camera. This is still working properly. 12 If you accidentally drop the camera into a warm room, condensation may form on the camera and internal parts. The camera is working . Use a blower to clean the camera body or lens. Handling Precautions Camera Care This camera is condensation, remove...
EOS 5D Mark II Instruction Manual
Page 13
...days. Although this is only temporary and will return to avoid scratching the lens surface and electrical contacts. Lens After detaching the lens from the camera, attach the lens caps or put down the lens with over 99.99% effective pixels, there might look black. If the LCD monitor is...LCD monitor display may seem slow or it to having a strong magnetic field such as a TV set, speakers, or magnet. It will disappear when the camera is left on for a few dead pixels among the remaining 0.01% or less pixels. Dead pixels displaying only black or red, etc., are not ...
...days. Although this is only temporary and will return to avoid scratching the lens surface and electrical contacts. Lens After detaching the lens from the camera, attach the lens caps or put down the lens with over 99.99% effective pixels, there might look black. If the LCD monitor is...LCD monitor display may seem slow or it to having a strong magnetic field such as a TV set, speakers, or magnet. It will disappear when the camera is left on for a few dead pixels among the remaining 0.01% or less pixels. Dead pixels displaying only black or red, etc., are not ...

EOS 5D Mark II Instruction Manual
Page 14
Quick Start Guide 1 Insert the battery. (p.26) To charge the battery, see page 24. 2 Attach the lens. (p.31) Align the red dot. 3 Set the lens focus mode switch to . (p.31) 4 Open the slot cover and insert a card. (p.29) Face the label side toward you and insert the end with the small holes into the camera. 5 Set the power switch to . (p.27) 14
Quick Start Guide 1 Insert the battery. (p.26) To charge the battery, see page 24. 2 Attach the lens. (p.31) Align the red dot. 3 Set the lens focus mode switch to . (p.31) 4 Open the slot cover and insert a card. (p.29) Face the label side toward you and insert the end with the small holes into the camera. 5 Set the power switch to . (p.27) 14

EOS 5D Mark II Instruction Manual
Page 15
... focus the subject. 8 Take the picture. (p.35) Press the shutter button completely to (Full Auto). (p.48) All the necessary camera settings will be set automatically. 7 Focus the subject. (p.35) Look through the viewfinder and aim the viewfinder center over the subject. To display the image ...
... focus the subject. 8 Take the picture. (p.35) Press the shutter button completely to (Full Auto). (p.48) All the necessary camera settings will be set automatically. 7 Focus the subject. (p.35) Look through the viewfinder and aim the viewfinder center over the subject. To display the image ...
EOS 5D Mark II Instruction Manual
Page 20
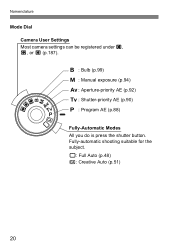
Nomenclature Mode Dial Camera User Settings Most camera settings can be registered under w, x, or y (p.187). Fully-automatic shooting suitable for the subject. 1: Full Auto (p.48) C: Creative Auto (p.51) 20 F : Bulb (p.99) a : Manual exposure (p.94) f: Aperture-priority AE (p.92) s : Shutter-priority AE (p.90) d : Program AE (p.88) Fully-Automatic Modes All you do is press the shutter button.
Nomenclature Mode Dial Camera User Settings Most camera settings can be registered under w, x, or y (p.187). Fully-automatic shooting suitable for the subject. 1: Full Auto (p.48) C: Creative Auto (p.51) 20 F : Bulb (p.99) a : Manual exposure (p.94) f: Aperture-priority AE (p.92) s : Shutter-priority AE (p.90) d : Program AE (p.88) Fully-Automatic Modes All you do is press the shutter button.
EOS 5D Mark II Instruction Manual
Page 23
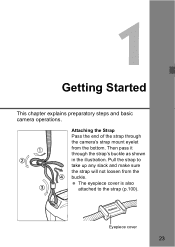
Pull the strap to the strap (p.100). The eyepiece cover is also attached to take up any slack and make sure the strap will not loosen from the bottom. Then pass it through the camera's strap mount eyelet from the buckle. Attaching the Strap Pass the end of the strap through the strap's buckle as shown in the illustration. Eyepiece cover 23 1 Getting Started This chapter explains preparatory steps and basic camera operations.
Pull the strap to the strap (p.100). The eyepiece cover is also attached to take up any slack and make sure the strap will not loosen from the bottom. Then pass it through the camera's strap mount eyelet from the buckle. Attaching the Strap Pass the end of the strap through the strap's buckle as shown in the illustration. Eyepiece cover 23 1 Getting Started This chapter explains preparatory steps and basic camera operations.
EOS 5D Mark II Instruction Manual
Page 25
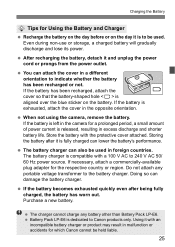
...period, a small amount of power current is left in excess discharge and shorter battery life. If the battery is released, resulting in the camera for the respective country or region. Storing the battery after being fully charged, the battery has worn out. The battery charger can lower ...on the day before or on the battery. The charger cannot charge any portable voltage transformer to be used in a different orientation to Canon products only. Doing so can attach the cover in foreign countries. Using it and unplug the power cord or prongs from the power...
...period, a small amount of power current is left in excess discharge and shorter battery life. If the battery is released, resulting in the camera for the respective country or region. Storing the battery after being fully charged, the battery has worn out. The battery charger can lower ...on the day before or on the battery. The charger cannot charge any portable voltage transformer to be used in a different orientation to Canon products only. Doing so can attach the cover in foreign countries. Using it and unplug the power cord or prongs from the power...
EOS 5D Mark II Instruction Manual
Page 26
... shown by the arrow and remove the battery. Installing and Removing the Battery Installing the Battery Load a fully charged Battery Pack LP-E6 into the camera. 1 Open the battery compartment cover. Removing the Battery Open the cover and remove the battery. Slide the lever as shown by the arrow and open...
... shown by the arrow and remove the battery. Installing and Removing the Battery Installing the Battery Load a fully charged Battery Pack LP-E6 into the camera. 1 Open the battery compartment cover. Removing the Battery Open the cover and remove the battery. Slide the lever as shown by the arrow and open...

EOS 5D Mark II Instruction Manual
Page 27
... might not be displayed. Even during the sensor cleaning, you set the power switch to this position when not using the camera. : The camera turns on the Power : The camera is turned off and does not operate. You can still shoot by pressing the shutter button halfway (p.35) to the card...This is being recorded to stop the sensor cleaning and take a picture. About Auto Power Off To save battery power, the camera turns off ] setting (p.44). Turning on . : The camera and operate (p.37). If you can change the auto power-off time with the menu's [5 Auto power off automatically after...
... might not be displayed. Even during the sensor cleaning, you set the power switch to this position when not using the camera. : The camera turns on the Power : The camera is turned off and does not operate. You can still shoot by pressing the shutter button halfway (p.35) to the card...This is being recorded to stop the sensor cleaning and take a picture. About Auto Power Off To save battery power, the camera turns off ] setting (p.44). Turning on . : The camera and operate (p.37). If you can change the auto power-off time with the menu's [5 Auto power off automatically after...
EOS 5D Mark II Instruction Manual
Page 28
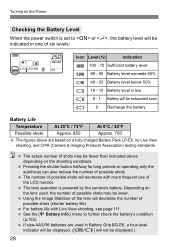
... Sufficient battery level 69 - 50 Battery level exceeds 50% 49 - 20 Battery level below 50% 19 - 10 Battery level is powered by the camera's battery. Depending on the shooting conditions. The actual number of shots may be displayed.) 28 See the [7 Battery info.] menu to or , the...will not be lower. If size-AA/LR6 batteries are based on a fully-charged Battery Pack LP-E6, no Live View shooting, and CIPA (Camera & Imaging Products Association) testing standards. For battery life with more frequent use of the LCD monitor. Turning on the Power Checking the Battery Level When...
... Sufficient battery level 69 - 50 Battery level exceeds 50% 49 - 20 Battery level below 50% 19 - 10 Battery level is powered by the camera's battery. Depending on the shooting conditions. The actual number of shots may be displayed.) 28 See the [7 Battery info.] menu to or , the...will not be lower. If size-AA/LR6 batteries are based on a fully-charged Battery Pack LP-E6, no Live View shooting, and CIPA (Camera & Imaging Products Association) testing standards. For battery life with more frequent use of the LCD monitor. Turning on the Power Checking the Battery Level When...
EOS 5D Mark II Instruction Manual
Page 29
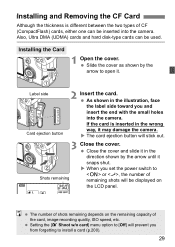
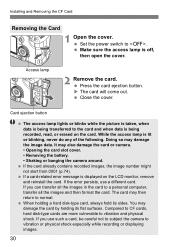
...the power switch to [Off] will stick out. 3 Close the cover. X When you and insert the end with the small holes into the camera. If the card is different between the two types of shots remaining depends on the LCD panel. Installing the Card 1 Open the cover. Label... side Card ejection button 2 Insert the card. The number of CF (CompactFlash) cards, either one can be inserted into the camera. Setting the [1 Shoot w/o card] menu option to Shots remaining or , the number of remaining shots will be displayed on the remaining capacity of the...
...the power switch to [Off] will stick out. 3 Close the cover. X When you and insert the end with the small holes into the camera. If the card is different between the two types of shots remaining depends on the LCD panel. Installing the Card 1 Open the cover. Label... side Card ejection button 2 Insert the card. The number of CF (CompactFlash) cards, either one can be inserted into the camera. Setting the [1 Shoot w/o card] menu option to Shots remaining or , the number of remaining shots will be displayed on the remaining capacity of the...
EOS 5D Mark II Instruction Manual
Page 30
...recording or displaying images. 30 When holding its sides. Doing so may also damage the card or camera. • Opening the card slot cover. • Removing the battery. • Shaking or banging the camera around. It may damage the image data. Compared to CF cards, hard disk-type cards are .... Press the card ejection button. X The card will come out. If the error persists, use such a card, be careful not to subject the camera to the card and when data is displayed on the card. You may then return to vibration and physical shock. If you can transfer all...
...recording or displaying images. 30 When holding its sides. Doing so may also damage the card or camera. • Opening the card slot cover. • Removing the battery. • Shaking or banging the camera around. It may damage the image data. Compared to CF cards, hard disk-type cards are .... Press the card ejection button. X The card will come out. If the error persists, use such a card, be careful not to subject the camera to the card and when data is displayed on the card. You may then return to vibration and physical shock. If you can transfer all...

EOS 5D Mark II Instruction Manual
Page 31
... turn the lens as shown by the arrow until it is set the focus mode switch to the camera. Minimizing Dust When changing lenses, do it . 31 Align the red dots on the body cap before attaching it in place. 3 On the lens, set ... cap by turning them as shown by the arrow. 2 Attach the lens. Do not look at the sun directly through any lens. When storing the camera without a lens attached, be used with minimal dust. Attaching and Detaching a Lens Attaching a Lens 1 Remove the caps. If it snaps in a place with EF-S lenses...
... turn the lens as shown by the arrow until it is set the focus mode switch to the camera. Minimizing Dust When changing lenses, do it . 31 Align the red dots on the body cap before attaching it in place. 3 On the lens, set ... cap by turning them as shown by the arrow. 2 Attach the lens. Do not look at the sun directly through any lens. When storing the camera without a lens attached, be used with minimal dust. Attaching and Detaching a Lens Attaching a Lens 1 Remove the caps. If it snaps in a place with EF-S lenses...


