Optura Instruction Manual
Page 2
Digital Video Camcorder, OPTURA This device complies with Part 15 of the equipment. Operation is intended to alert the user to the presence of uninsulated "dangerous voltage" within the product's enclosure, that may be determined by turning the equipment off and on, the user is encouraged to try to correct the interference by one or more of electric shock to stop operation of...
Digital Video Camcorder, OPTURA This device complies with Part 15 of the equipment. Operation is intended to alert the user to the presence of uninsulated "dangerous voltage" within the product's enclosure, that may be determined by turning the equipment off and on, the user is encouraged to try to correct the interference by one or more of electric shock to stop operation of...
Optura Instruction Manual
Page 3
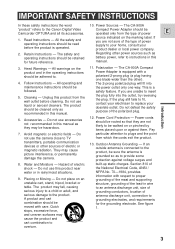
... against them. If an outside antenna is connected to the product, be hazardous. 7. source indicated on an unstable cart, stand, tripod, bracket or table. Do not use the camera close to an antenna discharge unit, size of grounding conductors, location of power E 1. Do not use this manual as battery power, refer to the Canon Digital Video Camcorder OPTURA and all its accessories. Do not...
... against them. If an outside antenna is connected to the product, be hazardous. 7. source indicated on an unstable cart, stand, tripod, bracket or table. Do not use the camera close to an antenna discharge unit, size of grounding conductors, location of power E 1. Do not use this manual as battery power, refer to the Canon Digital Video Camcorder OPTURA and all its accessories. Do not...
Optura Instruction Manual
Page 4
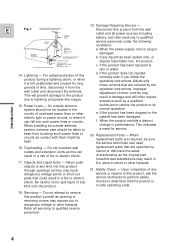
... service this product through openings as opening or removing covers may expose you follow the operating instructions. Lightning - Power Lines - If the product has been dropped or the cabinet has been damaged. replacement parts that are specified by Canon or that are required, be fatal. 20. Be careful not to its normal operation. Safety Check - This will often require extensive work by the operation instructions...
... service this product through openings as opening or removing covers may expose you follow the operating instructions. Lightning - Power Lines - If the product has been dropped or the cabinet has been damaged. replacement parts that are specified by Canon or that are required, be fatal. 20. Be careful not to its normal operation. Safety Check - This will often require extensive work by the operation instructions...

Optura Instruction Manual
Page 5
... Audio Recording 43 Setting the Self-Timer 44 Powering Your Camcorder 8 Using a Canon Speedlite for Flash Loading a Cassette 10 Photography (optional accessory) ........45 Basic Recording 12 Zooming 14 ~ When Making Manual Adjustments ...~ Using the LCD Screen 15 Adjusting Exposure Manually 46 Playing back a Cassette 16 Adjusting Focus Manually 47 Connections for Making Better Videos 22 Introduction Using the Full Range of Features ~ General ... ~ Turning the Optical Image Stabilizer On/Off 24 Selecting from the Menus 25 Using the Wireless Controller...
... Audio Recording 43 Setting the Self-Timer 44 Powering Your Camcorder 8 Using a Canon Speedlite for Flash Loading a Cassette 10 Photography (optional accessory) ........45 Basic Recording 12 Zooming 14 ~ When Making Manual Adjustments ...~ Using the LCD Screen 15 Adjusting Exposure Manually 46 Playing back a Cassette 16 Adjusting Focus Manually 47 Connections for Making Better Videos 22 Introduction Using the Full Range of Features ~ General ... ~ Turning the Optical Image Stabilizer On/Off 24 Selecting from the Menus 25 Using the Wireless Controller...
Optura Instruction Manual
Page 6
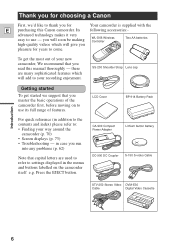
... add to your way around the camcorder (p. 70) • Screen displays (p. 73) • Troubleshooting - LCD Cover BP-914 Battery Pack Introduction For quick reference (in the menus and buttons labelled on to use - Press the EJECT button. CA-900 Compact Power Adapter Lithium button battery DC-900 DC Coupler S-150 S-video Cable STV-250 Stereo Video DVM-E30 Cable Digital Video Cassette 6 there are used to refer to settings displayed in addition to the contents...
... add to your way around the camcorder (p. 70) • Screen displays (p. 73) • Troubleshooting - LCD Cover BP-914 Battery Pack Introduction For quick reference (in the menus and buttons labelled on to use - Press the EJECT button. CA-900 Compact Power Adapter Lithium button battery DC-900 DC Coupler S-150 S-video Cable STV-250 Stereo Video DVM-E30 Cable Digital Video Cassette 6 there are used to refer to settings displayed in addition to the contents...
Optura Instruction Manual
Page 7
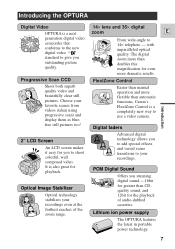
... OPTURA features the latest in portable power technology. 7 Optical Image Stabilizer Optical technology stabilizes your recordings. with unparalleled optical quality. It is a next generation digital video camcorder that conforms to the new digital video Mini standard to use a video camera. Introduction Digital faders Advanced digital technology allows you to 14× telephoto - FlexiZone Control Easier than CDquality sound, and 12bit for the playback of the zoom range. 14× lens...
... OPTURA features the latest in portable power technology. 7 Optical Image Stabilizer Optical technology stabilizes your recordings. with unparalleled optical quality. It is a next generation digital video camcorder that conforms to the new digital video Mini standard to use a video camera. Introduction Digital faders Advanced digital technology allows you to 14× telephoto - FlexiZone Control Easier than CDquality sound, and 12bit for the playback of the zoom range. 14× lens...
Optura Instruction Manual
Page 9
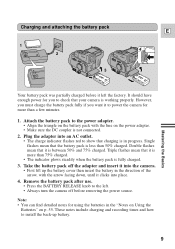
... connected. 2. Note: • You can find detailed notes for you want it to the left. • Always turn the camera off the adapter and insert it left the factory. These notes include charging and recording times and how to show that charging is between 50% and 75% charged. It should have enough power for using the batteries in progress. However, you must charge the battery...
... connected. 2. Note: • You can find detailed notes for you want it to the left. • Always turn the camera off the adapter and insert it left the factory. These notes include charging and recording times and how to show that charging is between 50% and 75% charged. It should have enough power for using the batteries in progress. However, you must charge the battery...
Optura Instruction Manual
Page 13
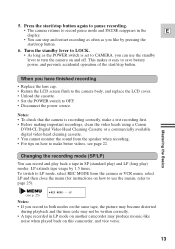
... start/stop button again to pause recording. • The camera returns to record pause mode and PAUSE reappears in the E display. • You can stop and restart recording as often as the POWER switch is recording correctly, make a test recording first. • Before making important recordings, clean the video heads using a Canon DVM-CL Digital Video Head Cleaning Cassette or a commercially available digital video head cleaning cassette. • You cannot monitor the sound from the camera or VCR menu, select LP and then close the menu (for instructions on...
... start/stop button again to pause recording. • The camera returns to record pause mode and PAUSE reappears in the E display. • You can stop and restart recording as often as the POWER switch is recording correctly, make a test recording first. • Before making important recordings, clean the video heads using a Canon DVM-CL Digital Video Head Cleaning Cassette or a commercially available digital video head cleaning cassette. • You cannot monitor the sound from the camera or VCR menu, select LP and then close the menu (for instructions on...

Optura Instruction Manual
Page 14
... window wipe. 14 Notes: • When you turn the zoom control, the faster the zoom speed.) The T and W buttons on the wireless controller adjust the picture angle, but not the zoom speed. 35× digital zoom Turn the digital zoom on a subject as close as usual. You can focus on from choosing D. the camera automatically switches between 1× and 35× magnification - Zooming E W Zoom out T W Zoom in T 14× optical zoom The camera's 14× zoom lens...
... window wipe. 14 Notes: • When you turn the zoom control, the faster the zoom speed.) The T and W buttons on the wireless controller adjust the picture angle, but not the zoom speed. 35× digital zoom Turn the digital zoom on a subject as close as usual. You can focus on from choosing D. the camera automatically switches between 1× and 35× magnification - Zooming E W Zoom out T W Zoom in T 14× optical zoom The camera's 14× zoom lens...
Optura Instruction Manual
Page 15
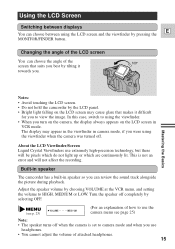
... you. Using the LCD Screen Switching between displays E You can choose between using the viewfinder. • When you turn on the camera, the display always appears on the LCD screen may cause glare that suits you use headphones. • You cannot adjust the volume of the LCD screen You can review the sound track alongside the picture during playback. The display may appear in the viewfinder in VCR mode. Adjust the speaker volume by pressing...
... you. Using the LCD Screen Switching between displays E You can choose between using the viewfinder. • When you turn on the camera, the display always appears on the LCD screen may cause glare that suits you use headphones. • You cannot adjust the volume of the LCD screen You can review the sound track alongside the picture during playback. The display may appear in the viewfinder in VCR mode. Adjust the speaker volume by pressing...

Optura Instruction Manual
Page 29
... to scan quickly. • Once you move to another part of the display starts flashing. 4. Setting the display style (see p. 30). Press the MENU button to flash. 3. Set the date and time display when you first start . Set the months, days, hours, and minutes in record pause or VCR mode. 2. Choose between 1997 and 2020. • If you press the MENU button in the middle of the data code. Setting the Date and Time E MENU Using the...
... to scan quickly. • Once you move to another part of the display starts flashing. 4. Setting the display style (see p. 30). Press the MENU button to flash. 3. Set the date and time display when you first start . Set the months, days, hours, and minutes in record pause or VCR mode. 2. Choose between 1997 and 2020. • If you press the MENU button in the middle of the data code. Setting the Date and Time E MENU Using the...
Optura Instruction Manual
Page 31
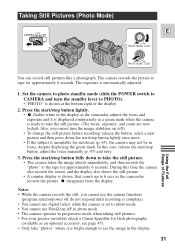
... a Canon Speedlite for autofocus (p. 63), the camera may not be in the display. 31 Using the Full Range of the display. 2. Also, you cannot use the camera functions (program selector/power off ) • To change the still picture before recording: release the button, select a new picture and then press down the start /stop button lightly once more. • If the subject is automatically adjusted. 1. Taking Still Pictures (Photo Mode) CAMERA OFF VCR POWER E PHOTO MOVIE LOCK PHOTO MOVIE...
... a Canon Speedlite for autofocus (p. 63), the camera may not be in the display. 31 Using the Full Range of the display. 2. Also, you cannot use the camera functions (program selector/power off ) • To change the still picture before recording: release the button, select a new picture and then press down the start /stop button lightly once more. • If the subject is automatically adjusted. 1. Taking Still Pictures (Photo Mode) CAMERA OFF VCR POWER E PHOTO MOVIE LOCK PHOTO MOVIE...

Optura Instruction Manual
Page 43
Headphones and external microphone For greater creative control over audio recording, you can connect an external microphone to the camera's terminal. You can record sound in the display for you want the microphone to a tape using this camcorder. • For details of Features (see p. 25) WIND SCREEN•AUTO The camera has an automatic wind screen to the 12 bit mode open the camera menu and select AUDIO MODE. 2. Open the camera menu and point the arrow at a later date. 1. Notes...
Headphones and external microphone For greater creative control over audio recording, you can connect an external microphone to the camera's terminal. You can record sound in the display for you want the microphone to a tape using this camcorder. • For details of Features (see p. 25) WIND SCREEN•AUTO The camera has an automatic wind screen to the 12 bit mode open the camera menu and select AUDIO MODE. 2. Open the camera menu and point the arrow at a later date. 1. Notes...
Optura Instruction Manual
Page 48
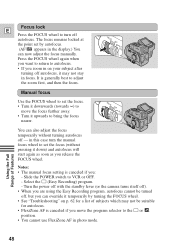
... cannot use FlexiZone AF in photo mode. 48 Notes: • The manual focus setting is canceled if you : - Turn the power off with the standby lever (or the camera turns itself off). • When you are using the Easy Recording program, autofocus cannot be turned off, but you can override it temporarily by autofocus. (AF | appears in the display.) You can also adjust the focus temporarily...
... cannot use FlexiZone AF in photo mode. 48 Notes: • The manual focus setting is canceled if you : - Turn the power off with the standby lever (or the camera turns itself off). • When you are using the Easy Recording program, autofocus cannot be turned off, but you can override it temporarily by autofocus. (AF | appears in the display.) You can also adjust the focus temporarily...

Optura Instruction Manual
Page 51
... to VCR, and load your recorded cassette. Slide the camera's POWER switch to a VCR Playback the tape on the VCR. S-VIDEO OUT INPUT E S-VIDEO VIDEO VIDEO/ AUDIO OUT REMOTE AUDIO L R Record the scenes you want to copy, then stop playback on the TV and set it back while you want to remove unwanted scenes - By connecting the camera to another VCR, you want to copy. 2. Connect the camera to LINE. Prepare the TV and VCR. • Turn on the camera. 5. Load a blank cassette, and...
... to VCR, and load your recorded cassette. Slide the camera's POWER switch to a VCR Playback the tape on the VCR. S-VIDEO OUT INPUT E S-VIDEO VIDEO VIDEO/ AUDIO OUT REMOTE AUDIO L R Record the scenes you want to copy, then stop playback on the TV and set it back while you want to remove unwanted scenes - By connecting the camera to another VCR, you want to copy. 2. Connect the camera to LINE. Prepare the TV and VCR. • Turn on the camera. 5. Load a blank cassette, and...
Optura Instruction Manual
Page 52
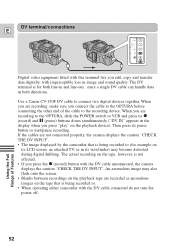
... handle data in image and sound quality. The actual recording on the playback device). If the cables are recording to the OPTURA, slide the POWER switch to the OPTURA before connecting the other end of Features When you are recorded as anomalous images on its LCD screen, an attached TV, or in the display when you connect the cable to VCR and press its pause button to connect two digital devices together. Then press its 2 (record) and a (pause) buttons...
... handle data in image and sound quality. The actual recording on the playback device). If the cables are recording to the OPTURA, slide the POWER switch to the OPTURA before connecting the other end of Features When you are recorded as anomalous images on its LCD screen, an attached TV, or in the display when you connect the cable to VCR and press its pause button to connect two digital devices together. Then press its 2 (record) and a (pause) buttons...
Optura Instruction Manual
Page 60
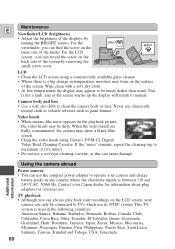
...; Adjust the brightness of the displays by removing the small screw cover. If the "noise" remains, repeat the cleaning (up the display will return to normal. LCD • Clean the LCD screen using Canon's DVM-CL Digital Video Head Cleaning Cassette. Wipe clean with a soft, dry cloth. • At low temperatures the display may form on the surface of the screen by turning the BRIGHT screws. Contact your camera and charge battery packs...
...; Adjust the brightness of the displays by removing the small screw cover. If the "noise" remains, repeat the cleaning (up the display will return to normal. LCD • Clean the LCD screen using Canon's DVM-CL Digital Video Head Cleaning Cassette. Wipe clean with a soft, dry cloth. • At low temperatures the display may form on the surface of the screen by turning the BRIGHT screws. Contact your camera and charge battery packs...

Optura Instruction Manual
Page 67
... sound field, while in the zoom mode the dial adjusts the sensitivity of the higher performance battery pack BP-927, to power the light. VL-10Li Battery Video Light (available soon) This compact yet powerful video light can be used to give twice the playback time. It can charge them both indoor and outdoor shooting. • Lithium ion battery packs can also make use of the microphone from near to the camera...
... sound field, while in the zoom mode the dial adjusts the sensitivity of the higher performance battery pack BP-927, to power the light. VL-10Li Battery Video Light (available soon) This compact yet powerful video light can be used to give twice the playback time. It can charge them both indoor and outdoor shooting. • Lithium ion battery packs can also make use of the microphone from near to the camera...
Optura Instruction Manual
Page 69
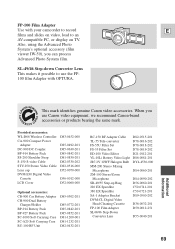
...-150 RF Adapter Cable TL-55 Tele-converter FS-55U Filter Set FS-55 Filter Set ED-100 Video Editor VL-10Li Battery Video Light JR7.2V 10WF Halogen Bulb MM-200 Stereo Mixing Microphone ZM-100 Stereo/Zoom Microphone SR-49/55 Step-up Ring 220 EX Speedlite 380 EX Speedlite SA-1 Adapter Bracket DVM-CL Digital Video Head Cleaning Cassette FP-100 Film Adapter SL49/46...
...-150 RF Adapter Cable TL-55 Tele-converter FS-55U Filter Set FS-55 Filter Set ED-100 Video Editor VL-10Li Battery Video Light JR7.2V 10WF Halogen Bulb MM-200 Stereo Mixing Microphone ZM-100 Stereo/Zoom Microphone SR-49/55 Step-up Ring 220 EX Speedlite 380 EX Speedlite SA-1 Adapter Bracket DVM-CL Digital Video Head Cleaning Cassette FP-100 Film Adapter SL49/46...
Optura Instruction Manual
Page 77
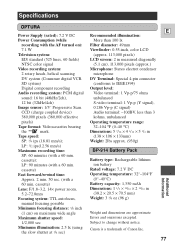
... to change without notice. cassette) Lens: F/1.8-3.2, 14× power zoom, 5.2-72.8mm Focusing system: TTL autofocus, manual focusing possible Minimum focusing distance: 3/8 inch (1 cm) on ): 7.1 W Television system: EIS standard (525 lines, 60 fields) NTSC color signal Video recording system: 2 rotary heads, helical scanning DV system (Consumer digital VCR SD system) Digital component recording Audio recording system: PCM digital sound: 16 bit (48kHz/2ch), 12 bit (32kHz/4ch) Image sensor: 1/3" Progressive Scan CCD (charge coupled device) 380...
... to change without notice. cassette) Lens: F/1.8-3.2, 14× power zoom, 5.2-72.8mm Focusing system: TTL autofocus, manual focusing possible Minimum focusing distance: 3/8 inch (1 cm) on ): 7.1 W Television system: EIS standard (525 lines, 60 fields) NTSC color signal Video recording system: 2 rotary heads, helical scanning DV system (Consumer digital VCR SD system) Digital component recording Audio recording system: PCM digital sound: 16 bit (48kHz/2ch), 12 bit (32kHz/4ch) Image sensor: 1/3" Progressive Scan CCD (charge coupled device) 380...


