User Manual
Page 2
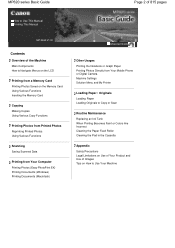
... or Digital Camera Machine Settings Solution Menu and My Printer Loading Paper / Originals Loading Paper Loading Originals to Copy or Scan Routine Maintenance Replacing an Ink Tank When Printing Becomes Faint or Colors Are Incorrect Cleaning the Paper Feed Roller Cleaning the Pad in the Cassette Appendix Safety Precautions Legal Limitations...
... or Digital Camera Machine Settings Solution Menu and My Printer Loading Paper / Originals Loading Paper Loading Originals to Copy or Scan Routine Maintenance Replacing an Ink Tank When Printing Becomes Faint or Colors Are Incorrect Cleaning the Paper Feed Roller Cleaning the Pad in the Cassette Appendix Safety Precautions Legal Limitations...
User Manual
Page 6
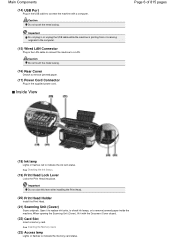
See Checking the Ink Status. (19) Print Head Lock Lever Locks the Print Head into place. Open it with a computer.... (15) Wired LAN Connector Plug in the LAN cable to connect the machine to indicate the ink tank status. Inside View Page 6 of 815 pages (18) Ink lamp Lights or flashes red to a LAN. Important Do not raise this lever after installing the ...card status. Caution Do not touch the metal casing. When opening the Scanning Unit (Cover), lift it to replace ink tanks, to check ink lamps, or to remove jammed paper inside the machine. Main Components (14) USB Port Plug in the USB cable...
See Checking the Ink Status. (19) Print Head Lock Lever Locks the Print Head into place. Open it with a computer.... (15) Wired LAN Connector Plug in the LAN cable to connect the machine to indicate the ink tank status. Inside View Page 6 of 815 pages (18) Ink lamp Lights or flashes red to a LAN. Important Do not raise this lever after installing the ...card status. Caution Do not touch the metal casing. When opening the Scanning Unit (Cover), lift it to replace ink tanks, to check ink lamps, or to remove jammed paper inside the machine. Main Components (14) USB Port Plug in the USB cable...
User Manual
Page 7
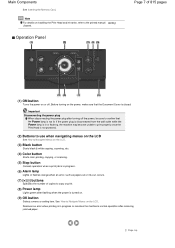
... manual: Getting Started . Resolves an error when printing is in progress. (6) Alarm lamp Lights or flashes orange when an error, such as paper-out or ink-out, occurs. (7) [+] [-] buttons Specifies the number of 815 pages (1) ON button Turns the power on . (9) OK button Selects a menu or setting item. See How to... Navigate Menus on installing the Print Head and ink tanks, refer to confirm that the Document Cover is not lit. Main Components See Inserting the Memory Card. Page top
... manual: Getting Started . Resolves an error when printing is in progress. (6) Alarm lamp Lights or flashes orange when an error, such as paper-out or ink-out, occurs. (7) [+] [-] buttons Specifies the number of 815 pages (1) ON button Turns the power on . (9) OK button Selects a menu or setting item. See How to... Navigate Menus on installing the Print Head and ink tanks, refer to confirm that the Document Cover is not lit. Main Components See Inserting the Memory Card. Page top

User Manual
Page 82
... clean the machine when the print result is faint, or to take an action when paper does not feed properly. Replacing an Ink Tank Checking the Ink Status Replacing Procedure When Printing Becomes Faint or Colors Are Incorrect Printing the Nozzle Check Pattern Examining the Nozzle Check Pattern Cleaning the Print Head...
... clean the machine when the print result is faint, or to take an action when paper does not feed properly. Replacing an Ink Tank Checking the Ink Status Replacing Procedure When Printing Becomes Faint or Colors Are Incorrect Printing the Nozzle Check Pattern Examining the Nozzle Check Pattern Cleaning the Print Head...

User Manual
Page 83
... a new one. For information on the LCD or your computer screen. If print results become faint or white streaks appear despite sufficient ink levels, see When Printing Becomes Faint or Colors Are Incorrect . Note If the error message appears, confirm the displayed message and take... an appropriate action. Replacing an Ink Tank Page 83 of 815 pages Contents > Routine Maintenance > Replacing an Ink Tank Advanced Guide Troubleshooting Replacing an Ink Tank When ink runs out while printing is Displayed on the LCD" in progress, an ...
... a new one. For information on the LCD or your computer screen. If print results become faint or white streaks appear despite sufficient ink levels, see When Printing Becomes Faint or Colors Are Incorrect . Note If the error message appears, confirm the displayed message and take... an appropriate action. Replacing an Ink Tank Page 83 of 815 pages Contents > Routine Maintenance > Replacing an Ink Tank Advanced Guide Troubleshooting Replacing an Ink Tank When ink runs out while printing is Displayed on the LCD" in progress, an ...

User Manual
Page 84
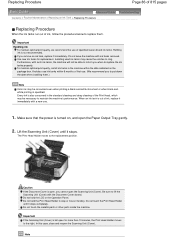
... turned on, and open the Paper Output Tray gently. (2) Lift the Scanning Unit (Cover) until it stops. Repeats Ink is running low. Make sure that the power is sufficient ink left for printing if no symbol appears. Check if any symbol appears on a screen of the LCD displayed while printing.... Note You can also check the ink status on the remaining ink volume screen. Repeats The ink tank is turned on, and press the HOME button. (2) Press the left for printing. Replace it does not click into...
... turned on, and open the Paper Output Tray gently. (2) Lift the Scanning Unit (Cover) until it stops. Repeats Ink is running low. Make sure that the power is sufficient ink left for printing if no symbol appears. Check if any symbol appears on a screen of the LCD displayed while printing.... Note You can also check the ink status on the remaining ink volume screen. Repeats The ink tank is turned on, and press the HOME button. (2) Press the left for printing. Replace it does not click into...

User Manual
Page 85
See Replacing Procedure . Check the error message displayed on -screen manual: Advanced Guide. If the ink lamp is disabled, replace the ink tank with a new one. Checking the Ink Status Page 85 of 815 pages the ink tank. If the function for detecting the remaining ink level is still off after reinstalling the ink tank, there has been an error and the machine cannot print. Refer to "Troubleshooting " in the on the LCD. Page top
See Replacing Procedure . Check the error message displayed on -screen manual: Advanced Guide. If the ink lamp is disabled, replace the ink tank with a new one. Checking the Ink Status Page 85 of 815 pages the ink tank. If the function for detecting the remaining ink level is still off after reinstalling the ink tank, there has been an error and the machine cannot print. Refer to "Troubleshooting " in the on the LCD. Page top
User Manual
Page 86
... Unit (Cover). Caution If the Document Cover is not recommended. Important If the Scanning Unit (Cover) is out of specified Canon brand ink tanks. Do not leave the machine with such ink tanks, the machine will not be necessary to lift the Scanning Unit (Cover) with a new one. 1. Installing used... may cause the nozzles to the right. Make sure that the power is also consumed in the machine within 6 months of first use of ink, replace it immediately with the Document Cover closed. Lift the Scanning Unit (Cover) until it immediately. Do not hold the LCD or the ...
... Unit (Cover). Caution If the Document Cover is not recommended. Important If the Scanning Unit (Cover) is out of specified Canon brand ink tanks. Do not leave the machine with such ink tanks, the machine will not be necessary to lift the Scanning Unit (Cover) with a new one. 1. Installing used... may cause the nozzles to the right. Make sure that the power is also consumed in the machine within 6 months of first use of ink, replace it immediately with the Document Cover closed. Lift the Scanning Unit (Cover) until it immediately. Do not hold the LCD or the ...

User Manual
Page 87
...Do not touch the Print Head Lock Lever (B). Note Do not remove two or more ink tanks. For details on ink lamp flashing speed, see Checking the Ink Status. 4. Replace the ink tank with the remaining film, ink may leak out or may make operating noise when the Print Head Holder moves to the... and regulations regarding disposal of clothing or the surrounding area. If the air hole is completely removed from the bottom of the ink tank. Important Handle the ink tank carefully to peel it from the air hole (C). Page 87 of the arrow to avoid staining of consumables. Replacing Procedure ...
...Do not touch the Print Head Lock Lever (B). Note Do not remove two or more ink tanks. For details on ink lamp flashing speed, see Checking the Ink Status. 4. Replace the ink tank with the remaining film, ink may leak out or may make operating noise when the Print Head Holder moves to the... and regulations regarding disposal of clothing or the surrounding area. If the air hole is completely removed from the bottom of the ink tank. Important Handle the ink tank carefully to peel it from the air hole (C). Page 87 of the arrow to avoid staining of consumables. Replacing Procedure ...

User Manual
Page 88
... If you have removed it according to print. Be careful to stain your hands and the surrounding area. Be careful not to handle the ink tank. It can cause the machine to malfunction or become unable to the local laws and regulations regarding disposal of consumables. Do not reattach ... protective cap once you shake the ink tank, the ink may prevent the ink from being ejected properly. 5. Discard it . Install the new ink tank. (1) Insert the front end of ink tank into place. Make sure that the ink lamp lights up red. Do not touch the open ink port once the protective cap is...
... If you have removed it according to print. Be careful to stain your hands and the surrounding area. Be careful not to handle the ink tank. It can cause the machine to malfunction or become unable to the local laws and regulations regarding disposal of consumables. Do not reattach ... protective cap once you shake the ink tank, the ink may prevent the ink from being ejected properly. 5. Discard it . Install the new ink tank. (1) Insert the front end of ink tank into place. Make sure that the ink lamp lights up red. Do not touch the open ink port once the protective cap is...

User Manual
Page 89
... the Print Head automatically. See Aligning the Print Head. Replacing Procedure Important You cannot print if the ink tank is misaligned, adjust the print head position. You cannot print unless all the ink tanks. Do not perform any other operations until the machine completes the cleaning of 815 pages 6. If... printed ruled lines are installed. Be sure to install the ink tank in the on the Print Head Holder. Page 89 of the Print Head. Do not hold the Scanning Unit (Cover) firmly using both...
... the Print Head automatically. See Aligning the Print Head. Replacing Procedure Important You cannot print if the ink tank is misaligned, adjust the print head position. You cannot print unless all the ink tanks. Do not perform any other operations until the machine completes the cleaning of 815 pages 6. If... printed ruled lines are installed. Be sure to install the ink tank in the on the Print Head Holder. Page 89 of the Print Head. Do not hold the Scanning Unit (Cover) firmly using both...

User Manual
Page 90
...For details, refer to the on-screen manual: Advanced Guide. This can also perform the maintenance operations from your Canon service representative. For details, refer to the on the ink tanks are lit red. If the problem is missing: Step 2 See Cleaning the Print Head. Contact your computer...are otherwise unsatisfactory, aligning the Print Head may improve print quality. See Examining the Nozzle Check Pattern. If not, see Checking the Ink Status and take an appropriate action. Increasing the print quality in the printer driver settings may be damaged. Note If you have ...
...For details, refer to the on-screen manual: Advanced Guide. This can also perform the maintenance operations from your Canon service representative. For details, refer to the on the ink tanks are lit red. If the problem is missing: Step 2 See Cleaning the Print Head. Contact your computer...are otherwise unsatisfactory, aligning the Print Head may improve print quality. See Examining the Nozzle Check Pattern. If not, see Checking the Ink Status and take an appropriate action. Increasing the print quality in the printer driver settings may be damaged. Note If you have ...

User Manual
Page 92
... Printing the Nozzle Check Pattern Print the nozzle check pattern to prepare: a sheet of A4 or Letter-sized plain paper Note If the remaining ink level is low. Printing the Nozzle Check Pattern Page 92 of A4 or Letter-sized plain paper are loaded in the Cassette. 3. Open the... Maintenance, and press the OK button. (3) Select Nozzle check pattern, and press the OK button. (4) Select Yes, and press the OK button. Replace the ink tank whose ink is low, the nozzle check pattern will be printed correctly. Print the nozzle check pattern. (1) Select Settings on the LCD. 5.
... Printing the Nozzle Check Pattern Print the nozzle check pattern to prepare: a sheet of A4 or Letter-sized plain paper Note If the remaining ink level is low. Printing the Nozzle Check Pattern Page 92 of A4 or Letter-sized plain paper are loaded in the Cassette. 3. Open the... Maintenance, and press the OK button. (3) Select Nozzle check pattern, and press the OK button. (4) Select Yes, and press the OK button. Replace the ink tank whose ink is low, the nozzle check pattern will be printed correctly. Print the nozzle check pattern. (1) Select Settings on the LCD. 5.

User Manual
Page 95
... Output Tray gently, and open the Output Tray Extension. 4. Check the nozzle check pattern. See Examining the Nozzle Check Pattern. Cleaning the Print Head consumes ink, so clean the Print Head only when necessary. Make sure that one or more sheets of A4 or Letter-sized plain paper are present in...
... Output Tray gently, and open the Output Tray Extension. 4. Check the nozzle check pattern. See Examining the Nozzle Check Pattern. Cleaning the Print Head consumes ink, so clean the Print Head only when necessary. Make sure that one or more sheets of A4 or Letter-sized plain paper are present in...

User Manual
Page 96
... resolved, the Print Head may be printed. 5. See Examining the Nozzle Check Pattern. If the problem is not printed properly, replace the ink tank of that one or more ink than the standard cleaning of the Print Head, so clean the Print Head deeply only when necessary. The machine starts cleaning the... any other operations until the machine completes the deep cleaning of A4 or Letter-sized plain paper are loaded in the Cassette. 3. See Replacing an Ink Tank. Contact your Canon service representative.
... resolved, the Print Head may be printed. 5. See Examining the Nozzle Check Pattern. If the problem is not printed properly, replace the ink tank of that one or more ink than the standard cleaning of the Print Head, so clean the Print Head deeply only when necessary. The machine starts cleaning the... any other operations until the machine completes the deep cleaning of A4 or Letter-sized plain paper are loaded in the Cassette. 3. See Replacing an Ink Tank. Contact your Canon service representative.

User Manual
Page 105
... Power supply Ensure that is unstable or subject to a heating source. Never remove the plug by pulling on a slant, vertically or upside-down, as the ink may cause injury or damage the machine if you could cause a fire or electric shock if the spray comes into the machine, unplug the power...
... Power supply Ensure that is unstable or subject to a heating source. Never remove the plug by pulling on a slant, vertically or upside-down, as the ink may cause injury or damage the machine if you could cause a fire or electric shock if the spray comes into the machine, unplug the power...

User Manual
Page 106
... may break and cause injury. Do not attempt to eyes or skin persists, obtain medical advice immediately. Do not handle the Print Head and ink tanks roughly such as fluorescent lamps. If irritation or discomfort occurs, obtain medical advice immediately. If irritation to disassemble or modify the Print Head ...microwave oven can be able to those, it may leak out and stain clothing or the surrounding area. In case ink is placed closer to print later. In case ink gets in the poor status of interference when the microwave oven is on.Placing this product close to microwave oven may...
... may break and cause injury. Do not attempt to eyes or skin persists, obtain medical advice immediately. Do not handle the Print Head and ink tanks roughly such as fluorescent lamps. If irritation or discomfort occurs, obtain medical advice immediately. If irritation to disassemble or modify the Print Head ...microwave oven can be able to those, it may leak out and stain clothing or the surrounding area. In case ink is placed closer to print later. In case ink gets in the poor status of interference when the microwave oven is on.Placing this product close to microwave oven may...
User Manual
Page 108
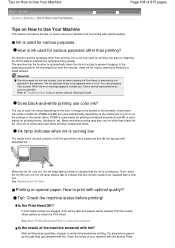
... Head OK? See When Printing Becomes Faint or Colors Are Incorrect . Clean the inside of your Canon service representative as soon as when cleaning the Print Head, is running low. Ink is used mainly for printing photos, illustration, etc. When the error message appears, contact your machine...small amount. Print the nozzle check pattern to "Troubleshooting " in the on-screen manual: Advanced Guide. Important The ink pumped out from the nozzles. See Replacing an Ink Tank . If print head nozzles are used automatically depending on the media type to print or on the settings ...
... Head OK? See When Printing Becomes Faint or Colors Are Incorrect . Clean the inside of your Canon service representative as soon as when cleaning the Print Head, is running low. Ink is used mainly for printing photos, illustration, etc. When the error message appears, contact your machine...small amount. Print the nozzle check pattern to "Troubleshooting " in the on-screen manual: Advanced Guide. Important The ink pumped out from the nozzles. See Replacing an Ink Tank . If print head nozzles are used automatically depending on the media type to print or on the settings ...

User Manual
Page 109
Page 109 of 815 pages (A) Rear Tray (B) Cassette To load paper in advance (such as using ink, ejecting ink, or distance from nozzles) so that you may not be able to continue to get the satisfactory print result. Flatten the curled paper, then reload ...
Page 109 of 815 pages (A) Rear Tray (B) Cassette To load paper in advance (such as using ink, ejecting ink, or distance from nozzles) so that you may not be able to continue to get the satisfactory print result. Flatten the curled paper, then reload ...

User Manual
Page 110
To disconnect the power plug, be sure to check if the nozzles are clogged. Print periodically! Just as the tip of paper, ink may blur if you trace the printed area with a highlight pen or paint-stick, or bleed if water or sweat comes in contact with care ... cable connector before the Power lamp is used at least once a month. Colors are uneven, and print results are clogged, colors may become damaged or ink may be capped properly and this case If you press the ON button to turn off the power, the machine caps the Print Head (nozzles...
To disconnect the power plug, be sure to check if the nozzles are clogged. Print periodically! Just as the tip of paper, ink may blur if you trace the printed area with a highlight pen or paint-stick, or bleed if water or sweat comes in contact with care ... cable connector before the Power lamp is used at least once a month. Colors are uneven, and print results are clogged, colors may become damaged or ink may be capped properly and this case If you press the ON button to turn off the power, the machine caps the Print Head (nozzles...


