

Users Manual - English
Page 6
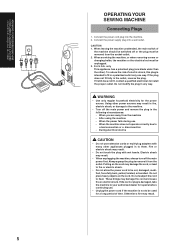
Turn on or off the switch for the main power and sew-light. 1 Turn on 2 Turn off or the plug must unplugged. Connecting Plugs and Main Power / Sewing Light Switch 2 1 1. Connect the three-prong plug into a wall outlet. - Connect the electrical supply plug into the machine. 2. When leaving the machine unattended, the main switch of the machine should be switched off - When servicing the machine, or when removing covers or changing bulbs, the machine or the electrical set must be removed from the socket outlet.
Turn on or off the switch for the main power and sew-light. 1 Turn on 2 Turn off or the plug must unplugged. Connecting Plugs and Main Power / Sewing Light Switch 2 1 1. Connect the three-prong plug into a wall outlet. - Connect the electrical supply plug into the machine. 2. When leaving the machine unattended, the main switch of the machine should be switched off - When servicing the machine, or when removing covers or changing bulbs, the machine or the electrical set must be removed from the socket outlet.
Users Manual - English
Page 7
... touch the balance wheel, thread take-up, needle, or other hot objects. 2. Remember to assure correct installation. Do not store anything on the needle while sewing. Benzene, thinner, and scouring powders can damage the case and machine, and should never be used. 3. PLEASE READ BEFORE USING THIS MACHINE For safe operation...
... touch the balance wheel, thread take-up, needle, or other hot objects. 2. Remember to assure correct installation. Do not store anything on the needle while sewing. Benzene, thinner, and scouring powders can damage the case and machine, and should never be used. 3. PLEASE READ BEFORE USING THIS MACHINE For safe operation...
Users Manual - English
Page 10
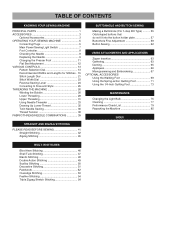
...3 OPERATING YOUR SEWING MACHINE 5 Connecting Plugs 5 Main Power/Sewing Light Switch 7 ... Stitch Length Dial 21 Stitch Width Dial 23 Reverse Sewing Lever 24 Converting to Free-arm Style 25 THREADING... 35 Twin Needle Sewing 36 Thread Tension 38 FABRIC/THREAD/NEEDLE COMBINATIONS 39 BUTTONHOLE AND BUTTON SEWING Making a Buttonhole ... button holder plate 57 Buttonhole Fine Adjustment 59 Button Sewing 62 USING ATTACHMENTS AND APPLICATIONS Zipper Insertion 63 Gathering ...85 INDEX STRAIGHT AND ZIGZAG STITCHING PLEASE READ BEFORE SEWING 41 Straight Stitching 42 Zigzag Stitching 45 BUILT-...
...3 OPERATING YOUR SEWING MACHINE 5 Connecting Plugs 5 Main Power/Sewing Light Switch 7 ... Stitch Length Dial 21 Stitch Width Dial 23 Reverse Sewing Lever 24 Converting to Free-arm Style 25 THREADING... 35 Twin Needle Sewing 36 Thread Tension 38 FABRIC/THREAD/NEEDLE COMBINATIONS 39 BUTTONHOLE AND BUTTON SEWING Making a Buttonhole ... button holder plate 57 Buttonhole Fine Adjustment 59 Button Sewing 62 USING ATTACHMENTS AND APPLICATIONS Zipper Insertion 63 Gathering ...85 INDEX STRAIGHT AND ZIGZAG STITCHING PLEASE READ BEFORE SEWING 41 Straight Stitching 42 Zigzag Stitching 45 BUILT-...
Users Manual - English
Page 13
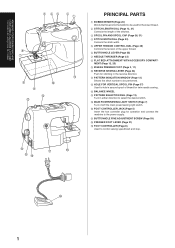
... the stitch width. 5 UPPER TENSION CONTROL DIAL (Page 38) Controls the tension of thread for stitching in either direction to control sewing speed/start and stop. F FOOT CONTROLLER JACK (Page 5) Insert the foot controller plug for operation and connect the machine to hold...) 7 NEEDLE THREADER (Page 33) 8 FLAT BED ATTACHMENT WITH ACCESSORY COMPART- B HOLE FOR VERTICAL SPOOL PIN (Page 37) Used to the power supply. KNOWING YOUR SEWING MACHINE CONNAITRE SA MACHINE A COUDRE CONOZCA SU MÁQUINA DE COSER 5 43 2 1 6 7 A 8 : 9 B C PRINCIPAL PARTS 1 BOBBIN WINDER (Page...
... the stitch width. 5 UPPER TENSION CONTROL DIAL (Page 38) Controls the tension of thread for stitching in either direction to control sewing speed/start and stop. F FOOT CONTROLLER JACK (Page 5) Insert the foot controller plug for operation and connect the machine to hold...) 7 NEEDLE THREADER (Page 33) 8 FLAT BED ATTACHMENT WITH ACCESSORY COMPART- B HOLE FOR VERTICAL SPOOL PIN (Page 37) Used to the power supply. KNOWING YOUR SEWING MACHINE CONNAITRE SA MACHINE A COUDRE CONOZCA SU MÁQUINA DE COSER 5 43 2 1 6 7 A 8 : 9 B C PRINCIPAL PARTS 1 BOBBIN WINDER (Page...
Users Manual - English
Page 15
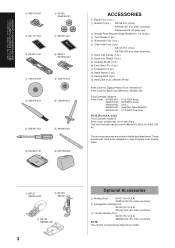
...pc.) 9 Cleaning Brush (1 pc.) 0 Extra Spool Pin (1 pc.) A Screwdriver (1 pc.) B Seam Ripper (1 pc.) C Darning Plate (1pc.) D Hard Case (1 pc.) (Model XR-46) Parts Code for Zigzag Presser Foot: X51953-051 Parts Code for Model XL-6562, XL-6452, XR46. only): Foot Controller: Model N Parts Code: J00360... (U.K.) (Australia, New Zealand) (110/220V Dual Ara) NOTE (For U.S.A. The above accessories are stored in the flat bed attachment. KNOWING YOUR SEWING MACHINE CONNAITRE SA MACHINE A COUDRE CONOZCA SU MÁQUINA DE COSER 1 X59370-051 2 SA156 XA5539-051 3 X57117-051 4 X57521-001 5 XA4911...
...pc.) 9 Cleaning Brush (1 pc.) 0 Extra Spool Pin (1 pc.) A Screwdriver (1 pc.) B Seam Ripper (1 pc.) C Darning Plate (1pc.) D Hard Case (1 pc.) (Model XR-46) Parts Code for Zigzag Presser Foot: X51953-051 Parts Code for Model XL-6562, XL-6452, XR46. only): Foot Controller: Model N Parts Code: J00360... (U.K.) (Australia, New Zealand) (110/220V Dual Ara) NOTE (For U.S.A. The above accessories are stored in the flat bed attachment. KNOWING YOUR SEWING MACHINE CONNAITRE SA MACHINE A COUDRE CONOZCA SU MÁQUINA DE COSER 1 X59370-051 2 SA156 XA5539-051 3 X57117-051 4 X57521-001 5 XA4911...
Users Manual - English
Page 17
... of the machine should be switched off or the plug must be used for the power source. KNOWING YOUR SEWING MACHINE CONNAITRE SA MACHINE A COUDRE CONOZCA SU MÁQUINA DE COSER OPERATING YOUR SEWING MACHINE Connecting Plugs 1. Do not modify the plug in the outlet, reverse the plug. Using other appliances plugged...
... of the machine should be switched off or the plug must be used for the power source. KNOWING YOUR SEWING MACHINE CONNAITRE SA MACHINE A COUDRE CONOZCA SU MÁQUINA DE COSER OPERATING YOUR SEWING MACHINE Connecting Plugs 1. Do not modify the plug in the outlet, reverse the plug. Using other appliances plugged...
Users Manual - English
Page 21
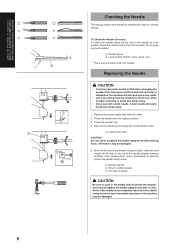
...surface. If the main power is left on and foot controller is loose, the needle may break or the machine may result. • Use only sewing machine needles for setting needle 4 Flat side of the needle stopper (viewing window) in the needle until it may bend or break and cause injury.... • Never sew with a screwdriver. Remove the power supply plug from the top and the sides. Lower the presser foot. 4. Throw away any bent needles. 1 Parallel space 2 ...
...surface. If the main power is left on and foot controller is loose, the needle may break or the machine may result. • Use only sewing machine needles for setting needle 4 Flat side of the needle stopper (viewing window) in the needle until it may bend or break and cause injury.... • Never sew with a screwdriver. Remove the power supply plug from the top and the sides. Lower the presser foot. 4. Throw away any bent needles. 1 Parallel space 2 ...
Users Manual - English
Page 25
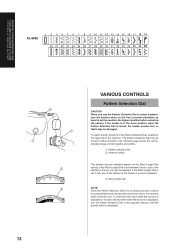
... side of stitch lengths and widths. 1 Pattern selection dial 2 Pattern number The stitches that are available depend on the Stitch Length Dial setting. KNOWING YOUR SEWING MACHINE CONNAITRE SA MACHINE A COUDRE CONOZCA SU MÁQUINA DE COSER XL-6562 1 2 3 4 5 6 7 8 9 10 11 12 13 14 15 16 17 18 19 20 21...
... side of stitch lengths and widths. 1 Pattern selection dial 2 Pattern number The stitches that are available depend on the Stitch Length Dial setting. KNOWING YOUR SEWING MACHINE CONNAITRE SA MACHINE A COUDRE CONOZCA SU MÁQUINA DE COSER XL-6562 1 2 3 4 5 6 7 8 9 10 11 12 13 14 15 16 17 18 19 20 21...

Users Manual - English
Page 27
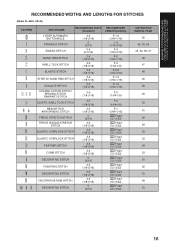
KNOWING YOUR SEWING MACHINE CONNAITRE SA MACHINE A COUDRE CONOZCA SU MÁQUINA DE COSER RECOMMENDED WIDTHS AND LENGTHS FOR STITCHES (Model XL-6562) PATTERN STITCH NAME RECOMMENDED WIDTH [... PAGE 55 42, 63, 65 45, 62, 66, 67 46 47 48 46 50 49 53 51 51 42 54 53 53 54 53 51 52 51 49 51...
KNOWING YOUR SEWING MACHINE CONNAITRE SA MACHINE A COUDRE CONOZCA SU MÁQUINA DE COSER RECOMMENDED WIDTHS AND LENGTHS FOR STITCHES (Model XL-6562) PATTERN STITCH NAME RECOMMENDED WIDTH [... PAGE 55 42, 63, 65 45, 62, 66, 67 46 47 48 46 50 49 53 51 51 42 54 53 53 54 53 51 52 51 49 51...
Users Manual - English
Page 28
KNOWING YOUR SEWING MACHINE CONNAITRE SA MACHINE A COUDRE CONOZCA SU MÁQUINA DE COSER RECOMMENDED WIDTHS AND LENGTHS FOR STITCHES (Model XL-6452, XR-46) PATTERN STITCH NAME RECOMMENDED WIDTH [mm(inch)] 1-STEP AUTOMATIC BUTTONHOLE STRAIGHT STITCH ZIGZAG STITCH BLIND HEM STITCH SHELL TUCK STITCH ELASTIC STITCH STRETCH BLIND ... MANUAL PAGE 55 42, 63, 65 45, 62, 66, 67 46 47 48 46 50 49 53 51 42 54 53 53 54 53 51 52 51 49 51 16
KNOWING YOUR SEWING MACHINE CONNAITRE SA MACHINE A COUDRE CONOZCA SU MÁQUINA DE COSER RECOMMENDED WIDTHS AND LENGTHS FOR STITCHES (Model XL-6452, XR-46) PATTERN STITCH NAME RECOMMENDED WIDTH [mm(inch)] 1-STEP AUTOMATIC BUTTONHOLE STRAIGHT STITCH ZIGZAG STITCH BLIND HEM STITCH SHELL TUCK STITCH ELASTIC STITCH STRETCH BLIND ... MANUAL PAGE 55 42, 63, 65 45, 62, 66, 67 46 47 48 46 50 49 53 51 42 54 53 53 54 53 51 52 51 49 51 16
Users Manual - English
Page 33
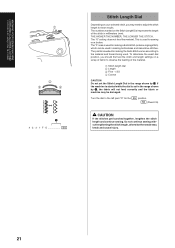
...for making the Satin Stitch varies according to the left past "O" for best results. This is used in millimeters (mm). Do not continue sewing without lengthening the stitch length, otherwise the needle may need to observe the feeding of the material. 1 Stitch length dial 2 Length 3 ... THE NUMBER, THE LONGER THE STITCH. To determine the exact dial position, you may break and cause injury. 21 The "F" area is used . KNOWING YOUR SEWING MACHINE CONNAITRE SA MACHINE A COUDRE CONOZCA SU MÁQUINA DE COSER 1 2 3 4 3 · 2 ·1 A 4 · 3 · 2 · 1 · F · ...
...for making the Satin Stitch varies according to the left past "O" for best results. This is used in millimeters (mm). Do not continue sewing without lengthening the stitch length, otherwise the needle may need to observe the feeding of the material. 1 Stitch length dial 2 Length 3 ... THE NUMBER, THE LONGER THE STITCH. To determine the exact dial position, you may break and cause injury. 21 The "F" area is used . KNOWING YOUR SEWING MACHINE CONNAITRE SA MACHINE A COUDRE CONOZCA SU MÁQUINA DE COSER 1 2 3 4 3 · 2 ·1 A 4 · 3 · 2 · 1 · F · ...

Users Manual - English
Page 35
... du point. Selector de ancho de puntada Según el modelo de puntada seleccionado, se necesitará o no ajustar el ancho de puntada. KNOWING YOUR SEWING MACHINE CONNAITRE SA MACHINE A COUDRE CONOZCA SU MÁQUINA DE COSER 1 5 64 10 1 Stitch Width Dial Depending on the dial represent the stitch width. PLUS...
... du point. Selector de ancho de puntada Según el modelo de puntada seleccionado, se necesitará o no ajustar el ancho de puntada. KNOWING YOUR SEWING MACHINE CONNAITRE SA MACHINE A COUDRE CONOZCA SU MÁQUINA DE COSER 1 5 64 10 1 Stitch Width Dial Depending on the dial represent the stitch width. PLUS...
Users Manual - English
Page 39
...shaft to start. 5. Immediately after winding the bobbin, it may cause the thread tension to loosen, breaking the needle and resulting in damage to sew or manually turning the balance wheel. Then stop the machine. Step down on the foot controller to the left and remove the bobbin. CAUTION ... into the groove of the bobbin. 1 Spring on the shaft 2 Groove of the thread through the hole on the bobbin winder seat. KNOWING YOUR SEWING MACHINE CONNAITRE SA MACHINE A COUDRE CONOZCA SU MÁQUINA DE COSER 2 31 2. Doing so could loosen or remove the bobbin winder seat, resulting ...
...shaft to start. 5. Immediately after winding the bobbin, it may cause the thread tension to loosen, breaking the needle and resulting in damage to sew or manually turning the balance wheel. Then stop the machine. Step down on the foot controller to the left and remove the bobbin. CAUTION ... into the groove of the bobbin. 1 Spring on the shaft 2 Groove of the thread through the hole on the bobbin winder seat. KNOWING YOUR SEWING MACHINE CONNAITRE SA MACHINE A COUDRE CONOZCA SU MÁQUINA DE COSER 2 31 2. Doing so could loosen or remove the bobbin winder seat, resulting ...
Users Manual - English
Page 41
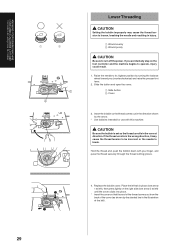
... the balance wheel toward you (counterclockwise) and raise the presser foot lever. 2. Hold the thread end, push the bobbin down with this machine. KNOWING YOUR SEWING MACHINE CONNAITRE SA MACHINE A COUDRE CONOZCA SU MÁQUINA DE COSER 1 2 1 2 Lower Threading CAUTION Setting the bobbin improperly may cause the thread tension to be...
... the balance wheel toward you (counterclockwise) and raise the presser foot lever. 2. Hold the thread end, push the bobbin down with this machine. KNOWING YOUR SEWING MACHINE CONNAITRE SA MACHINE A COUDRE CONOZCA SU MÁQUINA DE COSER 1 2 1 2 Lower Threading CAUTION Setting the bobbin improperly may cause the thread tension to be...

Users Manual - English
Page 43
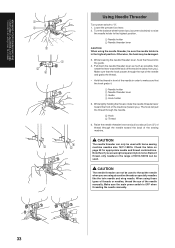
... of the spool and cause the needle to break. If a spool cap smaller than the thread spool is used, the thread may cause sewing problems. 1 42 KNOWING YOUR SEWING MACHINE CONNAITRE SA MACHINE A COUDRE CONOZCA SU MÁQUINA DE COSER 53 1 2 31 Upper Threading 1. Place a spool of the spool. Place thread behind...
... of the spool and cause the needle to break. If a spool cap smaller than the thread spool is used, the thread may cause sewing problems. 1 42 KNOWING YOUR SEWING MACHINE CONNAITRE SA MACHINE A COUDRE CONOZCA SU MÁQUINA DE COSER 53 1 2 31 Upper Threading 1. Place a spool of the spool. Place thread behind...
Users Manual - English
Page 45
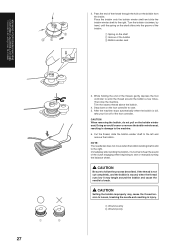
...foot lever. 2. While lightly holding the thread, rotate the needle threader lever toward the front of the machine (toward the back of the sewing machine. Check the table on page 39 for appropriate needle and thread combinations. When using the needle threader, be sure the needle holder is ... or needles, thread the eye of 90/14-100/16 can be damaged. 3. Otherwise, the hook may be used with home sewing machine needles size 75/11-100/16. KNOWING YOUR SEWING MACHINE CONNAITRE SA MACHINE A COUDRE CONOZCA SU MÁQUINA DE COSER 1 2 3 1 2 4 5 6 5 Using Needle Threader Turn power switch...
...foot lever. 2. While lightly holding the thread, rotate the needle threader lever toward the front of the machine (toward the back of the sewing machine. Check the table on page 39 for appropriate needle and thread combinations. When using the needle threader, be sure the needle holder is ... or needles, thread the eye of 90/14-100/16 can be damaged. 3. Otherwise, the hook may be used with home sewing machine needles size 75/11-100/16. KNOWING YOUR SEWING MACHINE CONNAITRE SA MACHINE A COUDRE CONOZCA SU MÁQUINA DE COSER 1 2 3 1 2 4 5 6 5 Using Needle Threader Turn power switch...

Users Manual - English
Page 67
... piece of fabric before attempting it on the underside of the fabric. One-step buttonhole-making is recommended to begin sewing. Stitches 1, 2, 3 and 4 are sewn, then stop the machine. BUTTONHOLE AND BUTTON SEWING COUTURE DE BOUTONNIERES ET DE BOUTONS OJALES Y COSTURA DE BOTONES 55 A 1 2 B 3 C 4 5 a D 3 24 1 A Making a Buttonhole (For 1-step BH Type) Pattern...
... piece of fabric before attempting it on the underside of the fabric. One-step buttonhole-making is recommended to begin sewing. Stitches 1, 2, 3 and 4 are sewn, then stop the machine. BUTTONHOLE AND BUTTON SEWING COUTURE DE BOUTONNIERES ET DE BOUTONS OJALES Y COSTURA DE BOTONES 55 A 1 2 B 3 C 4 5 a D 3 24 1 A Making a Buttonhole (For 1-step BH Type) Pattern...

Users Manual - English
Page 71
... left side is too coarse or fine compared to appear uniform. 6 Stitch length dial 7 Buttonhole fine adjusting screw 8 Right row 9 Adjusted stitch BUTTONHOLE AND BUTTON SEWING COUTURE DE BOUTONNIERES ET DE BOUTONS OJALES Y COSTURA DE BOTONES 9 9 + - + - 59 Set the Stitch Length Dial at "F-1.5" and stitch the right side of fabric while...
... left side is too coarse or fine compared to appear uniform. 6 Stitch length dial 7 Buttonhole fine adjusting screw 8 Right row 9 Adjusted stitch BUTTONHOLE AND BUTTON SEWING COUTURE DE BOUTONNIERES ET DE BOUTONS OJALES Y COSTURA DE BOTONES 9 9 + - + - 59 Set the Stitch Length Dial at "F-1.5" and stitch the right side of fabric while...
Users Manual - English
Page 75
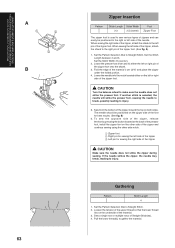
...side of the zipper foot. Pull the lower thread(s) to Straight Stitch. Set the Stitch Length between 2 and 3. CAUTION Turn the balance wheel to injury. Sew from the bottom of the zipper foot. B) 6. The needle should be positioned to the right or left pin of the zipper toward the top on... 3 Left pin for best results. (See fig. Loosen the tension of the upper thread so that the lower thread lies on both sides. A) 1. To sew the opposite side of the zipper, release the foot by pressing the button located at the back of the presser foot, install the zipper foot...
...side of the zipper foot. Pull the lower thread(s) to Straight Stitch. Set the Stitch Length between 2 and 3. CAUTION Turn the balance wheel to injury. Sew from the bottom of the zipper foot. B) 6. The needle should be positioned to the right or left pin of the zipper toward the top on... 3 Left pin for best results. (See fig. Loosen the tension of the upper thread so that the lower thread lies on both sides. A) 1. To sew the opposite side of the zipper, release the foot by pressing the button located at the back of the presser foot, install the zipper foot...
Users Manual - English
Page 79
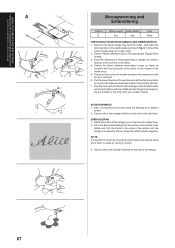
... power supply plug from the inside to the edge of the fabric. 4. Stretch the fabric between embroidery hoops as firmly as shown in fig. MONOGRAMMING 1. Sew, moving the hoop slowly along the lettering at the starting position by moving the embroidery hoop. 2. Stitch the outline of the inside and from the...
... power supply plug from the inside to the edge of the fabric. 4. Stretch the fabric between embroidery hoops as firmly as shown in fig. MONOGRAMMING 1. Sew, moving the hoop slowly along the lettering at the starting position by moving the embroidery hoop. 2. Stitch the outline of the inside and from the...


