
Users Manual - English
Page 2
..., electric shock, or injury to break. 14. Always unplug before cleaning. 2. WARNING - Close attention is necessary when the machine is not working properly, if it to persons: 1. Use this machine only for use as described in the needle area, such as threading needle, changing needle, threading bobbin, or changing the presser foot, and the like. 15. Never operate this machine if it has a damaged cord or plug, if it is...
..., electric shock, or injury to break. 14. Always unplug before cleaning. 2. WARNING - Close attention is necessary when the machine is not working properly, if it to persons: 1. Use this machine only for use as described in the needle area, such as threading needle, changing needle, threading bobbin, or changing the presser foot, and the like. 15. Never operate this machine if it has a damaged cord or plug, if it is...
Users Manual - English
Page 7
... needle while sewing. Do not use • Maintaining the machine • Leaving the machine unattended. 3. Use only neutral soaps or detergents to keep your local authorized dealer. For repair or adjustment In the event a malfunction occurs or adjustment is completed • Replacing or removing the needle or any assemblies, the presser feet, needle, or other hot objects. 2. For a longer service life 1. Be sure to clean the case. Plug the machine directly...
... needle while sewing. Do not use • Maintaining the machine • Leaving the machine unattended. 3. Use only neutral soaps or detergents to keep your local authorized dealer. For repair or adjustment In the event a malfunction occurs or adjustment is completed • Replacing or removing the needle or any assemblies, the presser feet, needle, or other hot objects. 2. For a longer service life 1. Be sure to clean the case. Plug the machine directly...
Users Manual - English
Page 10
...3 OPERATING YOUR SEWING MACHINE 5 Connecting Plugs 5 Main Power/Sewing Light Switch 7 Foot Controller 8 Checking the Needle 9 Replacing the Needle 9 Changing the Presser Foot 11 Flat Bed Attachment 12 VARIOUS CONTROLS 13 Pattern Selection Dial 13 Recommended Widths and Lengths for Stitches . 15 Stitch Length Dial 21 Stitch Width Dial 23 Reverse Sewing Lever 24 Converting to Free-arm Style 25 THREADING THE MACHINE 26 Winding the Bobbin 26 Lower Threading 29 Upper Threading 31 Using Needle Threader 33 Drawing Up Lower Thread 35 Twin Needle Sewing 36 Thread Tension 38 FABRIC...
...3 OPERATING YOUR SEWING MACHINE 5 Connecting Plugs 5 Main Power/Sewing Light Switch 7 Foot Controller 8 Checking the Needle 9 Replacing the Needle 9 Changing the Presser Foot 11 Flat Bed Attachment 12 VARIOUS CONTROLS 13 Pattern Selection Dial 13 Recommended Widths and Lengths for Stitches . 15 Stitch Length Dial 21 Stitch Width Dial 23 Reverse Sewing Lever 24 Converting to Free-arm Style 25 THREADING THE MACHINE 26 Winding the Bobbin 26 Lower Threading 29 Upper Threading 31 Using Needle Threader 33 Drawing Up Lower Thread 35 Twin Needle Sewing 36 Thread Tension 38 FABRIC...
Users Manual - English
Page 13
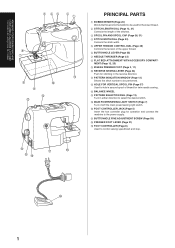
... STITCH WIDTH DIAL (Page 23) Controls the stitch width. 5 UPPER TENSION CONTROL DIAL (Page 38) Controls the tension of the upper thread. 6 BUTTONHOLE LEVER (Page 55) 7 NEEDLE THREADER (Page 33) 8 FLAT BED ATTACHMENT WITH ACCESSORY COMPART- E MAIN POWER/SEWING LIGHT SWITCH (Page 7) Turn on/off the main power/sewing light switch. G BUTTONHOLE FINE ADJUSTMENT SCREW (Page 59) H PRESSER FOOT LEVER (Page 31) I 1 KNOWING YOUR SEWING MACHINE CONNAITRE SA MACHINE A COUDRE CONOZCA SU MÁQUINA DE COSER 5 43 2 1 6 7 A 8 : 9 B C PRINCIPAL PARTS 1 BOBBIN WINDER (Page 26) Winds the thread onto...
... STITCH WIDTH DIAL (Page 23) Controls the stitch width. 5 UPPER TENSION CONTROL DIAL (Page 38) Controls the tension of the upper thread. 6 BUTTONHOLE LEVER (Page 55) 7 NEEDLE THREADER (Page 33) 8 FLAT BED ATTACHMENT WITH ACCESSORY COMPART- E MAIN POWER/SEWING LIGHT SWITCH (Page 7) Turn on/off the main power/sewing light switch. G BUTTONHOLE FINE ADJUSTMENT SCREW (Page 59) H PRESSER FOOT LEVER (Page 31) I 1 KNOWING YOUR SEWING MACHINE CONNAITRE SA MACHINE A COUDRE CONOZCA SU MÁQUINA DE COSER 5 43 2 1 6 7 A 8 : 9 B C PRINCIPAL PARTS 1 BOBBIN WINDER (Page 26) Winds the thread onto...
Users Manual - English
Page 15
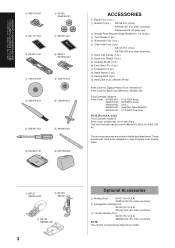
...-002 3 Optional Accessories 1 Walking Foot SA107 (For U.S.A) XA8319-002 (For other countries) 2 Springaction Quilting Foot SA129 (For U.S.A) X81021-002 (For other countries) 3 1/4-Inch Quilting Foot SA125 (For U.S.A) X80980-002 (For other countries) 7 Spool Cap (Large) (1 pc.) 8 Spool Cap (Small) (1 pc.) 9 Cleaning Brush (1 pc.) 0 Extra Spool Pin (1 pc.) A Screwdriver (1 pc.) B Seam Ripper (1 pc.) C Darning Plate (1pc.) D Hard Case (1 pc.) (Model XR-46) Parts Code for Zigzag Presser Foot: X51953-051 Parts Code for Model XL-6562, XL...
...-002 3 Optional Accessories 1 Walking Foot SA107 (For U.S.A) XA8319-002 (For other countries) 2 Springaction Quilting Foot SA129 (For U.S.A) X81021-002 (For other countries) 3 1/4-Inch Quilting Foot SA125 (For U.S.A) X80980-002 (For other countries) 7 Spool Cap (Large) (1 pc.) 8 Spool Cap (Small) (1 pc.) 9 Cleaning Brush (1 pc.) 0 Extra Spool Pin (1 pc.) A Screwdriver (1 pc.) B Seam Ripper (1 pc.) C Darning Plate (1pc.) D Hard Case (1 pc.) (Model XR-46) Parts Code for Zigzag Presser Foot: X51953-051 Parts Code for Model XL-6562, XL...
Users Manual - English
Page 21
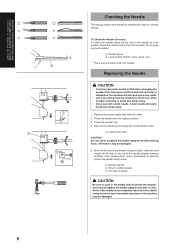
... flat side of the needle facing the back, insert the new needle all the way to OFF before changing the needle. A bent needle will start and injury may result. • Use only sewing machine needles for home use. Remove the needle by loosening the needle clamp screw. 2 1 Presser foot lever CAUTION Do not loosen or tighten the needle clamp screw with a bent needle. Throw away any bent needles. 1 Parallel space 2 Level surface (bobbin cover, glass, etc.) * Place a level...
... flat side of the needle facing the back, insert the new needle all the way to OFF before changing the needle. A bent needle will start and injury may result. • Use only sewing machine needles for home use. Remove the needle by loosening the needle clamp screw. 2 1 Presser foot lever CAUTION Do not loosen or tighten the needle clamp screw with a bent needle. Throw away any bent needles. 1 Parallel space 2 Level surface (bobbin cover, glass, etc.) * Place a level...
Users Manual - English
Page 33
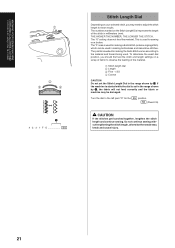
... "O" setting does not feed the material. The position needed for making buttonholes and decorative stitches. Turn the dial to the material and thread being used for sewing on a scrap of fabric to adjust the stitch length for the SS position. Do not continue sewing without lengthening the stitch length, otherwise the needle may be used for making a Satin Stitch (a dense zigzag stitch) which can be damaged. This is used . If the machine is started while the dial is used in making the Satin Stitch...
... "O" setting does not feed the material. The position needed for making buttonholes and decorative stitches. Turn the dial to the material and thread being used for sewing on a scrap of fabric to adjust the stitch length for the SS position. Do not continue sewing without lengthening the stitch length, otherwise the needle may be used for making a Satin Stitch (a dense zigzag stitch) which can be damaged. This is used . If the machine is started while the dial is used in making the Satin Stitch...
Users Manual - English
Page 39
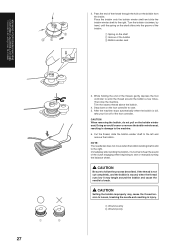
... break. Doing so could loosen or remove the bobbin winder seat, resulting in injury. 1 Wound evenly 2 Wound poorly NOTE: The needle bar does not move when the bobbin winding shaft is full, take your foot off of the bobbin. 1 Spring on the bobbin from the inside. CAUTION Setting the bobbin improperly may tangle around the bobbin a few times. Place the bobbin onto the bobbin winder shaft and slide the bobbin winder...
... break. Doing so could loosen or remove the bobbin winder seat, resulting in injury. 1 Wound evenly 2 Wound poorly NOTE: The needle bar does not move when the bobbin winding shaft is full, take your foot off of the bobbin. 1 Spring on the bobbin from the inside. CAUTION Setting the bobbin improperly may tangle around the bobbin a few times. Place the bobbin onto the bobbin winder shaft and slide the bobbin winder...
Users Manual - English
Page 41
... arrow 1 at left), then press lightly on the foot controller and the machine begins to turn off the power. Slide the button and open the cover. 1 Slide button 2 Cover 3. Replace the bobbin cover. KNOWING YOUR SEWING MACHINE CONNAITRE SA MACHINE A COUDRE CONOZCA SU MÁQUINA DE COSER 1 2 1 2 Lower Threading CAUTION Setting the bobbin improperly may cause the thread tension to be incorrect or the needle to its highest position by turning the balance wheel toward...
... arrow 1 at left), then press lightly on the foot controller and the machine begins to turn off the power. Slide the button and open the cover. 1 Slide button 2 Cover 3. Replace the bobbin cover. KNOWING YOUR SEWING MACHINE CONNAITRE SA MACHINE A COUDRE CONOZCA SU MÁQUINA DE COSER 1 2 1 2 Lower Threading CAUTION Setting the bobbin improperly may cause the thread tension to be incorrect or the needle to its highest position by turning the balance wheel toward...

Users Manual - English
Page 43
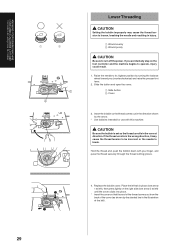
... needle to guide the thread through the thread take -up lever. 1 42 KNOWING YOUR SEWING MACHINE CONNAITRE SA MACHINE A COUDRE CONOZCA SU MÁQUINA DE COSER 53 1 2 31 Upper Threading 1. Make sure to break. • Use the spool cap (large, medium, or small) that is lowered, the upper thread can cause the thread to tangle and break the needle, leading to its highest position by turning the balance wheel toward you (counterclockwise). 1 Presser foot lever...
... needle to guide the thread through the thread take -up lever. 1 42 KNOWING YOUR SEWING MACHINE CONNAITRE SA MACHINE A COUDRE CONOZCA SU MÁQUINA DE COSER 53 1 2 31 Upper Threading 1. Make sure to break. • Use the spool cap (large, medium, or small) that is lowered, the upper thread can cause the thread to tangle and break the needle, leading to its highest position by turning the balance wheel toward you (counterclockwise). 1 Presser foot lever...
Users Manual - English
Page 45
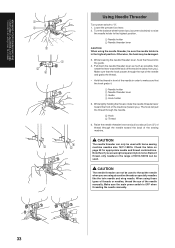
... the needle holder to the highest position. 1 Needle holder 2 Needle threader lever CAUTION When using those types of threads or needles, thread the eye of 90/14-100/16 can not be sure the needle holder is OFF when threading the needle manually. 33 Note that the hook grabs it. 1 Needle holder 2 Needle threader lever 3 Guide 4 Hook holder 5. KNOWING YOUR SEWING MACHINE CONNAITRE SA MACHINE A COUDRE CONOZCA SU MÁQUINA DE COSER 1 2 3 1 2 4 5 6 5 Using Needle Threader Turn power switch to make sure that , if you are using transparent...
... the needle holder to the highest position. 1 Needle holder 2 Needle threader lever CAUTION When using those types of threads or needles, thread the eye of 90/14-100/16 can not be sure the needle holder is OFF when threading the needle manually. 33 Note that the hook grabs it. 1 Needle holder 2 Needle threader lever 3 Guide 4 Hook holder 5. KNOWING YOUR SEWING MACHINE CONNAITRE SA MACHINE A COUDRE CONOZCA SU MÁQUINA DE COSER 1 2 3 1 2 4 5 6 5 Using Needle Threader Turn power switch to make sure that , if you are using transparent...

Users Manual - English
Page 67
... buttonhole lever to begin sewing. CAUTION Pulling the thread too strongly may bend or break the needle, and lead to pass the thread under the presser foot and pull it toward the back of the fabric. MAKING A BUTTONHOLE 1. Be sure to injury. 7. Set the Pattern Selection Dial to practice making is a simple process that provides reliable results. D) 3 Button holder 4 Mark on fabric 5 Line on the foot controller to its lowest position, then lightly...
... buttonhole lever to begin sewing. CAUTION Pulling the thread too strongly may bend or break the needle, and lead to pass the thread under the presser foot and pull it toward the back of the fabric. MAKING A BUTTONHOLE 1. Be sure to injury. 7. Set the Pattern Selection Dial to practice making is a simple process that provides reliable results. D) 3 Button holder 4 Mark on fabric 5 Line on the foot controller to its lowest position, then lightly...
Users Manual - English
Page 75
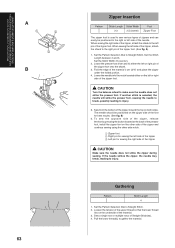
.... Gathering Pattern Stitch Length 4 1. Set the Pattern Selection Dial to Straight Stitch. 2. The needle should be positioned to the right or left side of the zipper, attach the shank to the right pin of the zipper foot onto the shank. 3. Set the Pattern Selection Dial to Straight Stitch. To sew the opposite side of the zipper, release the foot by pressing the button located at the back of the presser foot, install the zipper foot on the zipper side of the zipper CAUTION Make sure...
.... Gathering Pattern Stitch Length 4 1. Set the Pattern Selection Dial to Straight Stitch. 2. The needle should be positioned to the right or left side of the zipper, attach the shank to the right pin of the zipper foot onto the shank. 3. Set the Pattern Selection Dial to Straight Stitch. To sew the opposite side of the zipper, release the foot by pressing the button located at the back of the presser foot, install the zipper foot on the zipper side of the zipper CAUTION Make sure...
Users Manual - English
Page 79
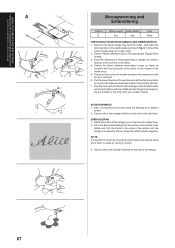
... the end of the design to the appropriate Zigzag Stitch setting. 3. Draw the lettering (for monogramming) or design (for embroidering) on the needle plate as possible with a few straight stitches at a constant speed. 2. Sew, moving the embroidery hoop. 2. EMBROIDERING 1. USING ATTACHMENTS AND APPLICATIONS UTILISATION DES ACCESSOIRES ET LEURS APPLICATIONS USO DE ACCESORIOS Y APLICACIONES A Monogramming and Embroidering Pattern Stitch Length Stitch Width Any Any Foot None PREPARING FOR MONOGRAMMING AND EMBROIDERING 1. Keep the stitching close together. Grip...
... the end of the design to the appropriate Zigzag Stitch setting. 3. Draw the lettering (for monogramming) or design (for embroidering) on the needle plate as possible with a few straight stitches at a constant speed. 2. Sew, moving the embroidery hoop. 2. EMBROIDERING 1. USING ATTACHMENTS AND APPLICATIONS UTILISATION DES ACCESSOIRES ET LEURS APPLICATIONS USO DE ACCESORIOS Y APLICACIONES A Monogramming and Embroidering Pattern Stitch Length Stitch Width Any Any Foot None PREPARING FOR MONOGRAMMING AND EMBROIDERING 1. Keep the stitching close together. Grip...
Users Manual - English
Page 81
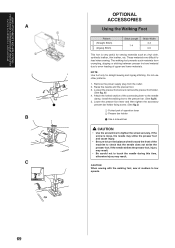
... upper and lower materials. A) 4. These materials are difficult to low speeds. 69 Lower the presser foot lever and then tighten the accessory presser bar holder fixing screw. (See fig.C) 1 Forked part of the connecting lever to the needle clamp, install the walking foot to remove the presser foot holder. (See fig. Do not use other patterns. 1. CAUTION When sewing with the walking foot, sew at medium to feed when sewing. Loosen the presser foot screw to the presser bar. (See fig B) 5. If the screw is very useful for straight sewing and zigzag stitching...
... upper and lower materials. A) 4. These materials are difficult to low speeds. 69 Lower the presser foot lever and then tighten the accessory presser bar holder fixing screw. (See fig.C) 1 Forked part of the connecting lever to the needle clamp, install the walking foot to remove the presser foot holder. (See fig. Do not use other patterns. 1. CAUTION When sewing with the walking foot, sew at medium to feed when sewing. Loosen the presser foot screw to the presser bar. (See fig B) 5. If the screw is very useful for straight sewing and zigzag stitching...
Users Manual - English
Page 83
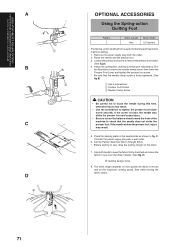
... tighten the presser foot holder screw securely. The stitch length depends on how quickly the fabric is useful for darning and freemotion machine quilting. 1. Place the darning plate on the fabric. 7. D) B Quilting design (Line) 8. Set the Pattern Selection Dial to Straight Stitch. * Before starting to check that the needle clamp screw is above the needle clamp screw, then lower the Presser Foot Lever and tighten the presser foot screw. * Be sure that the needle does not strike the presser foot. Sew while moving the fabric slowly. 71 Connect the power supply plug...
... tighten the presser foot holder screw securely. The stitch length depends on how quickly the fabric is useful for darning and freemotion machine quilting. 1. Place the darning plate on the fabric. 7. D) B Quilting design (Line) 8. Set the Pattern Selection Dial to Straight Stitch. * Before starting to check that the needle clamp screw is above the needle clamp screw, then lower the Presser Foot Lever and tighten the presser foot screw. * Be sure that the needle does not strike the presser foot. Sew while moving the fabric slowly. 71 Connect the power supply plug...

Users Manual - English
Page 87
... on and foot controller is changed, an electric shock may result. • To avoid burns, give the light bulb time to cool before changing the light bulb. A. 4. B) 1 Bulb 1 Loosen 2 Tighten 5. Remove the light cover from the outlet. 2. A. 3. Replace the sewing light bulb. (See fig. C. 75 Loosen the screw on , injuries may result. Reattach the light cover and fasten the screw as illustrated in fig. Remove the power supply plug from the machine as shown...
... on and foot controller is changed, an electric shock may result. • To avoid burns, give the light bulb time to cool before changing the light bulb. A. 4. B) 1 Bulb 1 Loosen 2 Tighten 5. Remove the light cover from the outlet. 2. A. 3. Replace the sewing light bulb. (See fig. C. 75 Loosen the screw on , injuries may result. Reattach the light cover and fasten the screw as illustrated in fig. Remove the power supply plug from the machine as shown...
Users Manual - English
Page 91
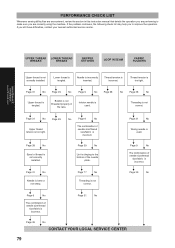
... 38 Upper thread is not correctly installed. Bobbin is incorrect. Page 38 No Spool of needle size/thread size/fabric is not threaded properly in this instruction manual that details the operation you are correctly using the machine. If the problem continues, the following check list may help you are performing to make sure you to the bottom of the needle plate. If you still have difficulties, contact your nearest authorized service center. Thread tension...
... 38 Upper thread is not correctly installed. Bobbin is incorrect. Page 38 No Spool of needle size/thread size/fabric is not threaded properly in this instruction manual that details the operation you are correctly using the machine. If the problem continues, the following check list may help you are performing to make sure you to the bottom of the needle plate. If you still have difficulties, contact your nearest authorized service center. Thread tension...
Users Manual - English
Page 92
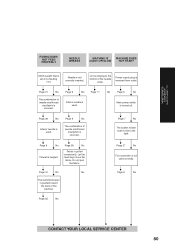
... of needle size/thread size/fabric is removed from outlet. Page 7 No The bobbin winder shaft is turned off. Page 31 No No The buttonhole lever is pushed toward the back of needle size/thread size/fabric is incorrect. Page 39 No Inferior needle is used . Page 8 No CONTACT YOUR LOCAL SERVICE CENTER 80 MAINTENANCE ENTRETIEN MANTENIMIENTO FABRIC DOES NOT FEED PROPERLY NEEDLE BREAKS MACHINE IS MACHINE DOES NOISY OR SLOW NOT START Stitch Length Dial is set at no feeding. ("0") Needle...
... of needle size/thread size/fabric is removed from outlet. Page 7 No The bobbin winder shaft is turned off. Page 31 No No The buttonhole lever is pushed toward the back of needle size/thread size/fabric is incorrect. Page 39 No Inferior needle is used . Page 8 No CONTACT YOUR LOCAL SERVICE CENTER 80 MAINTENANCE ENTRETIEN MANTENIMIENTO FABRIC DOES NOT FEED PROPERLY NEEDLE BREAKS MACHINE IS MACHINE DOES NOISY OR SLOW NOT START Stitch Length Dial is set at no feeding. ("0") Needle...
Users Manual - English
Page 98
... the Machine 85 Reverse Sewing Lever 24 S Scallop Stitch 50 Sewing Ligh Light Bulb Replacement 75 Switch 7 Shell Tuck Stitch 47 Shuttle 77 Spool Pin and Spool Cap 26, 31 Springaction Quilting Foot 3, 71 Square Stitch 51 Stitch Length Dial 13, 21 Stitch Width Dial 23 Straight Stitch 42, 63, 65 Stretch Blind Hem Stitch 46 T Thread Tension 38 Triangle Stitch 51 Triple Stretch Stitch 42 Triple Zigzag Stretch Stitch 54 Troubleshooting 79 Twin Needle Sewing 36 U Upper Tension Control Dial 38 Upper Threading 31 Using Neadle Threader 33 W Walking Foot 3, 69 Winding the Bobbin...
... the Machine 85 Reverse Sewing Lever 24 S Scallop Stitch 50 Sewing Ligh Light Bulb Replacement 75 Switch 7 Shell Tuck Stitch 47 Shuttle 77 Spool Pin and Spool Cap 26, 31 Springaction Quilting Foot 3, 71 Square Stitch 51 Stitch Length Dial 13, 21 Stitch Width Dial 23 Straight Stitch 42, 63, 65 Stretch Blind Hem Stitch 46 T Thread Tension 38 Triangle Stitch 51 Triple Stretch Stitch 42 Triple Zigzag Stretch Stitch 54 Troubleshooting 79 Twin Needle Sewing 36 U Upper Tension Control Dial 38 Upper Threading 31 Using Neadle Threader 33 W Walking Foot 3, 69 Winding the Bobbin...


