

Users Manual - English
Page 6
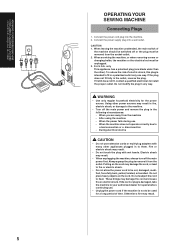
When servicing the machine, or when removing covers or changing bulbs, the machine or the electrical set must be removed from the socket outlet. When leaving the machine unattended, the main switch of the machine should be switched off - Connecting Plugs and Main Power / Sewing Light Switch 2 1 1. Connect the three-prong plug into a wall outlet. - Turn on or off the switch for the main power and sew-light. 1 Turn on 2 Turn off or the plug must unplugged. Connect the electrical supply plug into the machine. 2.
When servicing the machine, or when removing covers or changing bulbs, the machine or the electrical set must be removed from the socket outlet. When leaving the machine unattended, the main switch of the machine should be switched off - Connecting Plugs and Main Power / Sewing Light Switch 2 1 1. Connect the three-prong plug into a wall outlet. - Turn on or off the switch for the main power and sew-light. 1 Turn on 2 Turn off or the plug must unplugged. Connect the electrical supply plug into the machine. 2.
Users Manual - English
Page 7
... needle or any assemblies, the presser feet, needle, or other parts • A power failure occurs during use • Maintaining the machine • Leaving the machine unattended. 3. If the problem persists, please consult your eye on the foot controller. 4. Always consult the operation manual when replacing or ...or detergents to keep your local authorized dealer. Do not drop or hit the machine. 4. Be sure to clean the case. Do not store anything on the needle while sewing. Do not use or store the machine near a space heater, iron, halogen lamp, or other moving parts. 2. Do...
... needle or any assemblies, the presser feet, needle, or other parts • A power failure occurs during use • Maintaining the machine • Leaving the machine unattended. 3. If the problem persists, please consult your eye on the foot controller. 4. Always consult the operation manual when replacing or ...or detergents to keep your local authorized dealer. Do not drop or hit the machine. 4. Be sure to clean the case. Do not store anything on the needle while sewing. Do not use or store the machine near a space heater, iron, halogen lamp, or other moving parts. 2. Do...
Users Manual - English
Page 10
TABLE OF CONTENTS KNOWING YOUR SEWING MACHINE PRINCIPAL PARTS 1 ACCESSORIES 3 Optional Accessories 3 OPERATING YOUR SEWING MACHINE 5 Connecting Plugs 5 Main Power/Sewing Light Switch 7 Foot Controller 8 Checking the Needle 9 Replacing the Needle 9 Changing the Presser Foot 11 Flat Bed...ZIGZAG STITCHING PLEASE READ BEFORE SEWING 41 Straight Stitching 42 Zigzag Stitching 45 BUILT-IN STITCHES Blind Hem Stitching 46 Shell Tuck Stitching 47 Elastic Stitching 48 Double Action Stitching 49 Scallop Stitching 50 Decorative Stitching 51 Patchwork 52 Overedge Stitching 53 Feather ...
TABLE OF CONTENTS KNOWING YOUR SEWING MACHINE PRINCIPAL PARTS 1 ACCESSORIES 3 Optional Accessories 3 OPERATING YOUR SEWING MACHINE 5 Connecting Plugs 5 Main Power/Sewing Light Switch 7 Foot Controller 8 Checking the Needle 9 Replacing the Needle 9 Changing the Presser Foot 11 Flat Bed...ZIGZAG STITCHING PLEASE READ BEFORE SEWING 41 Straight Stitching 42 Zigzag Stitching 45 BUILT-IN STITCHES Blind Hem Stitching 46 Shell Tuck Stitching 47 Elastic Stitching 48 Double Action Stitching 49 Scallop Stitching 50 Decorative Stitching 51 Patchwork 52 Overedge Stitching 53 Feather ...
Users Manual - English
Page 13
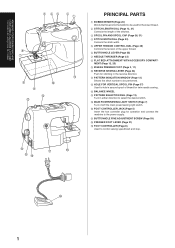
A PATTERN INDICATION WINDOW (Page 13) Shows the stitch number to be used for stitching in either direction to the power supply. KNOWING YOUR SEWING MACHINE CONNAITRE SA MACHINE A COUDRE CONOZCA SU MÁQUINA DE COSER 5 43 2 1 6 7 A 8 : 9 B C PRINCIPAL PARTS 1 BOBBIN WINDER (Page 26) Winds the thread onto the bobbin to be performed. C BALANCE WHEEL D ...
A PATTERN INDICATION WINDOW (Page 13) Shows the stitch number to be used for stitching in either direction to the power supply. KNOWING YOUR SEWING MACHINE CONNAITRE SA MACHINE A COUDRE CONOZCA SU MÁQUINA DE COSER 5 43 2 1 6 7 A 8 : 9 B C PRINCIPAL PARTS 1 BOBBIN WINDER (Page 26) Winds the thread onto the bobbin to be performed. C BALANCE WHEEL D ...
Users Manual - English
Page 15
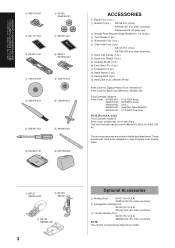
...9 Cleaning Brush (1 pc.) 0 Extra Spool Pin (1 pc.) A Screwdriver (1 pc.) B Seam Ripper (1 pc.) C Darning Plate (1pc.) D Hard Case (1 pc.) (Model XR-46) Parts Code for Zigzag Presser Foot: X51953-051 Parts Code for Model XL-6562, XL-6452, XR46. only): Foot Controller: Model N Parts Code: J00360... (Australia, New Zealand) (110/220V Dual Ara) NOTE (For U.S.A. The above accessories are stored in the flat bed attachment. KNOWING YOUR SEWING MACHINE CONNAITRE SA MACHINE A COUDRE CONOZCA SU MÁQUINA DE COSER 1 X59370-051 2 SA156 XA5539-051 3 X57117-051 4 X57521-001 5 XA4911-151 6 SA144...
...9 Cleaning Brush (1 pc.) 0 Extra Spool Pin (1 pc.) A Screwdriver (1 pc.) B Seam Ripper (1 pc.) C Darning Plate (1pc.) D Hard Case (1 pc.) (Model XR-46) Parts Code for Zigzag Presser Foot: X51953-051 Parts Code for Model XL-6562, XL-6452, XR46. only): Foot Controller: Model N Parts Code: J00360... (Australia, New Zealand) (110/220V Dual Ara) NOTE (For U.S.A. The above accessories are stored in the flat bed attachment. KNOWING YOUR SEWING MACHINE CONNAITRE SA MACHINE A COUDRE CONOZCA SU MÁQUINA DE COSER 1 X59370-051 2 SA156 XA5539-051 3 X57117-051 4 X57521-001 5 XA4911-151 6 SA144...
Users Manual - English
Page 17
... CONOZCA SU MÁQUINA DE COSER OPERATING YOUR SEWING MACHINE Connecting Plugs 1. CAUTION 1. For U.S.A. Fire or electric shock may result. 5 Using other ). Otherwise a fire may result. • Do not touch the plug with many other ...main power first. Electric shock may result in the following circumstances: - Pulling on the cord. only This appliance has a polarized plug (one way. When the machine does not operate correctly due to install the proper outlet. Connect the power cord plug into a wall outlet. Connect the power supply plug into the...
... CONOZCA SU MÁQUINA DE COSER OPERATING YOUR SEWING MACHINE Connecting Plugs 1. CAUTION 1. For U.S.A. Fire or electric shock may result. 5 Using other ). Otherwise a fire may result. • Do not touch the plug with many other ...main power first. Electric shock may result in the following circumstances: - Pulling on the cord. only This appliance has a polarized plug (one way. When the machine does not operate correctly due to install the proper outlet. Connect the power cord plug into a wall outlet. Connect the power supply plug into the...
Users Manual - English
Page 21
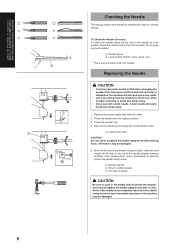
... its highest position. 3. If the main power is left on , the machine will easily break and cause injury. 1 1. A bent needle will start and injury may result. • Use only sewing machine needles for home use. If the needle is not completely inserted or the ..., otherwise it touches the stopper, and securely tighten the needle clamp screw with a screwdriver. KNOWING YOUR SEWING MACHINE CONNAITRE SA MACHINE A COUDRE CONOZCA SU MÁQUINA DE COSER Checking the Needle The sewing needle must always be damaged. 9 Check the needle from the outlet. 2. Throw away any bent needles...
... its highest position. 3. If the main power is left on , the machine will easily break and cause injury. 1 1. A bent needle will start and injury may result. • Use only sewing machine needles for home use. If the needle is not completely inserted or the ..., otherwise it touches the stopper, and securely tighten the needle clamp screw with a screwdriver. KNOWING YOUR SEWING MACHINE CONNAITRE SA MACHINE A COUDRE CONOZCA SU MÁQUINA DE COSER Checking the Needle The sewing needle must always be damaged. 9 Check the needle from the outlet. 2. Throw away any bent needles...
Users Manual - English
Page 25
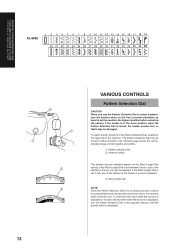
... range of stitch lengths and widths. 1 Pattern selection dial 2 Pattern number The stitches that are available depend on the right side of the machine. KNOWING YOUR SEWING MACHINE CONNAITRE SA MACHINE A COUDRE CONOZCA SU MÁQUINA DE COSER XL-6562 1 2 3 4 5 6 7 8 9 10 11 12 13 14 15 16 17 18 19 20 21 22 23...
... range of stitch lengths and widths. 1 Pattern selection dial 2 Pattern number The stitches that are available depend on the right side of the machine. KNOWING YOUR SEWING MACHINE CONNAITRE SA MACHINE A COUDRE CONOZCA SU MÁQUINA DE COSER XL-6562 1 2 3 4 5 6 7 8 9 10 11 12 13 14 15 16 17 18 19 20 21 22 23...

Users Manual - English
Page 27
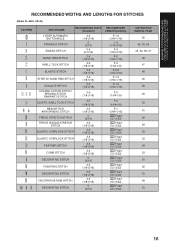
KNOWING YOUR SEWING MACHINE CONNAITRE SA MACHINE A COUDRE CONOZCA SU MÁQUINA DE COSER RECOMMENDED WIDTHS AND LENGTHS FOR STITCHES (Model XL-6562) PATTERN STITCH NAME RECOMMENDED WIDTH [mm(inch)] 1-STEP AUTOMATIC ... PAGE 55 42, 63, 65 45, 62, 66, 67 46 47 48 46 50 49 53 51 51 42 54 53 53 54 53 51 52 51 49 51...
KNOWING YOUR SEWING MACHINE CONNAITRE SA MACHINE A COUDRE CONOZCA SU MÁQUINA DE COSER RECOMMENDED WIDTHS AND LENGTHS FOR STITCHES (Model XL-6562) PATTERN STITCH NAME RECOMMENDED WIDTH [mm(inch)] 1-STEP AUTOMATIC ... PAGE 55 42, 63, 65 45, 62, 66, 67 46 47 48 46 50 49 53 51 51 42 54 53 53 54 53 51 52 51 49 51...
Users Manual - English
Page 28
KNOWING YOUR SEWING MACHINE CONNAITRE SA MACHINE A COUDRE CONOZCA SU MÁQUINA DE COSER RECOMMENDED WIDTHS AND LENGTHS FOR STITCHES (Model XL-6452, XR-46) PATTERN STITCH NAME RECOMMENDED WIDTH [mm(inch)] 1-STEP AUTOMATIC BUTTONHOLE STRAIGHT STITCH ZIGZAG STITCH BLIND HEM STITCH SHELL TUCK STITCH ELASTIC STITCH STRETCH BLIND ... MANUAL PAGE 55 42, 63, 65 45, 62, 66, 67 46 47 48 46 50 49 53 51 42 54 53 53 54 53 51 52 51 49 51 16
KNOWING YOUR SEWING MACHINE CONNAITRE SA MACHINE A COUDRE CONOZCA SU MÁQUINA DE COSER RECOMMENDED WIDTHS AND LENGTHS FOR STITCHES (Model XL-6452, XR-46) PATTERN STITCH NAME RECOMMENDED WIDTH [mm(inch)] 1-STEP AUTOMATIC BUTTONHOLE STRAIGHT STITCH ZIGZAG STITCH BLIND HEM STITCH SHELL TUCK STITCH ELASTIC STITCH STRETCH BLIND ... MANUAL PAGE 55 42, 63, 65 45, 62, 66, 67 46 47 48 46 50 49 53 51 42 54 53 53 54 53 51 52 51 49 51 16
Users Manual - English
Page 33
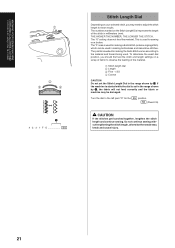
... Do not set in millimeters (mm). The "O" setting does not feed the material. Do not continue sewing without lengthening the stitch length, otherwise the needle may be used for the SS position. KNOWING YOUR SEWING MACHINE CONNAITRE SA MACHINE A COUDRE CONOZCA SU MÁQUINA DE COSER 1 2 3 4 3 · 2 ·1 A 4 · 3 · 2 · 1 · F · O SS...
... Do not set in millimeters (mm). The "O" setting does not feed the material. Do not continue sewing without lengthening the stitch length, otherwise the needle may be used for the SS position. KNOWING YOUR SEWING MACHINE CONNAITRE SA MACHINE A COUDRE CONOZCA SU MÁQUINA DE COSER 1 2 3 4 3 · 2 ·1 A 4 · 3 · 2 · 1 · F · O SS...

Users Manual - English
Page 35
... aguja esté metida en el tejido. Les chiffres inscrits sur le sélecteur représentent la largeur réelle du point. KNOWING YOUR SEWING MACHINE CONNAITRE SA MACHINE A COUDRE CONOZCA SU MÁQUINA DE COSER 1 5 64 10 1 Stitch Width Dial Depending on the dial represent the stitch width.
... aguja esté metida en el tejido. Les chiffres inscrits sur le sélecteur représentent la largeur réelle du point. KNOWING YOUR SEWING MACHINE CONNAITRE SA MACHINE A COUDRE CONOZCA SU MÁQUINA DE COSER 1 5 64 10 1 Stitch Width Dial Depending on the dial represent the stitch width.
Users Manual - English
Page 39
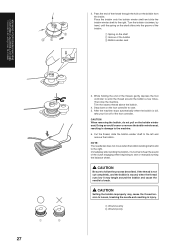
...after winding the bobbin, it may cause the thread tension to loosen, breaking the needle and resulting in damage to sew or manually turning the balance wheel. KNOWING YOUR SEWING MACHINE CONNAITRE SA MACHINE A COUDRE CONOZCA SU MÁQUINA DE COSER 2 31 2. Turn the bobbin clockwise, by hand, until the ...is normal to the right. Trim the excess thread above the bobbin. 4. CAUTION Be sure to the left and remove the bobbin. After the machine stops automatically when the bobbin is slid to hear the sound of the foot controller. Pass the end of the bobbin 3 Bobbin winder seat ...
...after winding the bobbin, it may cause the thread tension to loosen, breaking the needle and resulting in damage to sew or manually turning the balance wheel. KNOWING YOUR SEWING MACHINE CONNAITRE SA MACHINE A COUDRE CONOZCA SU MÁQUINA DE COSER 2 31 2. Turn the bobbin clockwise, by hand, until the ...is normal to the right. Trim the excess thread above the bobbin. 4. CAUTION Be sure to the left and remove the bobbin. After the machine stops automatically when the bobbin is slid to hear the sound of the foot controller. Pass the end of the bobbin 3 Bobbin winder seat ...
Users Manual - English
Page 41
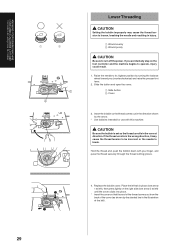
... set so the thread unrolls in place (see arrow 1 at left), then press lightly on the foot controller and the machine begins to turn off the power. KNOWING YOUR SEWING MACHINE CONNAITRE SA MACHINE A COUDRE CONOZCA SU MÁQUINA DE COSER 1 2 1 2 Lower Threading CAUTION Setting the bobbin improperly may cause the thread tension to...
... set so the thread unrolls in place (see arrow 1 at left), then press lightly on the foot controller and the machine begins to turn off the power. KNOWING YOUR SEWING MACHINE CONNAITRE SA MACHINE A COUDRE CONOZCA SU MÁQUINA DE COSER 1 2 1 2 Lower Threading CAUTION Setting the bobbin improperly may cause the thread tension to...

Users Manual - English
Page 43
... the end of the spool and cause the needle to the thread spool. Deliver the upper thread as shown in place. 1 42 KNOWING YOUR SEWING MACHINE CONNAITRE SA MACHINE A COUDRE CONOZCA SU MÁQUINA DE COSER 53 1 2 31 Upper Threading 1. Raise the needle to injury. 4. If a spool cap smaller than ...the thread spool is used, the thread may cause sewing problems. Make sure to guide the thread through the thread take-up lever from the bottom...
... the end of the spool and cause the needle to the thread spool. Deliver the upper thread as shown in place. 1 42 KNOWING YOUR SEWING MACHINE CONNAITRE SA MACHINE A COUDRE CONOZCA SU MÁQUINA DE COSER 53 1 2 31 Upper Threading 1. Raise the needle to injury. 4. If a spool cap smaller than ...the thread spool is used, the thread may cause sewing problems. Make sure to guide the thread through the thread take-up lever from the bottom...
Users Manual - English
Page 45
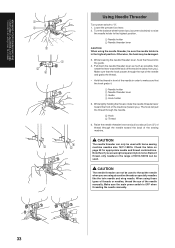
Lower the presser foot lever. 2. Note that, if you are using decorative threads or specialty needles like the twin needle and wing needle. KNOWING YOUR SEWING MACHINE CONNAITRE SA MACHINE A COUDRE CONOZCA SU MÁQUINA DE COSER 1 2 3 1 2 4 5 6 5 Using Needle Threader Turn power switch to the highest position. 1... When using the needle threader, be damaged. 3. The hook will pull the thread through the needle toward the back of the sewing machine. CAUTION The needle threader can not be used . Otherwise, the hook may be sure the needle holder is OFF when threading the...
Lower the presser foot lever. 2. Note that, if you are using decorative threads or specialty needles like the twin needle and wing needle. KNOWING YOUR SEWING MACHINE CONNAITRE SA MACHINE A COUDRE CONOZCA SU MÁQUINA DE COSER 1 2 3 1 2 4 5 6 5 Using Needle Threader Turn power switch to the highest position. 1... When using the needle threader, be damaged. 3. The hook will pull the thread through the needle toward the back of the sewing machine. CAUTION The needle threader can not be used . Otherwise, the hook may be sure the needle holder is OFF when threading the...

Users Manual - English
Page 67
...mark on the fabric. 2. MAKING A BUTTONHOLE 1. Set the Pattern Selection Dial to begin sewing. B) * The size of the buttonhole is recommended to pass the thread under the presser foot and pull it toward the back of the machine. (See fig. D) 3 Button holder 4 Mark on fabric 5 Line on the presser ...button. (See fig. Hold the upper thread and step down the buttonhole lever to injury. 7. Stitches 1, 2, 3 and 4 are sewn, then stop the machine. Align the red line on the presser foot with the correct size. 1 Do not close this gap.(Fig.A) 2 Align the lines on presser foot 6. ...
...mark on the fabric. 2. MAKING A BUTTONHOLE 1. Set the Pattern Selection Dial to begin sewing. B) * The size of the buttonhole is recommended to pass the thread under the presser foot and pull it toward the back of the machine. (See fig. D) 3 Button holder 4 Mark on fabric 5 Line on the presser ...button. (See fig. Hold the upper thread and step down the buttonhole lever to injury. 7. Stitches 1, 2, 3 and 4 are sewn, then stop the machine. Align the red line on the presser foot with the correct size. 1 Do not close this gap.(Fig.A) 2 Align the lines on presser foot 6. ...
Users Manual - English
Page 81
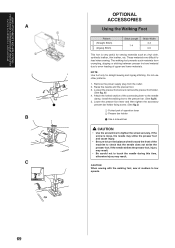
...power supply plug from crumpling, slipping or sticking between presser foot and material due to even feeding of the machine to tighten the screw securely. A) 4. NOTE: Use foot only for sewing materials such as vinyl cloth, synthetic leather, thin leather, etc. Loosen the presser foot screw to feed... when sewing. If the screw is very useful for straight sewing and zigzag stitching. CAUTION When sewing with the walking foot, sew at medium to turn the balance wheel toward the front of upper and lower materials...
...power supply plug from crumpling, slipping or sticking between presser foot and material due to even feeding of the machine to tighten the screw securely. A) 4. NOTE: Use foot only for sewing materials such as vinyl cloth, synthetic leather, thin leather, etc. Loosen the presser foot screw to feed... when sewing. If the screw is very useful for straight sewing and zigzag stitching. CAUTION When sewing with the walking foot, sew at medium to turn the balance wheel toward the front of upper and lower materials...
Users Manual - English
Page 83
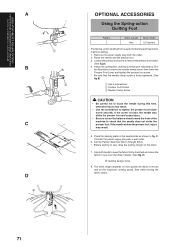
... • Be sure to turn the balance wheel toward the front of the machine to check that the needle clamp screw is moved and on the machine's sewing speed. If the screw is useful for darning and freemotion machine quilting. 1. Set the Pattern Selection Dial to Straight Stitch. * Before starting ...to sew, draw the quilting design on the needle plate as shown in the ...
... • Be sure to turn the balance wheel toward the front of the machine to check that the needle clamp screw is moved and on the machine's sewing speed. If the screw is useful for darning and freemotion machine quilting. 1. Set the Pattern Selection Dial to Straight Stitch. * Before starting ...to sew, draw the quilting design on the needle plate as shown in the ...

Users Manual - English
Page 87
... fasten the screw as shown in fig. C. 75 If the machine is on and foot controller is stepped on, injuries may result. A. 3. Loosen the screw on when the light bulb is on the reverse side of sewing head as shown in fig. Remove the light cover from the outlet...B) 1 Bulb 1 Loosen 2 Tighten 5. MAINTENANCE ENTRETIEN MANTENIMIENTO A B 1 1 2 C Changing the Light Bulb CAUTION • Turn off the main power switch and unplug the machine before changing it. 1. Remove the power supply plug from the machine as illustrated in fig. Replace the sewing light bulb. (See fig. A. 4.
... fasten the screw as shown in fig. C. 75 If the machine is on and foot controller is stepped on, injuries may result. A. 3. Loosen the screw on when the light bulb is on the reverse side of sewing head as shown in fig. Remove the light cover from the outlet...B) 1 Bulb 1 Loosen 2 Tighten 5. MAINTENANCE ENTRETIEN MANTENIMIENTO A B 1 1 2 C Changing the Light Bulb CAUTION • Turn off the main power switch and unplug the machine before changing it. 1. Remove the power supply plug from the machine as illustrated in fig. Replace the sewing light bulb. (See fig. A. 4.


