
Users Manual - English
Page 21
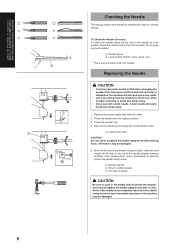
... a strong force, otherwise it touches the stopper, and securely tighten the needle clamp screw with a screwdriver. Check the needle from the outlet. 2. With the flat side of the needle facing the back, insert the new needle all the way to securely tighten the needle clamp screw. 2 Needle stopper 3 Hole for home use. Use a screwdriver to the top of...
... a strong force, otherwise it touches the stopper, and securely tighten the needle clamp screw with a screwdriver. Check the needle from the outlet. 2. With the flat side of the needle facing the back, insert the new needle all the way to securely tighten the needle clamp screw. 2 Needle stopper 3 Hole for home use. Use a screwdriver to the top of...
Users Manual - English
Page 81
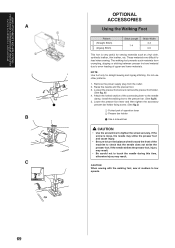
... 1 B C OPTIONAL ACCESSORIES Using the Walking Foot Pattern (Straight Stitch) (Zigzag Stitch) Stitch Length 1-4 Stitch Width 2-3 0-5 This foot is loose, the needle may result. Remove the power supply plug from crumpling, slipping or sticking between presser foot and material due to even feeding of operation lever 2 Presser...8226; Be careful not to touch the needle during this time, otherwise injury may strike the presser foot and cause injury. • Be sure to turn the balance wheel toward the front of the connecting lever to the needle clamp, install the walking foot to feed when...
... 1 B C OPTIONAL ACCESSORIES Using the Walking Foot Pattern (Straight Stitch) (Zigzag Stitch) Stitch Length 1-4 Stitch Width 2-3 0-5 This foot is loose, the needle may result. Remove the power supply plug from crumpling, slipping or sticking between presser foot and material due to even feeding of operation lever 2 Presser...8226; Be careful not to touch the needle during this time, otherwise injury may strike the presser foot and cause injury. • Be sure to turn the balance wheel toward the front of the connecting lever to the needle clamp, install the walking foot to feed when...
Users Manual - English
Page 83
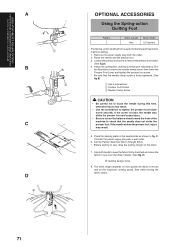
... as shown in the illustration is firmly tightened. (See fig.B) 1 Use a screwdriver. 2 Presser Foot Screw 3 Needle Clamp Screw CAUTION • Be careful not to tighten the presser foot holder screw securely. The stitch length depends on how quickly the fabric is useful ... to remove the presser foot holder. (See fig.A) 4. Use both hands to keep the fabric firmly stretched and move the fabric to check that the needle clamp screw is above the needle clamp screw, then lower the Presser Foot Lever and tighten the presser foot screw. * Be sure that the...
... as shown in the illustration is firmly tightened. (See fig.B) 1 Use a screwdriver. 2 Presser Foot Screw 3 Needle Clamp Screw CAUTION • Be careful not to tighten the presser foot holder screw securely. The stitch length depends on how quickly the fabric is useful ... to remove the presser foot holder. (See fig.A) 4. Use both hands to keep the fabric firmly stretched and move the fabric to check that the needle clamp screw is above the needle clamp screw, then lower the Presser Foot Lever and tighten the presser foot screw. * Be sure that the...

Users Manual - English
Page 89
...8226; Be sure to remove the presser foot holder and the needle. (See fig. Loosen the presser foot screw and the needle clamp screw to insert the race in the other direction may break. 8. Otherwise, the needle may damage the machine. 6. Install the needle plate by sliding it to remove it . DO NOT OIL ... Be sure to clean the race. A) 4. When installing the race, be sure that the notch of shuttle is hooked into the machine. Raise the needle and the presser foot. 3. Then lift the plate to the left (the reverse of its removal procedure). 7 Notch of the machine. Otherwise, the ...
...8226; Be sure to remove the presser foot holder and the needle. (See fig. Loosen the presser foot screw and the needle clamp screw to insert the race in the other direction may break. 8. Otherwise, the needle may damage the machine. 6. Install the needle plate by sliding it to remove it . DO NOT OIL ... Be sure to clean the race. A) 4. When installing the race, be sure that the notch of shuttle is hooked into the machine. Raise the needle and the presser foot. 3. Then lift the plate to the left (the reverse of its removal procedure). 7 Notch of the machine. Otherwise, the ...


