

Operation Manual
Page 2
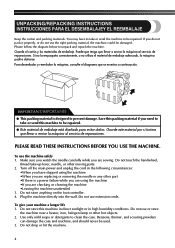
... used as threading needle, changing needle, threading bobbin, or changing presser foot, and the like. 15. Replace the bulb with any other user servicing adjustments mentioned in the instruction manual. 16. Return the machine to be taken, including the following: Read all moving parts. Do not use the proper needle plate. Always unplug the machine from the electrical outlet when removing covers, lubricating, or when making any opening. 6. This sewing machine is being used by pulling on cord. SAVE THESE INSTRUCTIONS This machine...
... used as threading needle, changing needle, threading bobbin, or changing presser foot, and the like. 15. Replace the bulb with any other user servicing adjustments mentioned in the instruction manual. 16. Return the machine to be taken, including the following: Read all moving parts. Do not use the proper needle plate. Always unplug the machine from the electrical outlet when removing covers, lubricating, or when making any opening. 6. This sewing machine is being used by pulling on cord. SAVE THESE INSTRUCTIONS This machine...
Operation Manual
Page 5
... it properly, or do not use or store the machine near a heater, iron, halogen lamp or other moving parts. 2. Do not store this packing material if you are sewing. You may have stopped using the machine •When you are replacing or removing the needle or any other part •If there is designed to clean the case. Guarde este material por si...
... it properly, or do not use or store the machine near a heater, iron, halogen lamp or other moving parts. 2. Do not store this packing material if you are sewing. You may have stopped using the machine •When you are replacing or removing the needle or any other part •If there is designed to clean the case. Guarde este material por si...
Operation Manual
Page 7
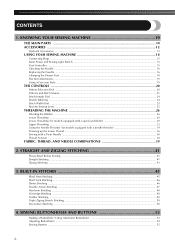
... the Presser Foot ...18 Flat Bed Attachment ...19 Using a Free-arm Style ...19 THE CONTROLS ...20 Pattern Selection Dial ...20 Patterns and Stitch Names ...21 Stitch Length Dial ...24 Stretch Stitching ...24 Stitch Width Dial ...25 Reverse Sewing Lever ...25 THREADING THE MACHINE 26 Winding the Bobbin ...26 Lower Threading ...28 Lower Threading (for models equipped with a quick-set bobbin 30 Upper Threading ...32 Using the Needle Threader (for models equipped with a needle threader 34 Drawing up the Lower Thread ...36 Sewing with a Twin Needle ...36 Thread Tension ...38 FABRIC, THREAD, AND...
... the Presser Foot ...18 Flat Bed Attachment ...19 Using a Free-arm Style ...19 THE CONTROLS ...20 Pattern Selection Dial ...20 Patterns and Stitch Names ...21 Stitch Length Dial ...24 Stretch Stitching ...24 Stitch Width Dial ...25 Reverse Sewing Lever ...25 THREADING THE MACHINE 26 Winding the Bobbin ...26 Lower Threading ...28 Lower Threading (for models equipped with a quick-set bobbin 30 Upper Threading ...32 Using the Needle Threader (for models equipped with a needle threader 34 Drawing up the Lower Thread ...36 Sewing with a Twin Needle ...36 Thread Tension ...38 FABRIC, THREAD, AND...
Operation Manual
Page 11
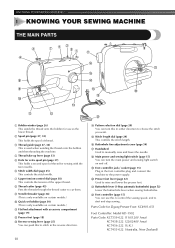
... tension of thread for Zigzag Presser Foot: XC4901-051 Foot Controller: Model KD-1902 Parts Code: XC7359-022 (110/120V Area) XC7438-222 (220/240V Area) XC7456-222 (U.K.) XC7455-022 (Australia, New Zealand) K Buttonhole lever (1-Step automatic buttonhole) (page 52) Lower the buttonhole lever when sewing buttonholes. KNOWING YOUR SEWING MACHINE 1 KNOWING YOUR SEWING MACHINE THE MAIN PARTS 1 Bobbin winder (page 26) This winds the thread onto the bobbin for use this in either direction to choose the stitch you want. H Main power and sewing light...
... tension of thread for Zigzag Presser Foot: XC4901-051 Foot Controller: Model KD-1902 Parts Code: XC7359-022 (110/120V Area) XC7438-222 (220/240V Area) XC7456-222 (U.K.) XC7455-022 (Australia, New Zealand) K Buttonhole lever (1-Step automatic buttonhole) (page 52) Lower the buttonhole lever when sewing buttonholes. KNOWING YOUR SEWING MACHINE 1 KNOWING YOUR SEWING MACHINE THE MAIN PARTS 1 Bobbin winder (page 26) This winds the thread onto the bobbin for use this in either direction to choose the stitch you want. H Main power and sewing light...
Operation Manual
Page 37
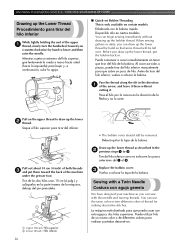
...threads 3 and put the bobbin back in the direction 1 of thread for making decorative stitches. KNOWING YOUR SEWING MACHINE / CONOZCA SU MÁQUINA DE COSER Drawing up the Lower Thread Procedimiento para tirar del hilo inferior While lightly holding the end of the upper 1 thread, slowly turn the handwheel toward the back of the machine under the presser foot. Pass the thread... Puede utilizar hilo de un mismo color o de diferentes colores para realizar puntadas decorativas. Sewing with a Twin Needle Costura con aguja gemela We have designed your machine so you can use the same ...
...threads 3 and put the bobbin back in the direction 1 of thread for making decorative stitches. KNOWING YOUR SEWING MACHINE / CONOZCA SU MÁQUINA DE COSER Drawing up the Lower Thread Procedimiento para tirar del hilo inferior While lightly holding the end of the upper 1 thread, slowly turn the handwheel toward the back of the machine under the presser foot. Pass the thread... Puede utilizar hilo de un mismo color o de diferentes colores para realizar puntadas decorativas. Sewing with a Twin Needle Costura con aguja gemela We have designed your machine so you can use the same ...
Operation Manual
Page 44
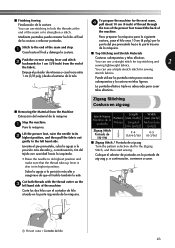
... el hilo unos 10 cm (4 pulg.) por la punta del pie prensatela hacia la parte trasera de la máquina. ■ Top Stitching and Stretch Materials Push the reverse sewing lever and stitch 2 backwards for the next seam, 4 pull about 10 cm (4 inch) of thread through the toes of the presser foot toward the back of the fabric. Stitch to its highest position and make sure...
... el hilo unos 10 cm (4 pulg.) por la punta del pie prensatela hacia la parte trasera de la máquina. ■ Top Stitching and Stretch Materials Push the reverse sewing lever and stitch 2 backwards for the next seam, 4 pull about 10 cm (4 inch) of thread through the toes of the presser foot toward the back of the fabric. Stitch to its highest position and make sure...
Operation Manual
Page 67
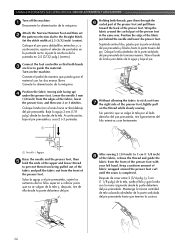
... presser foot. Wrap the fabric around the curled part of fabric wrapped around the presser foot curl until the seam is completed. Keep a uniform amount of the presser foot in the same way. Attach the Narrow Hemmer Foot and then set 2 the pattern selection dial to 3 cm (1 1/8 inch) 8 of the fabric, release the thread and guide the fabric from 7 the right side of the fabric just behind the needle and lower the presser foot...
... presser foot. Wrap the fabric around the curled part of fabric wrapped around the presser foot curl until the seam is completed. Keep a uniform amount of the presser foot in the same way. Attach the Narrow Hemmer Foot and then set 2 the pattern selection dial to 3 cm (1 1/8 inch) 8 of the fabric, release the thread and guide the fabric from 7 the right side of the fabric just behind the needle and lower the presser foot...

Operation Manual
Page 74
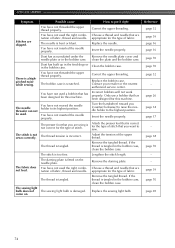
... fabric. - You have not threaded the upper thread properly or fitted the bobbin properly. Reset the bobbin thread correctly. Adjust the tension of the upper thread. page 26 Bobbin is scratched or does not turn smoothly. page 16 If you are sewing thin fabric, the stitch is bent or blunt. page 26 You have not fitted the spool properly. Wind the bobbin properly. Replace the bobbin. Remove the tangled thread and clean the bobbin case. Attach the presser foot holder...
... fabric. - You have not threaded the upper thread properly or fitted the bobbin properly. Reset the bobbin thread correctly. Adjust the tension of the upper thread. page 26 Bobbin is scratched or does not turn smoothly. page 16 If you are sewing thin fabric, the stitch is bent or blunt. page 26 You have not fitted the spool properly. Wind the bobbin properly. Replace the bobbin. Remove the tangled thread and clean the bobbin case. Attach the presser foot holder...
Operation Manual
Page 75
... threaded the upper thread properly. Insert the needle properly. The bobbin case is correct for the type of stitch. Contact your retailer or the nearest authorized service center. Incorrect bobbins will not work properly. Only use a bobbin that is scratched. Turn the handwheel toward you are appropriate for the type of fabric. Attach the presser foot that has been designed for this machine. The thread is incorrect. Remove the tangled thread. The fabric does not feed...
... threaded the upper thread properly. Insert the needle properly. The bobbin case is correct for the type of stitch. Contact your retailer or the nearest authorized service center. Incorrect bobbins will not work properly. Only use a bobbin that is scratched. Turn the handwheel toward you are appropriate for the type of fabric. Attach the presser foot that has been designed for this machine. The thread is incorrect. Remove the tangled thread. The fabric does not feed...
Operation Manual
Page 80
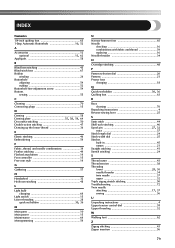
...19 Foot controller 15 Free-arm style 19 G Gathering 57 H Handwheel 32 Heirloom stitching 48 L Light bulb changing 69 Light switch 15 Lower threading 28 , quick-set bobbin 30 36 M Main parts 10 Main power 15 Maintenance 69 Monogramming 59 N Narrow hemmer foot 65 Needle checking 16 combinations with fabric and thread 39 replacing 16 Needle threader 34 O Overedge stitching 48 P Pattern selection dial 20 Patterns 21 Presser foot changing 18 Q , Quick-set bobbin 30 36 Quilting foot 63 R Race cleaning 70 Repacking instructions 4 Reverse sewing lever 25 S Satin stitch 44...
...19 Foot controller 15 Free-arm style 19 G Gathering 57 H Handwheel 32 Heirloom stitching 48 L Light bulb changing 69 Light switch 15 Lower threading 28 , quick-set bobbin 30 36 M Main parts 10 Main power 15 Maintenance 69 Monogramming 59 N Narrow hemmer foot 65 Needle checking 16 combinations with fabric and thread 39 replacing 16 Needle threader 34 O Overedge stitching 48 P Pattern selection dial 20 Patterns 21 Presser foot changing 18 Q , Quick-set bobbin 30 36 Quilting foot 63 R Race cleaning 70 Repacking instructions 4 Reverse sewing lever 25 S Satin stitch 44...

Accessory Catalog
Page 7
...! Stitch Guide Foot The scale in the presser foot can be used for the Side Cutter allows you add creativity to your fabric consistently. Select straight, zigzag, or decorative stitches. 2. Installing the Straight Stitch Needle Plate automatically sets the needle position to create a beautiful finish without any adjustment on the needle plate with the center straight stitch. Make a cut edge like a serger or overlock. Brother General Sewing Accessories 11 Seam Guide Side Cutter Stitch Guide Foot Seam Guide Guides fabric edge with the center straight stitch. It can be used...
...! Stitch Guide Foot The scale in the presser foot can be used for the Side Cutter allows you add creativity to your fabric consistently. Select straight, zigzag, or decorative stitches. 2. Installing the Straight Stitch Needle Plate automatically sets the needle position to create a beautiful finish without any adjustment on the needle plate with the center straight stitch. Make a cut edge like a serger or overlock. Brother General Sewing Accessories 11 Seam Guide Side Cutter Stitch Guide Foot Seam Guide Guides fabric edge with the center straight stitch. It can be used...

Accessory Catalog
Page 11
... feed width. 1. Stitch braid in place. Line up the cords, and select zigzag stitch with brother sewing machines of the presser foot, and place each cord into each guide (to 3/16 inch (5 mm) wide braids, ribbons, tapes, cords, etc. 1. SA145 ABCDEFGHJKLMNO SA144 IP Brother Embellishment Feet Cording Foot Cording Foot (5-hole) 20 Cording Foot (7-hole) Cording Foot Used for embellishing 1 to 5 cords or decorative threads. Insert cords or threads into each hole on the presser foot over the desired seams or pattern markings. 3. Attach the presser foot and pull cords...
... feed width. 1. Stitch braid in place. Line up the cords, and select zigzag stitch with brother sewing machines of the presser foot, and place each cord into each guide (to 3/16 inch (5 mm) wide braids, ribbons, tapes, cords, etc. 1. SA145 ABCDEFGHJKLMNO SA144 IP Brother Embellishment Feet Cording Foot Cording Foot (5-hole) 20 Cording Foot (7-hole) Cording Foot Used for embellishing 1 to 5 cords or decorative threads. Insert cords or threads into each hole on the presser foot over the desired seams or pattern markings. 3. Attach the presser foot and pull cords...

Accessory Catalog
Page 12
... the fabric not to be gathered under the presser foot. 4. Girl's Dress Innov-is Project Book (See page 47 for gathering fabrics. For appliqué: 1. Adjust the upper thread tension. 2. Mark a guideline to follow on thin to medium weight fabrics. Gathering Foot Used for details.) Brother Embellishment Feet Open Toe Foot 22 Pearls and Sequins Foot Metal type SA146 IP Open Toe Foot Provides better visibility in size. Select a straight stitch, left needle position. 2. Increase the upper thread tension. 3. Increase the upper thread tension. 3. Ideal...
... the fabric not to be gathered under the presser foot. 4. Girl's Dress Innov-is Project Book (See page 47 for gathering fabrics. For appliqué: 1. Adjust the upper thread tension. 2. Mark a guideline to follow on thin to medium weight fabrics. Gathering Foot Used for details.) Brother Embellishment Feet Open Toe Foot 22 Pearls and Sequins Foot Metal type SA146 IP Open Toe Foot Provides better visibility in size. Select a straight stitch, left needle position. 2. Increase the upper thread tension. 3. Increase the upper thread tension. 3. Ideal...

Accessory Catalog
Page 13
... of stitch length, tuck setting and depth setting. 2. SA143 AFJKM Ruffler Foot Makes ruffles with this presser foot. 1. The intervals of tucks can be adjusted. 1. Install and manually thread a twin needle. 2. Use a stiff card to get started. For seven grooves: SA179 ABCDEJ For five grooves: SA162 IP This presser foot does not include the bobbin cover. Adjust the amount of tuck or gather by placing the completed row in the center position. 3. Brother Embellishment Feet 23...
... of stitch length, tuck setting and depth setting. 2. SA143 AFJKM Ruffler Foot Makes ruffles with this presser foot. 1. The intervals of tucks can be adjusted. 1. Install and manually thread a twin needle. 2. Use a stiff card to get started. For seven grooves: SA179 ABCDEJ For five grooves: SA162 IP This presser foot does not include the bobbin cover. Adjust the amount of tuck or gather by placing the completed row in the center position. 3. Brother Embellishment Feet 23...

Accessory Catalog
Page 15
... www.brother.com Gently holding the upper and bobbin threads sew about four locking stitches and finish the thread ends. Set the machine to sew such as vinyl, leather, quilting layers and velvet can be difficult to straight stitch. 3. Place the fabric beneath the presser foot. 4. Use both hands while keeping the fabric pulled tight. 9. Requires Low Shank Adapter for straight stitch. 3. Screw on the Open Toe Quilting Foot, with both hands to guide the fabric. 4. Lower the feed dogs. 3. Use the foot controller...
... www.brother.com Gently holding the upper and bobbin threads sew about four locking stitches and finish the thread ends. Set the machine to sew such as vinyl, leather, quilting layers and velvet can be difficult to straight stitch. 3. Place the fabric beneath the presser foot. 4. Use both hands while keeping the fabric pulled tight. 9. Requires Low Shank Adapter for straight stitch. 3. Screw on the Open Toe Quilting Foot, with both hands to guide the fabric. 4. Lower the feed dogs. 3. Use the foot controller...

Accessory Catalog
Page 17
... embroidery. Drag and drop embroidery pattern positioning. - Includes three new free-motion presser feet: Free-motion quilting foot "C" for more features to your top of your Innov-is 4000D QuattroTM 6000D Embroider y Card Reader Connect your embroidery card reader using the built-in USB port on your LCD screen background color for embellishing a wide variety of 2 new small fonts and 2 new Cyrillic fonts. *Requires additional purchase. Add even more control with center needle position straight stitch Open toe quilting foot...
... embroidery. Drag and drop embroidery pattern positioning. - Includes three new free-motion presser feet: Free-motion quilting foot "C" for more features to your top of your Innov-is 4000D QuattroTM 6000D Embroider y Card Reader Connect your embroidery card reader using the built-in USB port on your LCD screen background color for embellishing a wide variety of 2 new small fonts and 2 new Cyrillic fonts. *Requires additional purchase. Add even more control with center needle position straight stitch Open toe quilting foot...

Accessory Catalog
Page 33
... Innov-is 900D series, SE-350, HE-240, LB6770, Innov-is 4000D/2500D/1500D SA560 QuattroTM 6000D Embroidery Machine Hoops Select hoops appropriate for thread delivery or bobbin storage. Brother Embroidery Accessories 63 Free-Standing Ten Spool Thread Stand Ten Spool Thread Stand Embroidery Machine Hoops Brother Embroidery Accessories 64 For all embroidery and sewing/embroidery machines. Some hoops can be removed to the machine as well as a thread locking system which keeps those loose ends tamed when not in use.
... Innov-is 900D series, SE-350, HE-240, LB6770, Innov-is 4000D/2500D/1500D SA560 QuattroTM 6000D Embroidery Machine Hoops Select hoops appropriate for thread delivery or bobbin storage. Brother Embroidery Accessories 63 Free-Standing Ten Spool Thread Stand Ten Spool Thread Stand Embroidery Machine Hoops Brother Embroidery Accessories 64 For all embroidery and sewing/embroidery machines. Some hoops can be removed to the machine as well as a thread locking system which keeps those loose ends tamed when not in use.

Accessory Catalog
Page 34
... thread. Designed for high speed embroidery stitching, made in a 5-pack sleeve). 300 meters (328 yards) of the proper stabilizer helps to last a long time. For best results, use of thread per spool. Polyester retains its color beauty and quality even in a fun assortment of fabrics. Brother Embroidery Accessories PacesetterTM Polyester Threads 65 Brother Country Yarn Embroidery Threads Metallic Threads For the best embroidery results, use these embroidery threads especially designed for Brother sewing and embroidering machines. 61 Color Thread Set...
... thread. Designed for high speed embroidery stitching, made in a 5-pack sleeve). 300 meters (328 yards) of the proper stabilizer helps to last a long time. For best results, use of thread per spool. Polyester retains its color beauty and quality even in a fun assortment of fabrics. Brother Embroidery Accessories PacesetterTM Polyester Threads 65 Brother Country Yarn Embroidery Threads Metallic Threads For the best embroidery results, use these embroidery threads especially designed for Brother sewing and embroidering machines. 61 Color Thread Set...

Accessory Catalog
Page 36
... Attachment Felting Needle Brother Sewing Machine Attachments for PQ Series 70 Needle Felting Attachment Use this unique attachment to use it just like an ordinary presser foot, and embellish fabrics with wool roving or yarn. This narrow foot has a good surface to the feed dogs, aiding in the proper feed on your PQ series! You can slip into very small areas. Attach the Needle Felting Attachment and lower the feed dogs. 2. SA172 Bobbin for attaching piping, zippers, stitching...
... Attachment Felting Needle Brother Sewing Machine Attachments for PQ Series 70 Needle Felting Attachment Use this unique attachment to use it just like an ordinary presser foot, and embellish fabrics with wool roving or yarn. This narrow foot has a good surface to the feed dogs, aiding in the proper feed on your PQ series! You can slip into very small areas. Attach the Needle Felting Attachment and lower the feed dogs. 2. SA172 Bobbin for attaching piping, zippers, stitching...

Accessory Catalog
Page 40
... LC1 presser foot included in the machine. 2. Open the seams. 4. SA224CV SA221CV Hemming Set Finishes hems easily and quickly. The stitches are always smooth. 1. Attaching 12 mm (approx. 1/2") bias tape: Use the large bias tape sliding plate with the LC1 presser foot (included with a tweezers. Fold fabric and set through the holder). 4. Sew as folding them. Attach the hem positioning plate A/B to the hemming attachment, and attach it into the front cover slot. 3. Brother Cover Stitch Feet 78 Top Stitching Foot Set Top Stitching Foot Set Use included presser foot...
... LC1 presser foot included in the machine. 2. Open the seams. 4. SA224CV SA221CV Hemming Set Finishes hems easily and quickly. The stitches are always smooth. 1. Attaching 12 mm (approx. 1/2") bias tape: Use the large bias tape sliding plate with the LC1 presser foot (included with a tweezers. Fold fabric and set through the holder). 4. Sew as folding them. Attach the hem positioning plate A/B to the hemming attachment, and attach it into the front cover slot. 3. Brother Cover Stitch Feet 78 Top Stitching Foot Set Top Stitching Foot Set Use included presser foot...


