

Operation Manual
Page 2
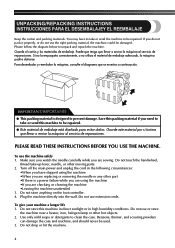
... any opening. 6. This sewing machine is not working properly, if it to break. 14. Young children should be taken, including the following: Read all moving parts. IMPORTANT SAFETY INSTRUCTIONS When using this machine, basic safety precautions should always be supervised to ensure that they do not play with this machine. Never...
... any opening. 6. This sewing machine is not working properly, if it to break. 14. Young children should be taken, including the following: Read all moving parts. IMPORTANT SAFETY INSTRUCTIONS When using this machine, basic safety precautions should always be supervised to ensure that they do not play with this machine. Never...
Operation Manual
Page 5
..., or other hot objects. 2. To use extension cords. Do not store this packing material if you are replacing or removing the needle or any other part •If there is designed to clean the case. Do not touch the handwheel, thread take or send the machine to be used. 3. Do not... machine •If you do not pack it properly, or do not use or store the machine near a heater, iron, halogen lamp or other moving parts. 2.
..., or other hot objects. 2. To use extension cords. Do not store this packing material if you are replacing or removing the needle or any other part •If there is designed to clean the case. Do not touch the handwheel, thread take or send the machine to be used. 3. Do not... machine •If you do not pack it properly, or do not use or store the machine near a heater, iron, halogen lamp or other moving parts. 2.
Operation Manual
Page 7
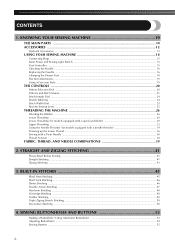
... ...47 Heirloom Stitching ...48 Overedge Stitching ...48 Feather Stitching ...49 Triple Zigzag Stretch Stitching ...50 Decorative Stitching ...50 4. KNOWING YOUR SEWING MACHINE 10 THE MAIN PARTS ...10 ACCESSORIES ...12 Optional Accessories ...13 USING YOUR SEWING MACHINE 14 Connecting Plugs ...15 Main Power and Sewing Light Switch ...15 Foot Controller ...15 Checking...
... ...47 Heirloom Stitching ...48 Overedge Stitching ...48 Feather Stitching ...49 Triple Zigzag Stretch Stitching ...50 Decorative Stitching ...50 4. KNOWING YOUR SEWING MACHINE 10 THE MAIN PARTS ...10 ACCESSORIES ...12 Optional Accessories ...13 USING YOUR SEWING MACHINE 14 Connecting Plugs ...15 Main Power and Sewing Light Switch ...15 Foot Controller ...15 Checking...
Operation Manual
Page 11
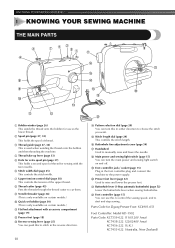
... (1-Step automatic buttonhole) (page 52) Lower the buttonhole lever when sewing buttonholes. KNOWING YOUR SEWING MACHINE 1 KNOWING YOUR SEWING MACHINE THE MAIN PARTS 1 Bobbin winder (page 26) This winds the thread onto the bobbin for use this to control the sewing speed, and to manually raise ... 5 Hole for extra spool pin (page 37) This holds a second spool of thread for Zigzag Presser Foot: XC4901-051 Foot Controller: Model KD-1902 Parts Code: XC7359-022 (110/120V Area) XC7438-222 (220/240V Area) XC7456-222 (U.K.) XC7455-022 (Australia, New Zealand) F Buttonhole fine-adjustment screw ...
... (1-Step automatic buttonhole) (page 52) Lower the buttonhole lever when sewing buttonholes. KNOWING YOUR SEWING MACHINE 1 KNOWING YOUR SEWING MACHINE THE MAIN PARTS 1 Bobbin winder (page 26) This winds the thread onto the bobbin for use this to control the sewing speed, and to manually raise ... 5 Hole for extra spool pin (page 37) This holds a second spool of thread for Zigzag Presser Foot: XC4901-051 Foot Controller: Model KD-1902 Parts Code: XC7359-022 (110/120V Area) XC7438-222 (220/240V Area) XC7456-222 (U.K.) XC7455-022 (Australia, New Zealand) F Buttonhole fine-adjustment screw ...
Operation Manual
Page 13
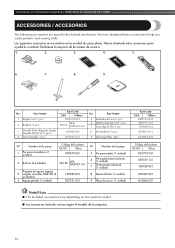
...237;a de las tareas de costura. 1. 2. 3. 4. 5. 6. 7. 8. 9. Part Name 5 Buttonhole Foot (1 pc.) 6 Button Sewing Foot (1 pc.) 7 Extra Spool Pin (1 pc.) 8 Screwdriver (1 pc.) 9 Darning Plate (1pc.) Part Code USA Others XD1792-031 X59375-121 130920-021 X55467-021 XC6063-021 Nº Nombre... Placa de zurcir (1 unidad) Código de la pieza EE.UU. No. Part Name 1 Zipper foot (1 pc.) 2 Bobbin (3 pcs.) 3 Needle Pack (Regular Single Needle HAX130 (3 pcs.)) 4 Twin Needle (1 pc.) Part Code USA Others X59370-021 SA156 SFB: XA5539-151 129583-021 X57521-021 No. ...
...237;a de las tareas de costura. 1. 2. 3. 4. 5. 6. 7. 8. 9. Part Name 5 Buttonhole Foot (1 pc.) 6 Button Sewing Foot (1 pc.) 7 Extra Spool Pin (1 pc.) 8 Screwdriver (1 pc.) 9 Darning Plate (1pc.) Part Code USA Others XD1792-031 X59375-121 130920-021 X55467-021 XC6063-021 Nº Nombre... Placa de zurcir (1 unidad) Código de la pieza EE.UU. No. Part Name 1 Zipper foot (1 pc.) 2 Bobbin (3 pcs.) 3 Needle Pack (Regular Single Needle HAX130 (3 pcs.)) 4 Twin Needle (1 pc.) Part Code USA Others X59370-021 SA156 SFB: XA5539-151 129583-021 X57521-021 No. ...
Operation Manual
Page 19
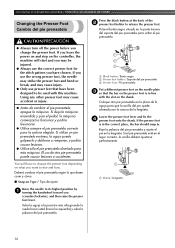
... the power before you change the presser foot depending on what you want to sew and how. Pulse el botón negro situado en la parte trasera del soporte del pie prensatela para soltar el pie prensatela. 1 Black button / Botón negro 2 Presser foot holder / Soporte del pie prensatela 3 Presser Foot...
... the power before you change the presser foot depending on what you want to sew and how. Pulse el botón negro situado en la parte trasera del soporte del pie prensatela para soltar el pie prensatela. 1 Black button / Botón negro 2 Presser foot holder / Soporte del pie prensatela 3 Presser Foot...
Operation Manual
Page 27
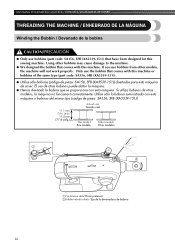
... LA MÁQUINA Winding the Bobbin / Devanado de la bobina CAUTION/PRECAUCIÓN ● Only use bobbins (part code: SA156, SFB (XA5539-151)) that comes with this machine or bobbins of the same type (part code: SA156, SFB (XA5539-151)). ● Utilice sólo bobinas (código de pieza: SA156, SFB (XA5539...
... LA MÁQUINA Winding the Bobbin / Devanado de la bobina CAUTION/PRECAUCIÓN ● Only use bobbins (part code: SA156, SFB (XA5539-151)) that comes with this machine or bobbins of the same type (part code: SA156, SFB (XA5539-151)). ● Utilice sólo bobinas (código de pieza: SA156, SFB (XA5539...
Operation Manual
Page 37
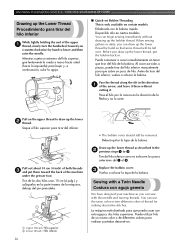
... que tirar del hilo de la bobina. Pull on certain models. Tire de los dos hilos unos 10 cm (4 pulg.) y colóquelos en la parte trasera de la máquina, debajo del pie prensatela. 1 Upper thread / Hilo superior 2 Lower thread / Hilo inferior 36 • The bobbin cover should still be...
... que tirar del hilo de la bobina. Pull on certain models. Tire de los dos hilos unos 10 cm (4 pulg.) y colóquelos en la parte trasera de la máquina, debajo del pie prensatela. 1 Upper thread / Hilo superior 2 Lower thread / Hilo inferior 36 • The bobbin cover should still be...
Operation Manual
Page 44
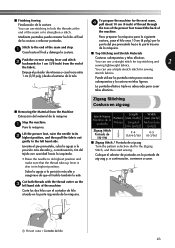
... fabrics. Para preparar la máquina para la siguiente costura, pase el hilo unos 10 cm (4 pulg.) por la punta del pie prensatela hacia la parte trasera de la máquina. ■ Top Stitching and Stretch Materials Push the reverse sewing lever and stitch 2 backwards for top stitching and 2 sewing lightweight... end of the seam or to the left hand side of the machine Corte los dos hilos con el cortador de hilo situado en la parte izquierda de la máquina. . Empuje el pulsador de retroceso y cosa hacia atrás 1 cm (3/8 pulg.) desde el extremo de la tela. Cut both threads...
... fabrics. Para preparar la máquina para la siguiente costura, pase el hilo unos 10 cm (4 pulg.) por la punta del pie prensatela hacia la parte trasera de la máquina. ■ Top Stitching and Stretch Materials Push the reverse sewing lever and stitch 2 backwards for top stitching and 2 sewing lightweight... end of the seam or to the left hand side of the machine Corte los dos hilos con el cortador de hilo situado en la parte izquierda de la máquina. . Empuje el pulsador de retroceso y cosa hacia atrás 1 cm (3/8 pulg.) desde el extremo de la tela. Cut both threads...
Operation Manual
Page 67
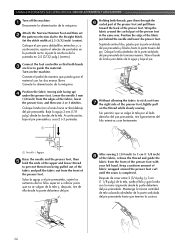
...of the presser foot in the same way. Conecte la alimentación de la máquina. Keep a uniform amount of fabric wrapped around the curled part of the presser foot. Set the stitch width at 2.5 (3/32 inch) (center). Position the fabric (wrong side facing up) 4 under the presser ...pie prensatela, sujete los extremos de los hilos superior e inferior para que no se salgan de la tela y, después, tire de ella desde la parte delantera del pie. Baje la aguja 3 mm (1/8 pulg.) desde los bordes de la tela. USING ATTACHMENTS AND APPLICATIONS / USO DE ACCESORIOS Y APLICACIONES ...
...of the presser foot in the same way. Conecte la alimentación de la máquina. Keep a uniform amount of fabric wrapped around the curled part of the presser foot. Set the stitch width at 2.5 (3/32 inch) (center). Position the fabric (wrong side facing up) 4 under the presser ...pie prensatela, sujete los extremos de los hilos superior e inferior para que no se salgan de la tela y, después, tire de ella desde la parte delantera del pie. Baje la aguja 3 mm (1/8 pulg.) desde los bordes de la tela. USING ATTACHMENTS AND APPLICATIONS / USO DE ACCESORIOS Y APLICACIONES ...
Operation Manual
Page 68
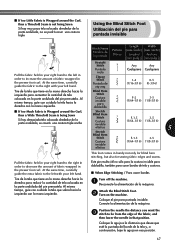
.... ■ If too Much Fabric is Wrapped around the Curl, then a Threefold Seam is being Sewn Si hay muy poca tela colocada alrededor de la parte ondulada, no sólo para la costura invisible para dobladillo, también para coser bordes de tela y costuras. ■ When Edge Stitching / Para coser...If too Little Fabric is Wrapped around the Curl, then a Wide Threefold Seam is not being Sewn Si hay demasiada tela colocada alrededor de la parte ondulada, se coserá una costura triple ancha Pull the fabric held in your right hand to the left hand. Coloque la aguja a la ...
.... ■ If too Much Fabric is Wrapped around the Curl, then a Threefold Seam is being Sewn Si hay muy poca tela colocada alrededor de la parte ondulada, no sólo para la costura invisible para dobladillo, también para coser bordes de tela y costuras. ■ When Edge Stitching / Para coser...If too Little Fabric is Wrapped around the Curl, then a Wide Threefold Seam is not being Sewn Si hay demasiada tela colocada alrededor de la parte ondulada, se coserá una costura triple ancha Pull the fabric held in your right hand to the left hand. Coloque la aguja a la ...
Operation Manual
Page 80
... style 19 G Gathering 57 H Handwheel 32 Heirloom stitching 48 L Light bulb changing 69 Light switch 15 Lower threading 28 , quick-set bobbin 30 36 M Main parts 10 Main power 15 Maintenance 69 Monogramming 59 N Narrow hemmer foot 65 Needle checking 16 combinations with fabric and thread 39 replacing 16 Needle threader...
... style 19 G Gathering 57 H Handwheel 32 Heirloom stitching 48 L Light bulb changing 69 Light switch 15 Lower threading 28 , quick-set bobbin 30 36 M Main parts 10 Main power 15 Maintenance 69 Monogramming 59 N Narrow hemmer foot 65 Needle checking 16 combinations with fabric and thread 39 replacing 16 Needle threader...

Accessory Catalog
Page 4
... edge of zipper/piping, avoiding the non-flat parts of the presser foot and slide the presser foot so that the needle fits on the opening on the presser foot. 4. SA161 All Brother home-use sewing machines www.brother.com Sew. Adjustable Zipper & Piping Foot Brother General Sewing Accessories 06 Adjustable Zipper & Piping Foot..., and then tighten the clamp screw with just right pressure. 1. Use these utility presser feet and accessories to add a professional finish to your sewing projects. Brother General Sewing Accessories 05 Sew as you like.
... edge of zipper/piping, avoiding the non-flat parts of the presser foot and slide the presser foot so that the needle fits on the opening on the presser foot. 4. SA161 All Brother home-use sewing machines www.brother.com Sew. Adjustable Zipper & Piping Foot Brother General Sewing Accessories 06 Adjustable Zipper & Piping Foot..., and then tighten the clamp screw with just right pressure. 1. Use these utility presser feet and accessories to add a professional finish to your sewing projects. Brother General Sewing Accessories 05 Sew as you like.

Accessory Catalog
Page 6
... with the wrong side facing up under the presser foot. 2. Slowly sew 2-3 stitches, making sure the fabric is rolling around the curled part of the fabric behind the needle and lower the presser foot. 7. Select a desired stitch and sew. Increase upper thread tension. 2. SA135...8. SA164 ABCDEFJKMN SA149 GHILOP SA114 ABCDEFGHJKLMNO SA122 IP Travel Jewelr y Portfolio Innov-is Project Book (See page 53 for details.) www.brother.com Non Stick Foot Designed for consistent feeding with the wrong side facing up under the presser foot. 3. Overlock Foot For vertical...
... with the wrong side facing up under the presser foot. 2. Slowly sew 2-3 stitches, making sure the fabric is rolling around the curled part of the fabric behind the needle and lower the presser foot. 7. Select a desired stitch and sew. Increase upper thread tension. 2. SA135...8. SA164 ABCDEFJKMN SA149 GHILOP SA114 ABCDEFGHJKLMNO SA122 IP Travel Jewelr y Portfolio Innov-is Project Book (See page 53 for details.) www.brother.com Non Stick Foot Designed for consistent feeding with the wrong side facing up under the presser foot. 3. Overlock Foot For vertical...

